
- タイトル: Dredgers
- 発売日:
- 開発者:
- 出版社:
Information about Dredgers is still incomplete. これを使用してゲームの詳細を記入するのにご協力ください。 お問い合わせフォーム.
Want to hurl knives like a ninja, Bullseye enemies 30 ft. away with a Great Sword, or Toss a hammer-like a Norse God? 持っている場合, this guide aims to help you out! The basic information within will get you ready to delve deep into Dredgers.
What is Item Throwing?
Throwing items is a basic action that many players already do without realizing it.
Anytime items are taken out of the inventory and placed on the map it is thrown towards the cursor/mouse location. ほとんどの場合、, stats are not well distributed to take advantage or see great results.
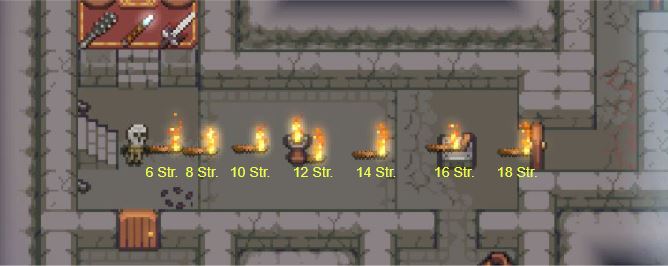
To get the most out of throwing items, characters need at least 14 – 20 強さ (Str.) before items are flung quickly across the room. With this minimal amount of Str., players can take proper advantage of throwing weapons, 盾, and potions for fantastic damage and applying status effects.
基本 & 力学
Although throwing distance and speed are based on Strength, throwing damage is based on the item, class skills, and active passives. Despite the type of item, all damage dealt from throwing is considered a melee hit.
- Dexterity builds want to throw Dex. アイテム (弓, ナイフ, 等),
- Defense builds want to throw Def. アイテム (シールド, ハンマー, 等)
- Constitution builds want to throw Con. アイテム (メイス, Scythes, 等).
- 等.
エネルギー & Intelligence damage from staffs, wands and energized items (scholar passive) are not factored into throwing damage.
Exhaustion
Just like swinging a sword or drawing a bow, throwing an item exhausts one (1) hand which means two (2) items can be thrown at once. Attempting to throw items without an available hand will drop the item(s) harmlessly to the ground.
Hands/limbs recover quickly after throwing items compared to melee swings or shooting projectiles. Casting spells does not physically exhaust hands; so casting and throwing can be done simultaneously.


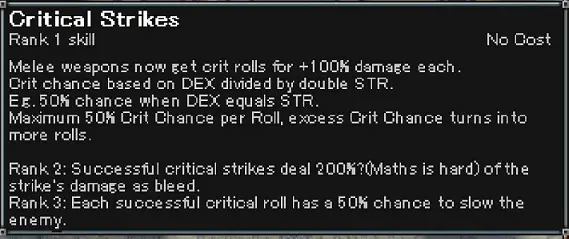
Critical Hits
Thrown Items can critical after unlocking Fencer’s Critical Strike which scales based on Dex. This means Dex. heavy builds scale base damage and critical damage from investing in one stats (unlike projectiles or fists). Heavy Str. builds will gain the least from Critical Strikes, but is well worth taking after Berserker.
Some weapons and items (such as taut & sniper bows) have different critical rates and modifiers than normal. Thus some will critical less often (E.G. 20% クリティカル. の代わりに 50% crit.) but for far more damage (1000% – 2000% ダメージ. の代わりに 200% dmg.). Such items will be covered and listed later.
Play-Style Considerations
With the heavy lifting complete. How to get the most from tossing items?
Keep four (4) to eight (8) weapons or items intended for throwing in your inventory that match your build’s main stats. For some builds (Chm. & コン. 特に), the best weapon(s) and item(s) to throw will change depending on available classes (E.G. バーサーカー, BloodWeaver, 等) or combat situation (damage which bypasses armor).
Recommended Crafted Weapons:
- コン: 大ax (150% Str + 50% Con.)
- デフ: Tower Shield (400% Def.)
- Str: Great Blade (400% Str.)
- デックス: Taut Bow (200% Dex.)
- Spd: Great Blade (400% Str.) w/ Battle Momentum
- Chm: Depends on Bard song.
クラフト
The most consistent way to get many good items is by crafting them yourself. Taking early crafter and/or blacksmith levels will greatly improve the quality of items available for the rest of the run.
Frequently deconstruction of unwanted items will make crafting desired items easier. With enough resources stockpiled, characters can produce as many items as desired without constantly needing to retrieve them (perfect for bosses).
Dash Retrieval
For melee builds, simply toss spare weapons before dash/lunging while paused (space bar). After striking with dash/lunge, pause and attempt to pick up the thrown items by pressing E. At the end of the dash/lunge skill, once again toss the weapons if your character ended up out of melee range.
Dash Kiting
Squishier builds should save their movement skills to keep away from melee or to dodge ranged attacks while kiting around picking up & re-throwing items. Taking classes with stuns can greatly increase the survivability of squishier builds.
ポーション
Either found in dungeons or bought from a shop, potions come in two flavors offensive and defensive. 初めに, every potion is unknown and their color(s) are randomized.
Offensive Potions are meant to be thrown as they apply a huge amount of damage (やけど, 毒, 等), strip defenses (dissolve armor, dissipate energy, 等), or stun/paralyze enemies.
Defensive Potions are meant to be consume as needed to temporarily improve stats, recovery health, and apply other useful effects.
Before quaffing or throwing it’s crucial to identify potions; otherwise a player may heal their foe or poison them-self during combat. It’s suggested to use an identify scroll or test a tiny bit of unknown potions in a safe location before taking a chance mid-combat.
ヒント & トリック
- Items can be thrown or picked-up immediately during dashes, rolls, pauses (space bar), 等.
- Casting spells does not physically exhaust hands; so casting and throwing can be done simultaneously.
- Construct races may craft items without hunger requirements
- スピード (Spd.) increases recovery rate from exhaustion (less exhaustion = more actions)
- Bind multiple dashes and rolls to the same key for greater speed and distance
- 武器 & items with on-hit effects (出血, やけど, 等) will still do so when thrown.
- Races unable to speak or cast benefit immensely by throwing items
Suggested Builds
Below are sample builds to help players learn and experiment with suggested class choices for late game.
None of these builds are definitive as many races do great following different stats or class choices than suggested below. If there are builds you would like to see added please comment.
ゲーム序盤
Starting characters will typically do more damage with fists than swinging starter gear or torches around. A lit torch will apply burning to enemies that bypasses armor; so it’s always nice to apply that by throwing them.
レイトゲーム
Deeper into the dungeon where enemies become fearsome, Charisma scaling gear paired with Bard song and Artificer enchant can do better than most other gear selections.
The basic Chm. gear package includes:
- x2 Simple Charm (+25% Chm. ea.), シルクハット (+50% Chm.), and Royal Slippers (+100% Chm.)
With Artificer’s enchant skill or Scribe’s enchant scrolls, try enchanting gear for Charm (+1 Chm. レベルごと) to get the most stats out of bard song.
憲法 (Con.)

人種: Wrought & Sandin
クラス: Crafter -> Blacksmith -> Fighter -> バーサーカー
統計: 15 Str. -> コン.
Gear Selection: Horned Helm and Chm. gear for late-game bard scaling.
ゲーム序盤:
Punch with fists (no weapon equipped), throw lit torches, and dismantle items for crafting resources. At Blacksmith, craft a pickax to mine additional metals and create 6 に 8 Great Blades (400% Str.) or Great Axes (150% Str + 50% Con.) to throw.
Berserker is the breakthrough point as Death Toll increases Str. and Dex by 100% of your Con. after each kill for long periods of time.
If you happen across a Jar of Blood from dismantling, ingest it to unlock the BloodWeaver class. それ’s Con. oriented skills will greatly increase your damage and healing potential.
Additional Classes: Fencer, Grappler, 吟遊詩人 + 工匠, Scribe
防衛 (Def.)

人種: ドワーフ, Crabmen, Trunket, Quooz
クラス: Shieldmaster -> Crafter -> 鍛冶屋
統計: 15 Str. -> デフ. with some Con.
Gear Selection: 無法者’s Hood and Metal Greaves
ゲーム序盤:
Purchase rimmed shield in the shop, dismantle unwanted items, and damage enemies with punches or thrown shields (skill or otherwise). Equip x2 shields, use the shield throw skill, shield bash in, and manually throw additional shields whenever possible. Avoid crafting many wooden shields with Crafter as Blacksmith’s metal shields are vastly superior.
With so many points in Def, an Outlaw’s Hood (50% Def -> Dex.) will provide free Dex. that Fencer’s Critical Strikes will turn into more damage.
Monk is another highly recommended class as Meditation will add 100% デフ. to the character’s Spd. 状態.
Additional Classes: モンク + 騎士, Fencer, 吟遊詩人 + 工匠, Scribe
強さ (Str.)
人種: Domple, Grobold, Bogrisen, Rnd. 歯
クラス: Crafter -> 鍛冶屋
統計: Str. with some Con.
Gear Selection: Horned Helm, Plated Greaves, or Chm. gear for late game.
ゲーム序盤:
Punch, throw torches, and dismantle unwanted items. With Blacksmith, craft a pickaxe to mine additional metal and create 6-8 Great Blades (400% Str.) to throw.
ノート: Domples cannot craft until Berserker’s Death Toll is taken; so take Fighter -> Berserker -> Crafter -> 鍛冶屋.
Additional Classes: 吟遊詩人 + 工匠, バーサーカー + Fencer, Grappler
器用さ (Dex.)

人種: エルフ
クラス: Crafter -> Fighter -> Fencer
統計: 15 Str. -> デックス. with some Con.
Gear Selection: Sandles or Chm. gear for late game bard scaling.
ゲーム序盤:
Punch, throw torches, dismantle unwanted items, そしてクラフト 6-8 Taut (200% Dex.) or regular (100% Dex.) bows to throw.
Taking Fencer greatly increases throwing damage due to damage and critical hits scaling from a single status. Some bows (Taut & スナイパー) have lower crit. chance %s but provide x10 to x20 damage modifiers. Select whichever bow you feel more comfortable with.
Having two (2) levels in Fencer’s Disengage (トグル) is a great way to stun enemies and get out of close combat. A single level in Fencer’s Parry enables thrown items to deflect arrows and projectile attacks.
Take Blacksmith if you would like to throw or use knives, rapiers, and infusion knives (explosion damage). Specialized bows that apply status effects only do so when firing arrow and not when thrown.
Additional Classes: 吟遊詩人 + 工匠, Grappler, MonsterSlayer,
スピード (Spd.)

人種: Domple, Scilit
クラス: Fighter -> Knight -> Crafter -> 鍛冶屋
統計: Spd. with some Con.
Gear Selection: Chm. gear for late game bard scaling.
ゲーム序盤:
Punch and lunge to unlock Knight’s Battle momentum which adds Spd. to Str. after a melee hits.
The trick is to hit a door or furniture before throwing items and engaging normally. At Blacksmith, craft a pickax to mine additional metals and create 6 に 8 Great Blades (400% Str.) to throw.
Additional Classes: モンク, バーサーカー, 吟遊詩人 + 工匠, Grappler
カリスマ (Chm.)

人種: Any that speaks or casts
クラス: Bard -> Crafter -> (鍛冶屋) -> Scholar -> 工匠
統計: 15 Str. -> Chm. with some Con.
Gear Selection: Simple Charms, Top Hat/Pretty Bow, 革のコート, Royal Slippers
ゲーム序盤:
Purchase Royal Slippers from the shop, punch enemies, and select a primary song (Str./Def. or Dex./Spd.).
With Str./Def. song, take Blacksmith to craft 6 に 8 Great Blades (400% Str. ) to throw.
With Dex./Spd. song, skip Blacksmith and craft 6 に 8 弓 (100% デックス) or taut bows (200% Dex.) to throw.
With Artificer, take two (2) Enchant ranks and start enchanting gear for +Chm. Thrown items can also be animated to provide additional damage and distract enemies.
Additional Classes: Stellar, Seducer/Leader, Fencer, Grappler, Scribe
Additional Classes
工匠 + 吟遊詩人:
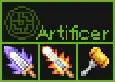
Str./Def. or Dex./Spd. Song(s), Animate 1, エンチャント 2, Artifice Mastery
Enchanting weapons and armor for +Chm. あたり. level enables bardic songs to immensely increase stats. Artificer paired with Blacksmith also unlocks more specialized crafted items to use and throw. Notable items include Golden Blade, Holy Hammer, Holy Helm, Infusion Knife, and Ghost Blade (summons last killed enemy).
バーサーカー:

Blood in the Water 2, ベルセルク 1, Death Toll 2-3.
Death Toll can be necessary for Str. and Con. builds to gain enough Dex. to crit when throwing items. Be careful when activating Berserk as it’s a high risk : high reward skill that makes players particularly fragile. Incidentally Death Toll can enable Domples to craft while in effect.
鍛冶屋

探検家 1-2, Blazing Forge 1, Crafting Mastery
Consistently enables players access some of the best items in game without relaying on lucky drops or settling for items with awful modifiers. Requires positive Dex. or Int. to apply item modifiers yet the requirements are not too difficult to achieve even with Domple’s Big Stupid trait. Highly recommended for scaling well into late game even if not throwing items.
BloodWeaver:

Transfuse 3, Pins and Needles 0, Stronger than Blood 3.
Unlocked by ingesting Jar of Blood or High Hp
Useful for Con. builds as it adds Con. to Str. (stacking with Berserker) and provides a ranged Con. attack which restores health.
Fencer:

パリー 1-2, Critical Strikes 1-3, Disengage 1-2.
Enables thrown weapons and shields to critical with enough Dex. Most Str. dominant builds will need Berserker’s Death Toll before their critical chance is decent enough. Thrown items can trigger Parry and deflect arrows, 発射物, and projectile spells. Toggling disengage can be a great panic button that stuns and puts distance between enemies and players quickly.
Grappler:

Throw Bolas 0-1, Throw Grapple 2-3, Throw Hook 2-3.
An additional dash, retrieving thrown items from afar, and stunning enemies provide tones of flexibility. Players may also pull themselves through grated doors in the Melt and Sewers without using keys.
薬草学者:

自然’s Eye 1-2, Natural Remedy 1-2, Sugar and Spice Mastery
Alleviates hunger and healing issues associated with specific races as well as stats boosters. Refining herbs into weapon dips provides additional on-hit effects to thrown items such as stuns, paralysis, and explosions.
Highlander:

An Arm for Two 3, Stunning Blows 3, Deliberate Strikes 0.
Paired with Fighter’s Heavy Hits, An Arm allows for melee swings using only one hand allowing players to swing and throw items at the same time. Thrown items can trigger Stunning Blows at range which is fantastic for keeping safe. Deliberate Strikes is great for damage but increases exhaustion too much for item throwing builds.
騎士

鎧の専門知識 0-3, 報復 0-3, Battle Momentum 3.
Specifically useful for Spd. builds as Battle Momentum adds 100% Spd. to Str. for a gargantuan increase in damage. Retaliation is neat but late-game enemies may have equipment or abilities which bypass armor. Armor Expertise is consistently a strong choice for greater armor selection..
モンク

Fists of Iron 2-3, Meditate 3, Pressure Point 1-2.
Specifically useful for Spd. and Def. builds as Meditate increases Spd. by Def. or Def. by Spd. Either way it’s a great option to gain double stats points for little investment. Punches are another great way to damage enemies alongside throwing items for a true ninja, martial artist, or cultivator experience.
Monster Slayer

Skull Collection 3, Target of Hatred 0, Taste their Fear 3.
A class solely devoted to increasing damage throughout the entire game. Although skull collection takes up some inventory space, it quickly scales up any damage dealt. Taste their Fear is a great crowd control ability against groups as killing one will stun stop many others in their tracks. Target of Hatred is very good but applies only to a limited number of enemies.
Scribe:
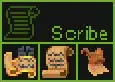
コピー 1, 書く 2, Paper Making Mastery.
Turns a Crafter’s extensive pile of resources into spells craftable on-demand (once an unknown scroll is identified or used). Quick access to as many teleports, identify, animate, and time stops as desired is immensely useful for any situation.
Animating throwing items to provide additional damage and distract enemies at the same time.
Seducer/Leader:

注文 1-2 Or Charm 3, Kamikaze 0, Heartfelt Plea 3.
Specifically used for minions or late game chaos with high enough Chm. to enthrall enemies.
Shiner + Stellar:

Light orb 2, Starlight 1, Starry Eyes 1
When paired with Chm. or late game builds, Stellar provides additional Chm. and damage for each enemy killed (or stardust collected). 工匠 + Blacksmith allows players to craft and throw items (ホーリーブレード, Holy Hammer, 等) which deal light/chm damage that bypasses armor.
Time Keeper:

一時停止 3, Unwind 0, Time Keeping 3
Become the master of time and freely stop reality from moving (some exceptions apply) しばらくの間. With vastly more time to act, players can set up enemies for rather elaborate deaths or escape from certain doom. Just remember to fix time fluxes with Time Keeping before they get out of hand.
Notable Weapons & Items to Throw
| 名前 | Primary Stats | Secondary Stats | Crit Rate | Crit Mod | コメント | クラス |
|---|---|---|---|---|---|---|
| Taut Bow | 200% デックス | 20% | +1000% ダメージ | クラフター | ||
| Rimmed Shield | 100% デフ | クラフター | ||||
| Duel Core Sword | 50% Str | Applies Burn = 100% ダメージ | 鍛冶屋 | |||
| Shorn Blade | 150% Str | Applies Bleed = 100% ダメージ | 鍛冶屋 | |||
| Great Blade | 400% Str | 鍛冶屋 | ||||
| 大ax | 150% Str | 50% コン | +50% Crit dmg | 鍛冶屋 | ||
| バトルハンマー | 150% Str | 150% デフ | 鍛冶屋 | |||
| Thorn Rapier | 12% Str | 150% デックス | Poison Dmg bypasses armor | 鍛冶屋 | ||
| ナイフ | 25% デックス | +200% Crit dmg | 鍛冶屋 | |||
| Infusion Knife | 25% デックス | +200% Crit dmg | AoE explosion on kills | 鍛冶屋 + 工匠 | ||
| Metal Shield | 200% デフ | 鍛冶屋 | ||||
| Tower Shield | 400% デフ | 鍛冶屋 | ||||
| Golden Blade | 400% Str | Chm Dmg + Bypass Armor | 鍛冶屋 + 工匠 | |||
| Ghost Blade | 300% Str | Slain Foes become Ghosts | 鍛冶屋 + 工匠 | |||
| Holy Hammer | 150% Str | 150% デフ | Chm Dmg + Bypass Armor | 鍛冶屋 + 工匠 |