Confused about Tools? We at E.T.C. are here to help!
Since we’ve started our new training course we’ve gotten a lot of new recruits, so we are going to publish a series of new Guides to help you to find your way. This first Guide will explain everything you need to know about the various Tools you’ll be using during Missions.
序章
You are tasked with locating, identifying and destroying a nanomachine infection that has started appearing in our space-faring vehicles. To achieve this you will need to find and destroy the Infection Source, which acts as the core and controller of the infection that is spreading throughout the ship. You will be given various tools and weapons to aid you in this purpose. This Section will introduce you to the basic concepts of Tools.
Tools are used for two purposes:
- Locating the Infection Source.
- Identifying the Infection Type.
Tools fall under three usage types:
- 近接性.
- Attach to surface.
- Aim at surface.
The proximity-based Tools are primarily used for locating the Infection Source within the ship and secondarily for identification. The other Tools are purely for identification purposes. For successful identification you need to find 3 証拠, 使用して 3 different Tools.
After identification we advice you to use a proximity-based Tool to find the position of the Infection Source, before using a weapon to destroy it.
Please read the Sections in this Guide carefully to fully understand how to use every Tool at your disposal. It is nigh impossible to know the Infection Type beforehand, nor the location of the Source, so you will likely rely on all the Tools to locate & identify it.
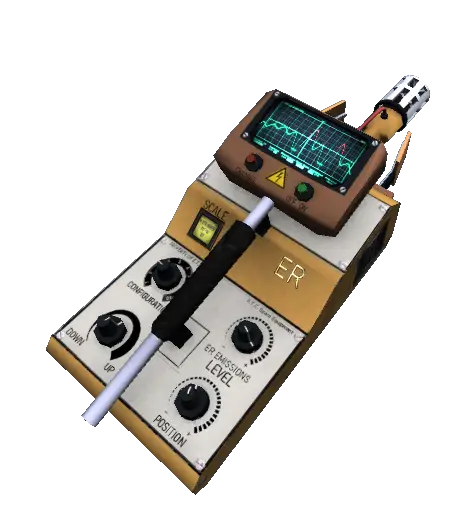
ER Detector
The ER Detector is normally used for finding cabling behind walls or abnormal activity in electronic systems. In your case you will be using it to locate and identify an Infection Source.
Specification:
- タイプ: 近接性.
- 範囲: だいたい 5 メートル.
- Alert: はい, beeps on strong signal. Red colored graph on screen on strong signal.
使用法:Some Infection Types will give off an exceptionally strong ER signal.
The screen of this Tool will show
どれでもER signals being detected, including those of surrounding electronics and equipment, so make sure you aren’t accidentally misidentifying a piece of machinery for the Infection Source. Our advice is to look for signals that will create peaks in the alert range, the ER Detector will start beeping if such signals are picked up.
Since the ER Detector is proximity-based it is great for finding the exact location of the Infection Source within the ship. The signal will become stronger to closer you are to the Source.
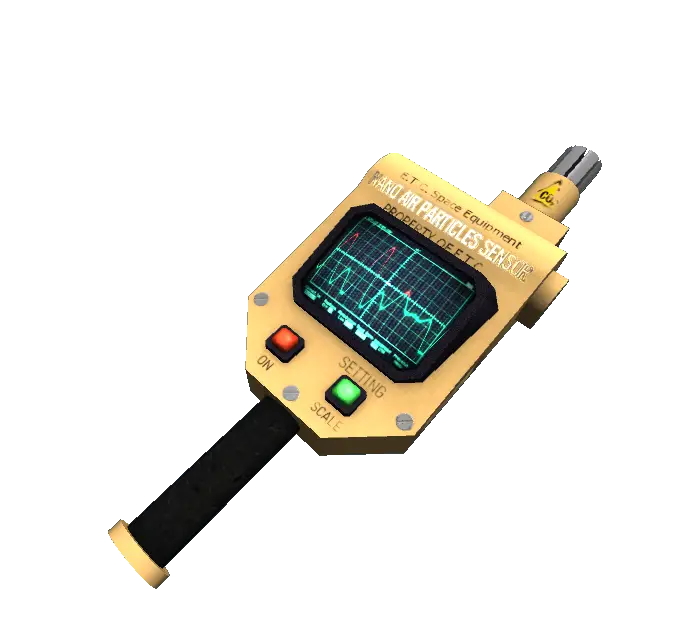
Air Particles Sensor
The Air Particles Sensor is normally used to check the status of Life Support Systems.
The Life Support System in various spaceships and stations uses a nanomachine system for maintenance and sterilization. The type of nanomachines used are capable of airborne travel.
Normally these nanomachine particles stay within the Life Support System but we’ve gotten reports that certain Infections mess with the security limiters of the airborne particles causing them to spread to any location within the ship.
Specification:
- タイプ: 近接性.
- 範囲: だいたい 5 メートル.
- Alert: はい, beeps on strong signal. Red colored graph on screen on strong signal.
使用法:According to our reports the corrupted airborne nanomachine particles tend to concentrate close to the Infection Source, so you will be using the Air Particles Sensor to find any abnormal peaks in airborne particle concentration, usually in the red graph range on the screen. Beware that the Life Support System also gives off a (faint) 信号, since that System uses this type of nanomachine the most, so best to ignore weak signals unless you are absolutely sure the signal cannot come from the Life Support System.
The Air Particles Sensor is proximity-based, so the closer you are to the Source the stronger the signal will be. This will help you greatly in locating the exact position of the Infection Source.
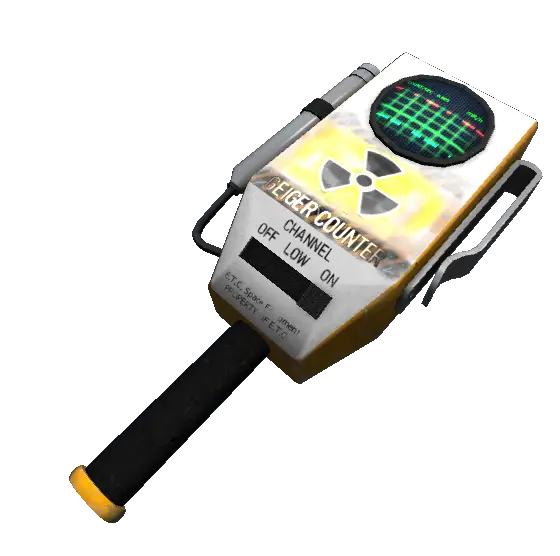
Geiger Counter
Living and working in space sometimes comes with extra danger and a Geiger Counter is mandatory for every astronaut. Certain cosmic events and objects produce various types of radiation which this Tool picks up. Some Systems may also produce radiation, such as the Reactor Core, and we’ve gotten reports that some types of Infections may also produce abnormal levels of radiation.
Specification:
- タイプ: 近接性.
- 範囲: だいたい 5 メートル.
- Alert: いいえ, will make an audible click for every ionizing particle detected.
使用法:In space there will always be some background radiation, so this Tool will indicate a weak signal most of the time. For every ionizing particle (つまり. 放射線) detected it will display a peak on the display and will make an audible clicking noise. The more particles hitting the detector the more peaks and clicks.
You are looking for abnormal levels of radiation which will be indicated by a lot of peaks on the display as well as a lot of clicks, in locations in the ship where there should not be. Beware that the Reactor Core will give off some radiation too, though usually at non-dangerous levels, so do not confuse that signal with possible evidence for the Infection Source.
As the Geiger Counter proximity-based you can use it to find the exact position of the Infection Source. The closer you are to the Source the stronger the signal will be.
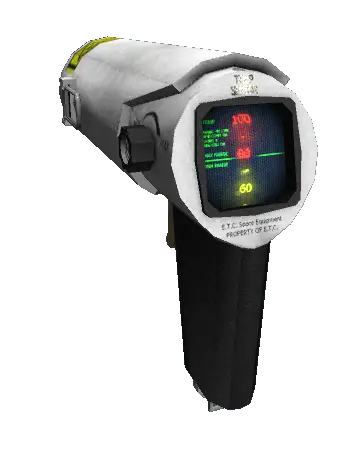
Temperature Gun
This Tool is used to measure the temperature of any surface it is aimed at. Usually used for identifying overheating (electronic) コンポーネント.
Specification:
- タイプ: Aim at surface.
- 範囲: だいたい 5 メートル.
- Alert: いいえ.
使用法:Aim this Tool at any surface you wish to measure the temperature of. The laser pointer at the front of the Tool will assist in aiming.
You will be looking in abnormal temperature differences between infected and non-infected areas of the ship. Look for big jumps in temperature of more than 10 摂氏. Finding an area of the ship that has a very high temperature (in the red range) is also a strong indication of evidence.
Beware that ship Systems will always give an higher temperature and that different areas of the ship will always have some minor temperature differences between them.
Beware that if the Life Support System is offline (due to power loss or infection) the temperature in the entire ship will slowly drop and equalize to zero, so it is advisable to look for temperature differences early on in the Mission.
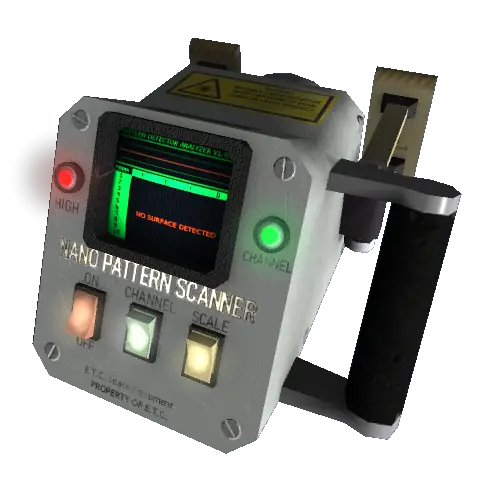
Nano Pattern Scanner
This Tool is normally used as an aid when programming a nanomachine System but we’ve adapted yours to aid in identification instead. As of writing of this Guide this Tool is
いつも needed for identification of the Infection Type.
Specification:
- タイプ: Attach to surface.
- 範囲: not applicable.
- Alert: いいえ.
使用法:This Tool will magnetically attach to any surface within the ship. We advice you to place it in a way that will allow you to easily read the screen as the Tool resets when you remove it.
To actually get a result it will need to be attached to an infected surface, so look for an heavily degraded area of the ship for best results.
Aim at a surface of your choosing and place the Tool down to attach it (Default key: right-mouse). The Nano Pattern Scanner will start the scanning process as soon as it is attached. This will take about a minute. The scanning light will go from white to green in color and the display will show you which nanomachine pattern it has found. The current patterns are ‘A-7’ for ‘Nano A’ evidence and ‘B-5’ for ‘Nano B’ evidence.
If no pattern was found the scanning light will turn red and the display will say ‘no pattern detected’. If this happens you likely put the Nano Pattern Detector on a surface with too low an infection level.
これが今日私たちがこの目的で共有するすべてです Disinfection ガイド. このガイドは元々、次の者によって作成および執筆されました。 EvilTurtle. このガイドを更新できなかった場合, これに従って最新のアップデートを見つけることができます リンク.
