- タイトル: Cortex Command
- 発売日:
- 開発者:
- 出版社:
Information about Cortex Command is still incomplete. これを使用してゲームの詳細を記入するのにご協力ください。 お問い合わせフォーム.
I looked around and discovered how to put workshop add-ons in your game without needing other websites or forum downloads.
Finding the Folder
The issue with Steam Workshop mods is that they don’t end up in the right place; they get stuck in your Steam folder instead of going to the CC folder. To sort this out, 次の手順に従ってください:
初め, に向かう “userdata.” You can locate this in the Steam folder within “プログラムファイル (x86).” On my computer, the file path looks like this:
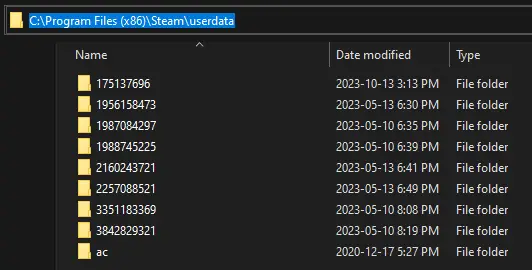
In Windows File Explorer, you can navigate to that path or wherever you’ve installed it. 一度あなたがいます “userdata” フォルダ, you’ll find the mods buried within. Although there might be numerous folders in there, with dozens of folders spread out throughout, it may seem challenging to find what you’re after. でも心配しないでください; there’s a useful trick to help you with this.
Finding the Files
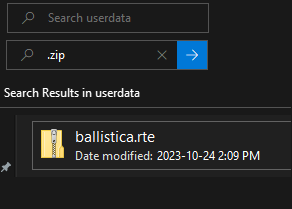
This happens because of how Cortex mods work. They come as portable zip files that can be moved and unpacked wherever you want. To locate them, you can simply search for “.ジップ” 内で “userdata” フォルダ. こちらです, you can find the mods without having to search through a bunch of folders, and you won’t need any shady downloaders. It’s a straightforward way to access and install your mods.
Installing the Files
今, here’s the easy part:
Right-click on Cortex Command in your library and select “プロパティ。”

から “インストールされたファイル” タブ, を開きます “Cortex” フォルダ.
Take the extracted “rte” フォルダ (you can use the built-in Windows file extraction tool; no need for WinRAR or 7zip) and drop it into the Cortex Command folder, placing it alongside the other “rte” フォルダ.

And just like that, you’re all set. You can now download any workshop mod you want. 覚えて, most mods extract into a folder with an “rte” that contains the actual “rte” 内部. Make sure to put the real “rte” in your Cortex folder for it to work correctly.
これが今日私たちがこの目的で共有するすべてです Cortex Command ガイド. このガイドは元々、次の者によって作成および執筆されました。 SolarFlare1234. このガイドを更新できなかった場合, これに従って最新のアップデートを見つけることができます リンク.