- タイトル: CityDriver
- 発売日:
- 開発者:
- 出版社:
Information about CityDriver is still incomplete. これを使用してゲームの詳細を記入するのにご協力ください。 お問い合わせフォーム.
Here is where you can locate your screenshots captured using the photo mode in CityDriver, along with additional helpful information.
TL;DR
The folder you need to access is:
C:\Users\YourUserName\AppData\Local\CityDriver\Saved\Screenshots\Windows.
“I can’t find the folder YourUserName.”
Please remember to either replace YourUserName with your actual user name on your system or manually navigate to the specified path and click on the folder with your username.
Deleting or moving files from the screenshot folder
Keep in mind that the screenshots are always named using the following format: HighresScreenshot[Sequential Number].
例えば: “HighresScreenshot00000,” “HighresScreenshot00001,” “HighresScreenshot00002,” 等々.
If you delete or move a screenshot from this folder and capture a new screenshot in the game afterward, the new screenshot will be named based on the next missing number in the sequence, rather than incrementally. 例えば, if you delete or move HighresScreenshot00001 between HighresScreenshot00000 and HighresScreenshot00002, the next new screenshot will be named HighresScreenshot00001, not HighresScreenshot00003.
How to take screenshots
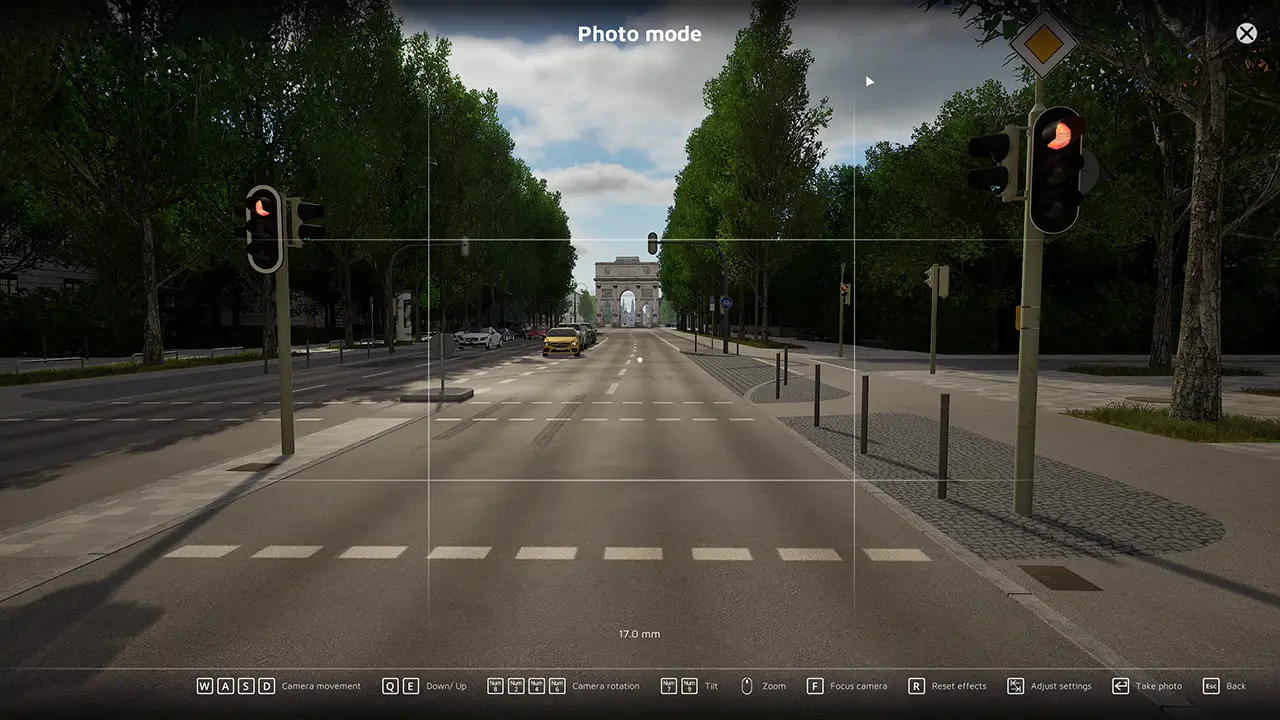
CityDriver features a built-in photo mode that not only enables you to capture screenshots but also allows you to pause the gameplay. In photo mode, you have the freedom to move, rotate, and tilt the camera, adjust focus automatically or manually, and modify other settings such as the time of day and specific post-processing effects.
To activate the photo mode in CityDriver, simply start a game session and press the “○” key at any time. プレス “入力” on your keyboard to take screenshots. You can enter photo mode while outside the vehicle on foot, inside the vehicle in first-person, third-person, or any other default camera perspective. しかし, please note that the photo mode cannot be used in the main menu or its submenus.
All functionalities in CityDriver can be accessed not only through hotkeys but also with the mouse.
Camera movement
To control the camera movement, use the W, あ, S, and D keys on your keyboard.
Changing the camera height can be done with the Q and E keys.
If your keyboard has a Numpad, you can utilize Num8, Num2, Num4, and Num6 to rotate the camera. あるいは, you can hold the left mouse button and move your mouse to adjust the camera’s viewing direction.
The camera tilt can be adjusted using Num7 and Num9 on the Numpad.
It’s important to note that the camera in photo mode intentionally doesn’t collide with most in-game objects, allowing for unrestricted movement to find the perfect angle for your screenshots.
Zooming
To zoom in or out of the camera’s view, scroll the mouse wheel up or down.
集中
You have the option to either enable auto-focus for the camera (shortcut key: F) or manually set the focus in the “Adjust settings” submenu (more details on this later). Auto-focus works best when there is a collidable object at the center of the camera’s view (indicated by a crosshair dot). This is generally effective when capturing screenshots outside the vehicle, as most objects in the game world have collisions (although not all for performance reasons). しかし, inside a vehicle, auto-focus might not work optimally since most assets lack collision (また, for performance optimization). そのような場合には, it is recommended to adjust the focus manually through the “Adjust settings” submenu.
Exiting the photo mode
To exit the photo mode and resume gameplay, simply press the Esc key or click the X located in the top right corner of the screen.
Adjusting settings
前述したように, you can fine-tune various settings in the photo mode. さらに, within the settings menu, you will find the button to directly access the location on your hard drive where the screenshots are saved.
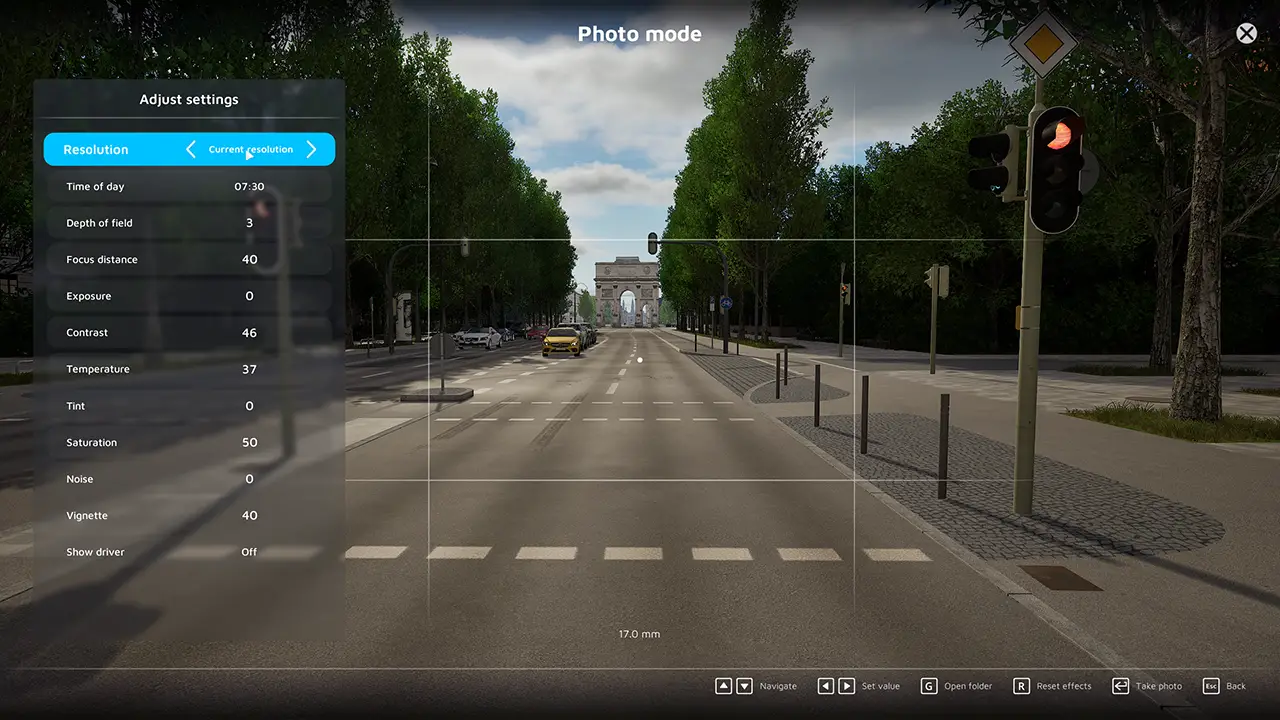
解決
このセクションでは, you have the choice to either use your current resolution settings or opt for a lower or higher resolution. しかし, it’s important to note that selecting a higher resolution may result in longer rendering times or screenshot capture, and in the worst-case scenario, it could lead to game crashes due to insufficient memory (VRAM or RAM) on your PC system.
時刻
Despite the game’s actual time of day, you can individually adjust the time of day specifically for the photo mode to capture your desired lighting conditions. Exiting the photo mode will restore the time of day to its previous state during gameplay.
Depth of field
The depth of field setting determines the extent to which your image appears in focus overall.
Focus distance
The focus distance refers to the distance between the focusing plane and the subject. Adjusting this parameter can result in the foreground or background being intentionally out of focus while maintaining focus on the subject.
Exposure
Exposure controls the amount of light that reaches the camera sensor or film, ultimately affecting the brightness or darkness of the image.
Contrast
Contrast pertains to the visual ratio between different tones within an image.
温度
Temperature relates to the color temperature of the image. A higher value indicates a “colder” or whiter color of light. For further information, you can refer to “A Photographer’s Guide to Color Temperature.”
Tint
Tint allows you to adjust the overall color spectrum of the image.
Saturation
Saturation describes the intensity of colors present in the image.
ノイズ
Noise refers to the presence of tiny particles, grains, or similar artifacts in the image.
ビネット
The vignette effect creates a gradual darkening from the edges towards the center of the screen. You can modify this effect using the available option.
Show driver
If you activate the photo mode while inside a vehicle, you can control the visibility of the driver model with this setting. Please note that this option has no impact if you activate the photo mode while on foot.
It’s important to mention that any changes made to these graphical settings within the photo mode will not be applied to the actual game graphics upon exiting the photo mode.
CityDriver Screenshot Save Location
執筆時点では, the screenshot folder in CityDriver can only be accessed through the Photomode, which can be activated by pressing the “○” 鍵. Once inside the Photomode, you can locate the option to access the screenshot folder within the “Adjust settings” submenu, which can be accessed by pressing the “タブ” 鍵.
内で “Adjust settings” submenu, you will find a button labeled “Open folder,” which can be accessed by pressing the “G” 鍵. Clicking this button will open an explorer window at the designated location:
C:\Users\*YourUserName*\AppData\Local\CityDriver\Saved\Screenshots\Windows.
これが今日私たちがこの目的で共有するすべてです CityDriver ガイド. このガイドは元々、次の者によって作成および執筆されました。 ScoDev. このガイドを更新できなかった場合, これに従って最新のアップデートを見つけることができます リンク.