This guide teaches you how to create mods for Aground Zero and share them on the Steam Workshop. It provides examples of mods, ヒント, and tools to help you begin your modding journey!
Your First Mod
To start a new mod, begin by locating the installation directory of Aground Zero. If you’re using Steam, right-click on Aground Zero in your library, go to Manage, and select Browse local files. In the data/mods folder, establish a fresh folder. Inside this new folder, generate a text file named “mod.xml.” 次, modify this file using a text editor that supports XML syntax highlighting (notepad++ is a recommended lightweight option).
Within the mod.xml file, insert the following content:
<?XML バージョン="1.0" エンコーディング="UTF-8" ?>
    <データ>
    <名前>My First Mod</名前>
    <説明>Doesn't do anything YET.</説明>
    <著者>自分!</著者>
    <バージョン>0.1.0</バージョン>
    <init>
    Your xml and code will go here...
    </init>
</データ>
Whenever you share code, ensure that quotes stay straight (‘ と “) as some text editors may curve them into ’ と ”, which appear similar but are not recognized in XML files.
After pasting the code, either launch the game or press Ctrl+Shift+M if it’s already running to reload all mods. If everything is successful, your mod should now appear in the mods list.

If your mod doesn’t show up or displays in red, an error has occurred. Press Ctrl+Shift+D to open the developer console and search for any red text. 時々, the issue is evident, but at times it might require troubleshooting. You can do this by removing or commenting out sections of your mod until it works again, helping you identify the problem. 必要に応じて, 私たちのサポートを求めてください discord’s #modding channel.
Although this is technically a mod, it might not be very exciting, so let’s attempt to make it perform a specific action! 加えて, mods may sometimes crash the game. If you encounter this, we recommend checking our Aground Zero troubleshooting guide.
Adding Items

If you want to add items to Aground Zero, a simple example is creating a mod for doughnuts. In the mod.xml file within the .zip file, check the <init> ブロック. そこには, you’ll find tags with comment lines (内部 <!– –>) explaining their functions. さらに, there’s a single image, doughnut.png, serving as the doughnut’s icon.
When adding items, you typically need:
- A name: You can provide names for multiple languages.
- An icon: Draw one yourself, use an open-source site like opengameart.org, or tint an existing in-game icon (like the doughnut).
- The item declaration, specifying its effects (例えば, eating doughnuts restores 150 飢え).
- Ways to obtain the item. In this mod, you can cook doughnuts in the kitchen or buy them from a vending machine.
For small mods, everything can be contained within the <init> ブロック. しかし, for larger mods, consider organizing them with folders and additional XML files using <include id=”folder/file.xml” />. Note that paths are relative to the calling XML file.
アクション
Actions determine the behavior of items when selected on your toolbar. 一部のアイテム, like raw materials for crafting, may not require any action. In the doughnut example, it used the eat action, already defined in the core game files (right-click to eat). Various existing actions include:
- mine: Mines blocks (例えば, Laser Drill).
- place_ground / place_ladder: Sets ground flags like cables, ベルト, はしご.
- 食べる: Consumes items to gain hunger and health.
- place_object: Places a specific object, optionally consuming the item if consume=”真実”.
- 建てる: Similar to place_object, but lets you choose a blueprint with right-click.
- クラフト: Crafts an item from your inventory, akin to the Assembler.
- place_block: Places a specific block, optionally consuming the item if consume=”真実”.
- シャベル: Like place_block, but right-click allows choosing the block to place.
- シュート: Shoots projectiles (例えば, レーザーガン).
- アップグレード: Upgrades items, used by upgrade chips.
- 青写真: Collecting these unlocks blueprints and recipes.
- paint: Paints blocks, similar to the painter tool.
- バケツ: Can be filled with water and places water when filled.
These actions are in data/core/items/actions.xml, where you can find their full code and functions. If none of these suit your needs, you can create your own custom actions!

Here’s a simple instance that adds a remote control item with a custom action. You can find the mod at このリンク. When you choose it on the toolbar, the action allows you to right-click to pair with a structure if one is selected. さもないと, you can right-click to access the paired structure from anywhere. It’s quite powerful, as you can now access a battery from any location for infinite power or storehouses to manage items. しかし, 理論的に, you could tweak what a remote control does when accessing a structure or change the structures it can access, enabling remote base management without anything too disruptive.
This example also utilizes item storage to identify the structure it is currently paired with. Storage lets you assign various data to items and objects that are saved. It’s important to note that an item’s storage affects the entire stack, and items with different storage cannot be stacked. If you want to alter the storage of a single item in a stack, you must remove it from the stack and place it in the cursor or another inventory slot (または, as a last resort, toss it on the ground). To avoid this issue, the remote controls are set to be unstackable.
Sharing Mods
Once you make a mod, you can share it with others in two ways. The first way is to put the mod folder in a zip file (と mod.xml in the main part of the zip file, not inside a folder). それから, you can manually give that zip file to others, and they can drop it into their game window without extracting it. This will install the mod.
The second way is to upload the mod to the Steam Workshop, which lets everyone see and subscribe to your mod! If your mod is in the data/mods folder and has no errors, you can choose it in the mods list, and you’ll see an option to Upload to Steam.
When uploading to Steam, you need a preview image. This image should be named プレビュー.png または preview.jpg and should be less than 1MB. Steam shows these images as square icons in the workshop, so if the image has a different shape, it will have black borders.
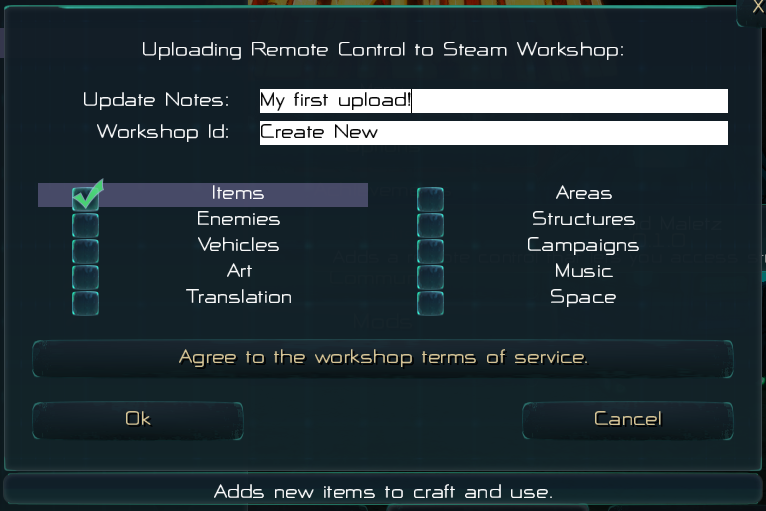
After making updates to your mod, you can add notes about the changes, put in the workshop item ID (or create a new one if it’s a new item), and choose relevant tags for the mod. それから, you need to agree to the workshop terms of service (this is a one-time requirement), and click okay to upload the mod.
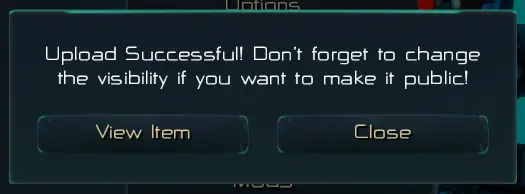
If there are no errors, a popup will appear, and you can click View Item to see your mod in the workshop. On the right side of the item, there are owner controls where you can edit the name, 説明, and set the visibility to public so others can see it.
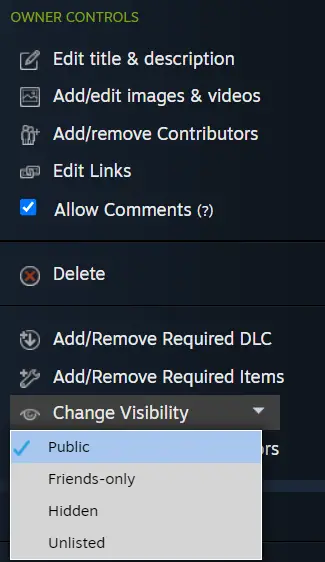
When you click Upload to Steam for the same mod again, the workshop ID should be filled in automatically. If it’s not, you can find it in the workshop item page URL after filedetails/?id=<ID> (you can locate this for any workshop item where you are listed as a contributor). Uploading again will modify the mod files, タグ, and preview image, but not the name, 説明, and other data. You can also check the change notes you added during the upload for each edit on the workshop item page and revert to previous edits. Once the mod is public, people can view and subscribe to it!
構造物
Structures and objects are tools that let you place interactive things in the game world. Each object comes with shapes that define its physical and interactive boundaries. Objects also have actions, similar to item actions, triggered when you select the shape of the object. You can disable interactions for specific actions if needed, such as for the laser gun. To debug shapes, you can use the developer code: container.showPhysics(true), which displays a red outline for all box, 球, and cylinder shapes. Note that if modelBottom="true", the main model transform is repositioned, making the origin at the bottom of all shapes. それで, moving the shapes up and down won’t affect their position relative to the model if this is true.
Consider this simple example that introduces a switch item using a place_object action to position an interactive switch in the world: switch.zip. Most of this is familiar from item examples, but now we introduce a switch object that can be placed and removed.
Similar to custom actions, switches have a getSelection event for setting tooltips and an onAlternate action for removing the switch. さらに, they have an onSelect event that toggles the switch on and off. This utilizes the POWSTRUC and SWITCH ground flags (POWSTRUC is under powered structures, resembling a cable passing power through, while SWITCH looks like a cable but doesn’t transmit power).
3Dモデル
Objects require something that items didn’t need – a model to display in the game world. You can reuse existing in-game models, adjusting their color and position, as demonstrated in the switch mod. While it’s generally easier to animate models in a 3D modeling program, you can create a simple 2 keyframe animation, like the one used for the switch moving on/off.
To introduce new 3D models, whether self-modeled or sourced from sites like opengameart.org, you must convert them into wobj files. The command line application CreateWOBJ facilitates this, available here: CreateWOBJ. When using CreateWOBJ, the input model is the first command line argument, and the output wobj is the second. Assimp, which supports various formats (listed ここ), is used by CreateWOBJ. It supports bone and node animations but not mesh animations (vertex-based animations, which are rare nowadays). CreateWOBJ merges all meshes, 材料, and animations into one file, with textures specified in xml. Aground Zero does not support multiple textures per wobj; textures should be packed into one mega-texture, or if necessary, the object should be split into multiple wobj files.
While meshes are merged, を使用できます -writemeshes as a third command line argument, which writes the names and vertex subset for each mesh in the object. This is useful for creating subsets, as seen in the subways and player hairstyles (all packed into one wobj).
Once you have a wobj, you define it in-game using:
<model id="名前" path="path to wobj" texture="diffuse" normal="普通" emission="emission" />
You can use the same model multiple times, altering the textures. Aground Zero supports four texture types: diffuse, 普通, emission, and specular. While specular is not explicitly defined in the model line, it’s packed into the otherwise unused alpha channel of the normal map. To adjust the alpha channel of a normal map (after loading it for at least one model), このコマンドを使用します:
<setSpecular normal="normal_map" specular="specular" scale="scale" />
The specular channel, a grayscale image (single alpha channel), interprets 0 as black, 0.5 as equal to the diffuse color, と 1 as pure white, smoothly interpolating between. The scale is optional, allowing you to brighten or darken the specular map, デフォルトで 0.5. If the specular parameter isn’t a basic texture (like white or black), it unloads after this command and can’t be reused unless you add unload="false" to the command. 通常, you don’t need the specular map once it’s packed into a normal map. If you prefer avoiding normal and specular maps, there are three primitive textures: no_normal (デフォルト, unchanged normals and 0.5 specular), no_specular (like no_normal, but black specular), と glass (white specular).
Regarding coordinates, x/y represents the ground plane, and z points upward (consider mining depth). Although most modeling programs use x/z as the ground plane and y as up, CreateWOBJ automatically adjusts models for this difference.
Billboards
If you prefer not to use 3D models, you have the option to place billboards or primitives. Primitives are straightforward shapes (quads, キューブ, spheres) defined similarly to models, but you use primitive="..." instead of referencing a wobj. Billboards, 一方で, are 2D sprites always facing the camera. While suitable for small, spherical, or cylindrical objects, they may seem to move when the camera rotates. To add billboards within an object, use the following code:
<billboard tile="タイル" animation="animation if desired" タイプ="タイプ" scale="size in meters/blocks" offsetX="x position relative to center, you can also have an offsetY and Z" />
The type can be normal (no blending, discards low alpha values), transparent (allows blending for semi-transparency), emissive (glows in the dark, unaffected by lighting), or indicator (visible through walls and other objects).
Billboards can also be added to objects with 3D models using the xml tag or object.addBillboard. This is how in-game warnings, such as being out of power, are incorporated.
青写真
の スイッチ example is an item, but in the game, many structures are placed as blueprints using the Fabricator and then built or dismantled. これを達成するには, create a structure that extends the blueprint structure. Set a type (力, produce, ベース, vehicle, decor), 情報 (the structure it will build), and a recipe that specifies the materials, power cost, and time needed to build the blueprint. A good example of this is the factory_blueprint. オプションで, you can define an animateIcon function for the blueprint, animating the structure in the Fabricator list when hovered.
There are various structure types you can extend, のような クラフト for factories, 育つ for item producers, manned_craft/manned_grow if they need an NPC to operate them, などなど. Once you have a blueprint, add it to the Fabricator using this command:
unlockBlueprints(州, プレーヤー, ["blueprint_id"]);
材料
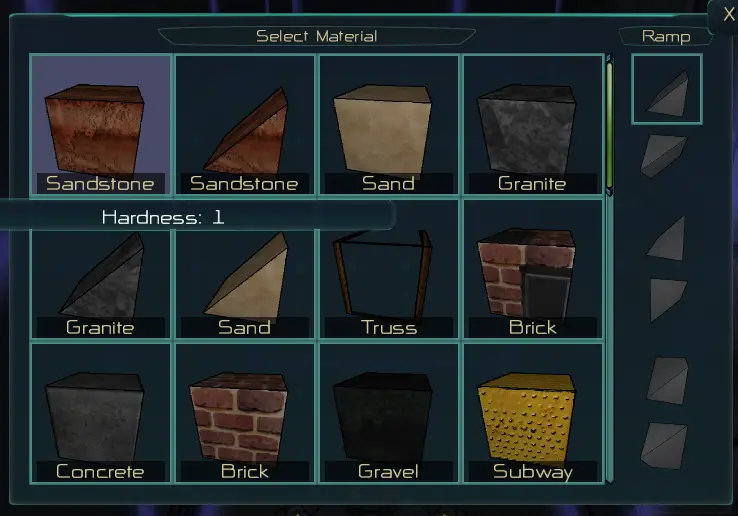
To introduce new blocks or ores in the game, you need to add materials. Each material has a name, a texture (which can be set on all six sides), a mining power, and optionally an onDig event.
Textures are 256×256 images that make 2×2 ブロック (each 128×128 quarter of the image is one block). They should be looping and must have a normal map. Laigter is a helpful tool for generating normal maps from images. Set bump to 0, enhance height between 60-100, and softness to 2-3. Use the visualization to see how the material will react to light sources in the game. Texture definitions look like this:
<texture id="cave_floor" color="cave_floor.png" normal="cave_floor_n.png" />
All textures must be the same size as they are placed in a single texture array. For texture packs, you can change it from 256×256, but ensure all textures have the new size. It will still make 2×2 ブロック. If you want all blocks to be the same, duplicate the top-left quarter four times.
After defining a texture, you can set the specular value of the normal map just like models:
<setSpecular normal="cave_floor_n.png" specular="黒" />
Materials do not support emission textures; their emission is set to the grid texture when placing structures.
Here’s how you can describe the material:
<material id="洞窟" sides="cave_wall" bottom="cave_ceiling" top="cave_floor" mine_power="1" />
To set textures, you have different options:
- 使用
texture=""すべてのために 6 側面. - 使用
sides=""for all sides excluding the top and bottom. - Use specific attributes like
top,bottom,left,right,back,frontto set textures for specific sides. This overwrites textures set withtexture=""またはsides="".
Additional material parameters you can use include:
mine_power: Sets the strength needed for a laser drill to break it.name: Sets the displayed name in the materializer (シャベル), デフォルトでmaterial>id.blocking: Determines if objects can pass through the block.ramp: Specifies if the block is a ramp.block_water: Indicates whether the block stops water passing through.block_light: Specifies if the block stops light passing through.item: Defines what item to drop when the block is mined.opaque: A comma-separated list of completely opaque sides.step: Sets the footstep sound for the block.visible: Disables rendering (can still block objects/water).paint/paintable: Used for the painter tool.
Every block can have two materials – base and overlay. Overlay materials are for ores and decorative elements, 使用して item and having a separate onDig イベント. Overlay materials don’t affect the mining power.
の onDig event runs when the tile is mined, passing a dig object with area, action-performing object, x/y/z position, and material. It can be used for player/enemy damage or granting achievements for mining a specific amount (like diamonds).
Areas
Once you gather materials, making new areas involves putting blocks and objects in place. Each area needs a specified width, 身長, and depth. Anything beyond these boundaries will show up visually but won’t be saved or interacted with. 例えば, the distant city on the surface is regenerated from a seed each time the area loads. Areas also require a defined ground, determining the appearance of cables, ベルト, and ladders. Default settings work for most areas, but you can customize them.
Here are some additional parameters for areas:
- gravity: Adjusts the gravity level; you can have low or inverted gravity (defaults to 1).
- belt_power: Sets the power consumption of each belt per second (defaults to 0.05).
- 波: Adds a normal map for water surfaces.
- bubbles: Incorporates an image for bubbles in water.
- dust: Includes an image for dust floating around lights.
- has_oxygen: If set to false, oxygen is only replenished inside vehicles or objects producing oxygen; さもないと, it’s available everywhere except underwater.
- break_tile: Specifies the tile for breaking blocks.
- break_anim: Defines the frame-by-frame animation for breaking blocks.
- break_emit: Determines how much the breaking block animation should glow in the dark. Use color codes (例えば, 000000 for none, ffffff for full), allowing separate adjustments for each channel.
To enhance your world’s visual appeal, you can utilize the atmosphere tag to incorporate a skybox, sunrise/sunset effects. Note that this feature may evolve and become more versatile when the moon is added.
で <infoInit> セクション, you have the option to configure the following parameters:
- shadow_z: Activates the sun’s directional light and shadow map when the camera is above this depth; さもないと, it remains disabled.
- infinite_water_z: Extends all water at this depth and above at the world’s edge to infinity. This prevents issues with rendering caused by an infinitely extended underground river, ensuring that infinite water remains simple and convex.
- waterColor: Specifies the color of the water. The alpha channel determines the water’s density, affecting its thickness and murkiness.
- waveScale: Sets the x/y scale of the wave texture on the surface. The z/w values are for a second copy of the wave texture added on top.
- waveSpeed: Determines the speed of the wave texture. The x/y values apply to the main texture, while z/w controls the movement of the additional copy, preventing obvious looping.
- waterSurface: Similar to waterColor but for the water’s surface, which should be notably darker (mostly reflective) and higher density, making objects under the surface less visible.
- bubble_size: Adjusts the scale of the bubble texture.
- bubble_strength: Controls the visibility of the bubble texture.
Creating a new area, like the Ore Cave, involves examining the data/core/world/ore_cave.xml file in the game install folder. このファイルの中で, ある <generate> block that defines how the ore cave is created. さらに, it introduces an ore_cave_portal と ore_cave_exit 物体, enabling you to enter and exit the ore cave. Without these objects, accessing the new area would be impossible. The ore cave is designed to reset when all players leave, and it gets reloaded in the ore_cave_portal, ensuring a fresh layout and new ores each time you enter.
In the game state, you are limited to one area per ID. しかし, similar to the ore cave, you have the flexibility to clear and regenerate temporary areas. Areas will only be generated the first time you use state.createArea(ID) or if you manually trigger area.generate. This allows you to control when and how new areas are introduced in the game.
乗り物
Vehicles in the game function as movable structures that players can mount and operate. Much of the underlying logic for vehicles is already managed by the structures mountable と vehicle, both of which can be extended. These structures are defined in data/mods/full/objects/vehicles.xml.
の vehicle 物体, 特に, serves as a mountable object equipped with an inventory and locator, allowing teleportation (similar to the sub and boring machine). 特に, chairs are examples of plain mountable objects.
While the intricacies of vehicles are extensive and not fully explained here, it is advisable to explore the definitions of the sub and boring machine for a deeper understanding. 必要に応じて, you can customize most of the graphical user interface (GUI) and controls when riding a vehicle, providing flexibility for your game experience.
敵
Enemy behavior in the game involves managing complexity, and a crucial aspect is implementing an onFrame event. This event runs every frame for each instance of the enemy, allowing you to execute logic for movement and attacking. While it’s important to keep this logic relatively simple for performance reasons, there are virtually no limits to what you can achieve. Introducing a reaction time for enemies is a recommended practice. 例えば, hunter bots might search for nearby players to shoot every 10 フレーム, reducing the computational load per frame. さらに, they could search for nearby structures to shoot every 60 フレーム.
To get a better grasp of enemy implementation, it’s beneficial to examine existing enemies in the game. If one of them aligns with your requirements, consider extending its functionality. This approach allows you to build upon the existing enemy behaviors, providing a foundation for customization while maintaining performance considerations.
Translations
To integrate translations into the game, you can follow the same process as outlined in the original Aground. を参照してください。 Aground translation guide for detailed instructions.
The only deviation is that you should place the language XML file in your mod folder and include the <含む> tag within your mod’s init block instead of directly modifying the core language folder. で <lang> tag of your language XML, you can include an attribute version=”0.2.2″, どこ 0.2.2 should correspond to the game version you translated (visible on the title screen). If the version attribute is absent or set to a different version than the current game version, the language will appear in red in the options menu, indicating a potential outdated status. This ensures compatibility and keeps users informed about the status of the translation in relation to the game version.
これが今日私たちがこの目的で共有するすべてです Aground Zero ガイド. このガイドは元々、次の者によって作成および執筆されました。 David Maletz. このガイドを更新できなかった場合, これに従って最新のアップデートを見つけることができます リンク.