- Title: From The Depths
- Release Date:
- Developer:
- Publisher:
Information about From The Depths is still incomplete. Please help us fill the details of the game using this contact form.
In this guide, I’m going to go over each and every weapon type in the game as well as some tips on how to make better guns.
Introduction
In this guide, I’ll be covering pretty much every weapon system in the game you can build and give some building tips I’ve learned throughout my playtime. Before we get started I will acknowledge that I mostly have experience with advanced cannons so take the tips of the buildings I have on other weapons systems with a grain of salt, also I’m assuming you already know how to build AIs and connect them to weapons but if you don’t basically you just need to connect a Local Weapons Controller (LWC) to the firing piece of the weapon or the turret it’s mounted on.
An Anti-Munitions Cannon Controller (AMCC) can also work but it will only target incoming CRAM shells and missiles and it only works with weapons on a turret. You can stick an LWC and an AMCC on the same turret and it will act as a dual-purpose weapon, shooting at crafts and munitions alike, just make sure both connect back to the AI. Anyways without further ado let’s get into the guide!
Simple Weapons
To start off with we’re looking at simple weapons, these guys are by far the easiest to set up, for the majority of them you just have to put the gun down and stick a LWC next to it and you’re done! The only downside is that most of them are fairly weak, only being a threat to unarmored targets like most Deep Water Guard craft, still they can be pretty useful secondary/main weapons, especially if you’re using the rams.
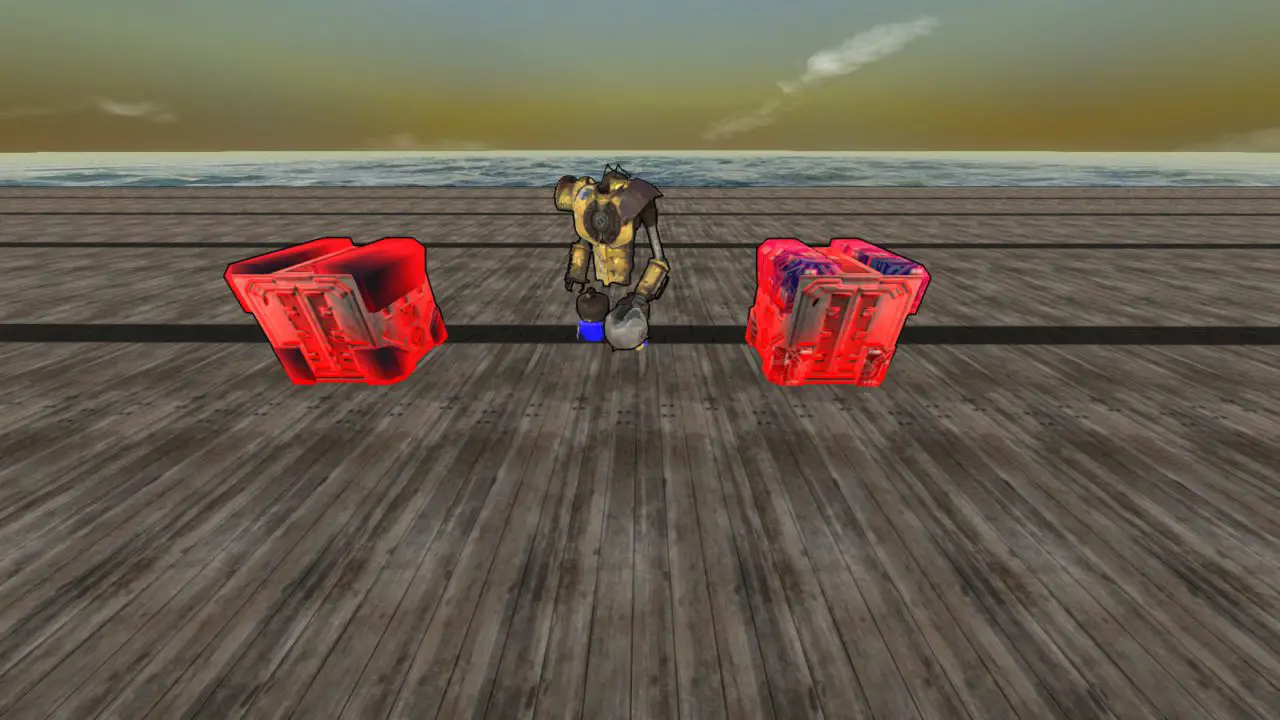
Melee Weapons
From left to right we have a Ram block, a Drill, and a Tactical Nuke
These are the most basic melee weapons in the game and probably the most effective simple weapons, the Rams are the most versatile and the easiest to use, just slap em on the front of your craft and hit things at high speed. Drills are a bit more complex requiring the main drill block, some drill bits, a power input and a torque amplifier to function as well as an Automated Control Block (ACB) to turn on by itself, the main advantage over rams being that you don’t need to be nearly as fast to be effective with them, just catching up to the target will do the trick, there’s also more powerful steam drills that require a steam engine to work but that’s another story. The Tactical Nuke also needs an ACB to function properly but you can get away with just ramming hard enough into the enemy to set off the nuke, they do a pretty hefty amount of damage but will almost certainly destroy the craft they’re attached to so put them on something cheap or very far away from the main body of the craft.
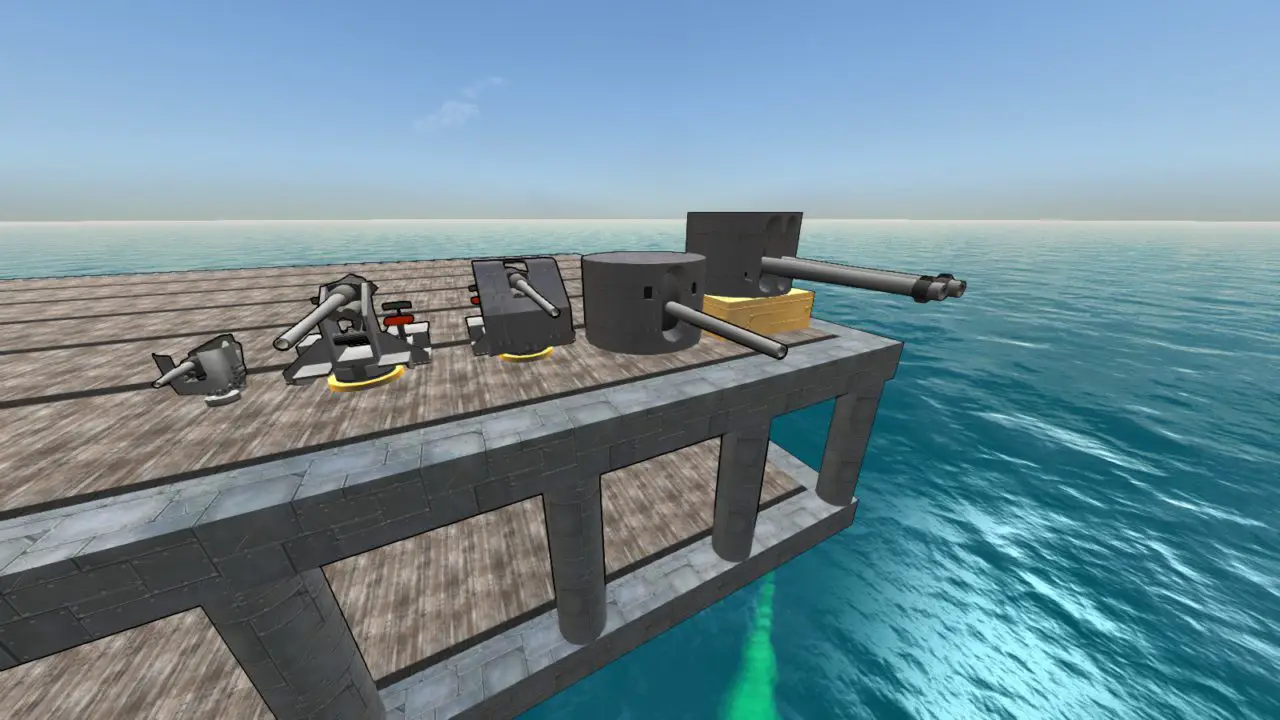
Ye Olde Cannons
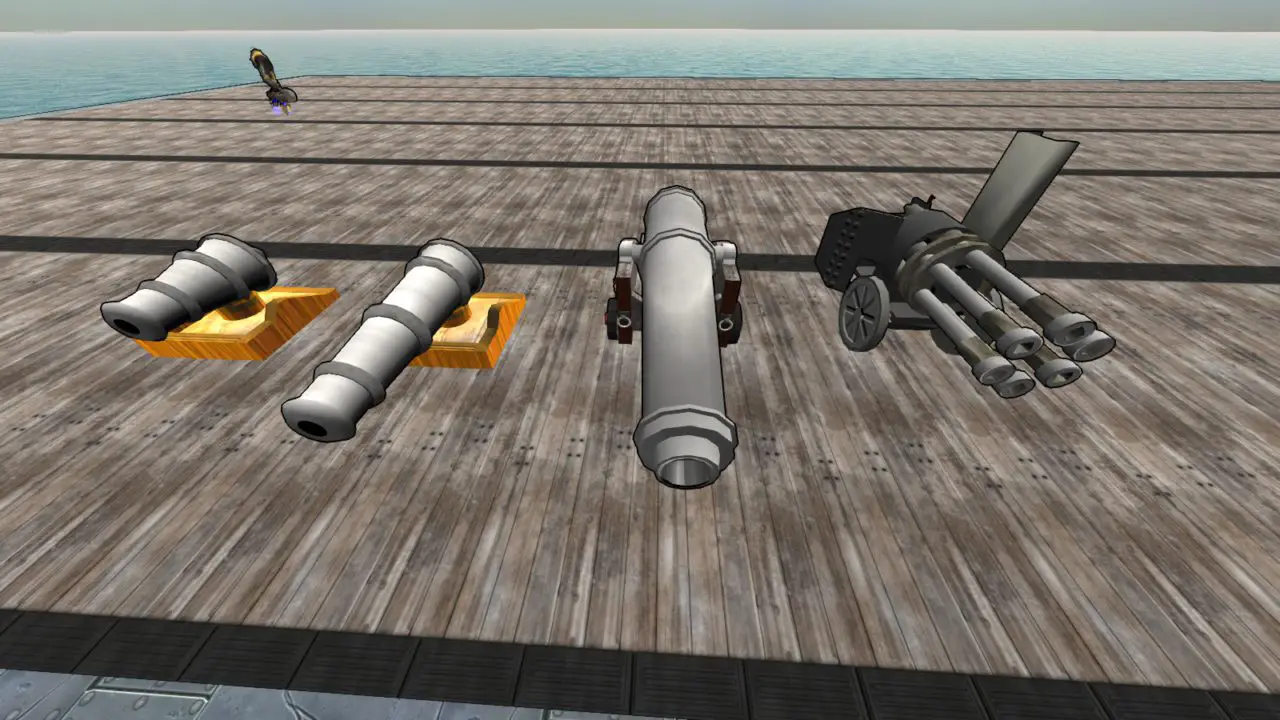
From left to right we have a 16 pound gun, a 32 pound gun, and a 64 pound gun with a revolving blast gun at the end
These guns are probably the most basic guns in the game, the 16, 32, and 64 pound guns all function in the same way, they fire one cannon ball and then take a while to reload with each gun firing a more damaging shot with each step up in weight. If you want to be as effective as possible use the 64 pound gun and use a lot of them for best effect. Meanwhile the revolving blast gun fires a lot of shots very quickly in a shotgun style spray, it has an alright field of fire and amount of shots for it’s burst but like the other cannons it takes a very long time to reload, about a minute if I’m not mistaken, similar to the cannons you’ll want to use more than one of these if you want to do some real damage.
Energy Weapons
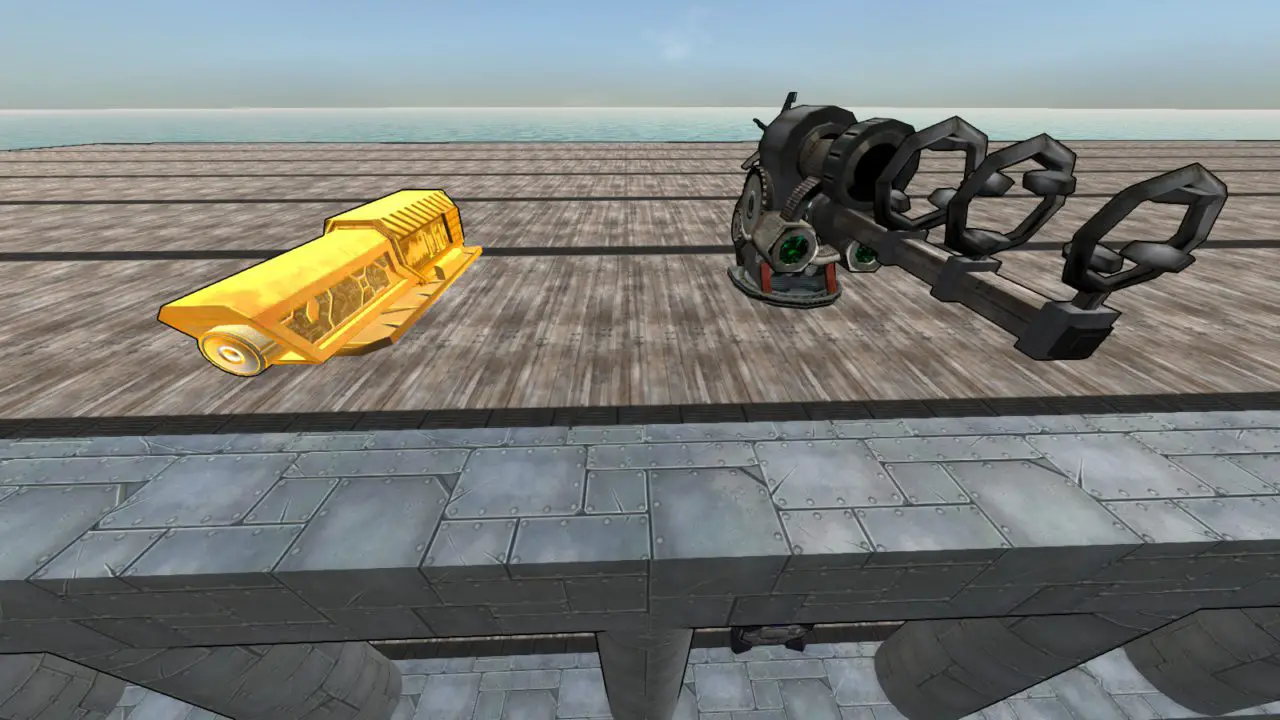
On the left, the Simple Laser, on the right, the Shard Cannon
Our very first energy weapons and probably the least used weapons in the game, the Simple Laser takes some time to charge up but once it does it fires a constant beam for a few seconds, it can carve through wood and it’s pretty cool looking but you’re better off using other weapons for anything with armor. As for the Shard Cannon this thing does quite a lot of damage per shot, almost enough to take out a wood beam with just one shot, it does suffer against metal but not nearly as much as the Laser, you’ll want more than one to keep the damage up but this is a fairly effective weapon.
Small Anti-Air (AA)
On the left, the T-Class 20mm Gun, on the right, the R-Class .50 Cal
Our first rapid-fire guns that don’t shoot like shotguns, the T-Class is a fairly decent start for your AA guns, it has a pretty decent magazine size and a fairly quick reload of about 6 seconds, if you’ve forgotten to make an Advanced Projectile System (APS) AA system the T-class is a pretty decent start. On the other hand the R-class is really only a threat against wooden targets, each shot does about half the damage of a T-class shot and it only has 30 rounds per mag with roughly the same reload time as the T-class, still they’re a pretty good decoration piece if you need some .50 cal guns on your boat but I wouldn’t use them as the only AA on the craft.
Medium AA
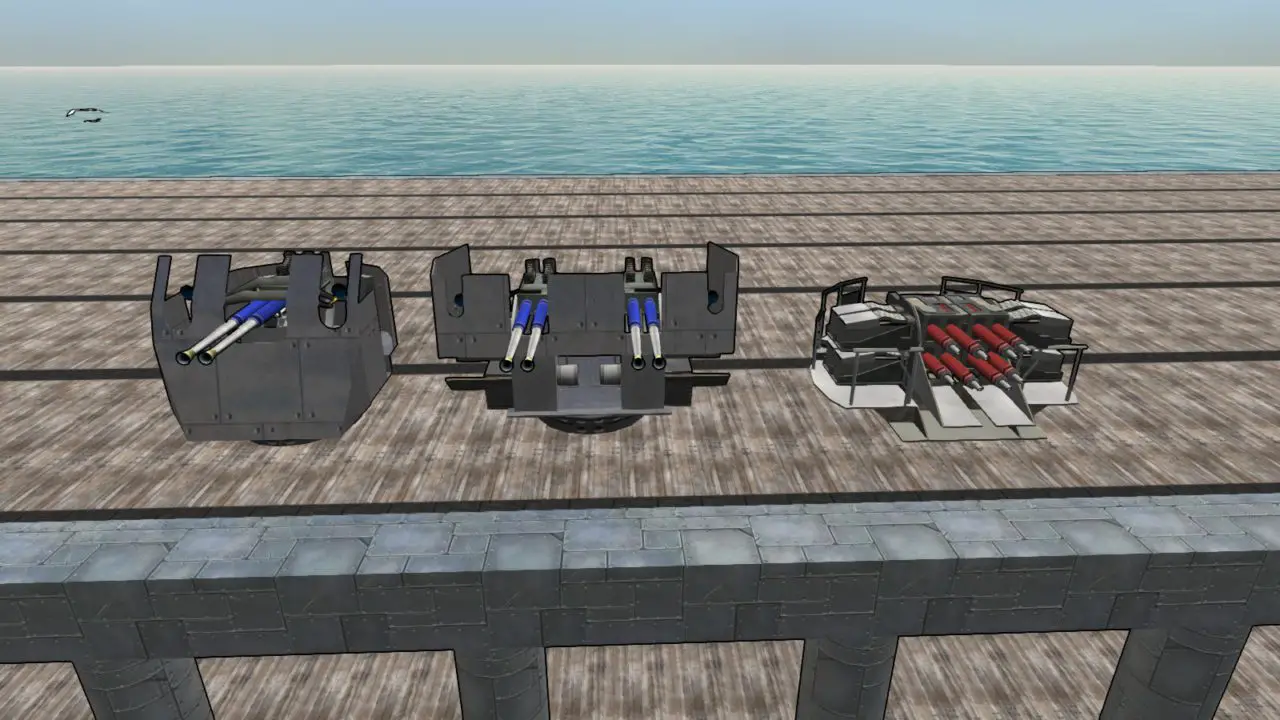
From left to right we have the Twin 40mm Mk-H, the Quad 40mm Mk-I, and the Octuple 40mm Mk-S
The first weapons that have explosive weaponry, all 3 guns fire explosive shells with pretty decent damage and AP for their caliber, the Mk-S in particular is the best AA in my opinion that isn’t an APS, with 8 shells per shot and a 200 round mag you just can’t go wrong with the Mk-S. the Mk-H and Mk-I can still do the same job but they don’t have nearly the same mag size, however the reload time is a bit better so if you don’t have space for a Mk-S use one of these bad boys and it’ll get the job done.
Burst-Fire Guns
On the left, the 30mm Assault Cannon, on the right, the 60mm Auto Cannon
The last burst weapons for the simple weapons, both the 30mm and the 60mm are probably the most effective simple weapons that don’t need custom shells to work, however both also have a terrible field of fire so sticking them on a 2-axis turret is advised. The 30mm has a larger mag but a longer reload time and the damage per shot is about half of the 60mm, meanwhile the 60mm only has 9 shots per mag but makes up for it with a 2 second reload time. Despite being good burst cannons I can’t really think of a good use for these guys, I have seen the 30mm being used on Steel Strider ships as a cheap CIWS but other than that I’m not sure, if you’ve come up with a use for them please let me know in the comments.
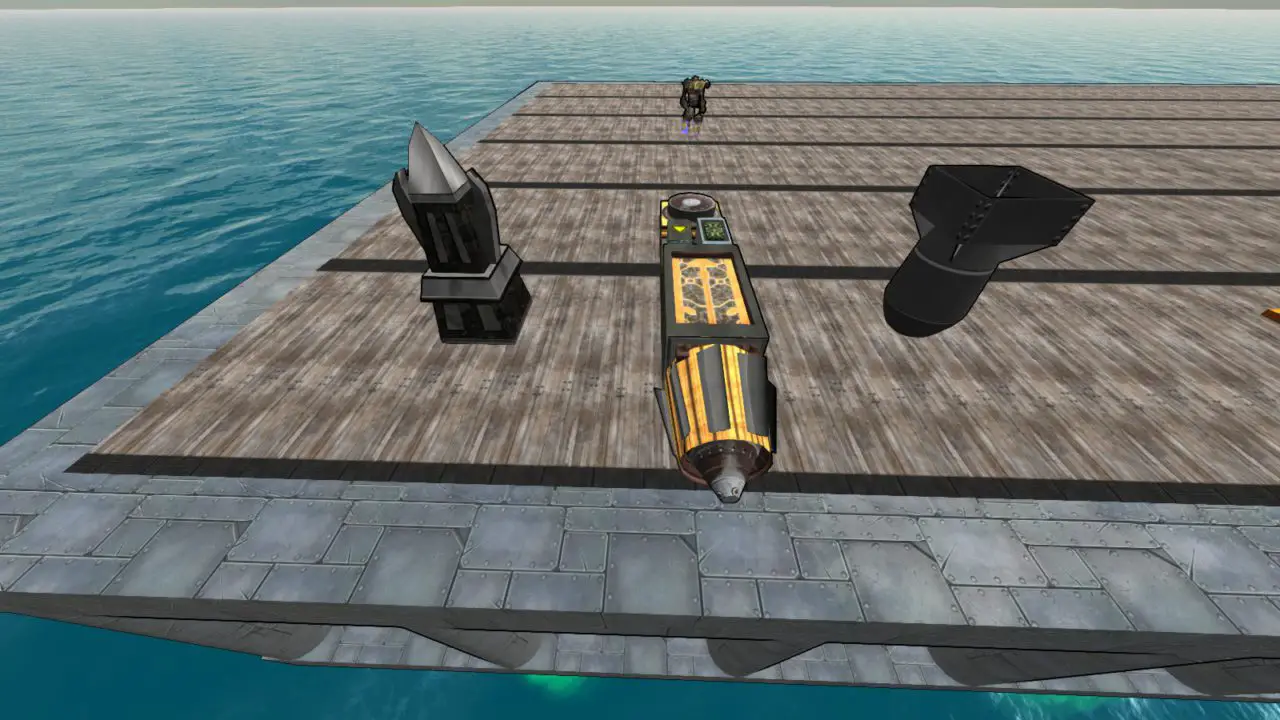
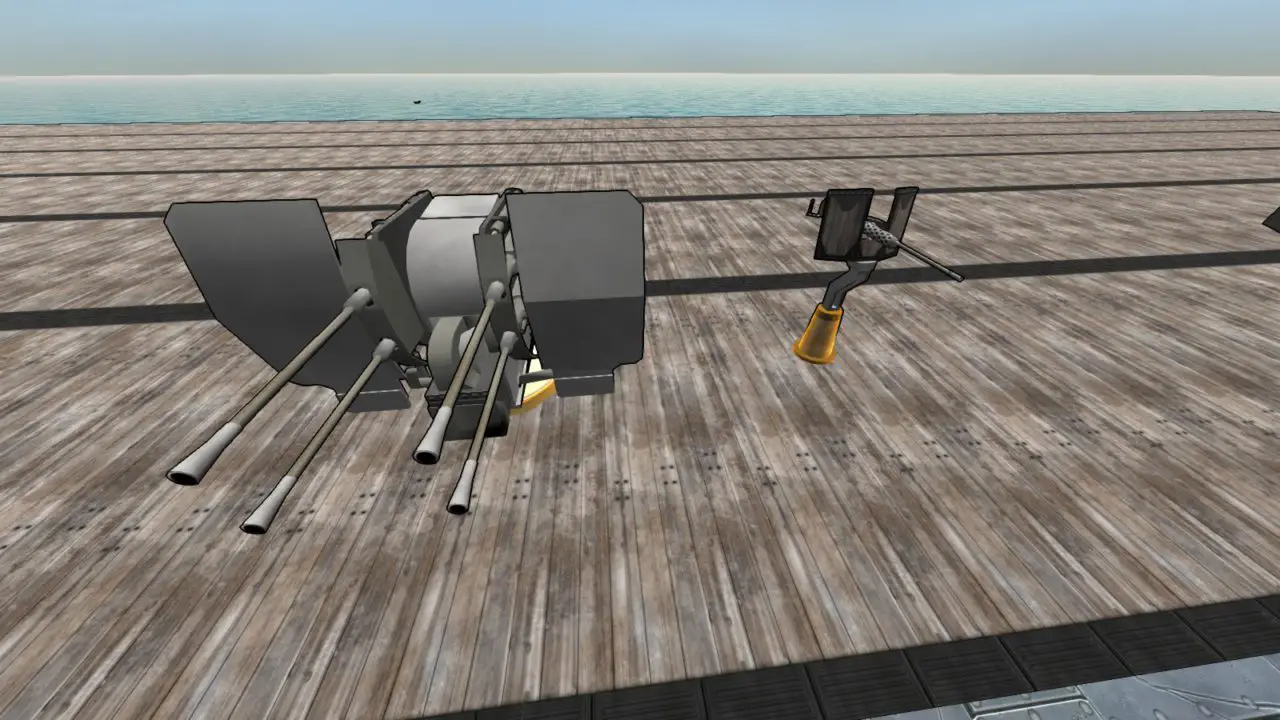
Custom Shell Cannons
From left to right we have the Type-E 60mm Grenade Launcher, the Type A 3.7″ Gun, the Type A(L) 3.7″ Gun, the Type L Casemated Gun, and finally the Type L(E) Casemated Gun
Our final category of Simple Weapons and probably the cheapest secondary guns you can get that can actually do something, these guys all fire customized shells from an APS Shell Customizer which will be covered in the Advanced Cannons section down below. The Type-E launcher is the weakest of the bunch thanks to it’s 60mm shells however it does make up for this slightly by being the only one in this group to have a magazine, however, it does have the same minute-long reload timer of the Blast Cannon so it’s pretty limited in it’s damage output, still it’s a good gun for small craft that need a boost in firepower. Meanwhile the Type A and Type A(L) both have the same shell size of 94mm or 3.7 freedom units, the only difference between the 2 is that the Type A(L) is slightly tankier and a bit more expensive unless you don’t like the gun shield or can’t afford the cost I’d recommend using the Type A(L) on your smaller ships if you think they need secondary guns.
Finally, we have the Type L and Type L(E), despite sharing the same type letter these last 2 guns have different shell sizes, the Type L takes 130mm shells while the Type L(E) takes 150mm shells. They’ve also got different reload speeds with the Type L(E) taking 8 seconds between shots, nearly double of the Type L’s 4.5 second reload, however the Type L(E) makes up for this by firing both barrels at the same time, if you need cheap secondary guns on your battleship and/or dreadnought that can fit basically anywhere these are the guns you’re looking for.
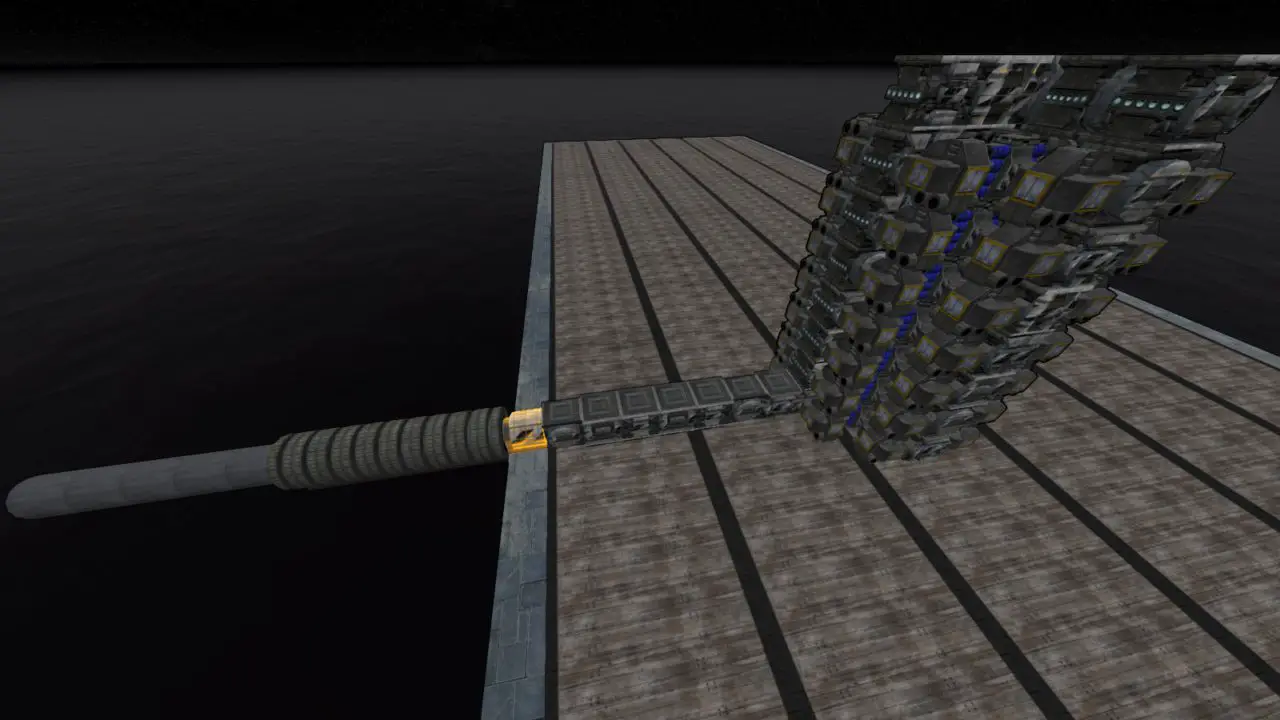
CRAM Cannons
The be all end all of the shell size, CRAM Cannons can fire shells up to 2 meters in diameter and are one of the easiest custom-built guns to put together in the game, it’s like playing with legos only these legos fire gigantic shells. They do have some drawbacks however, for one the shells are big enough that any active defenses like a Close-In Weapons System (CIWS) turret or LAMS can and will shoot at them, potentially destroying your shot before impact, also their shell speed can only go up to 200m/s making them a pretty terrible choice for dealing with more agile crafts. Now that we’ve gone over the basic idea let’s go over the blocks you need/want to make them work. As much as I would like to tell you about every single block and how they work in great detail I don’t want this guide to take another year to write, so from here on in I’m going to assume you can read the description on each block to find out how they work, I’ll still provide a quick reference table for the different blocks with a simplified description as well as pictures of example cannons at the end.
Quick-Reference table
| Block | Description | Notes |
|---|---|---|
| Firing Piece | Starting point for the weapon, every piece of the cannon must connect either directly or indirectly to this piece. | Fires bullets, duh. Make sure the firing end is pointing where you want it to. |
| Gauge Increaser | Increases the size of the bullet being fired, boosts damage accordingly. | Shell damage increases with size but loses speed as a trade-off, good idea to have a shell diameter in mind before building. |
| 6-Way Connector | Connects virtually any other block to the firing piece as long as the chain eventually leads to the firing piece. | Pretty much Essential in any cannon design, helps to use these blocks to build a “skeleton” that everything else fits into |
| Packer x3 (Manual/ |
Combines the ammo pellets into a bullet for the gun to fire, Manual orientation requires you to make sure everything’s pointing the right way, |
|
| Payload Compactor | Increases the payload capacity of the shells allowing more pellets to be packed in before firing, becomes more effective when connected to more Packers. | Will slow down reload times but the damage increase may be worth it especially for big doom cannons. |
| HE/Hardener/Frag/EMP Pellets | Provides different effects based on the amount of pellets and the ratio each of them have with each other, all become more effective when connected to more packers. | HE and Frag are very good against unarmored targets, however explosive radius is capped at 10 meters for pretty much all explosives in the game except for Flak, Hardener gives more Armor piercing (AP)/Shell health and EMP can fry electronics, the ideal ratio depends on what enemies you’re fighting. |
| Barrel & Barrel Types | Usually makes the gun more accurate while also increasing shell speed, different types will have different effects | Heavy Barrel’s beefier, Recoil Suppression helps with recoil, Motor Driven makes the barrel rotate to target faster, Flash Suppression makes the shell harder to detect, Elevation lets the gun aim wayyyy up, and the Bomb chute turns the shell into a low-velocity bomb. |
| Fusing Box | Allows you to set different fuses with different effects at the cost of payload space. | I can’t go over every fuse here but just know that this block is practically essential on any advanced CRAM design. |
| Laser Targete | Works in tandem with the Fusing box to accurately set fuses. | Practically a necessity if using timed/altitude fuses. |
| Fall of Shot Predictor | Will draw a line from the block itself to the predicted endpoint of the shot while aiming the gun. | Useful for manual aiming or figuring out exactly where your craft is firing at a glance, otherwise completely useless. |
| Interface Screen | Decorative cannon piece. | Originally used to display all the info you’d get by looking at the firing piece’s Q menu, now it’s just decoration, good for a mock CRT display I guess? |
With that quick-reference table out of the way, let’s discuss cannon design.
CRAM Cannon Example
| Blocks | Description | Notes |
|---|---|---|
| Firing Piece | Starting point for the weapon, every other cannon piece must connect either directly or indirectly to this block. | Pretty much identical to the CRAM cannon in function, just with a whole lot more options in the menu to use. |
| Gauge Increaser | Increases the shell size and damage at the cost of reload speed and shell speed, can connect to autoloaders. | The actual size of the shell will differ depending on what you want the gun to do, typically 60mm is the bare minimum, 150mm-300mm is medium-gauge, and anything above 300mm is a heavy/main gun. |
| Gauge Cooling Unit | Decreases the amount of time it takes for the barrel to cool down, can connect to autoloaders. | This will probably be the most common component in your cannon besides autoloaders and ammo racks, good for building the “skeleton” of the cannon. |
| 6-Way Connector | Connects virtually any block to any other block, as long as the chain either reaches the firing piece or Gauge Increasers/Coolers connected to the firing piece. | Pretty much exactly the same function as the CRAM version, really only useful on railguns, if you’ve built your cannon properly you won’t need these at all. |
| Autoloader (1m-8m) | Provides a way to load shells into the gun, length ranges from 1m-8m for different shell sizes. | The more of these you have the faster the fire rate will be, each individual loader can be optimized by having more clips attached to different slots up to a max of 4 in each slot. |
| Belt-fed Autoloader | Provides a very fast way of loading shells into the gun, will not reload until all rounds in clip are expended or the gun hasn’t fired in a while, capped at 1m in length | The length cap means this autoloader is only good for smaller gauges, that being said if you throw enough lead down range you’re bound to damage something, extending the clip can help the gun shoot for longer and adding more input feeders reduces reload time. |
| Ammo Input Feeder | Loads shells into the clip/autoloader/firing piece, needs an ammo customizer to function. | Reload times can be reduced by adding more of these, other than that not much to say. |
| Recoil Absorber (1m-8m) | Absorbs recoil from the gun, longer absorbers can take more recoil. | You’ll always want a few of these on any gun you build, recoil reduces accuracy so make sure you have enough absorbers to keep up on faster firing guns. |
| Mantlets | Lets you aim the gun barrel in various different fields of fire without needing a turret, Omni types cover most directions, Elevation types only cover vertical aiming, and AA mantlets give a very high upward field of fire with little downward and nothing laterally. | These blocks are pretty much essential for every gun you build, AA mantlets are great for deck guns and AA guns while the elevation mantlets are good for guns you want to aim both up and down with omni mantlets being great for in-hull mounted guns. |
| Barrels | Makes the shot more accurate, Heavy barrels are tougher but heavier, Bore Evacuator help with cooling and all the different Muzzle Brakes help reduce recoil. | it’s a good idea to include pretty much all of these parts no matter what cannon you’re building, the only exception would probably be the heavy barrel which is really only useful on very big guns. |
| Railgun Magnets & Fixtures | Used to provide energy capacity for the railgun to draw from, magnets only attach to magnet fixtures or other magnets and the fixtures only attach to the firing piece. | The more magnets you have the bigger the charge, just keep in mind that you’ll also need an appropriate amount of chargers to keep up with the firing rate. |
| Railgun Charger | Consumes vehicle energy to charge the rails on a railgun. | include more to speed up charge time, make sure you have enough to keep up with the firing rate! |
| Laser Targeter | Works in conjunction with shell fuse to automatically set shell detonation parameters. | Pretty much exactly like the CRAM version, the only difference is how you put fuses on the shells. |
| Fall of Shot Predictor | Draws an arc from where the block is placed to where the predicted impact point is. | Just like the CRAM version, good for telling where your gun is aiming but useless for anything else. |
| Ammo Customizer & Controller | Both blocks work together to build a shell for the gun to fire. | I’ll go over this more in the shell module quick reference table but right now all you need to know is this is how you make bullets for your gun. |
| Ammo Ejector | Tosses all the shells out of the connected autoloader’s clips, only connects directly to autoloaders. | Good for keeping your guns from exploding, be aware that shells are still live when they’re ejected unless you’ve included a defuser in the shell design. |
While all of these blocks bring a lot more complexity to building the gun, there’s also a lot more options to fiddle around with in the menus for these blocks, the Firing Piece for example allows you to set a desired shell gauge, number of barrels as well as plenty of other options for railguns and the like. This also crops up in the Ammo Customiser & Controller which allow you to fine tune your shell’s effectiveness a lot more than in CRAM cannons, speaking of which…
Quick Reference Table (Shell Modules)
Shell modules are the individual modules of your cannon’s shell that can be changed out for different modules in the Ammo Customiser & Controller blocks, shell length is determined here by how many segments are in sequence with a maximum of 20 modules. All of the different modules and their effects are listed below in the table.
| Modules | Description | Notes |
|---|---|---|
| Gunpowder Casing | Contains propellant that ignites when gun is fired and pushes the shell out of the gun barrel. | Include more in shell design to make shell go faster, increases cooldown time. |
| Railgun Casing | Utilizes magnetic energy from the Railgun to propel the shell at high velocity, allows a much greater portion of energy to be imparted into the shell. | Include more in shell design to increase shell energy capacity, not necessary for railgun to work but it really helps. |
| HE Warhead | Causes shell to detonate on impact has a nose variant. | Makes shell go boom, include more for bigger boom, ’nuff said. |
| Flak Warhead | Causes shell to detonate on impact in a wide radius at the cost of explosive damage, has a nose variant. | Good for AA guns or to give HE shells a bit more explosive range. |
| Frag Warhead | Upon detonation a certain number of fragments are thrown in different directions inside a defined cone, has a nose variant. | Smaller cone angles will reduce the damage of each fragment, wider angles are usually good for AA, can be combined with enough armor piercing to throw frags around inside a target. |
| Solid Warhead | Adds more mass to the shell thereby increasing kinetic damage & AP, also increasing shell health. | Good for APHE or straight Kinetic shells, APHE must be combined with a railgun in order to be effective. |
| Sabot Warhead | Greatly Increases AP by making the shell a very thin metal rod, AP increase comes at the cost of pretty much every other warhead’s damage, has a nose variant. | Really good for pure kinetic/AP rounds and makes an excellent sniper shell for a railgun, gun must be very accurate otherwise shell might miss vital components and pass directly through the target. |
| EMP Warhead | On contact with target, module will send an EMP surge through all conductive blocks greatly damaging electronic blocks, has a nose variant. | Add more to increase EMP damage, good for knocking out AI or disabling shields if combined with a disruptor head, Heavy armor takes more damage from EMP as well. |
| Smoke Warhead | Creates a smoke cloud on detonation, smoke reduces laser AP. | Good against targets using lasers, useless against anything else. |
| Heavy Head | A nose module that greatly increases kinetic damage, basically the nose variant of the Solid Warhead. | Good nose module for targets with light armor, useless for anything else thanks to no increase in AP. |
| AP Head | Nose module that adds both AP and kinetic damage, also lets the shell fly faster than the Heavy Head. | Good all-round nose module, use this for APHE shells or when you’re not sure what nose cap to use. |
| Hollow Point Head | Nose module that essentially turns kinetic damage into impact damage, works well with Solid Warheads. | Impact damage ignores armor so this cap is good against light to medium armor. |
| Shaped Charge Head (HEAT) | This nose cap takes part of the explosive energy from HE warheads and uses it to blast a stream of superheated copper into the target, has a body variant to allow for multiple HEAT attacks in a single shell. | This module is really good if for whatever reason you can’t have a fast shell in the gun and still need AP, ERA will block a single HEAT attack and spaced armor will negate some damage. |
| Squash Head (HESH) | Similar to HEAT, this nose module take some explosive energy from HE and uses it to create a shockwave that turns the interior part of the armor into deadly fragments. | Good against hard targets with a lot of armor stacking, useless against spaced armor. |
| Disruptor Conduit | Nose module that uses all EMP to weaken planar shields if shell hits a shield, all payloads are weakened by 50% | Pretty good for a specialized anti-shield gun, kinda useless for anything else. |
| Penetration Depth Fuse | Fuse that causes the shell to detonate a short distance after passing through a block as long as the shell has enough kinetic damage & AP to get through the block. | Practically essential for APHE so the shell doesn’t detonate on contact with the target. |
| Inertial Fuse | Fuse that causes the shell to detonate if the shell’s angle changes too quickly past a certain threshold. | Good for making your shell detonate on shields or detonate when the shell otherwise would’ve been deflected. |
| Timed Fuse | Fuse that causes shell to detonate after a certain amount of time has passed, works in conjunction with a Laser targeter to adjust the timing relative to target. | Practically essential for any good AA gun, also good to help turn near-misses into partial hits with any explosive shells. |
| Altitude Fuse | Fuse will detonate shell after a certain altitude, works with Laser targeter to adjust the altitude relative to the target. | Might be useful on an AA gun or a specialized depth charge gun? The existence of the Timed fuse seems to negate this one entirely. |
| Emergency Ejection Defuse | Prevents the shell from detonating after being thrown out of an Ammo Ejector. | Pretty much a necessity if you’re using ejectors inside your craft. |
| Base Bleeder | Increases shell speed at the cost of accuracy, only goes on the rear of the shell. | Useful for pretty much every shell as long as you’re not trading casing space for it. |
| Visible Tracer | Increases the accuracy of the next shot as long as the gun fires fast enough and both shells have similar speeds, however active defenses will pick up the shell more easily, only goes on rear of shell. | Good for high Rate of Fire (RoF) guns and especially AA guns where accuracy and RoF are usually paramount. |
| Supercavitation Base | Shell won’t bounce off water and greatly reduces drag while shell is in water, same warhead penalty as sabot. | Good for dedicated anti-sub guns and underside airship guns, only goes on rear of shell. |
| Graviton Ram | Imparts force on target equal to the unmitigated recoil of the gun, only goes on rear of shell. | Might throw off some shots from the enemy or even capsize them with larger guns but otherwise kind of useless. |
| Stabilizer Fin Body | Diametric opposite of the Base Bleeder, makes the shell more accurate at the cost of speed. | Good for guns you want to be super accurate and those sniper shells mentioned earlier. |
| Gravity Compensator | Imparts a downward force on the shell to keep it more accurate over high trajectories. | Good for mortars and other guns with really high firing arcs. |
| Skimmer Tip | The diametric opposite to the Supercavitation Base, causes the shell to bounce every time it hits water and increases the possible skim angle. | No viable applications afaik. |
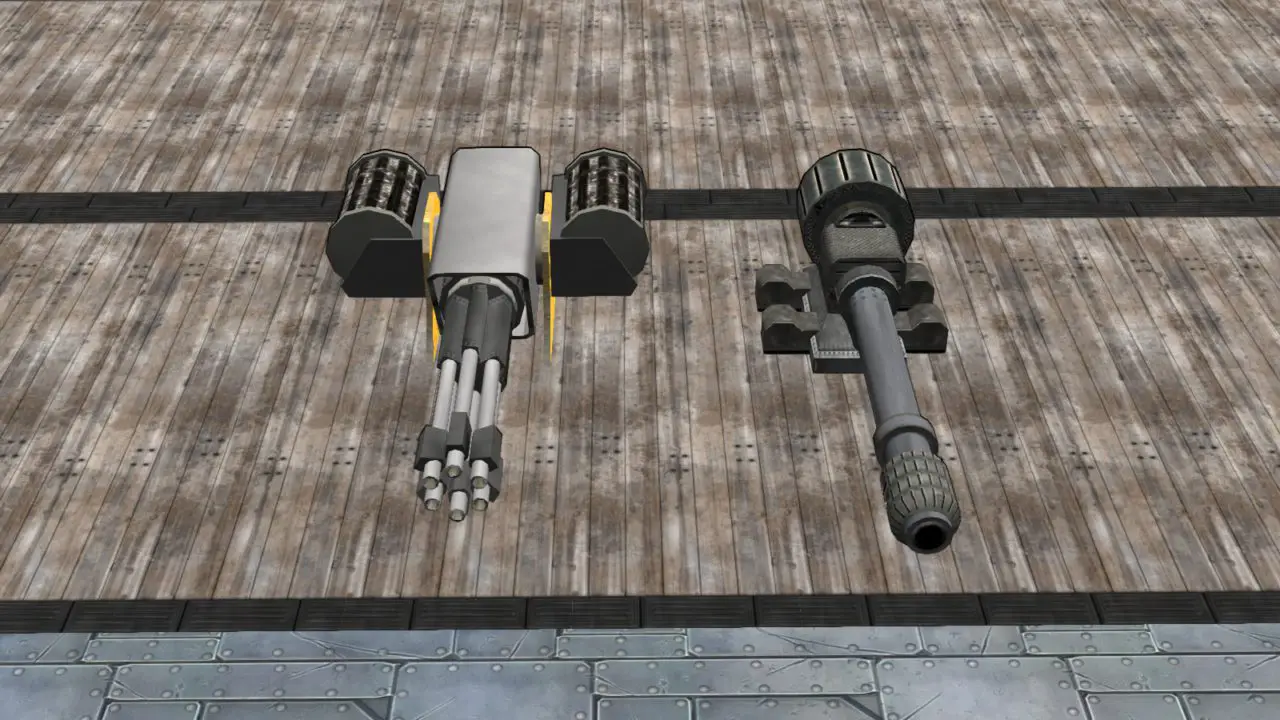
Example Cannons
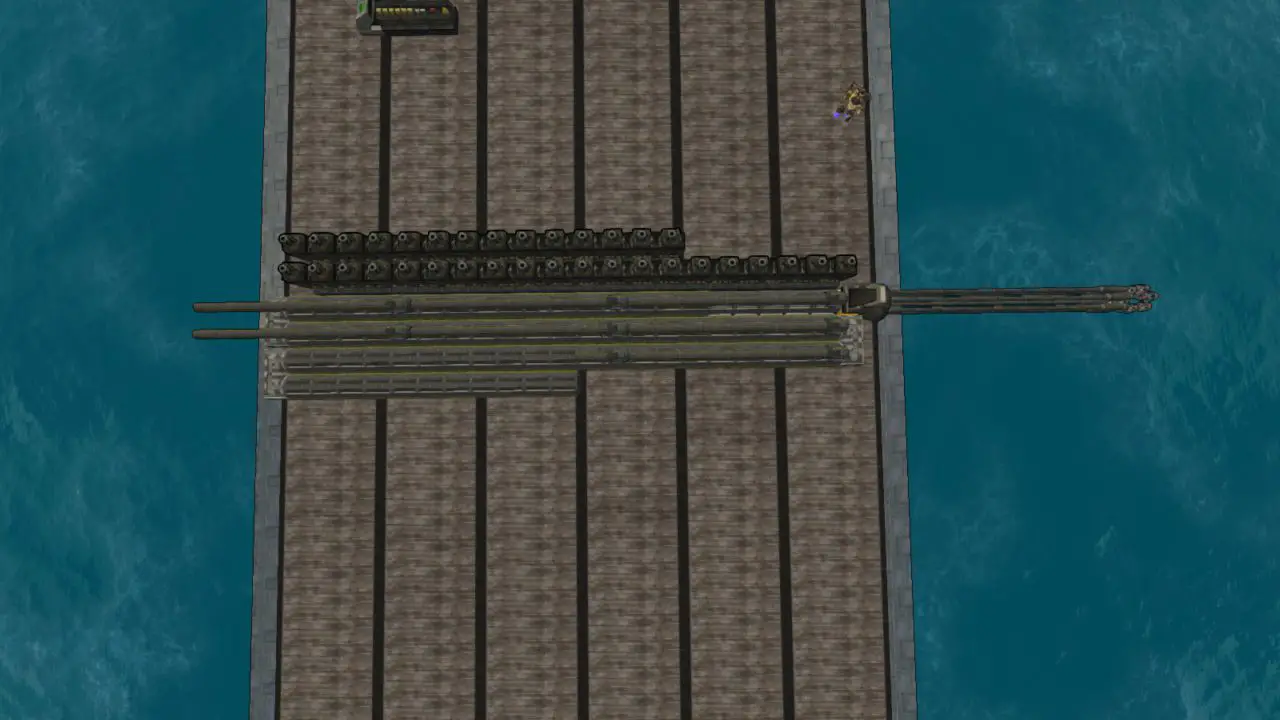
On top we have a 100mm, 500 RPM, 6-barrel design, below we have a 500mm, 24 RPM, single barrel design
Now that we’re free to discuss advanced cannon design let’s look at some examples starting with the 6-barrel design. Generally if you’re going for a high RoF on a gun you’ll want to go with a multibarrel since they provide a bonus to cooling, unless you going for a specific look or are making a very specialized cannon you’ll want to go with 6 barrels since that provides the biggest cooling bonus. As for gauge I always like to shoot for 100mm or more for my rapid-fire guns but you can go lower if you have to, 60mm is generally the bare minimum, anything below that and you might as well use a simple weapon for all the effectiveness it will have. For RoF I like to go for 500 RPM or more on my multibarrels, again you can go a bit lower, 400 RPM gives you a nice stream of bullets to work with, going any lower is generally reserved for guns with less than 6 barrels. if you want to copy the design all you need is the same amount of autoloaders, coolers, and recoil absorbers. sticking more clips on will keep the gun firing for longer and if you want to boost the RoF there’s 2 things you can do, you can stick on more autoloaders which means more cooling units and recoil absorbers making the gun more expensive, or you can shorten the shell being used in the gun which will reduce damage. If you want to use this design for AA you’ll generally want your shells to be moving at around 700-800 m/s, going higher tends to result in the projectile being only 1-2 modules long. Of course you’ll also want a laser targeter on the gun and a timed fuse on the shell for the most effective AA, if you want to see the shell I used it’ll be in a screenshot down below but generally any shell with flak or frag is good as long as you’re using timed fuses. Now with that out of the way let’s look some serious firepower.
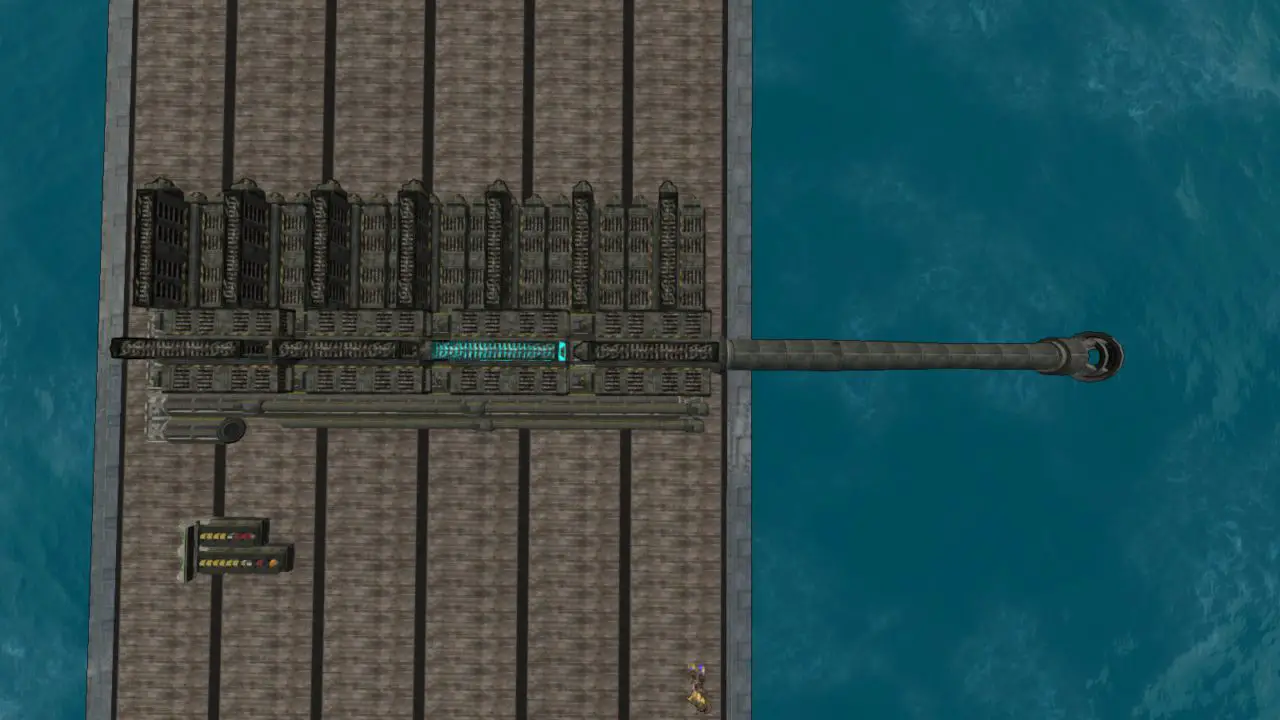
As for the big boi gun, 500 mm is the absolute maximum gauge you can have an advanced cannon be, single-barrel designs like this tend to take up a lot of space so you’ll really only want to use this type of design on battleships or other very big crafts. Generally for large-caliber single-barrels you’ll want to shoot for around 30-ish RPM, obviously I wasn’t able to get there with this design but I reckon if you keep the same number of autoloaders and go with 4 clips on each instead of 3 that should do the trick. For an upper limit on fire rate I’d say around 60 RPM is the fastest you want for big shells like this, pushing it any higher tends to eat up a lot of internal space on the craft, potentially taking away some armor. For this design I used 4m autoloaders, if you want to do as much damage as possible with every shot you can use 8m shells but that tends to lower the fire rate quite a bit. If you’re planning on converting this to a railgun I wouldn’t push the fire rate past 30 RPM, even the most basic railguns tend to eat up a lot of energy and internal space especially if you’re using APHE shells so make sure you got a massive engine capable of outputting ridiculous amounts of power. Also limiting the maximum amount of power each bullet takes to fire can help in energy management as well as fire rate if you’re running out of space below decks. The last piece of advice I can give here is that sometimes reverse engineering enemy designs might provide some insight as to how to make better cannons, the Scarlet Dawn in particular are practically experts on railguns and big shells so booting up the designer and taking a look at their cannons might be very beneficial.
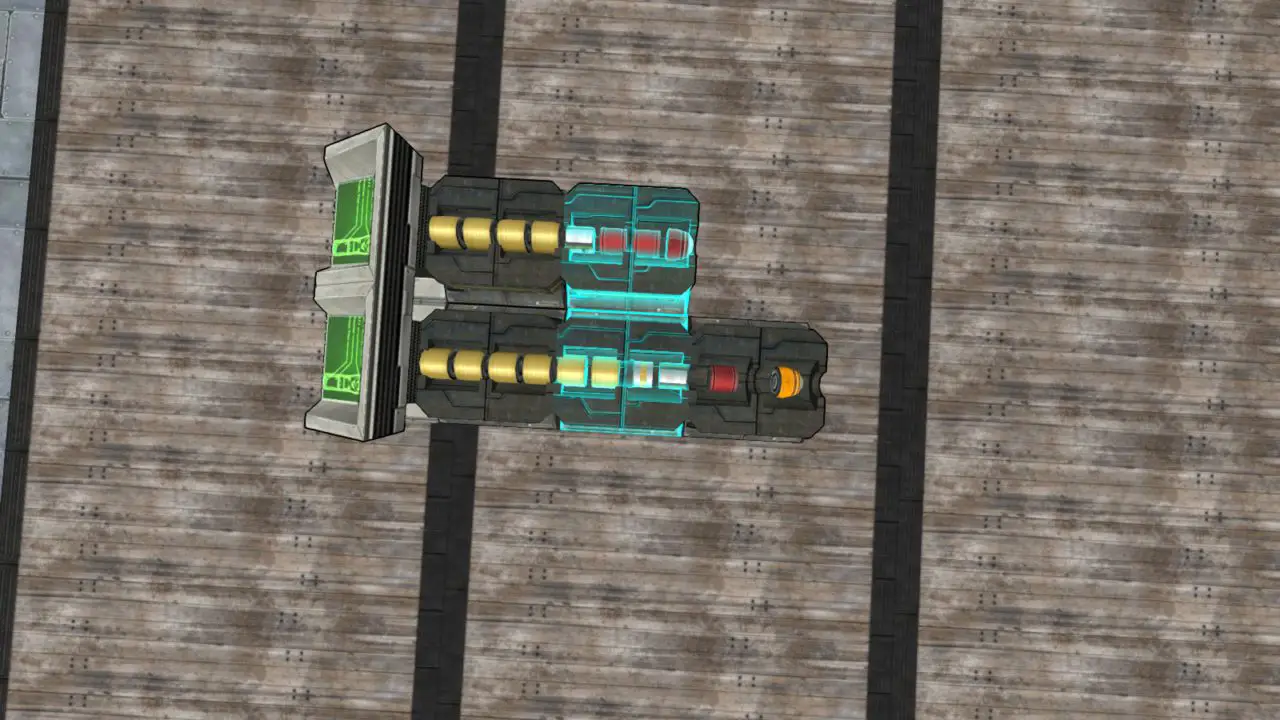
Of course as I mentioned earlier if you want to take a look at what shells I used there’s a screenshot below, the upper shell is used in the 500mm and the lower shell is used in the 100mm. As you can see for the 500 mm I just went for full HE with an intertial fuse, this is the most basic powerful shell you can make but if you’re going up against something with heavier armor you can swap out the nose for a HEAT nose. Meanwhile on the 100mm there’s a combination of HE and Flak with a timed fuse as well as a visible tracer, if you’re going for a CIWS cannon you can swap out the flak head for an HE or Frag head or swap out the HE body for Frag if you’re setting up a pure AA. The shell in the screenshot is a good dual-purpose shell if you stick both an AMCC and a LWC on the same turret, just make sure the AMCC has priority otherwise weird stuff might happen.
That's everything we are sharing today for this From The Depths guide. This guide was originally created and written by Some Random Dude. In case we fail to update this guide, you can find the latest update by following this link.
thanksssss