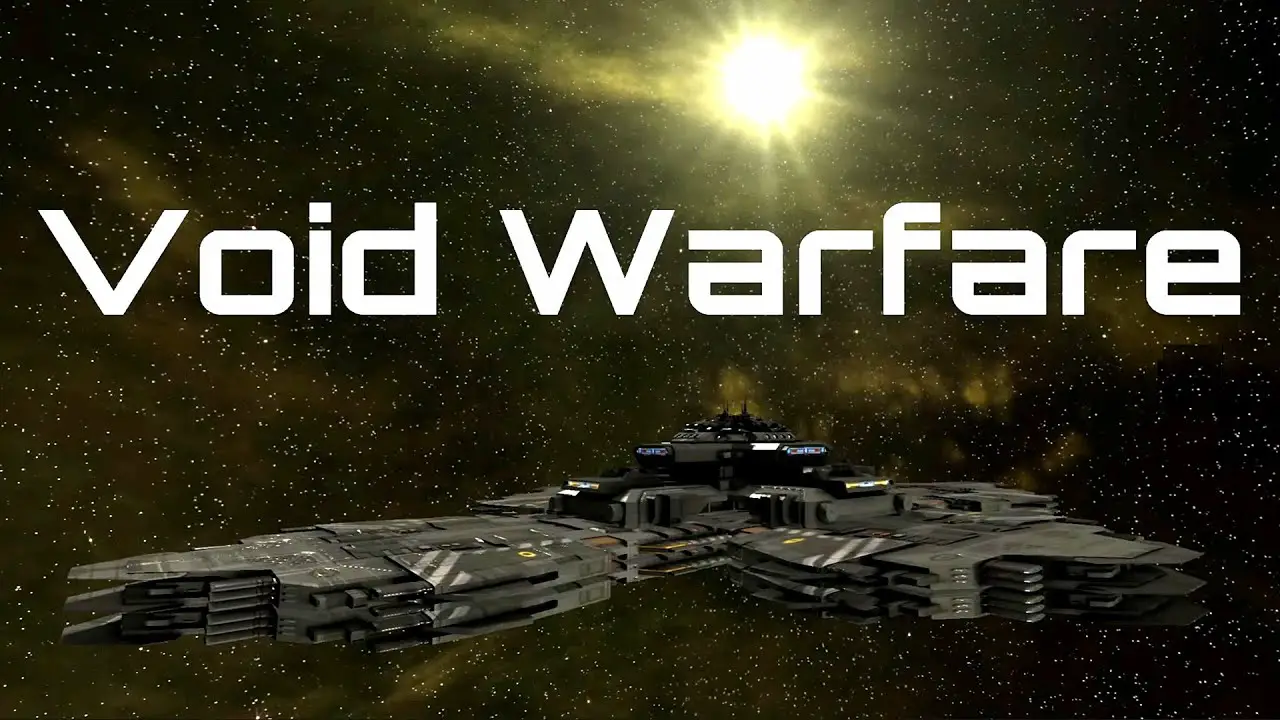
- Titre: Void Warfare
- Date de sortie:
- Promoteur:
- Éditeur:
Information about Void Warfare is still incomplete. S'il vous plaît, aidez-nous à remplir les détails du jeu en utilisant ceci formulaire de contact.
This guide covers the specifics of the Ships in the game Void Warfare, Réalisations, Leaderboards, Strategies of the AI, and things to be aware of during the gameplay.
Game Overview
The basics of Void Warfare is the playing of space battles chosen from a game mode. Game modes are broken down between 4 general areas – through their separation in the menus differs to organize them into their proper Ship Sectors.
- 1 Vs 4: These are all of the Small and Large Missions – pitting you against 4 navires.
- 1 Vs 8: These are all of the Death Match Missions – pitting you against 8 navires.
- 1 Vs 8 X 5 Waves: Wave Endurance pits you against all 5 Ship Lines one after another.
- 1 Vs 40: Battle Royale – You vs every Ship in the game! Enemies in this mode dislike each other also!
Leaderboards sont les suivants:
- Gun Kills – Registers all kills made by the player ship using Gun Weapons.
- Missile Kills – Registersall kills made by the player ship using Missile Weapons.
- Total Kills – Combines all kills made by the player ship using Gun and Missile Weapons.
- Times Killed – Registers how many times the player ship has been destroyed by enemies.
Réalisations sont les suivants:
Every Game Mode has a Minor Achievement for completing the Mode. Larger Achievements can be gained by completing all of the Minors in its category.
Par exemple, Hunter of the Elusive requires Ascik Small, Ertin Small, Ogin Small, Ralloz Small, and Zela Small Achievements to Unlock.
- Hunter of the Mighty requires all Large Game Modes completed/Achieved to Unlock.
- Master Hunter for all Death Match Game Modes completed/Achieved to Unlock.
- Survivor is attained only after defeating the Ogin wave in Wave Endurance Game Mode.
I find your lack of Defense disturbing is attained after defeating the Planetary Defense Station Game Mode while the Ascik line defends it.
- To Hell in Space and Back Again – Surviving the Battle Royale Game Mode as the last ship to coast the void.
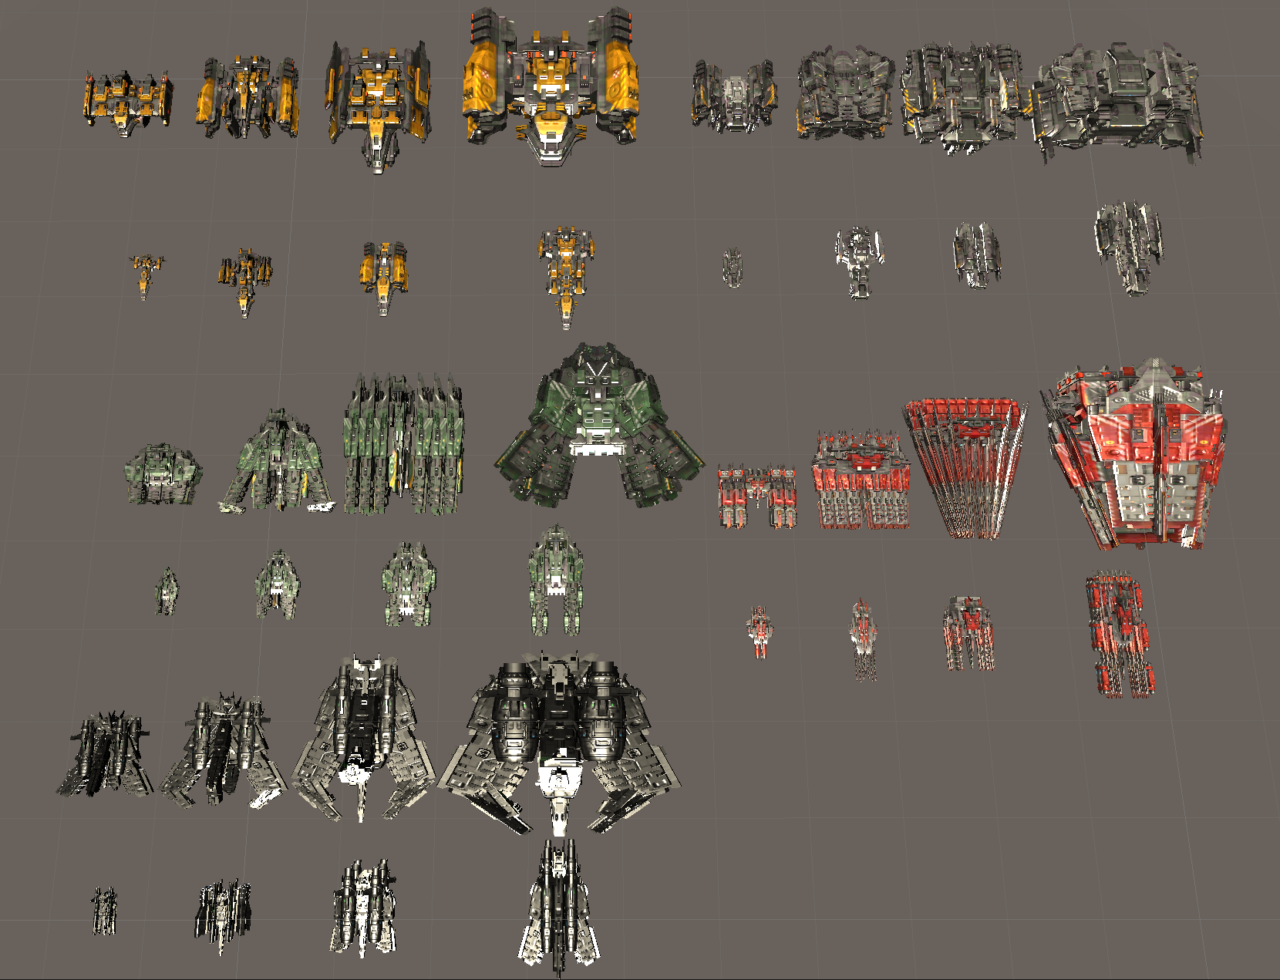
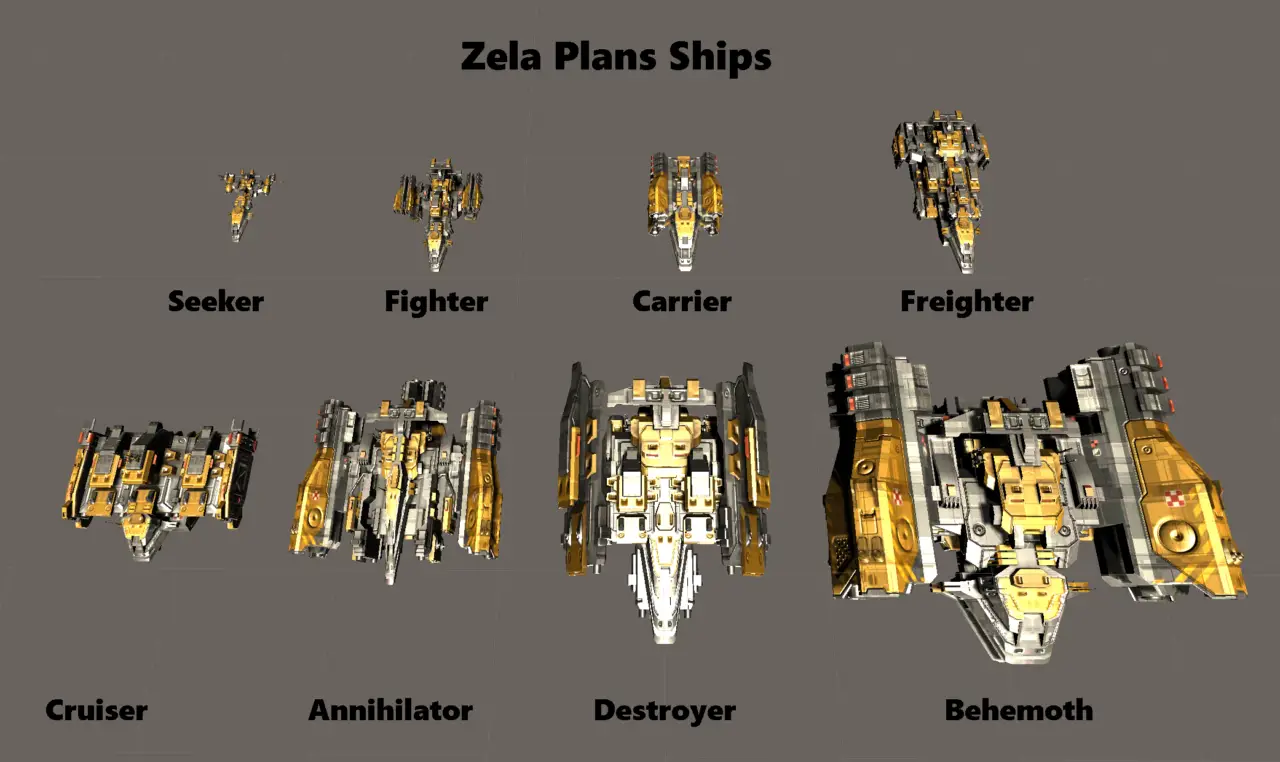
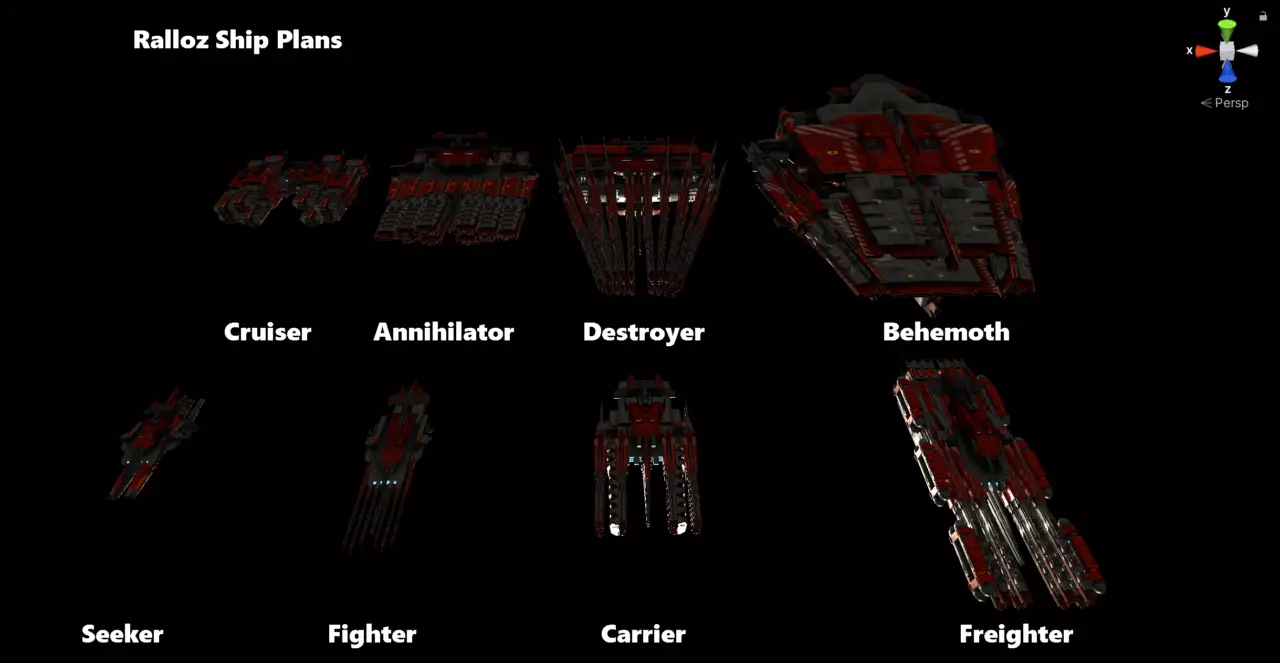
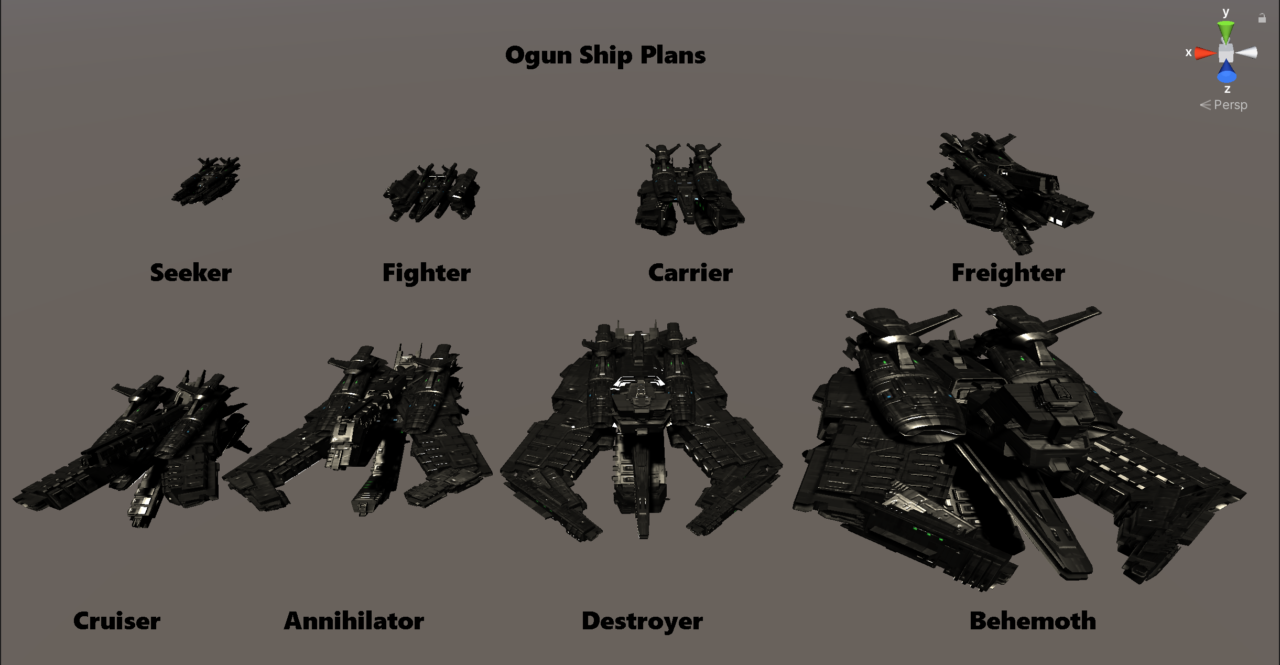
Below shows a comparison of sizes amongst all of the playable ships in the game. In the section for Ship Lines, each Line will be gone over and a picture will clearly show and name each ship in question.
Ship Lines
This Section will cover the different ships in each of their Lines. Information about each will be detailed as well as weapon counts.
Quick Guide to Terms:
- Coque – Ship Armor – s'il atteint 0 your ship explodes and you die.
- Boucliers – Deflection Shielding – can recharge and takes damage before Hull.
- Primary Guns – How many Guns can be used with the ship. (Projectile, Pulse Beam, or Beam)
- Missile Bays – How many Missile bays each ship has. Each Bay has a 5 missile payload.
- Max Speed – How fast the Ship can travel at Max Throttle forwards.
- Max Boost – How fast the Ship can travel at Max Boost Forwards.
- Rotation Allowance – How quickly compared to other Ships this vessel can turn to change direction. +0 is the base rate any ship can normally change direction.
In General, Smaller Ships are faster and more maneuverable than larger ships. Small Ships often avoid damage much easier but can take far less before dying. Ascik is the slowest and least weaponized of the Ship Lines, followed in order rising in power by Ertin, Zela, Ralloz, and Ogin. The Ogin Seeker is far superior to the Ascik Seeker, this allows for those who find the challenge of the better Ogin/Ralloz ships too easy to back off to a less potent ship and test their skills.
ASCIK SHIPS:
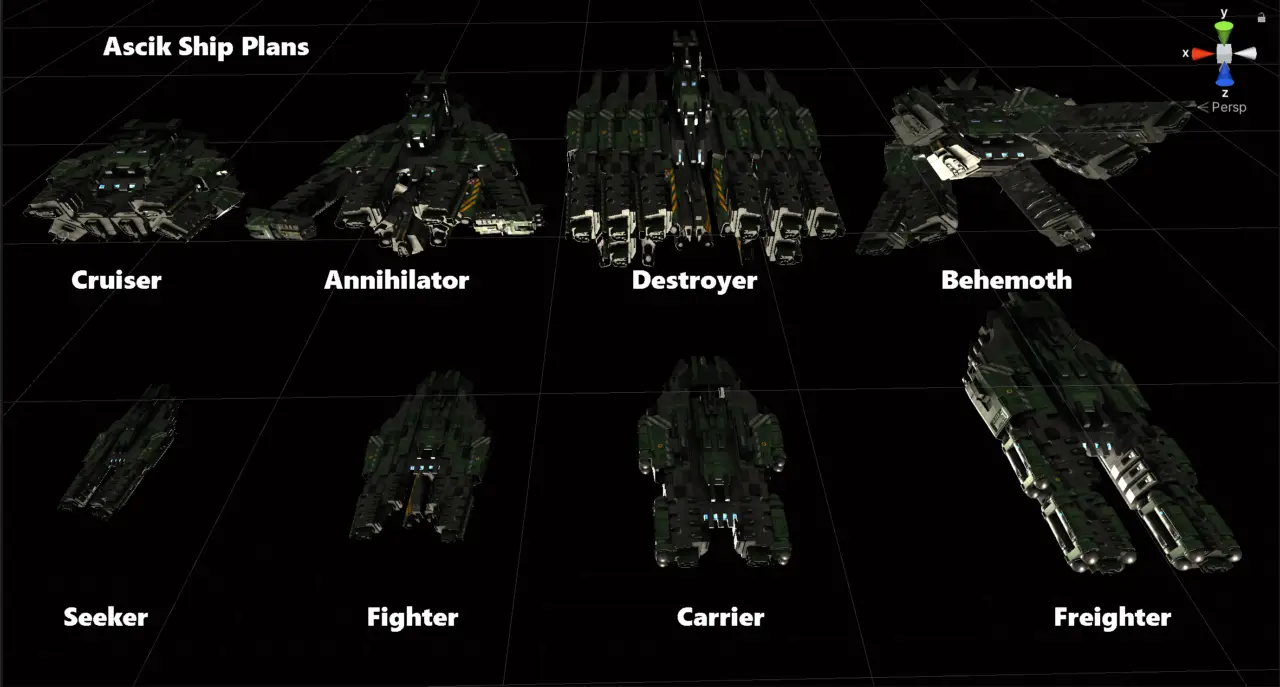
Ascik Seeker
- Coque: 8k. Boucliers: 12k. Primary Guns: 1. Missile Bays: 1
- Max Speed: 500mph. Max Boost: 900mph
- Rotation Allowance: +7
Ascik Fighter
- Coque: 20k. Boucliers: 10k. Primary Guns: 2. Missile Bays: 1
- Max Speed: 475mph. Max Boost: 875mph
- Rotation Allowance: +6
Ascik Carrier
- Coque: 15k. Boucliers: 25k. Primary Guns: 3. Missile Bays: 1
- Max Speed: 450mph. Max Boost: 850mph
- Rotation Allowance: +5
Ascik Freighter
- Coque: 30k. Boucliers: 20k. Primary Guns: 4. Missile Bays: 1
- Max Speed: 425mph. Max Boost: 825mph
- Rotation Allowance: +4
Ascik Cruiser
- Coque: 25k. Boucliers: 35k. Primary Guns: 6. Missile Bays: 2
- Max Speed: 400mph. Max Boost: 800mph
- Rotation Allowance: +3
Ascik Annihilator
- Coque: 40k. Boucliers: 30k. Primary Guns: 8. Missile Bays: 2
- Max Speed: 375mph. Max Boost: 775mph
- Rotation Allowance: +2
Ascik Destroyer
- Coque: 35k. Boucliers: 45k. Primary Guns: 10. Missile Bays: 2
- Max Speed: 350mph. Max Boost: 750mph
- Rotation Allowance: +1
Ascik Behemoth
- Coque: 50k. Boucliers: 40k. Primary Guns: 12. Missile Bays: 2
- Max Speed: 325mph. Max Boost: 725mph
- Rotation Allowance: +0
ERTIN SHIPS
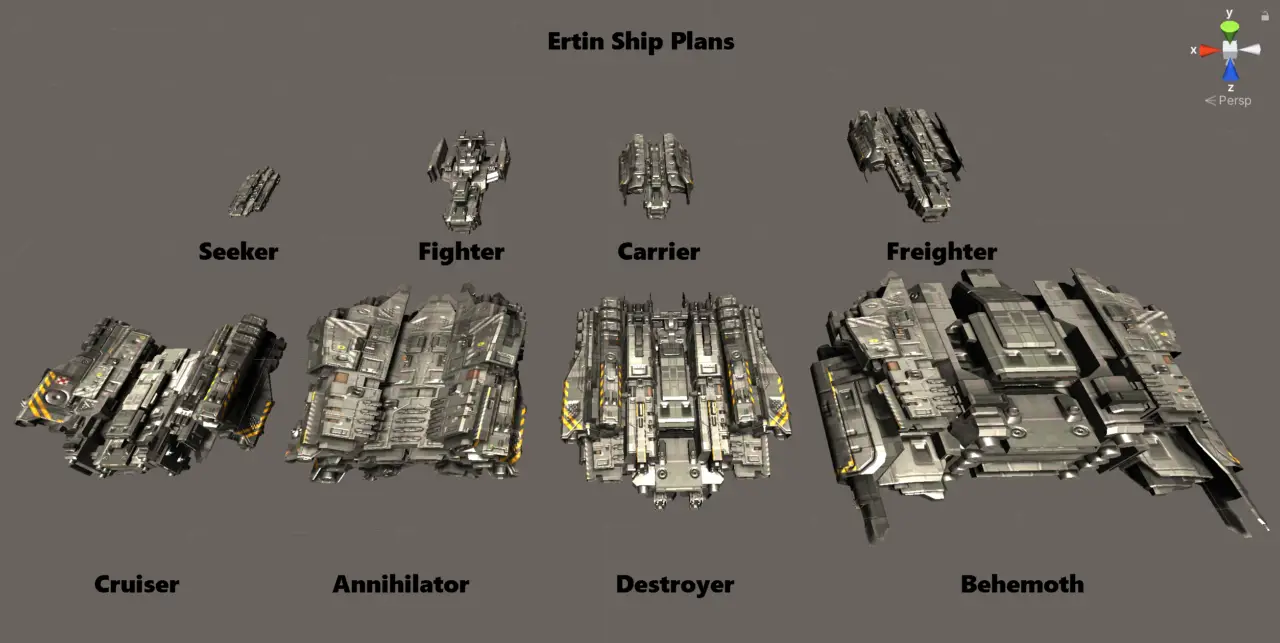
Ertin Seeker
- Coque: 12k. Boucliers: 15k. Primary Guns: 1. Missile Bays: 1
- Max Speed: 525mph. Max Boost: 925mph
- Rotation Allowance: +8
Ertin Fighter
- Coque: 22k. Boucliers: 14k. Primary Guns: 2. Missile Bays: 1
- Max Speed: 500mph. Max Boost: 900mph
- Rotation Allowance: +7
Ertin Carrier
- Coque: 18k. Boucliers: 28k. Primary Guns: 3. Missile Bays: 1
- Max Speed: 475mph. Max Boost: 875mph
- Rotation Allowance: +6
Ertin Freighter
- Coque: 34k. Boucliers: 22k. Primary Guns: 4. Missile Bays: 1
- Max Speed: 450mph. Max Boost: 850mph
- Rotation Allowance: +5
Ertin Cruiser
- Coque: 28k. Boucliers: 38k. Primary Guns: 6. Missile Bays: 2
- Max Speed: 425mph. Max Boost: 825mph
- Rotation Allowance: +4
Ertin Annihilator
- Coque: 42k. Boucliers: 34k. Primary Guns: 8. Missile Bays: 2
- Max Speed: 400mph. Max Boost: 800mph
- Rotation Allowance: +3
Ertin Destroyer
- Coque: 38k. Boucliers: 48k. Primary Guns: 10. Missile Bays: 2
- Max Speed: 375mph. Max Boost: 775mph
- Rotation Allowance: +2
Ertin Behemoth
- Coque: 55k. Boucliers: 41k. Primary Guns: 12. Missile Bays: 2
- Max Speed: 350mph. Max Boost: 750mph
- Rotation Allowance: +1
ZELA SHIPS
Zela Seeker
- Coque: 11k. Boucliers: 22k. Primary Guns: 1. Missile Bays: 1
- Max Speed: 550mph. Max Boost: 950mph
- Rotation Allowance: +9
Zela Fighter
- Coque: 26k. Boucliers: 16k. Primary Guns: 2. Missile Bays: 1
- Max Speed: 525mph. Max Boost: 925mph
- Rotation Allowance: +8
Zela Carrier
- Coque: 20k. Boucliers: 32k. Primary Guns: 3. Missile Bays: 1
- Max Speed: 500mph. Max Boost: 900mph
- Rotation Allowance: +7
Zela Freighter
- Coque: 36k. Boucliers: 26k. Primary Guns: 4. Missile Bays: 1
- Max Speed: 475mph. Max Boost: 875mph
- Rotation Allowance: +6
Zela Cruiser
- Coque: 32k. Boucliers: 40k. Primary Guns: 6. Missile Bays: 2
- Max Speed: 450mph. Max Boost: 750mph
- Rotation Allowance: +5
Zela Annihilator
- Coque: 46k. Boucliers: 36k. Primary Guns: 8. Missile Bays: 2
- Max Speed: 425mph. Max Boost: 825mph
- Rotation Allowance: +4
Zela Destroyer
- Coque: 40k. Boucliers: 52k. Primary Guns: 10. Missile Bays: 2
- Max Speed: 400mph. Max Boost: 800mph.
- Rotation Allowance: +3
Zela Behemoth
- Coque: 56k. Boucliers: 46k. Primary Guns: 12. Missile Bays: 2
- Max Speed: 375mph. Max Boost: 775mph
- Rotation Allowance: +2
RALLOZ SHIPS
Ralloz Seeker
- Coque: 16k. Boucliers: 24k. Primary Guns: 2. Missile Bays: 2
- Max Speed: 575mph. Max Boost: 975mph
- Rotation Allowance: +10
Ralloz Fighter
- Coque: 30k. Boucliers: 20k. Primary Guns: 3. Missile Bays: 2
- Max Speed: 550mph. Max Boost: 950mph
- Rotation Allowance: +9
Ralloz Carrier
- Coque: 25k. Boucliers: 35k. Primary Guns: 4. Missile Bays: 2
- Max Speed: 525mph. Max Boost: 925mph
- Rotation Allowance: +8
Ralloz Freighter
- Coque: 40k. Boucliers: 30k. Primary Guns: 6. Missile Bays: 2
- Max Speed: 500mph. Max Boost: 900mph
- Rotation Allowance: +7
Ralloz Cruiser
- Coque: 35k. Boucliers: 45k. Primary Guns: 8. Missile Bays: 3.
- Max Speed: 475mph. Max Boost: 875mph.
- Rotation Allowance: +6
Ralloz Annihilator
- Coque: 50k. Boucliers: 40k. Primary Guns: 10. Missile Bays: 3
- Max Speed: 450mph. Max Boost: 850mph
- Rotation Allowance: +5
Ralloz Destroyer
- Coque: 45k. Boucliers: 55k. Primary Guns: 12. Missile Bays: 3
- Max Speed: 425mph. Max Boost: 825mph
- Rotation Allowance: +4
Ralloz Behemoth
- Coque: 60k. Boucliers: 50k. Primary Guns: 14. Missile Bays: 3
- Max Speed: 500mph. Max Boost: 900mph
- Rotation Allowance: +3
OGIN SHIPS
Ogin Seeker
- Coque: 20k. Boucliers: 30k. Primary Guns: 3. Missile Bays: 2
- Max Speed: 600mph. Max Boost: 1000mph
- Rotation Allowance: +11
Ogin Fighter
- Coque: 35k. Boucliers: 25k. Primary Guns: 4. Missile Bays: 2
- Max Speed: 575mph. Max Boost: 975mph
- Rotation Allowance: +10
Ogin Carrier
- Coque: 25k. Boucliers: 35k. Primary Guns: 6. Missile Bays: 2
- Max Speed: 550mph. Max Boost: 950mph
- Rotation Allowance: +9
Ogin Freighter
- Coque: 45k. Boucliers: 35k. Primary Guns: 8. Missile Bays: 2
- Max Speed: 525mph. Max Boost: 925mph
- Rotation Allowance: +8
Ogin Cruiser
- Coque: 40k. Boucliers: 50k. Primary Guns: 10. Missile Bays: 3
- Max Speed: 500mph. Max Boost: 900mph
- Rotation Allowance: +7
Ogin Annihilator
- Coque: 55k. Boucliers: 45k. Primary Guns: 12. Missile Bays: 3
- Max Speed: 475mph. Max Boost: 875mph
- Rotation Allowance: +6
Ogin Destroyer
- Coque: 50k. Boucliers: 60k. Primary Guns: 14. Missile Bays: 3
- Max Speed: 450mph. Max Boost: 850mph
- Rotation Allowance: +5
Ogin Behemoth
- Coque: 65k. Boucliers: 55k. Primary Guns: 16. Missile Bays: 3
- Max Speed: 425mph. Max Boost: 725mph
- Rotation Allowance: +4
Armes
Weapons in Void Warfare are divided into two types, Guns and Missiles. Guns are divided into 3 sub-types; Projectile, Pulse Beam and Beam.
Projectile Weapons:
- Avantages: Quick and constant Damage, uses less power to keep active
- Inconvénients: Harder to aim than Beam Weapons
- Vitesse: 500 M/S
- Gamme: 1000 M
- Armor Damage: 1333 DPS
- Shield Damage: 1333 DPS
Pulse Beam Weapons
- Avantages: Easier aim, decent damage for power draw
- Inconvénients: Damage pulses, can take longer to down an enemy
- Vitesse: N / A
- Gamme: 1000
- Armor Damage: 600 DPS
- Shield Damage: 600 DPS
Armes de faisceau
- Avantages: Easiest to aim, great damage when held on target
- Inconvénients: Drains weapon power significantly faster than other Gun weapons
- Vitesse: N / A
- Gamme: 1000
- Armor Damage: 600 DPS
- Shield Damage: 600 DPS
Guns can be mixed and used as the player sees fit based on their play style. If they like to tailgate, having the Projectile Weapons might do more damage consistently. If you have a harder time keeping the sights aimed at the target, Beam weapons often are easier to keep on target.
Missiles
- Avantages: Heat Seeks, Aim Locking, can be fired in volleys of 5 Missiles per Bay on ship
- Inconvénients: Takes some time to reload, will not reload bay unless empty. Different bays can lock at different times – more bays need a hair of delay for multi-lock on confirmation
- Vitesse: 333 M/S
- Gamme: 225 M -1000 M (Any Closer than 225M No lock starts, Further than 1k Lock stops.)
- Armor Damage: 2500 Dmg
- Shield Damage: 2500 Dmg
Dans l'ensemble, Missiles are the bread and butter of major damage in Void Warfare. AI has been designed to be flighty when fired at, some faster ships can do hairpin turns to evade missiles fired in volleys – though not always. Missiles require careful checking on the ship distance in front of you, you need to remain with the Range sweet spot of distance from the enemy to get Missile Lock on the target.
Further information about Combat Ranges and tactics will be covered in the Combat and AI area.
Combat and AI
The Combat and AI Section will cover the ins and outs of Combat vs the AI in the game.
First to consider, distances between you and the ship ahead, speeds of both are needed to be considered. If you chase too fast you will often be too close to get a missile lock on the ship, as well you may end up ramming them and taking unwanted collision damage with them. Very much like driving on a road, keep aware of your surroundings – try to keep mental tabs on where the other enemies are. Keep your speed in check with the enemy you chase. Souvent 500-700 M is solid for distances as if they slow down or boost forward you get time to adjust also without losing your lock on time so far.
The AI itself is programmed to try various tactics in a Squad style effect. The largest and most armed of the vessels tends to be the one who will fly out to about 1000 M away then turn back and let lose a long volley of missiles and a raining of gunfire. Some will go beyond 1000 M to shed lock before turning back. The next largest ships tend to try to Joust or play Chicken with the Player. These ships on occasion will also Ram the player – a knack for doing so if you are lining up a kill shot to save a teammate on their side. The smaller ships are annoying pests, they tend to circle about behind the player and stay on them like Vultures. Deciding which of these pests to remove first can be tricky.
Si vous êtes laissé seul, the far bomber large ship will end up ripping your ship apart. It is often the easiest to assault as it tries to fly away to the largest distance before turning to fire again giving lots of time to chase it and destroy – the issue becomes the other 3 ships following you following the large ship. Due to the long-range bombing of the large ship, the middle Jousters tend to be the better go first – at least one of them. They move around a lot, so the Vulture smaller ship will not have a usual straight line firing path. This also makes the long bomber have difficulties as you move too much to line up from a distance. Most of the pain of this strategy comes from the 2nd Jouster who tends to join the Vulture to keep the player moving too much to get a long time in for missile locks.
Flying sideways with boost is very helpful – along with up or down. If you find you are being lined up by a larger ship; they often miss the initial spray of beams on fire and then correct their aim quickly. This does give you a brief window to react. If you see a battery of lasers over the top of your ship, boost downwards and to the side to get away from its correction immediately.
Do not be afraid to Boost away from thick combat – your shields will regenerate if you do not use Boosts or Gun weapons which both draw off the energy reserves and stop recharging. Aussi, if you are down to a 1 contre 1 but are deathly low; engage the back of the enemy with a cautious approach. Do not run away – likely one or two hits will kill you and you can’t see what is coming running away nor can you regain any Shields if you are Boosting to run away. Plutôt, enfiler’t go nuts on your gun weapons and use them when you feel you have the best chance of doing some damage. Your shields will start going up which will allow you those free hits randomly that can’t be avoided but also buy you the time you need to wipe out the enemy. Even if they are full and you have a tick left – stay on the enemy to get shields back. I have beaten many 1 contre 1’s this way and lost a few when I tried to evade or escape to get shields back.
In the Wave Endurance mode, your best method of approach would be one that you are most comfortable with from your play during Death Match game modes. Après le 8 Ascik ships are down, le 8 for the Ertin line spawn. After them, Zela then Ralloz then Ogin. Quand tout 40 ships are defeated, you complete the game mode. À cause de ça, being defensive while offensive is very key. Picking your chosen opponent might need several dumps of that target for another if the field changes to your choice defensively. This game mode is very tough, requiring the most care and attention of all game modes. Keeping shields higher is a priority here. It is very hard to do, often requiring you to get a few shots off then disengage to do so again for a better angle with less flack on you. Being too quick with these adjustments will only leave you lined up from others so evasion to engagement and back to evasion will be required. If you are being left alone – go nuts and wipe the target out while you have that chance – it will not happen often.
Planetary Defense Station Mode is a fun battle against the Defense Station hovering over the planet. The entire Ascik ship line is guarding this station but is unnecessary to complete the mission – the destruction of the Planet Defense Station is the way to win. It has 500k Shields and then 500k Hull. Pressure will need to be kept upon it. Missile lock on such a large target isn’t required at all, just aim at any broadside of the Station and let loose as long as you are between 225 M and 1000 M from it. Circle the Station, fly up and down as needed to avoid the barrages of weapon fire after you. This mode can be completed in a variety of ways, though pressure on the station directly is often the best result.
Battle Royale Game Mode is for those who want the absolute mayhem of 40 ships at once in 5 groups of 8 all at war with each other and you at the same time. Each faction of ships has a hate list that includes the player, but differing in order of distaste. When you start this mission, a great idea is to go evasive immediately. Enfiler’t fire guns right away or missiles – boost any direction but forward into the thick of it all and get some distance. Some of the initial ships will spot you and chase you – this is what you are looking for. Bring them out some away from the main cluster if possible; not always easy as the other 36 ships are going crazy on each other like a cloud of death beams and missile fire. Try to draw a few away at a time if possible and remove them. Keep shields up just like Wave Endurance – evade if you have to and don’t be scared to get some distance to slowly slip back into the thick. Enemies will destroy each other through missiles, guns as well as collisions with each other and asteroids. Often in this mode, staying alive will gain you more than trying to kill everyone. Enemies can whittle down your opposing side with you; trying to stay off their radar and aiding them will propel you further into the final few remaining more often than an aggressive approach will.
C'est tout ce que nous partageons aujourd'hui pour cela Void Warfare guide. Ce guide a été initialement créé et rédigé par xmxstudios. Si nous ne parvenons pas à mettre à jour ce guide, vous pouvez trouver la dernière mise à jour en suivant ceci lien.