

Ce guide est écrit pour les personnes ayant une expérience ou des connaissances en programmation zéro. Travailler avec IC10 peut être assez intimidant pour quelqu'un de nouveau. Heureusement, Une fois que vous vous êtes habitué à penser aux choses dans un, étape par étape, Faire des chips à faire ce que vous voulez qu'ils fassent est étonnamment intuitif. Ce guide vise à vous amener à ce point.
Installation
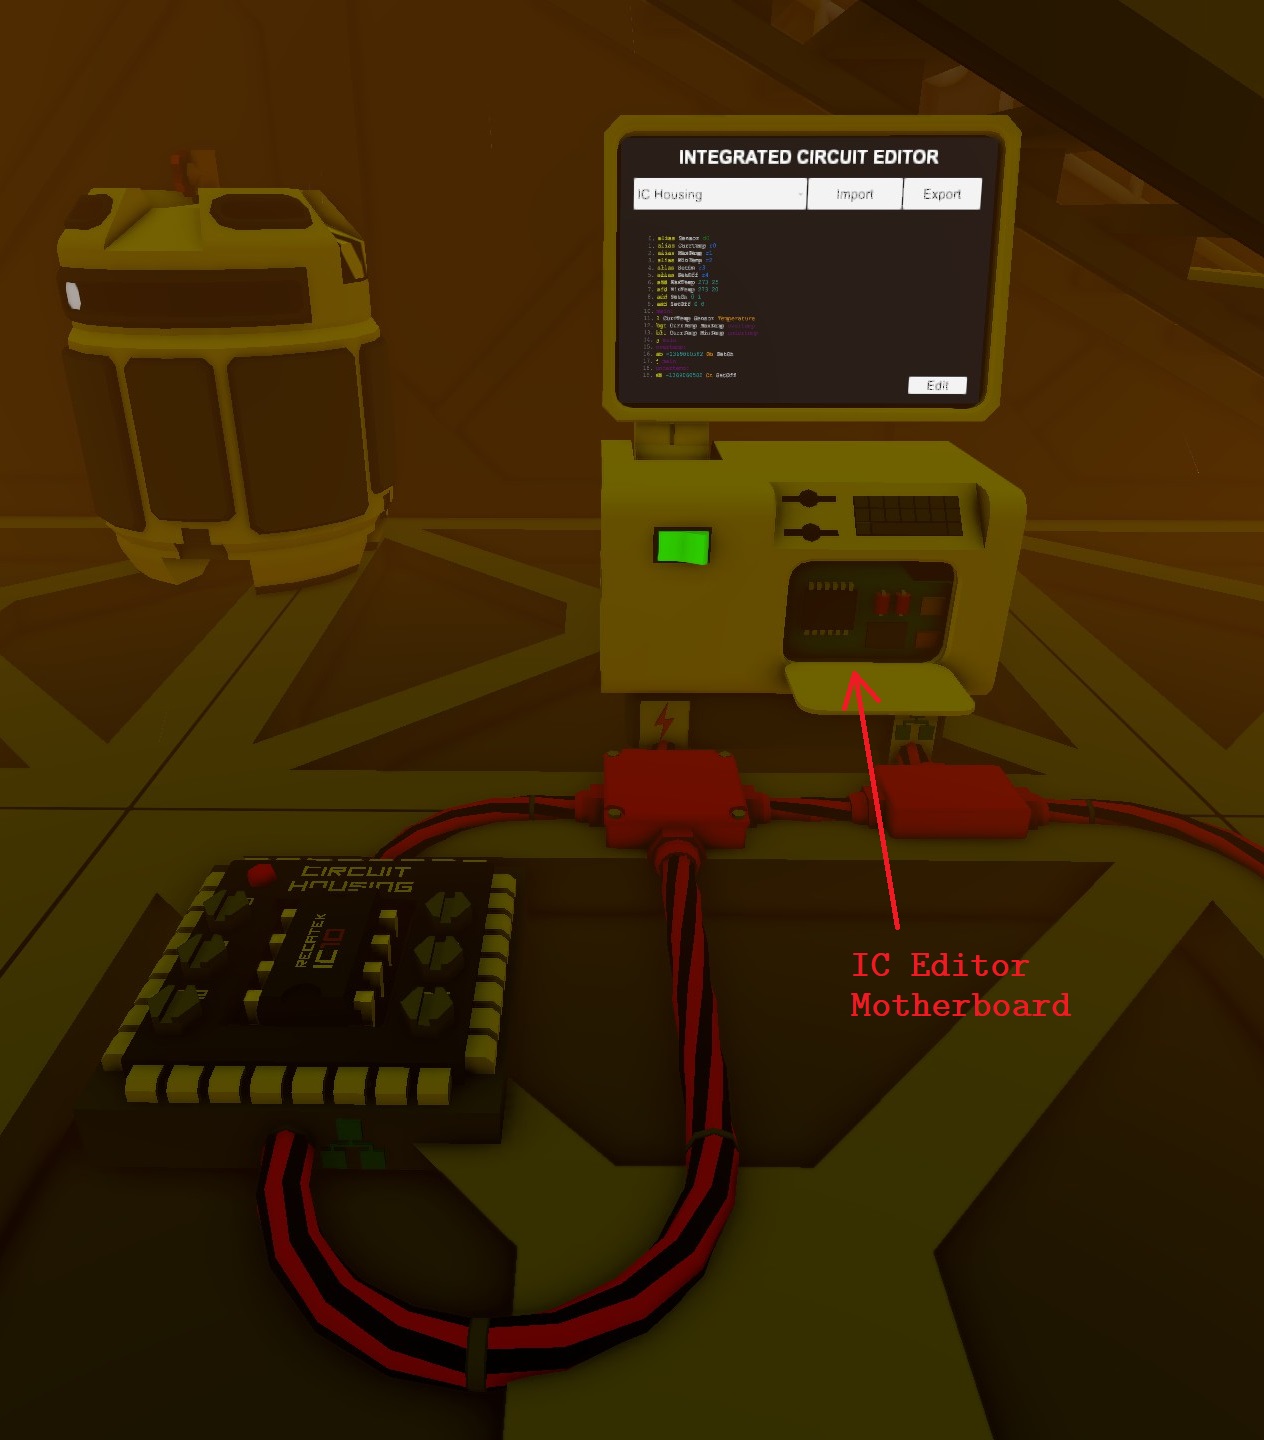
Pour commencer à travailler avec IC10, Vous aurez besoin d'équipements de base:
- Ordinateur
- IC Éditeur de carte mère
- Logement IC
- Puce IC10 (Placer à l'intérieur du logement)
Le logement IC’Le port de données doit être connecté à l'ordinateur’s Port de données, Et les deux devraient être alimentés. Pour la simplicité, Je les câbles tous ensemble sur un réseau séparé. Vous pouvez séparer un réseau du reste de votre base en mettant un contrôleur d'alimentation entre les deux.
Si les deux sont correctement connectés et alimentés, Vous verrez la liste déroulante en haut à gauche de l'écran de l'ordinateur lire « Logement IC » ou tout ce que vous avez étiqueté.
Notez les deux autres boutons: « Importer » et « Exporter ». Le code que vous écrivez dans l'ordinateur est stocké séparément et ne se transforme pas automatiquement sur la puce IC10 actuellement dans le logement. Cliquer sur « Importer » Chargera le code de la puce dans votre ordinateur, Écraser ce que vous avez dans l'éditeur. Cliquer sur « Exporter » Écrira le code de votre ordinateur sur la puce.
Enfiler’T Oubliez de frapper l'exportation chaque fois que vous avez fini de peaufiner votre code.
Enfin, cliquez sur le « Modifier » bouton en bas à droite de l'écran pour ouvrir l'éditeur de code.
Bases
Laisser’S plongez directement dans les choses.

Enfiler’t à s'inquiéter de tous les boutons pour l'instant. Pour comprendre le code, laisser’S Commencez par sa structure.
Le code est écrit comme une série de lignes, l'un après l'autre. Notez les numéros de ligne sur le côté gauche de l'écran. Il est lu de haut en bas. Gardez toujours à l'esprit que c'est exactement ce que fait l'ordinateur. Il lit d'abord la ligne 0 Et fait ce que cette ligne lui dit de faire, Puis passe à la ligne suivante et fait ce que cette ligne lui dit de faire.
Parfois, Une ligne indiquera à l'ordinateur saut à une ligne différente au lieu de la suivante. L'ordinateur lira alors cette ligne à laquelle il a sauté, Faites ce qu'il dit, Ensuite, passez à la ligne suivante, Et ainsi de suite.
En cas de doute, Commencez toujours à la ligne 0, et progressez lentement dans votre programme ligne par ligne. Suivez l'ordinateur’S train de pensée et vous pourrez toujours découvrir vos erreurs.
Notez que certains mots sont dans différentes couleurs. Chacune de ces couleurs signifie quelque chose de spécial. Ils sont un excellent moyen de vous aider à comprendre comment l'ordinateur interprète ce que vous avez écrit.
- Les mots jaunes sont fonctions. Ils disent à l'ordinateur d'effectuer une action spécifique. Souvent, vous devrez donner à une fonction quelques informations supplémentaires, ou arguments.
- Les mots blancs sont noms. Celles-ci aident à vous souvenir du rôle que vous’ve a attribué divers appareils et registres.
- Les mots verts sont ports de périphérique. Ils correspondent à des connexions spécifiques sur l'IC10 logement, Et c'est comment vous connectez la puce à d'autres choses sur le réseau telles que les capteurs, radiateurs et refroidisseurs, et ainsi de suite.
- Les mots orange sont Variables de l'appareil. Ils correspondent à des informations spécifiques qu'un appareil collectionne ou utilise, et ils diffèrent d'un appareil à un appareil. Par exemple, vous pouvez modifier Horizontal et Verticale sur des panneaux solaires pour contrôler où ils sont confrontés, Pendant que vous pouvez lire Température et Pression des capteurs de gaz.
- Les mots bleus sont registres. Ils fonctionnent comme une mémoire temporaire, endroits pour stocker les numéros que vous’RE travaille actuellement avec. Par exemple, Lorsque vous chargez la température d'un capteur de gaz, Vous devrez d'abord le stocker dans un registre si vous souhaitez le comparer avec autre chose.
- Les mots sarcelle sont valeurs. Ce sont des chiffres simples et signifient ce qu'ils ressemblent à dire.
- Les mots violets sont étiquettes. Au lieu de dire à un ordinateur de sauter sur une ligne spécifique, Nous pouvons lui dire de sauter sur une étiquette à la place. Cela nous aide grandement à organiser notre code en donnant des noms à des parties spécifiques.
- Les mots rouges sont des erreurs. Le plus souvent, Vous avez entré quelque chose de mal. toutefois, Parfois, l'éditeur ne fait pas’t reconnaître correctement les étiquettes.
Enfin, Notez les trois boutons en haut à droite de l'éditeur. Ce sont des listes de référence qui peuvent vous aider lorsque vous’re not sure what order to write your arguments in for example.
The most important one is « f », which is a list of functions and the arguments they take.
Dispositifs
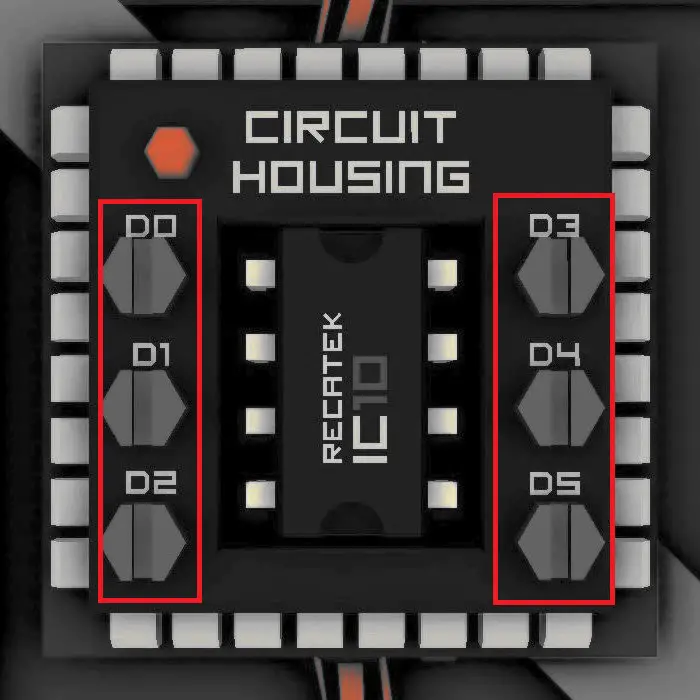
When you connect an IC10 housing to a network, it does not automatically recognize other devices on the network. In order to be able to talk to them in your code, you need to link them to the device ports on the IC10 housing.
This is done by holding a screwdriver and adjusting the screws on the housing. When you hover over each screw, you can see the name of the device that the port is currently connected to, and which one you will switch to if you click on the screw again.
Note that if you have renamed the device ports in your code with the alias function, you will see the port’s name when you hover on it. De la même manière, if you have renamed your devices with the labeler, you will see the device’s new name when you are adjusting the ports.
Code Part I

Tout au long de cette section, je’ll refer to the example script posted above, et seulement celui-là. The line numbers and section labels will always be the same. This script controls a bunch of liquid wall coolers to keep the temperature between 20 degrees Celsius and 25 degrés Celsius.
Laisser’s start from the very top and work our way down line by line.
0. alias Sensor d0
Le alias function simply assigns a name to something such as a device or a register. It is however one of the most useful functions you can use since it greatly helps the organization.
Dans ce cas, we are assigning the name « Capteur » to d0. Remember the previous section on devices? D0 is the device that is connected to the top left of the IC housing. Dans ce cas, Nous donnons l'appareil connecté à cette fente le surnom « Capteur ».
Notez que l'alias ne renomment pas réellement le périphérique connecté à la fente. Vous devez utiliser manuellement un étiqueteur pour le faire. Alias est uniquement à utiliser dans le code que vous écrivez.
1. Alias curtremp r0
Une autre utilisation d'un alias. toutefois, Nous attribuons un nom à un registre. Pensez à un registre comme un tampon à mémo. Il stocke les informations pour une utilisation temporaire. Dans ce cas, Nous allons l'utiliser pour stocker la température que nous obtenons du capteur, Et donc on l'appelle « Currem Temp », ou température actuelle.
2. alias maxtemp r1 3. Alias Mintemp R2 4. alias seton r3 5. Alias Conteff R4
Dans ces lignes, Nous attribuons quelques noms supplémentaires aux registres que nous utiliserons dans le programme. Ce sont les températures maximales et minimales que nous voulons dans la pièce, and the values that we need to store onto a device in order to tell it to turn on and off.
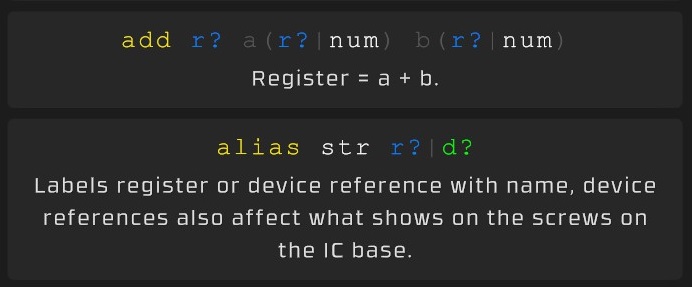
6. add MaxTemp 273 25
Here we get the first real math in the program. Laisser’S décomposer. First though, laisser’s take a look at the description of the function to add in the editor’s own reference guide.
If that seems confusing, enfiler’ne t'inquiète pas. Il’s quite simple once you break it down.
add r? un ( r? | num ) b ( r? | num )
Register = a + b.
The first line describes how you use the function in your code. Dans ce cas, you type « ajouter » d'abord. Then you specify the register (r?). Then you specify a, et enfin, you specify b.
The first register you specify is the location where you want to store the result. Remember that registers are memo pads where you store information. The result of adding two numbers together is useful, but if you want to use it, you need to store it somewhere- usually a register.
un(r? | num) means that « un » peut être un registre ou un numéro. Si vous spécifiez un registre, ajouter prendra le numéro stocké dans le registre. Il en va de même pour « b ».
N'oubliez pas que les registres sont des tampons de notes qui stockent les informations. Le plus souvent, Les registres stockeront un numéro. Donc, si vous inscrivez 4 stocke le numéro 15, et enregistrer 5 stocke le numéro 3, alors:
Ajouter R0 R4 R5
Cela signifie que vous souhaitez ajouter le nombre en R4 au nombre en R5 et stocker le résultat en R0. Après cette ligne, R0 contiendra le numéro 18.
De la même manière:
Ajouter R0 R4 6
Cela signifie que vous souhaitez ajouter le nombre en R4 au numéro 6 et stocker le résultat en R0. Après cette ligne, R0 contiendra le numéro 21.
Dans l'exemple de code, Nous avons utilisé:
6. add MaxTemp 273 25
Cela signifie que nous voulons ajouter 273 à 25, et stocker le résultat en « Maxtemp ». Rappelez-vous plus tôt (en ligne 2) que nous avons aliasé « Maxtemp » à R1. Ainsi, Cette ligne ajoute simplement 273 à 25 et le stocke en registre R1.
C'est ce que nous voulons que notre température maximale soit- 273 + 25 Degrés Kelvin, ou grossièrement 25 degrés Celsius.
7. Ajouter Mintemp 273 20
8. Ajouter Seton 0 1
9. add SetOff 0 0
Idem que ci-dessus. We are storing our minimum temperature of 20 degrees Celsius into register r2, storing the number 1 into register r3, and storing the number 0 into register r4.
Jusqu'à présent, so good. We have just set up the basic numbers we need.
Code Part II
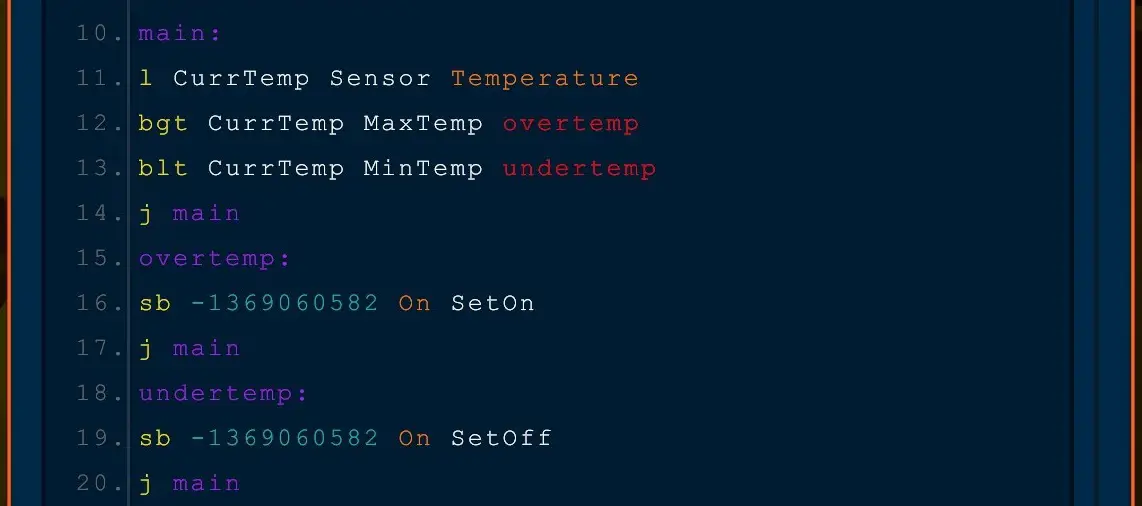
10. principal:
This line is a étiquette. In the following lines of code, if we want to jump back to this location, instead of telling the computer the specific line we want to jump to, we can simply tell it to jump to « principal » plutôt.
11. l CurrTemp Sensor Temperature
This is our first line with two aliases in it, mais ne’ne sois pas confus. Il’s simple instruction.
What the computer is doing is:
- Look for the device « Capteur », which was the alias we gave to d0 in line 0.
- Get the value « Température » from the sensor.
- Store the value into the register « Currem Temp », which was the alias we gave to r0 in line 1.
Après cette ligne, the current temperature that our gas sensor is displaying will be collected and stored into r0, or CurrTemp.
12. bgt CurrTemp MaxTemp overtemp
bgt is a bifurquer fonction, short for bifurquer (si) supérieur à.
The keyword is « si ». If the first argument is greater than the second argument, then the computer will jump to the place that you specify.
Dans ce cas: if CurrTemp is greater than MaxTemp- that is to say, if the temperature that we read from the sensor is greater than the maximum temperature we want, ce qui est 25 degrees celsius- then we want the computer to jump straight to the section called « overtemp ».
Sinon, if CurrTemp is not greater than MaxTemp, the computer will not jump to « overtemp » and instead just go on to the next line.
13. blt CurrTemp MinTemp undertemp
blt is another branch function, short for bifurquer (si) moins que.
Il’s the same deal as bgt, except with less than instead of greater than.
So in this case, if CurrTemp is less than MinTemp- if our current temperature on the sensor is lower than the minimum temperature of 20 degrees Celsius that we want- then we go straight to « undertemp ». Otherwise we simply go on to the next line.
14. j main
This is one of the most important lines in the entire program.
Simply enough, « j » tells the computer to saut to another specific line in the program.
Since we want to monitor the temperature of our room, nous pouvons’t just run it once- the program needs to keep repeating itself over and over again. Each time it repeats, we want it to check the temperature, and then turn on and off the coolers as necessary.
So when we reach the end of the program, we tell it to jump back to the start.
Dans ce cas, we tell it to jump back to « principal », which was labeled on line 10, at the start of this section of the guide. This entire looping part of the program is called the main loop.
We will get here if the temperature is neither above 25 degrees nor below 20 degrés Celsius- happily in between. Dans ce cas, we want to start from the top and check the temperature again, so we jump back to line 10 and restart the program from that point.
Code Part III

15. overtemp:
This is the label « overtemp ». Remember that if the temperature we collected from the sensor in the main loop was greater than 25 degrés Celsius, we told the computer to jump here.
sb -1369060582 On SetOn
This is another function that looks complicated but is actually quite simple.
sb is a function that sets variables on a batch of devices on the network.
Par exemple, if we wanted to tell all the solar panels on a network to turn towards a specific vertical height, we would use this function.
Dans ce cas, Nous voulons dire à tous les refroidisseurs de mur liquide sur le réseau pour allumer, Puisque la température est supérieure à la température maximale que nous voulons.
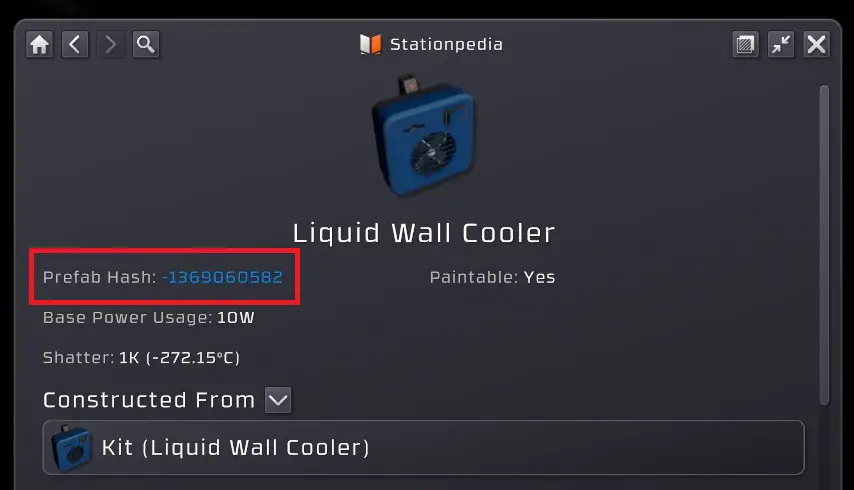
-1369060582 est le hachage préfabriqué de refroidisseurs de mur liquide. Le hachage identifie le taper de l'appareil, pas un objet individuel. Vous pouvez cliquer sur le hachage préfabriqué de couleur bleue pour le copier dans votre presse-papiers, et collez-le dans l'éditeur de cette façon au lieu de la mémoriser et de le taper.
Alors ce que nous disons avec sb est-ce que nous voulons faire quelque chose à chaque appareil de ce type particulier.
Spécifiquement, Nous voulons écrire la valeur du registre « Seton » au « Sur » variable sur l'appareil.
Essentiellement, Afin d'activer et de désactiver un appareil, Nous avons besoin d'écrire les valeurs « 1 » et « 0 » respectivement à son « Sur » variable. Le sb La fonction est un moyen facile de le faire à un lot entier d'appareils avec une puce IC10 sans avoir à utiliser les rédacteurs de lots logiques.
This can get a little confusing, because we will be writing to the same variable of « Sur » on the device later on in the undertemp section.
Que’s just how things are. Il n'y a’t a separate « Désactivé » variable to write to if we want to shut it off. Plutôt, we just have On = 0 for off, and On = 1 for on.
Thus after this line, we will have switched on all the liquid wall coolers on the network.
j main
Encore une fois, we need to monitor the temperature as it changes continually, not just once. Just as before, we jump back to the start of principal, so that we can read the temperature once again, and start the loop from the beginning.
18. undertemp:
19. sb -1369060582 On SetOff
20. j main
This should look familiar by now.
We get to undertemp when the temperature is under 20 degrés Celsius. Dans ce cas, we want to turn désactivé all our coolers. Thus instead of writing SetOn (which has the value of 1) to our wall coolers, we write SetOff (which has the value of 0).
Et enfin, we jump back to the main encore, starting the loop all over.
Analyse
Now that we know what each individual line does, what does the program as a whole actually do?
Laisser’s start off with a room that’s slightly too warm, dire 30 degrés Celsius, and run through the entire program to see what it does.
At the very beginning, the program sets up its aliases and basic numbers (or constants). That part happens as normal.
Now we get to line 11. Since the room is 30 degrés Celsius, the sensor will read 303 Degrés Kelvin, and hence the program will load the value of 303 into CurrTemp.
Now we get to line 12. The program compares CurrTemp to MaxTemp: 303 à 298. Depuis 303 is greater than 298, we branch (ou sauter) to overtemp.
Now we are on line 15 (overtemp), and we move on to line 16. We set all the wall coolers to turn on, and then move on to the next line.
Now we are on line 17. We jump back to main, which is line 10, and move on to line 11.
En attendant, the room has cooled down a bit- laisser’s say to 27 degrés Celsius.
Encore une fois, the program loads the temperature into CurrTemp, ce qui est 300.
Depuis 300 is still greater than 298, it jumps to overtemp again, and turns on all the wall coolers.
Note that during all this time, the wall coolers were still on! There was nothing that told them to turn off, and turning them on while they’re already on does nothing.
Après cela, we go back to the start of the main loop.
Now suppose the room has cooled even more, this time to 24 degrés Celsius.
The program loads the temperature once again, which is now 297.
This is not higher than 298! So the program does pas jump to overtemp.
Plutôt, it goes on to line 13, and compares it to MinTemp- 293.
297 is also pas lower than 293, and so the program moves on to line 14, and starts the main loop all over again.
Note once again that the coolers are still on during all of this time.
Suppose the room has finally cooled down to 19 degrés Celsius.
Once again we load the temperature, ce qui est 292.
This is not higher than 298, and so we do not jump to overtemp.
Cependant c'est inférieur à 293, Et donc nous sautions pour entreprendre.
Maintenant en ligne 19, Nous éteignons enfin tous les refroidisseurs et revenons au début de la boucle principale.
Essentiellement, Ce programme maintient la pièce dans une gamme entre 20 et 25 degrés Celsius. Si c'est fini 25, il le refroidira jusqu'à ce qu'il atteigne 20. Une fois qu'il frappe 20, il ne recommencera pas à nouveau jusqu'à ce que la température passe 25 encore une fois.
Vous pouvez vérifier que vous comprenez comment le programme fonctionne en commençant par une chambre froide sous 20 degrés Celsius qui se réchauffent naturellement, et exécuter les étapes que nous avons faites dans cette section.
Enfin, Vous pouvez vérifier davantage votre compréhension en commençant par une pièce terminée 30 degrés Celsius, Mais au lieu de se réchauffer naturellement, il fait naturellement plus froid à 0 degrés Celsius.
Organisation
Jusqu'à présent, Nous avons appris à lire et à comprendre le code du point de vue de l'ordinateur, et quelques fonctions de base, et comment les utiliser.
toutefois, La chose la plus importante à comprendre est la structure du programme.
Presque à chaque fois, Vous aurez la boucle principale. Pendant cette boucle, Vous lirez les données de divers capteurs et machines. Alors, Sur la base des données que vous collectez, Vous pouvez décider de faire différentes choses, en utilisant les différentes instructions de branche, Et peut-être en utilisant des instructions de magasin pour faire en sorte que d'autres appareils fassent quelque chose. À la fin de tout, Vous sauterez au début de la boucle principale.
La plupart des programmes dans les stationes seront structurés comme celui-ci. Par exemple, avec un programme de suivi solaire, Votre boucle principale sera utilisée pour obtenir les angles verticaux et horizontaux du soleil à partir de capteurs de lumière du jour. Alors vous ferez quelques calculs sur les angles, and use the store batch function to write to the Horizontal and Vertical variables on all the solar panels on the network.
The rest is figuring out what loads and writes to use, which math functions you need, when and how to branch, and then keeping everything tidy and readable.
C'est tout ce que nous partageons aujourd'hui pour cela Papeterie guide. Ce guide a été initialement créé et rédigé par pourquoi le cynique. Si nous ne parvenons pas à mettre à jour ce guide, vous pouvez trouver la dernière mise à jour en suivant ceci lien.
Salut,
I was looking for a detailed and explained example of ic code, and i find yours very clear! Thanks for taking the time to do this.
Great tutorial!
Merci! Очень подробно и понятно.