- Titre: Regions Of Ruin
- Date de sortie:
- Promoteur:
- Éditeur:
Information about Regions Of Ruin is still incomplete. S'il vous plaît, aidez-nous à remplir les détails du jeu en utilisant ceci formulaire de contact.
Want to understand the Tavern Minigame? To find your bounties? To understand some other mechanics in the game? This guide has the most info about the game since there’s a bunch of stuff that can be overwhelming or unclear. Kinda what I do.
Introduction
Tout d'abord, you are not supposed to cut down a tree to get wood. The Hatchet is to kill goblins, keep on going right. Kill the goblins, hit the pile of lumber, and collect the wood you need.
Que’s not what you got stuck on? Non, well good for you. Laisser’s move on then.
This is a good game, but some of the game’s mechanics are a bit weirdly explained or ambiguous so as always; I make a guide about it as I test things and look things up to collect information. Je veux dire, si je’m looking this up then other people are probably too? Droite?
Laisser’s get some controls and mechanics out of the way then.
- You move with WASD.
- Pressing W (en haut) is a jump.
- Space is a Dash forwards, can also be used in the air.
- Press E to interact with objects and NPCs
- Press C to enter stealth mode.
- Press Q to quick heal with healing items in your inventory
- Hold Arrow key down to guard (or left shift)
- Hold Arrow key up to throw an axe (une fois débloqué) (or middle mouse click)
- Press or hold Arrow key left to use quick attack (or left mouse click)
- Press Arrow key right to use a power attack (or right mouse click)
- Press M to open the map
- Press I to open the inventory
- Press P to open the character page
- Press J to open the journal
- Press Enter to comfirm
- Press ESC to open the game menu and to cancel
- Press F5 to quick save
- Press F8 to quick load
Carte, Workers and Quests
The Map and Exploration
When you start the game you only see a limited space, with the rest being hidden in fog. When someone gives you a clue about an area or a quest the location will show up even in the fog. Otherwise you need to use the explore feature to reveal a part of the map and the locations therein.
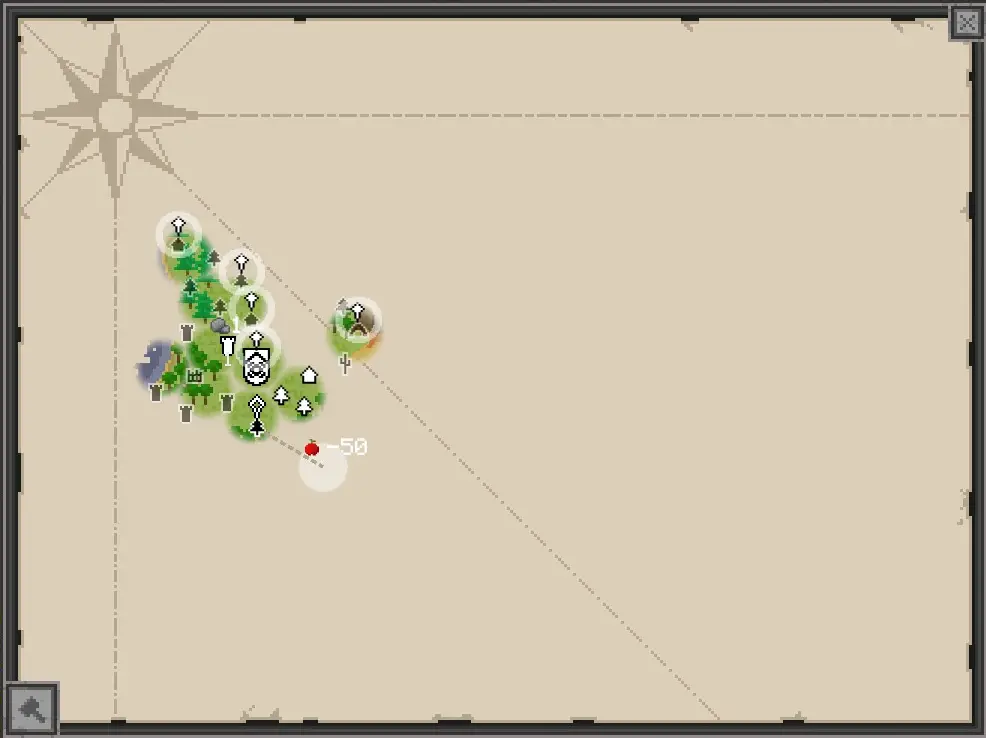
When you explore you choose a location from your settlement and pay a cost in Food depending on how far away it is to reveal a circle shaped area. The size of this area can be increased with the Campfire and the Tavern minigame. When you explore an area you can now access any locations that were revealed.
This picture represents the different levels of the campfire. The final largest circle is a maxed campfire and the Tavern Minigame bonus.
The Map and Icons
On the map there are a number of different icons. These icons give you clues about what you can expect.
The house symbol usually means a farm or similar, usually with an NPC that gives you a quest to clear the location for some sort of reward.
A tower usually means a ruin, these can hold books or be part of a puzzle. Or just an enemy stronghold.
Trees and cacti icons represent forest areas and deserts, they either come in surface level or a mix of surface and underground.
Et ainsi de suite.
Quoi’s worth noting though is that icons with a flashing ring around them are locations that you have been informed about. So you probably have a journal entry about them.
And an area with a Skull is the location of a Bounty you’ve taken from the Tavern.
The large shield like emblems are sieges, j'en reparlerai plus tard.
Workers and Resources
On the map there are different points of interests or Locations to visit. Once you have cleared an area you can also send Workers there to exhaust the resources indicated on the map from the location to your resource storage.
The resources you gather this way can only be gained this way. Il’s not that there’s a pile of 250 wood in a location you visited. Il’s basically the reward for clearing the area.
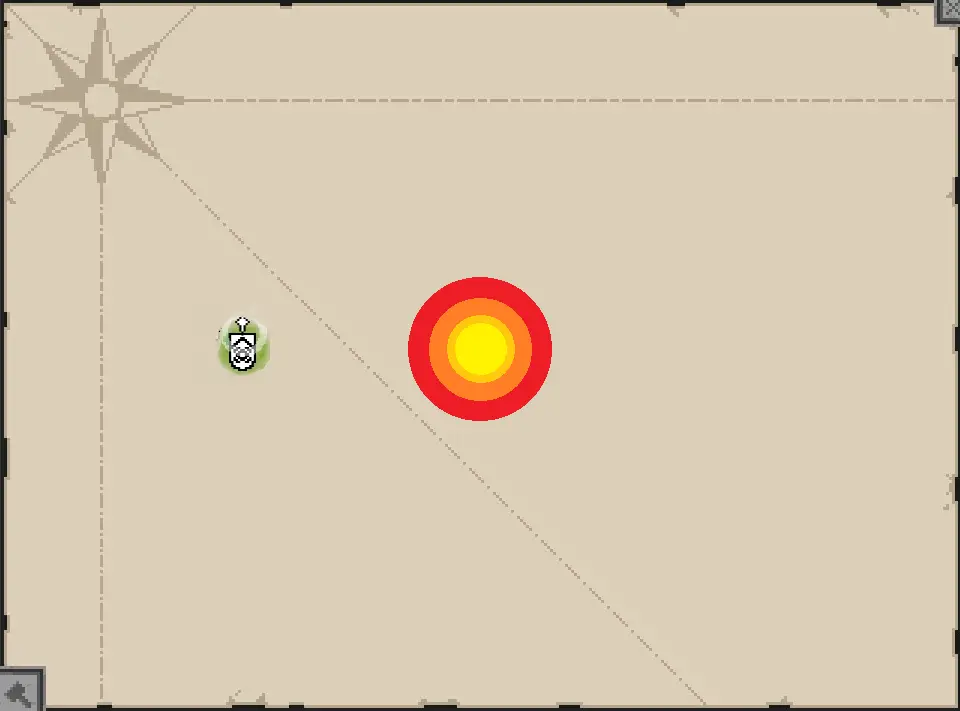
To help you out with this, press the Hammer button in the bottom left of the map screen to get a neat list instead of trying to remember what nodes you’ve taken everything from.
Assign a worker (ou plus) to an location with resources and they will decrease the number from the location and it will be added directly to your resources that you can see if you open the inventory and such. Once the resources have been gathered, the resources do not come back. Toi’ve reaped your reward and is now finished with that place. The more workers you assign to a location, the more of those resources you get each tick. Vous obtenez 1 resource for each assigned worker every 5 secondes.
It may seem slow, as you start with 1 Travailleur, but soon enough you will have 40 of them and simply assigning them to drain a location quickly.
Quêtes
Locations may have quests connected to them. For example there might be a NPC with a yellow exclamation mark above their head. Talk to them and choose whatever option looks unfamiliar and they’ll give you a short description of what to do for their quest.
Most quests are completed in the same location as you got them. On a few occasions you will be asked to go to another location to find something or kill something. Parfois 2-3 locations will be marked on your map and all of those need to be cleared until you are expected to return.
Quest rewards vary greatly here, some being only money, or resources, or sometimes a legendary weapon hidden under a bed.
This is where I plan to include a list of different quests or a map with marks for where there are quests or something.
Combat
Laisser’s talk a bit about combat before moving on.
Attack info
Tu as 2 attacks available Quick Attacks (QA) and Power Attacks (Pennsylvanie), each can be modified by leveling up if you want.
For the basic moves however, here is some advice:
If you QA an enemy with a shield up – you will get stunned.
If you PA an enemy with a shield up – you will deal normal damage and they get stunned.
If you hit an enemy that is making a power attack – it gets interrupted.
If you hit a magic projectile (such as firebolt) – it gets reflected back at them.
If you hit an enemy that is stunned – your crit chance is doubled.
If you hit an enemy in the back – you deal double damage.
If you hit an enemy while stealthed – you will do a surprise attack for « tremendous damage ».
Power attacks deal 3 times the damage of quick attacks.
When an enemy is flashing red before an attack, it means they are getting ready to do a power attack.
Blocking an attack reduces the damage by 90%.
Blocking a ranged attack reduces the damage to 0.
When sneaking, background objects will increase your stealth.
When sneaking, if an enemy is facing your way – you will be detected in a few seconds.
Once you unlock Throwing you can hold down the key to throw it longer and higher, and you can also jump.
With Throwing you can hit enemies even when stealthing.
Different weapons have different attack speeds and such, but in general they act the same and work the same.
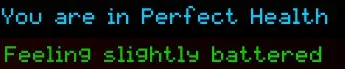
Vous ne’t have a health bar or hearts or anything. But you do have a value of some sorts, but its hidden.
Instead your health is indicated by a message that has different colour. Il y a 11 states in total, so picture that as your current health.
When at full health it will say « You are in Perfect Health », en bleu.
When almost nearly dead it will say « Succumbing to death » in dark red.
If you stay out of combat for 3 seconds your health state will recover.
toutefois, there are also wounds. Minor wounds on the left side in yellow, major wounds on the right side in red.
When you get wounds it will decrease how much your health will recover. So with 1 wound you can’t « In perfect health », it will block that final best state. A single major wound is approximately like 3 mineure.
You can recover wounds by going back to the Settlement and pay the Physician or by using healing items.
How do you get wounds? Well it seems like you get them by taking damage while your state is low. So at perfect health you probably won’t get a wound when hit, but once you drop lower and get hit the chance has increased. (Not sure though, pourrait’t find much info about it.)
Effets de statut: Poison, Burn etc.
These are terrible for you. Vous ne’t get wounds but these also come in different levels of intensity and will decrease your health state slowly. Or fast if it’s a deadly poison for example. When you get these, retreat and wait them out. Or your state will get low and you’ll get a bunch of wounds when you do get hit.
Guérison
Unlike many other games you will be given a lot of loot but not a lot of healing items. Or like, aucun.
Comme mentionné ci-dessus, wait around a bit and your health will start recovering, but only to the point where your wounds stop you. So the healing items removes wounds instead.
- Bandage: Removes 1 Minor Wound.
- Large bandage: Removes 1 Minor Wound and 1 Major Wound.
- Potion de guérison: Removes all wounds and status effects.
- Press the Q key to automatically use a healing item from your inventory.
Endurance
Je n'en ai pas’t really have much to say about this aside from experience and assumptions.
Attacking and dashing costs stamina. In an area without enemies your stamina will not decrease.
There is a yellow bar that pops up when you use your stamina.
Strength apparently increases your stamina.
It seems like if you manage to deplete all your stamina there will be a pause before it starts recovering again. Alors tu peux’t keep on spamming attacks.
Yeah that’s'asseoir, que’s all I’ve managed to understand about the mechanic really.
The Settlement
Your settlement will start with a Campfire. As you progress you will unlock more slots to build buildings on.
The campfire is the centre point, and then there will be 5 slots to the left and 5 À droite.
Most available buildings become available to build slowly but surely simply by building other buildings. But there is also a Runeforge that you get access to once you complete a location, j'en reparlerai plus tard.
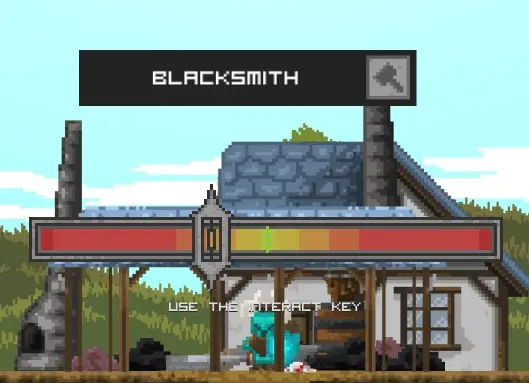
During your quests etc you may also encounter NPCs that join your settlement such as the Blacksmith NPC who can repair your gear, Vous commencez par 2, the Caravaner and the Physician who can heal your wounds etc.
To build a building look for the big floaty Hammer marker in the settlement and press E to open up a window and choose what to build.
Frais
Laisser’s list the building costs and upgrade costs of all buildings.
 10250
10250 150750300
 20010251501005002001200500
 10050
10050 1015050
 505001002502001200200300500
Blacksmith B>1: W25, H10, S50
Blacksmith 1>2:W200, S100, Co20, CB10
Blacksmith 2>3: W500, S250, Co50, IB20
Blacksmith 3>4: W750, S500, Co200, IB100
Blacksmith 4>5: W1000, S800, Co400, IB200
Apothecary B>1: H50, F50, C25
Apothecary 1>2: W150, H100, S20, C100
Apothecary 2>3:W500, S200, C200
Trade D B>1 W150, H50, F100
Trade D 1>2 W400, H200, TB20
Trade D 2>3 W750, H300, IB50
Library B>1 W200, H50, F50, C100
Library 1>2 W500, S500, CB50, IB10
Library 2>3 W800, H100, CB100, IB50
Library 3>4: W1500, H500, CB500, IB200
Training G B>1 W200, H100, S200, BB100
Training G 1>2: W400, H200, S300, SB100
Training G 2>3: W800, H400, S500, AB100
Market B>1 W200, H200, F100
Market 1>2 W500, H300, F100
Market 2>3 W800, H500, F200, TB100
Market 3>4:W1500, H1000, F400, IB100
Refinery B>1: S200, Co50
Refinery 1>2: S300, Co100, TB50, IB10
Refinery 2>3: S500, Co200, TB100, IB50
Refinery 3>4: S1000, Co500, IB200, SB20
Rune F B>1: W200, S500, IB50, BB100
Rune F1>2: S1000, IB100, BB50, SB20
Rune F 2>3: S1500, BB100, SB100, AB10
Total resources needed to build and upgrade all buildings:
Bois:16795
Cacher: 4635
Nourriture: 1360
Pierre: 9870
Coton: 1175
Charbon: 1520
Barre de cuivre: 660
Barre de fer: 1240
Bronze Bar: 350
Steel Bar: 240
Adamantine Bar: 110
Exigences
Et laisser’s show what you need to unlock them:
- Feu de camp (The first building you must build before you can build anything else)
- Forgeron > Raffinerie, Rune Forge(from completing the location « Hidden Cavern »)
- Taverne > Trade Depot, Bibliothèque & Terrain d'entraînement
- Trade Depot > Marché
The Settlement 2
Now for what the buildings do and what the point is of upgrading them.
Feu de camp
You start with this and you use this to level up your character.
Each upgrade will increase the area you reveal when you explore on the world map. It can be upgraded 2 times after building.
Storage Tent
This gives you a chest to store loot as well as increasing the cap of how much resources you can have in total.
Each upgrade increases the max resource cap.
- 0. Max. 50 of each Resource
- 1. Max. 150 of each Resource.
- 2. Max.
- 3. Max.
- 4. Max.
By completing the Tavern Minigame you will further increase the max storage by 1750, so at lvl 4 your total is X.
Taverne
Cela fait 4 des choses. At first level it can do 3 de ceux-ci. There is a chest on the outside that drops money each time you return to the settlement as well as an inside with a recruitable follower. You can also talk to the Tavernkeep to play the Tavern Clicker Minigame (I made an entire section just about that).
Au niveau 2 you can also use the hunting board at the outside to start bounties. J'en reparlerai plus tard.
Upgrading further increases how much gold you gain and how many selections of followers are available inside.
- 1. 1 available followers
- 2. 2 available followers, also adds Bounty Board
- 3. 3 available followers
- 4. 4 available followers

Apothicaire
A crafting station for healing items.
Each upgrade will make more items available to craft.
- 1. Bandage 5 Coton, 2 Cacher
- 2. Large Bandage 20 Coton, 5 Cacher, 5 Nourriture
- 3. Healin Potion 50 Coton, 50 Cacher, 50 Nourriture
Forgeron
A crafting station for equipment and option to dismantle gear into resources. After building this the Blacksmith NPC will also start selling items and give you the Rune Forge quest.
Each upgrade will make more gear available to craft. More on this in a different section.
Trade Depot
A place that has a random merchant when you return to your settlement. There are a number of different sprites for these merchants to hint towards what kind of gear they sell.
Each upgrade will increase the variety and number of merchant that are present at the same time.
- 1. 1 Marchand
- 2. More variety
- 3. More variety and 2 merchants at the same time.
Marché
A place where you can sell your resources for money, or buy resources for money. Quand tu fais, you do it 10 à la fois.
When built you can only buy/sell Wood and Hide.
Each upgrade makes additional resources available to buy/sell.
- 1. Bois, Cacher
- 2. Nourriture
- 3. Pierre, Coton
- 4. Charbon, Minerai
Raffinerie
A type of crafting station where you can create « barres » from ore. Each bar created is a mix of at least 2 different resources. When built you can craft Copper bars and Iron Bars.
Each upgrade makes additional crafting options.
- 1.Copper and Iron
- 2.Bronze
- 3.Acier
- 4.Adamanite
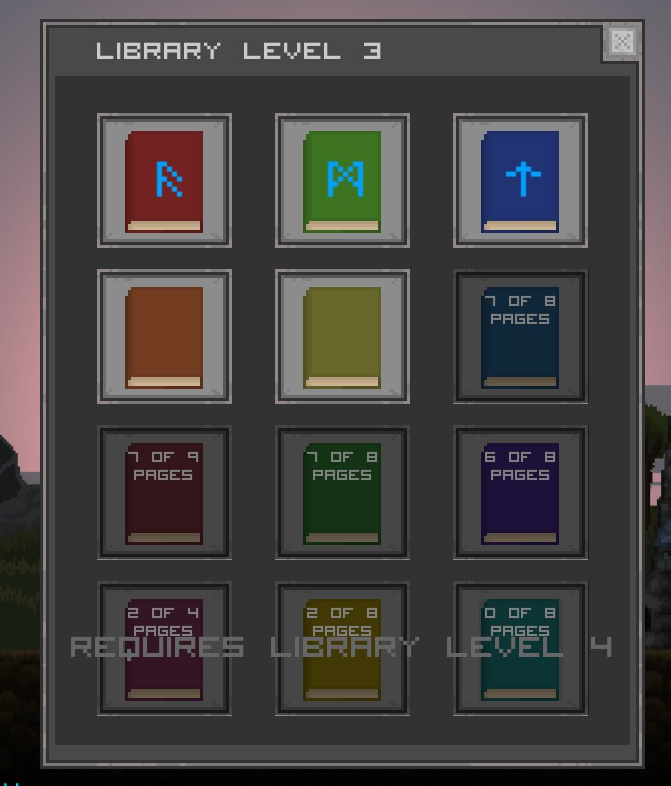
Bibliothèque
A place where you can buy permanent upgrades for your character when you have collected all pages for a tome. The tomes are available in the Journal, but checking the pedestal inside the library is way easier to tell how many you have. When built you can buy upgrades when you have all the pages for the different books inside.
Each upgrade makes it possible to buy upgrades from the next row of 3 books when the pages have been collected.
- 1.+10% Melee Speed, +10% Throwing Damage, +5% All Resistance
- 2. +10% Dégâts en mêlée, +20% Throwing Speed, +10% Max health
- 3. Backstabs to triple damage, lose sneaking visibility twice as slow, stunning is 50% plus efficace
- 4.All melee hits have a 5% chance to KO, can dash while sneaking, invulnerable to stuns
Terrain d'entraînement
A place that adds a stat bonus to your followers when built.
Each upgrade adds a higher stat bonus for your followers.
- 1. + 150% Santé, + 100% dommage, +5% vitesse de déplacement
- 2. + 300% Santé, + 200% dommage, +10% vitesse de déplacement, Pushback immunity
- 3. + 1000% Santé, + 300% dommage, +15% vitesse de déplacement, Pushback immunity, triple projectile firing.
Rune Forge
A place where you can dissolve gear with « magical properties » for Essence. Essance is then added to the Rune Forge to enchant other gear. Double click a piece of equipment to open the Enchant window to « acheter » upgrades for Essence. More on this in another section.
Each upgrade increases the cap of Enchantments you can add to a piece of equipment.
Forgeron, Rune Forge
When you choose to craft an item in the Black Smith you choose an option and an item will be crafted and added to your inventory.
- 1. Craft Leather armor and Sword, Shortaxe
- 2. Craft Iron armor and Greatsword
- 3. Craft Bronze armor and Greataxe
- 4. Craft Steel armor and Warhammer
- 5. Craft Adamantine armor and Poleaxe.
When you craft a piece of equipment a sort of input challenge begins where you need to press the interaction key (E) when the marker is as close to the middle as possible. You do this 4 times and get like +8 near the middle and +4 further out etc.
After doing it your item is created based on the total score I assume. A high score can make the item Blue etc while a low score simply craft the item.
The tavern mini game increases Blacksmith Rolls +1, which I assume means that whatever you get in this challenge is increased by 1 for each of the 4 tentatives. It also adds 50% quality to crafted items.
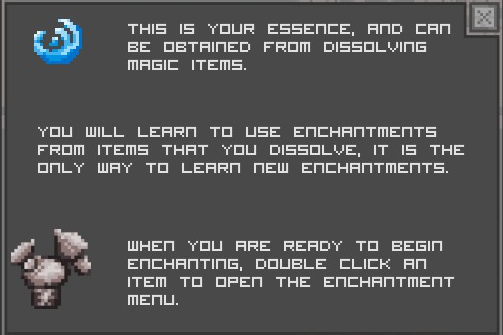
When you Dissolve an item with a magical effect you gain Essence to the Rune Forge.
The type of magical bonus that was on the item will also be added to the list of available Enchantments for the items that you want to enchant.
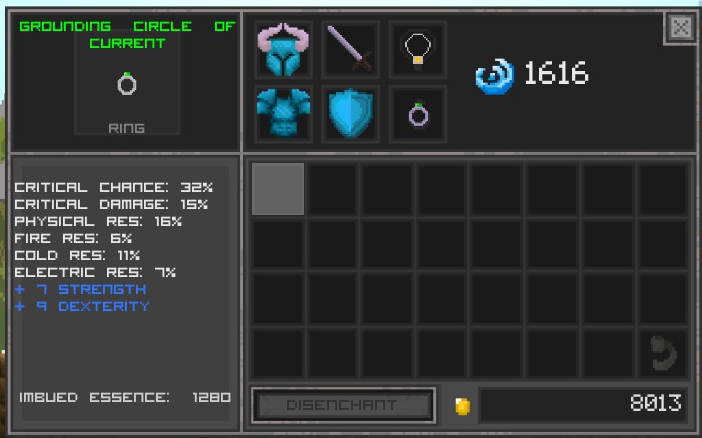
By playing the Tavern Minigame you can double the amount of Essence you gain.
Each level of the Rune Forge has a cap of how many points of enhancements you can add. For me it seems to be cropped however with the single digits missing. Because of my resolution? Pas sûr.
- 1. maximum 1000
- 2. maximum 2000
- 3. maximum 3000
By playing the Tavern Minigame another 1000 can be added. Totaling max 4000 points to enchant at Rune Forge lvl 3.
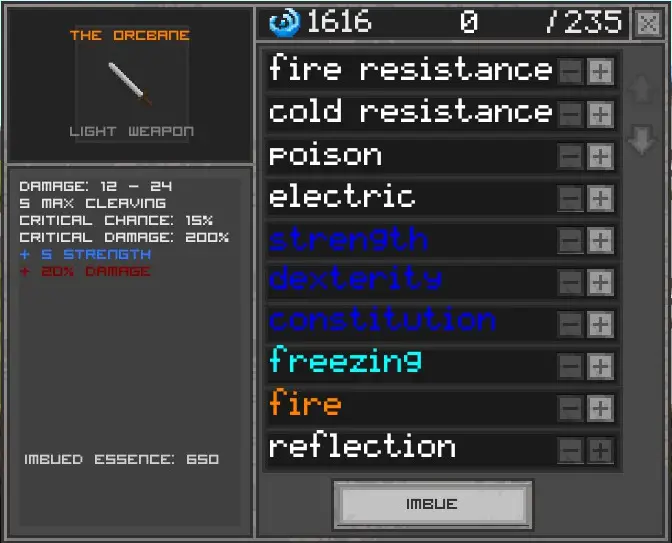
Enchanter
These are the effects you can add to your gear when you Enchant:
- Resistance to elements
- Force +
- Dextérité +
- Constiution +
- Gel
- Feu
- Froid
- Réflexion
- Régénération
- Lancement (Projectile Power)
- Overall Damage (Dommage %)
- Dashing
- Saigner
- Superbe
The frist couple of bonuses are found on blue and green itesm. toutefois, the elemental damage, reflect, régénération, dommage + etc are from orange or purple gear.
Niveler vers le haut
Expérience
There is a white bar below your health state message which shows your current experience points. Once the bar is filled you gain a level up.
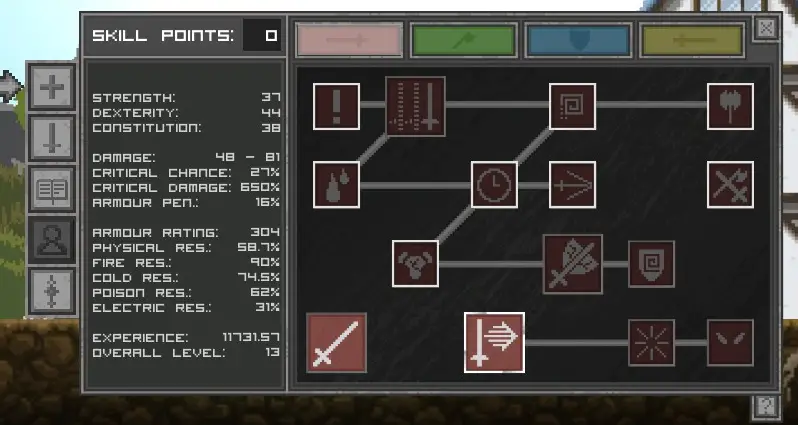
In order to level up you need to return to the settlement campfire and press P. You now choose a stat to increase and then gain 1 Skill point to place in one of the 4 arbres de compétences.
Le 4 skill trees are: Quick Attack, Lancer, Shield and Power Attack.
Noter que (Pour autant que je sache) tu peux’t undo your placed skill points, alors ne le fais pas’t place them into things you aren’t going to use.
Heureusement, most of the skills are really good and not just a marginal increase of something so you can’t really go wrong.
I personally only placed 1 point into Throwing to get the attack, then nothing else there since Throwing only scaled with dexterity and not your weapon.
Stats and terms
Force
Increases damage dealt (10%) et l'endurance
Dextérité
Increases your crit chance(?), dégâts critiques(5%) and the damage of the Throwing attack (10%).
Constitution
Increases your health and your resistances and Stamina recovery(?)
- Cote d'armure – the durability of your armor
- Cleaving – the number of enemies that take full damage from an attack(?)
- Chance de critique – chance to deal critical when attacking
- Dégâts critiques – how much more damage the critical will deal.
- Pénétration d'armure – how much of an enemy’s defense you ignore(?)
- Résistance – Different kinds of resistance does different things. Physical and elemental reduces damage. Poison though, no clue.
- Feu, Gel, Électrique – adds elemental damage. A weapon can only have one of these.
- Poison, Saigner – adds chance to give a status effect.
- Étourdir – adds a chance to stun when attacking.
- Projectile damage – increases throwing damage
- Réflexion – chance to hurt attackers (?)
- Régénération – how fast you heal when out of combat (?)
- Dommage + – adds a percentage bonus to your damage
- Tiret – ???
You can equip 6 équipement. Barre, Armure, Bouclier, Arme, Amulet and Ring.
The colour of the text marks how powerful the gear is.
- White is normal
- Blue has a single magical effect
- Green has a better magical effect or several. Sometimes a special effect.
- Orange has several magical effects and usually have special ones.
- Purple are pretty much preset from what I can getter, like orange but better.
Sieges and Bounties
At Map Locations with a large shield like emblem you will participate in a Siege.
In a Siege you will fend of waves of enemies to win the siege and gain the reward.
Before you start the Siege you may build walls. Press the hammer button at the top of the screen to get the outline of a wall. Press Up to toggle between different wall types. A small wooden wall (W30) large wooden wall (W200) and large stone wall(W200). To place them you need to pay the resources.

When you are ready you press the start button at the top of the screen. The button will change into a timer to show you when the next wave of enemies will spawn.
Enemies will spawn from both sides of the map and move towards the player. Defeat all the waves of enemies to get the reward.
What do you get? Well it depends on the siege. But in general you get some crates with resources, usually stone, wood and food. As well as a chest with a high chance of an orange drop.
Et hé, you can always complete these again to get the rewards again! More experience and resources!
After upgrading the Tavern to lvl 2 you can take up to 3 Bounties from the wanted poster outside the Tavern.
The wanted poster will show the enemy type, the area they’je suis dedans, an average difficulty as well as the reward.
Note that since the bounties will appear in areas you have previously completed your pool of available targets may change as well(?)
Go to the area indicated (marked with a Skull on the mini map) and defeat the now spawned target along with a few ordinary enemies as well.

After defeating the named enemy, return to the settlement and talk to the Tavernkeep to get your reward!
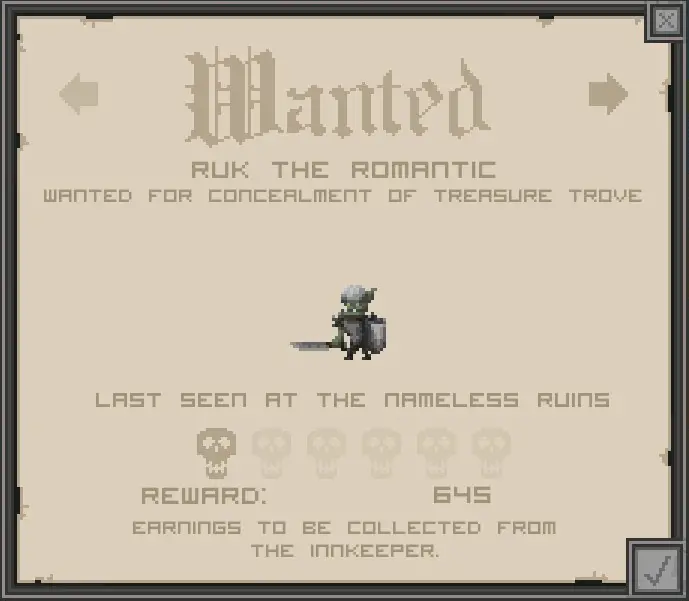
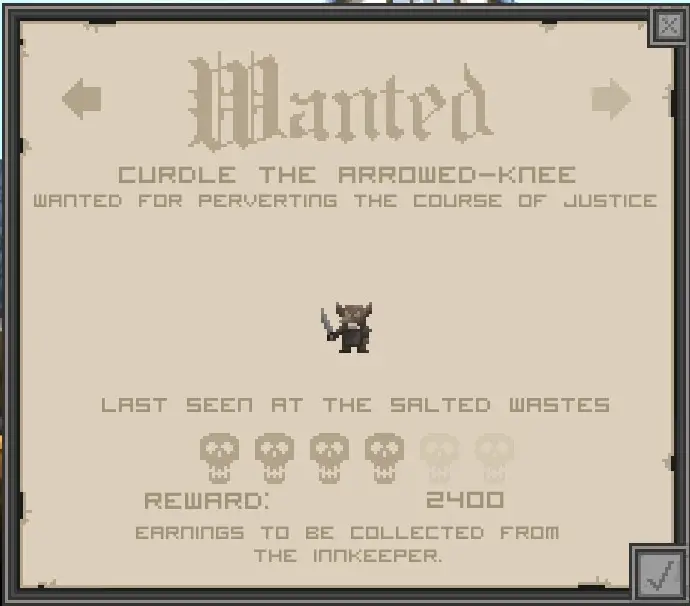
Completing Bounties is a good way to earn money and experience.
Tavern Clicker Minigame
This is a minigame in the game that will grant bonuses for the game itself when you unlock the mini game’s trophies.
The minigame can be played by building the Tavern, entering the building and choosing « Jouer » from the tabernkeeper’s dialogue menu.
Avant de commencer
je’m just going to say this from the start, là’s no point in playing the mini game right away. Wait until you have unlocked more Cards. « What Cards? » tu demandes? Bien, after building the Tavern each additional building you builf will unlock a Card. You start with Copper, then get Iron, Bronze, Argent, Or, Arcanite.
So wait until you have Bronze or silver before doing anything. Or until you have all of them.
« Why though? » You may ask, well because you only get rewards when you complete the trophies, and earing them requires you to unlock more upgrades etc first.
Ce qu'il faut faire
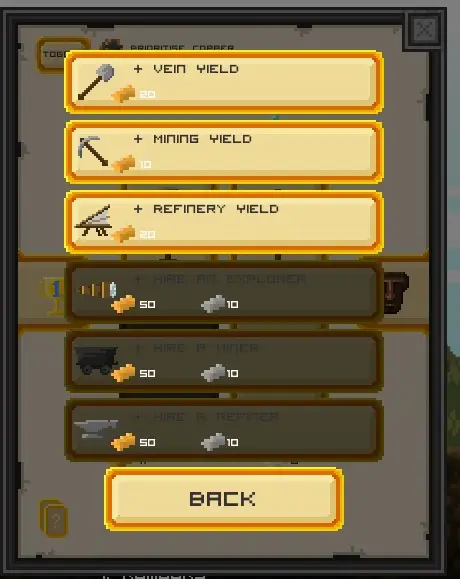
Starting off you have 4 buttons that looks like this:
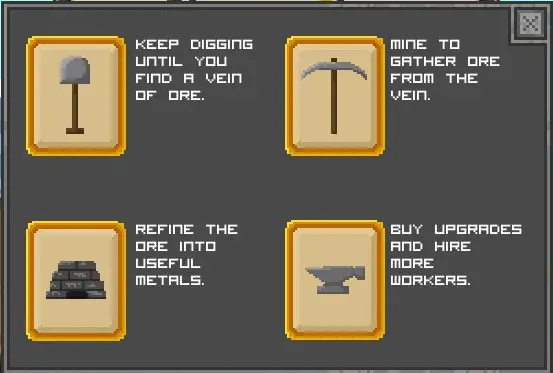
The Shovel is Explore, the Mining Pick is Mine, the Forge is Refine, the Anvil opens a upgrade menu for the minigame.
Note that this is a mini game, none of the ore or bars you get in the minigame is transfered to the game, il’s only for the minigame. The only reward is the bonuses from the trophies.
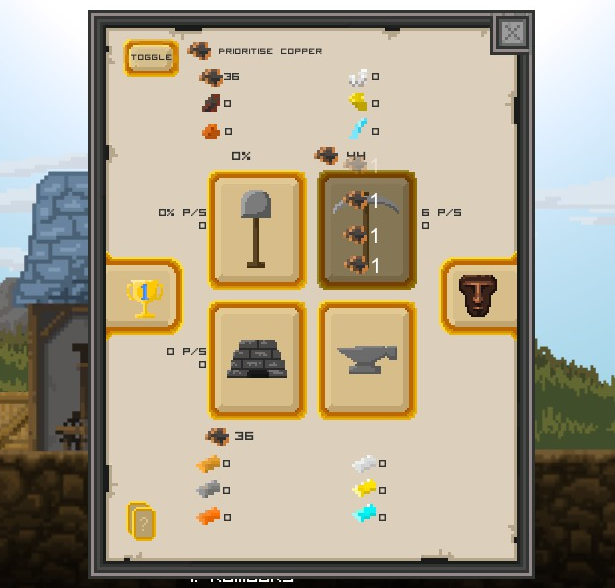
D'accord, so starting off your stats will be horrible and you will need to click manually on each button. Once you get Iron you can get « Ouvriers » on each of the 3 buttons to automate the process. The more workers, the faster it gets.
Étape 1: Explorer
Click the button until it reaches 100%, you will then get a message that you « found X deposit ».
Étape 2: Exploitation minière
Click the button to turn a certain number of deposit into ore.
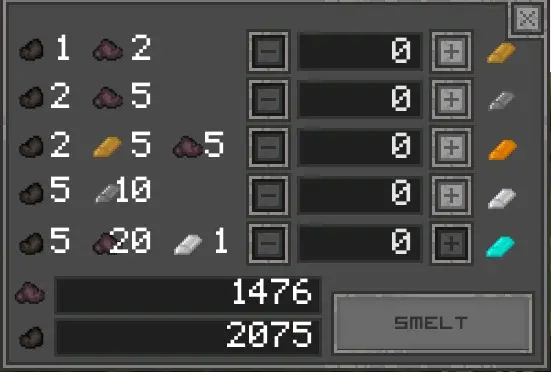
Étape 3: Refine
Click the button to turn a certain number of ore into bars.
Étape 4: Repeat or upgrade.
Open the forge menu to buy an upgrade or keep clicking for more resources.
Que’s the mini game really.
More stuff
Aside from these obvious things you can change the top menu « Prioritized ore » to change the priority for what will be used for the Mine and Refine. It will not make them pop up more often in Explore, il’s just to ensure that you are processing the resources you actually want.
The right hand side has « Artefacts », another upgrade menu really but with better overall bonuses. These are worth getting, get these fast.
The left hand side has « Trophées » where you can see the different trophies you can unlock by playing the mini game and what kind of real game bonus you unlock. All of these are worth getting, sauf 5 workers possibly. These unlock automatically when you fulfill the goals indicated.
Procédure pas à pas(?)
D'accord, alors laisse’s explain how to do this. I will just assume that you have gotten the Iron and Bronze cards already before starting. It will probably take like 1-3 hours to complete all trophies.
Keep mashing Explore to get copper deposit, turn those into ore and then bars and upgrade everything you can until you need Iron as well.
To speed this process up, both mash the Enter key and the mouse key to get twice the input.
If you reach the cap of all upgrades then just keep mashing away on the explore button until you are lucky and get an iron deposit.
Some people have reported that the more explores they did in one sitting (without exiting the minigame) they would get newer ores faster. Others say that your cps (clicks per second) affects what deposits you get, which is probably more true. Both works though, eventually you will get the new ones if you have the card. Notez également, that even if you have Iron – but still have Copper as your priority the picture for the iron deposit won’t show until you’ve exhausted all the copper, so change the priority.
I would also advice you to invest your first batch of Iron Ore into the Automatic Explore, that stuff is horrible to press, et ça’s also cheaper.
What about those upgrades?
La première 3 increases how effective the different buttons are. Donc, you get a higher number of deposits, you convert a higher number of deposits into ore, you convert a higher number of ore into bars.
Le prochain 3 are the automated workers. More automated workers means less clicking, il’c'est génial.
Alors oui, use that iron and upgrade everything, maybe you start getting Bronze before you finish, peut-être pas. Also remember to change the prioritized ore at the top to ensure that you are processing the kind you want and not your copper.
Then what?
What happens next is the following:
Each upgrade for the minigame will upgrade a few times before requiring the next tier of bars.
So Copper > Fer > Bronze > Argent > Or > Arcanite.
The more you upgrade, the more you get higher tier ores, and a larger number of them as well.
At first you upgrade with only Copper, then Copper and Iron, Then Copper, Iron and Bronze.
Simple and clean right?
Next up though, we shift things along so you now need Iron, Bronze and Silver. Then Bronze, Silver and Gold etc.
So there will be a point where you just don’t need any more Copper or Iron.
Keep on getting the upgrades, let the automation do its work and help and from then and then. Also remember the Artifacts for the big bonuses.
Instead of getting and converting like 10 of something you will suddenly deal with 200 à la fois, and the automatation means you can just keep the game on for 30min and grab a sandwich.
Eventually you will complete all the trophies which are all really based on upgrading the mini game. More workers to increase the rate, higher numbers from upgrades, and easier to amass 1 million of each resource.
What do I actually get?
Not gonna list what you need to do to get each of these since you can see that in game by hovering the mouse over it.
But when you have unlocked all of the trophies this is what you get:
- Resource Storage Increased by 1750
- Explore rate (the size of the area you reveal when you explore) is increased by 30%
- 5 Workers for your settlement
- 50% discount on all purchase from merchants (note, this is not reflected on the price seen in the shop).
- 50% discount at the Market (note, this is not reflected on the price seen in the market)
- 2x resources from your refinary (note, this is not reflected in the crafting window)
- 2x Essence when dissolving magical items at the Rune Forge
- +1000 essence to enchant at Rune Forge
- Triple the Drop Chance for Book pages (great if you’re going for the Library bonuses)
- Double health and damage of all companions
- +1 Blacksmith Rolls
- 50% more quality on forged items
C'est tout ce que nous partageons aujourd'hui pour cela Regions Of Ruin guide. Ce guide a été initialement créé et rédigé par PRPL_MAGE. Si nous ne parvenons pas à mettre à jour ce guide, vous pouvez trouver la dernière mise à jour en suivant ceci lien.