- Titre: Havsala: Into the Soul Palace
- Date de sortie:
- Promoteur:
- Éditeur:
Information about Havsala: Into the Soul Palace is still incomplete. S'il vous plaît, aidez-nous à remplir les détails du jeu en utilisant ceci formulaire de contact.
In order to obtain all the achievements, you will need to do 2 parties de jeu, each of them awarding two mutually exclusive achievements. One of these playthroughs has to be hint-free, in the other one you will need to use at least 5 conseils. One of these playthroughs requires you to answer all the quiz questions correctly, in the other one you will need to fail them all. One of these playthroughs must be done in one go.
This guide aims to obtain all possible achievements in the first playthrough (including playing it without hints and answering all the quiz questions correctly), and use the second playthrough as a « clean-up » run for the missing ones.
Chapitre 1: Phryne
– bottom left drawer: pick up the bribe for the crow
– on the left leg of the desk there’s a little compartment that you can open; pick up the note inside it
Front side of the room -> Left painting
– pick up the note behind the painting
Front side of the room -> Left bookcase
– read all the books; click on the highlighted pages to add notes to the diary
– click on the hanging plant to reveal a tetradecahedron-shaped cube, then click on door 4 to grab the nails
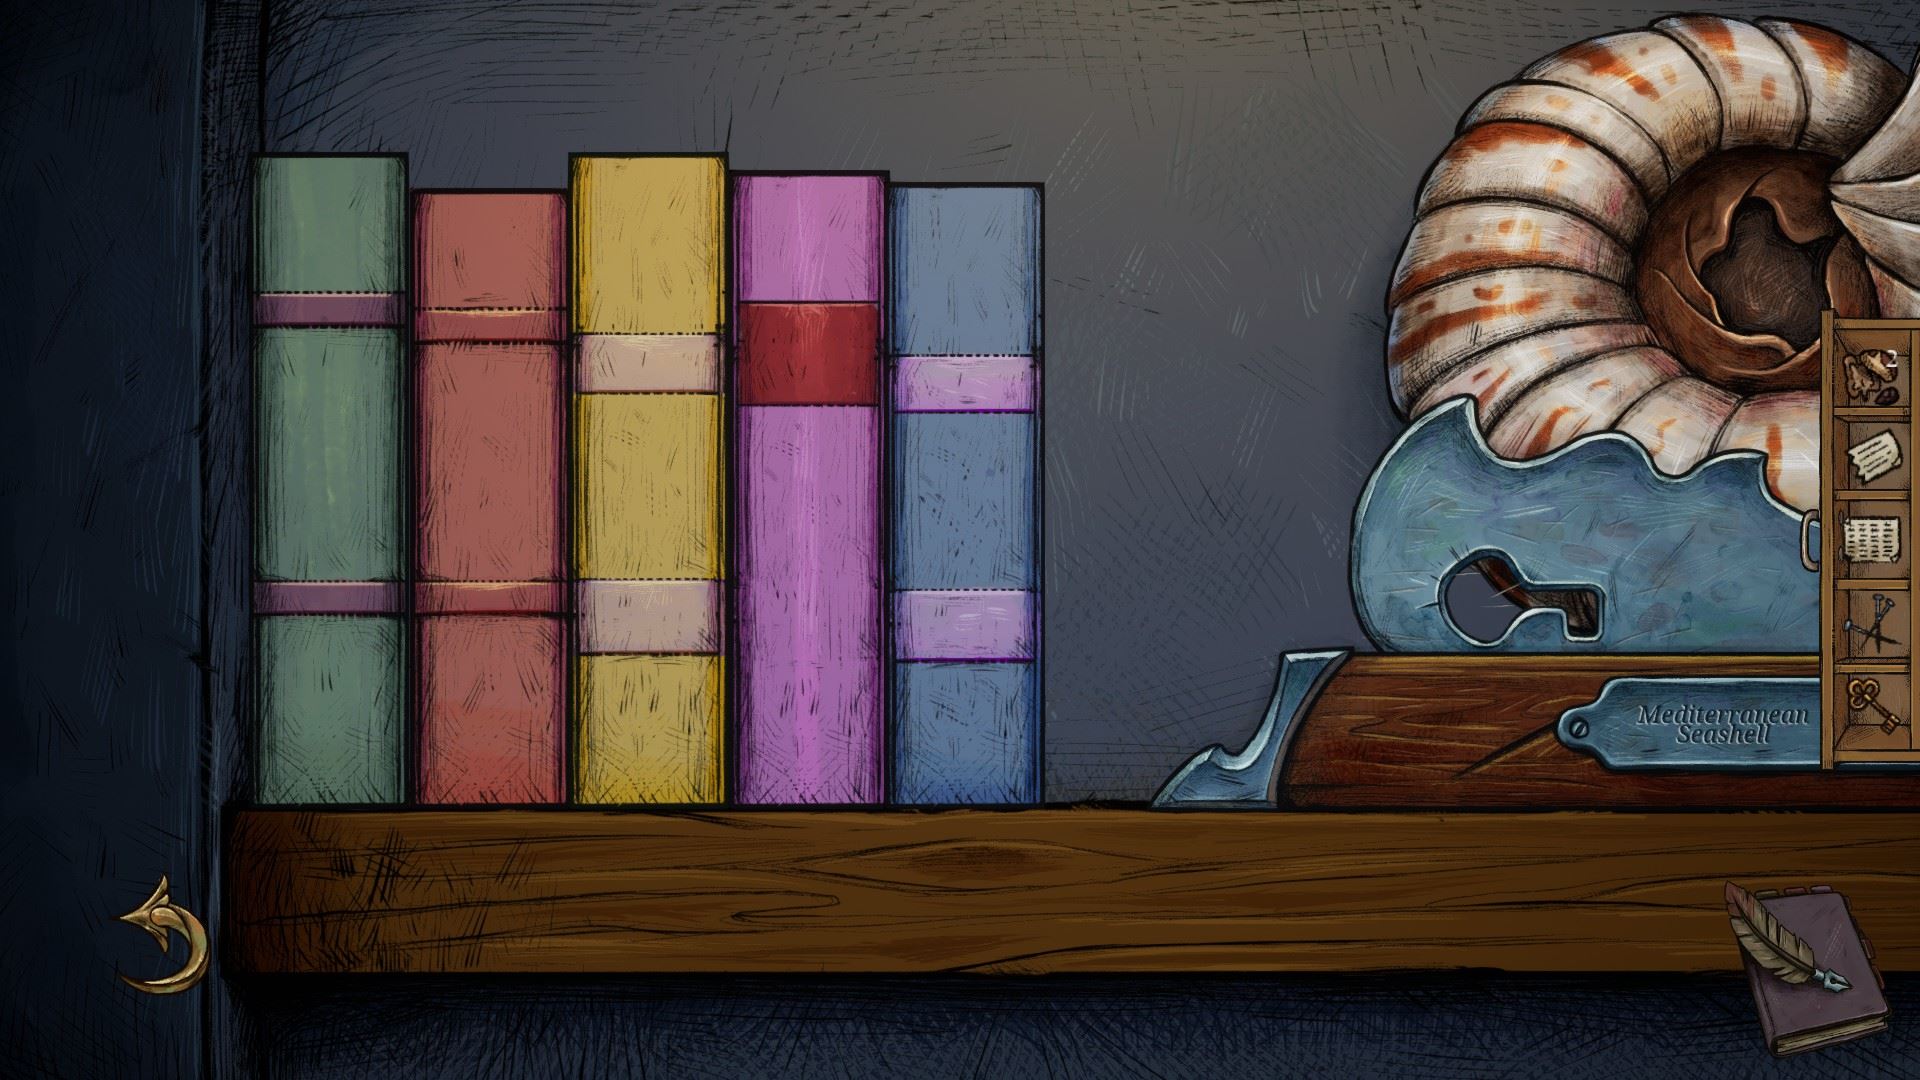
– top right shelf: place the books in the following order: green orange yellow pink blue (hint given by the previous painting); pick up the key that unlocks the glass showcase below this bookcase
– bottom right shelf: pick up the bribe for the crow
– use the key to unlock the glass showcase
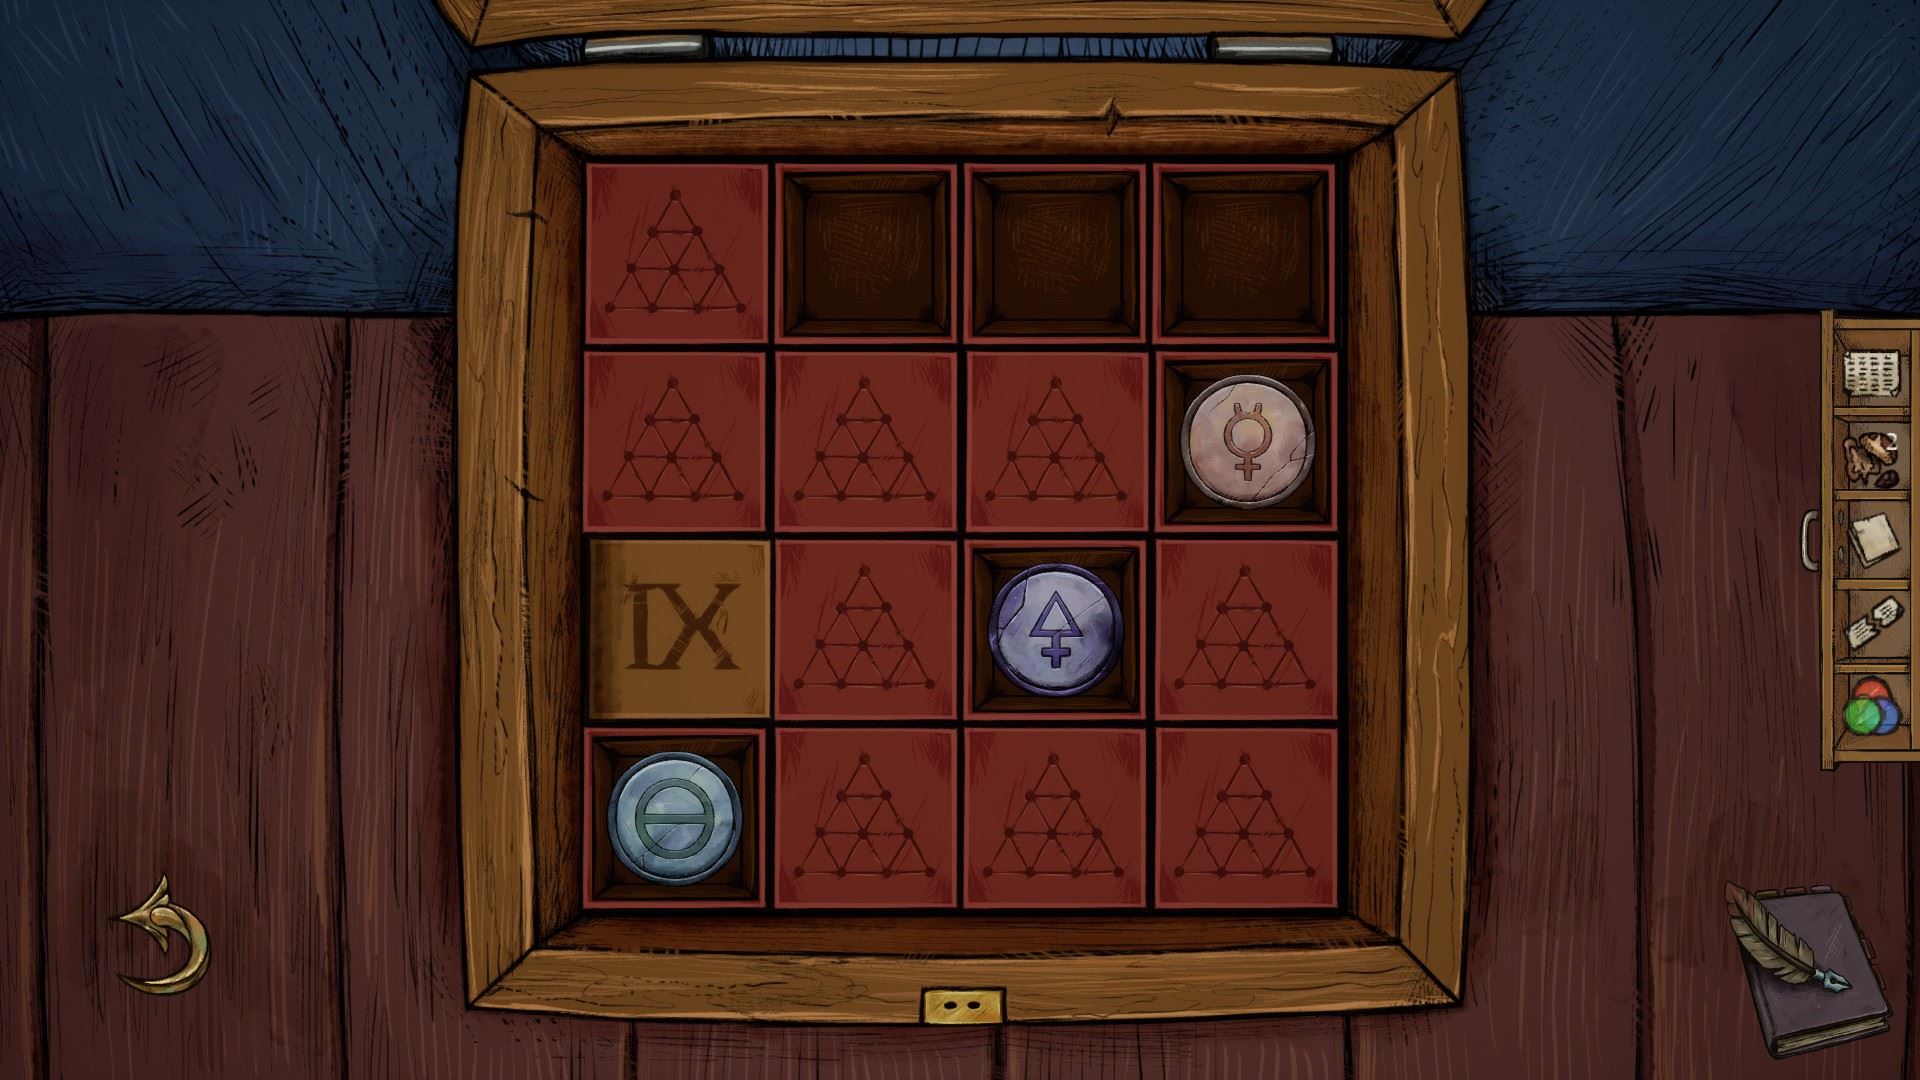
– solve the glass showcase puzzle: move the tiles with an infinity sign in the following positions:
3 = horizontal infinity sign, 4 = vertical infinity sign and 5 = angled infinity sign
(the hint can be found in Page 10 of the Pythagoras book located on a shelf above, by counting the number of squares overlapping with the infinity signs); ramasser le 3 flower-shaped discs
– scroll all way down: pick up the piece of the amphora
Front side of the room -> Amphora niche
– use the amphora piece to fix the amphora
– pick up the bribe for the crow
Back side of the room -> Left shelves
– sûr: pick up the bribe for the crow
– pick up the oil lamp
– shelf with the butterflies: pick up the bribe for the crow
Back side of the room -> Right niche
– Placer le 3 flower-shaped discs on the puzzle area in such a way that you replicate the drawing from the bottom right corner; you can rotate the discs by clicking on them when they’re outside the central puzzle area
– pay attention to the way they overlap in the image solution:

– après avoir résolu l'énigme, pick up the the bribe for the crow and the metallic string.
Front side of the room -> Lyra
– place the metallic string
– click the strings in the following order:
134751 (1 is the leftmost, 8 is the rightmost)
If you solve this puzzle without mistakes from the first try you obtain the following achievement:
🏆 Perfect pitch
Idling for 5 minutes in this screen will trigger the following achievement:
🏆 You made Orpheus jealous.
Back side of the room -> Arbre
– pick up the apple and place it in the statue hand located where the flower-discs puzzle was; this unlocks the map puzzle on the other side of the room
Front side of the room -> Carte
– set the coordinates to « Croton » (indice: Phryne text from your notebook) by dragging the top and right handles, change to year « 345 » avec un « - » in front of it (hint from Page 2 of the Chronology book), then press the button
🃏 Tarot card #1
How many flower discs did you use to open the hidden compartment?
Correct answer: 6
(During your second playthrough, pick any of the other wrong answers)
🏆 Good bye, Phyrne
Chapitre 2: Flavia
Front side of the room -> Bureau
– read the diary; pick up the key
– use the key on the top left drawer of the desk; pick up the gems with the goddess’ names
The diaries from the previous chapters are now placed in a box on the top left corner of the desk. Read one for an achievement (can be obtained anytime starting with Chapter 2)
🏆 Look back to see ahead
Front side of the room -> Left bookcase
– Lire le 4 new books that spawned around the Cybele box
– place the gems with the goddess’ names on the Cybele box like so (when they are in the correct position an icon will light up on the central hexagon); click on it to reveal a page from a book

Front side of the room -> Left bookcase -> Cybele puzzle (Partie 1)
– take the axe from the right page (in front of the sitting lady) and give it to the man on the left
– move the tree to the right side in the stone circle
– drag all the purple items onto it (fleurs, hanging ribbons, arc-en-ciel)
– in the end press the right arrow to go to the next page

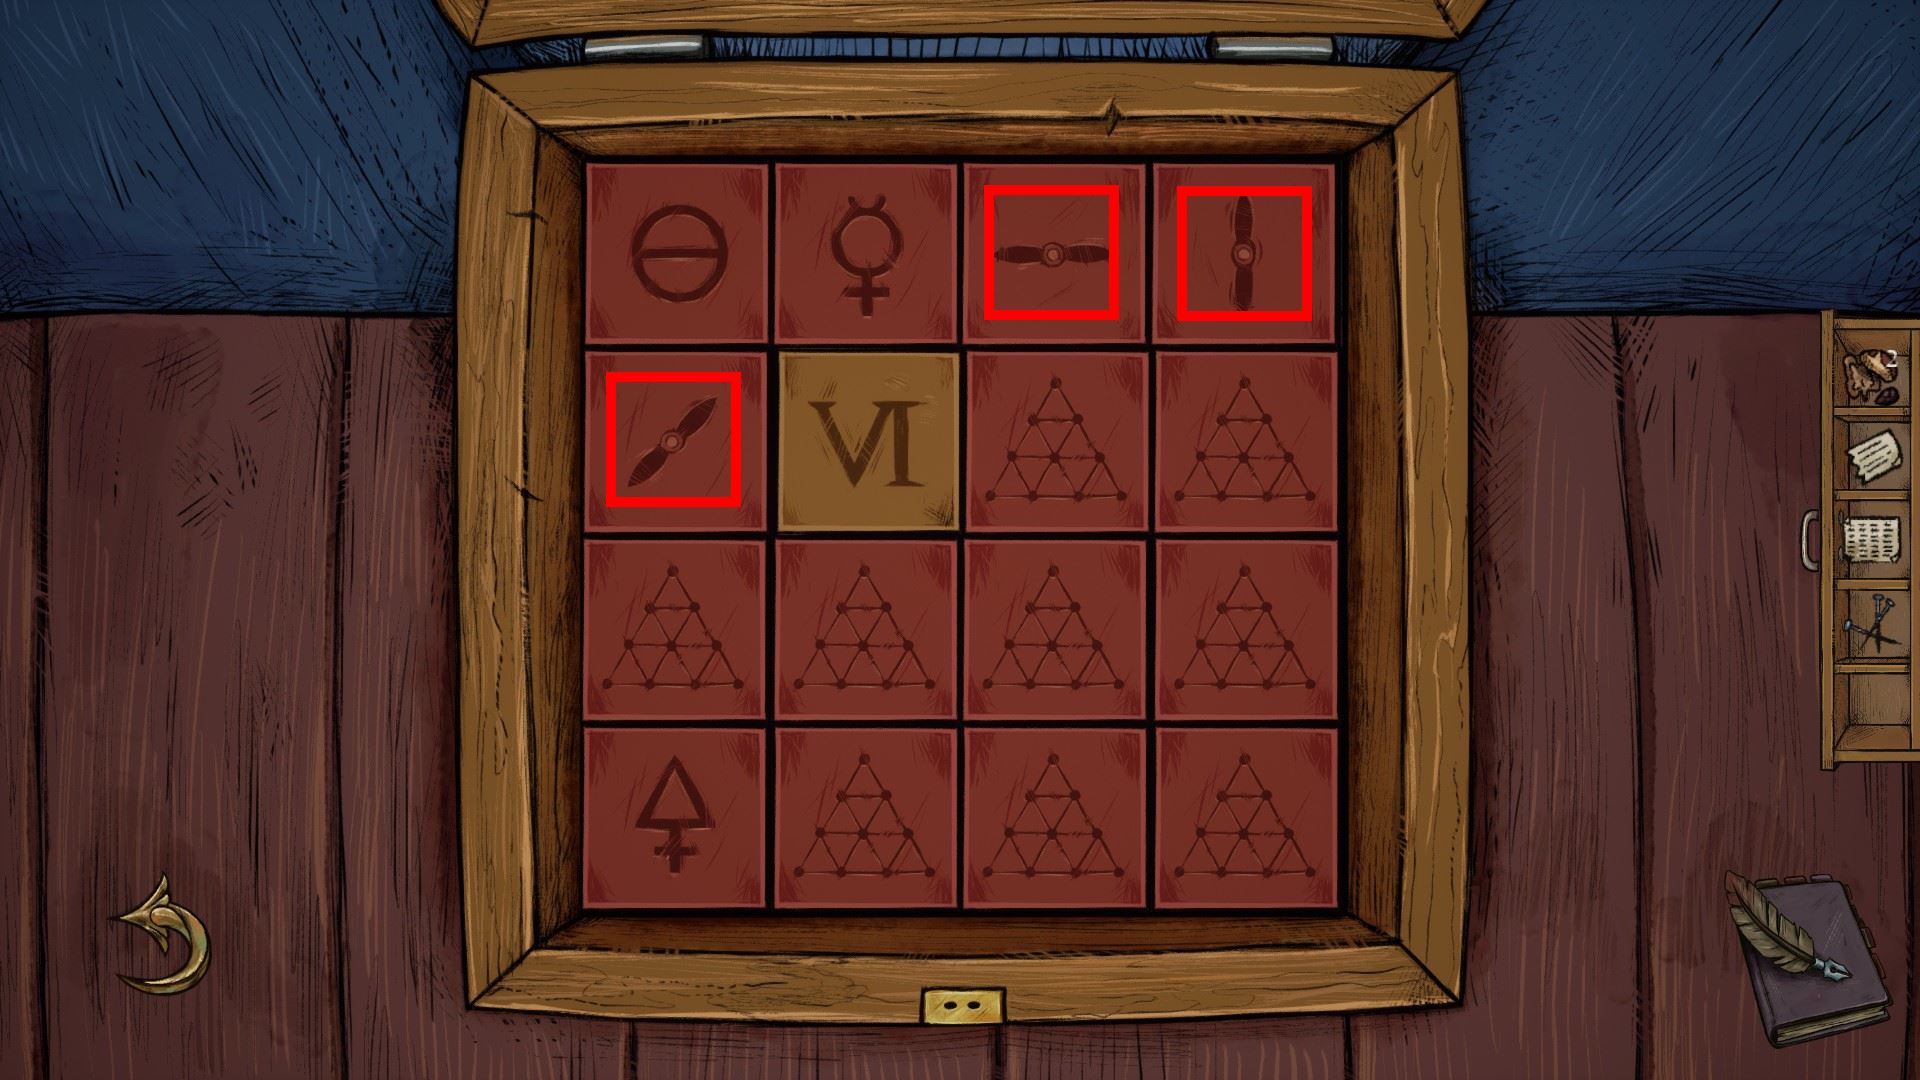
Front side of the room -> Left bookcase -> Cybele puzzle (Partie 2)
The objective here is to collect 6 pièces.
D'abord, give the bone to the dog for an achievement
🏆Ce n'est pas le cas’t give a coin
– click on the blue bird twice (left page)
– give the jug on the small round table (left page) to the man on the right wearing a cyan shirt
– give the mug from the corner of the table to the person wearing an orange toga (both on the left page)
– put the apple in the pig’la bouche (both are on the table on the right page)
– give the chicken leg to the man standing in front of it, wearing an orange shirt (both are on the right page)
– click on the wine amphoras on the right side multiple times until you reveal a coin
Front side of the room -> Left bookcase -> Cybele puzzle (Partie 3)
– move the sun in the hands of the lady sitting on a rock
– wait for the flute sound to end, and then pay attention to the beats made by her drum and the sounds made by the three musicians
– wait for her to produce a beat, then click on the correct musician; when you fail, she does a facepalm kind-of animation and the flute + demonstrative beats sequence is played again
– the sound order could be random for each playthrough (je’je ne suis pas 100% bien sûr)
Back side of the room -> Left shelves
– Calendar puzzle: place the nails in the following positions (hint from the note at the end of the Cybele puzzle) then pick up the Moon Goddess stone:

Back side of the room -> Arbre
– place the Moon Goddess stone in the tree slot that is highlighted at the top
– inside the tree: use the oil lamp to shed some light and move the archers so that their arrows touch all 4 animals depicted on the amphora, then press on the leftmost archer (the only one that can’t be moved); the correct configuration for the archers is shown below:

– after the puzzle is solved, pick up the meteorite piece (bottom right of the screen)
– go one screen back to the room and place it in the niche on the right of the tree
Front side of the room -> Carte
– set the coordinates to Rome, « -« , 160 (indice: Cybele book page from your notebook)
🃏 Tarot card #2
Which color was the hat of the priest collecting money in the book of Magna Mater festival?
Correct answer: Orange
(During your second playthrough, pick any of the other wrong answers)
🏆 Good bye, Flavia
Chapitre 3: Ision
Front side of the room -> Bureau
– read the diary; pick up the key
– use the key on the top right drawer of the desk; pick up the Earth symbol and 3 bribes for the crow
Front side of the room -> Left bookcase
– Lire le 7 new books that spawned on the two bottom right shelves; le « Constellations » book contains a note that you can pick up
Back side of the room -> Ceiling
– place the Earth symbol in the middle, then rotate the rings so that the dividers between them fall into the the vertical space below the center.
– move the moon piece down and out of the puzzle
Front side of the room -> Balcon
– drop the moon box anywhere into the scene to open it; prends la clé
Front side of the room -> Bureau
– above the diary, insert the newly acquired key in the left key slot; pick up the note and « a thingy »
Front side of the room -> Carte
– attach « a thingy » to the bottom part of the map, on the right side of the year counter
– click on the newly formed device (the time module) to pick it up and then on the small compartment under the map to reveal the missing part of the incomplete note; clicking any of the two parts in your inventory then on the rotating button that appears on the screen will merge them
Back side of the room -> Left shelves
– Sûr: attach the time module and set the year to 1932 (indice: the year on M.’s note that you picked up earlier from the desk); pick up the telescope parts
Back side of the room -> Arbre
– place the moon box in the highlighted slot
Front side of the room -> Balcon
The order of steps needed to obtain the two missing planets can be found in a note in your inventory. toutefois, following the instructions only from the left side of the note will award an achievement.
For the achievement, suivez ces étapes:
– install the telescope
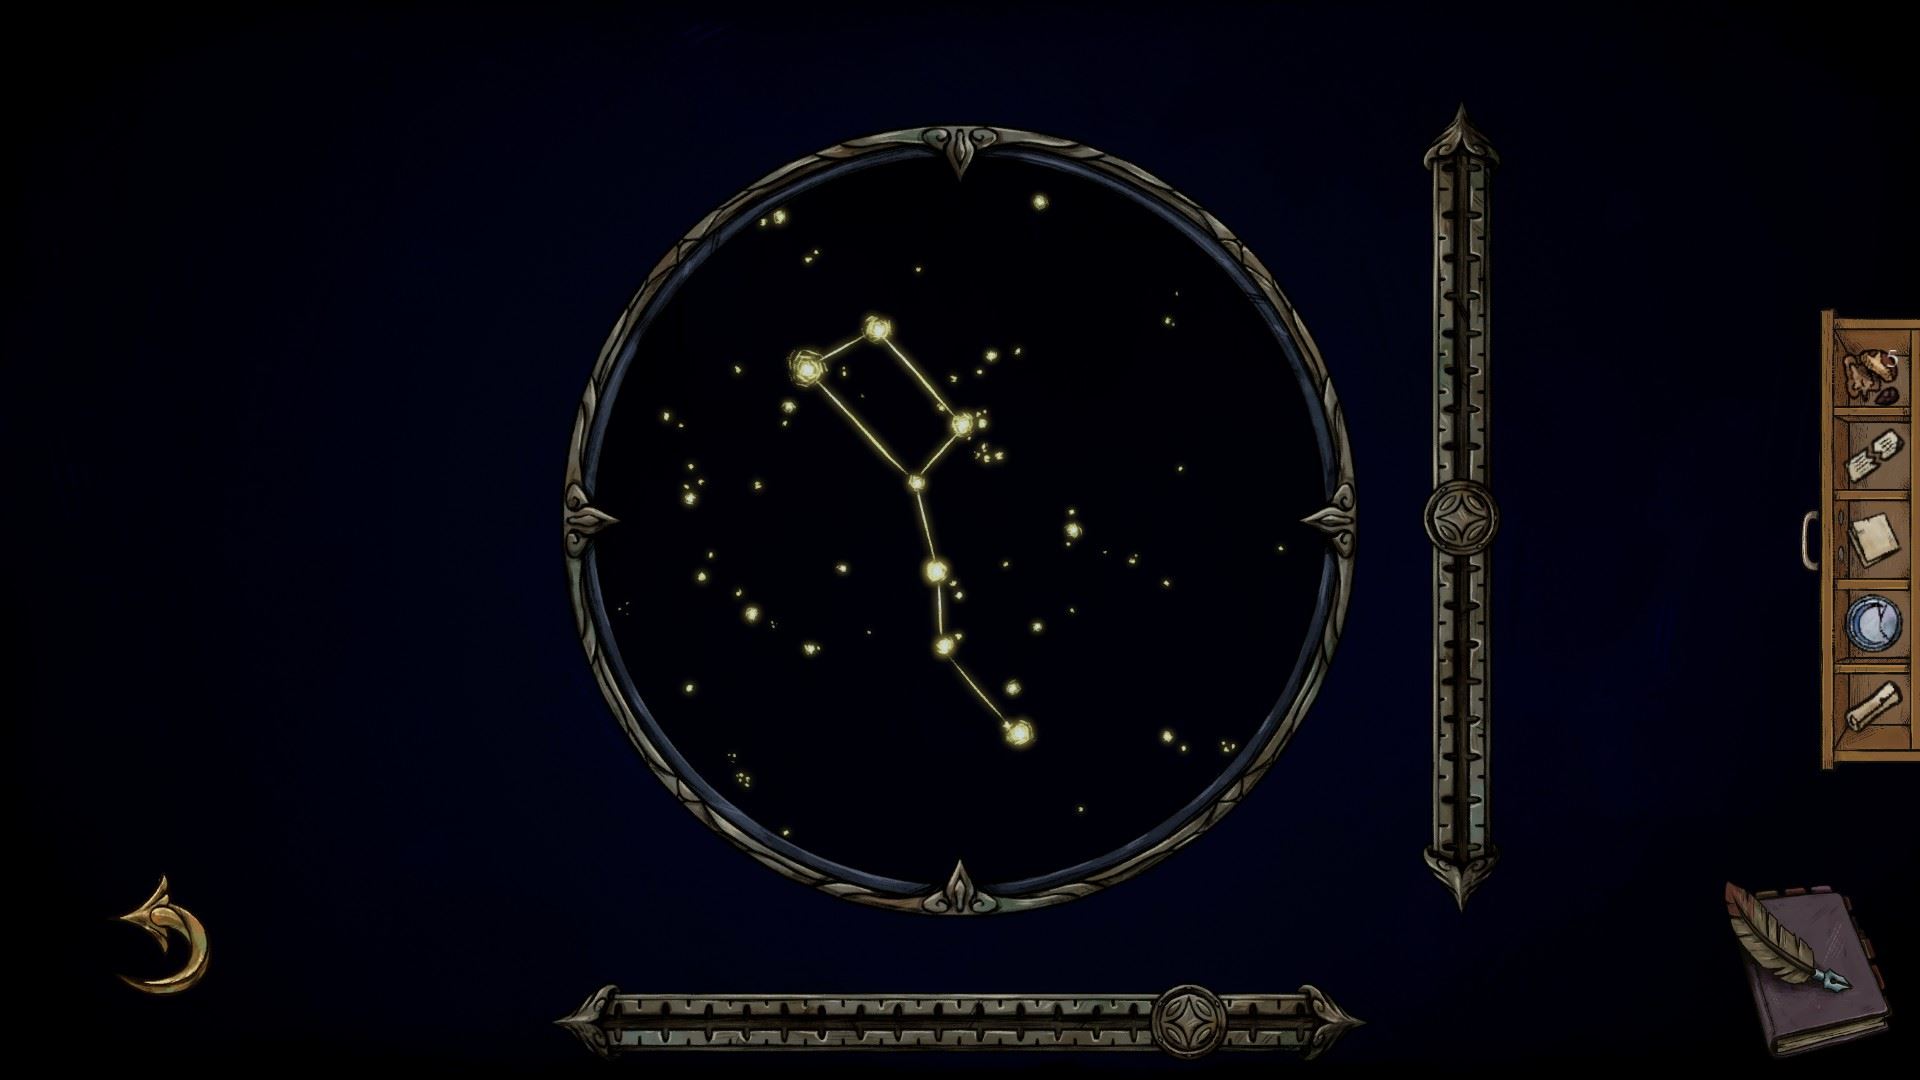
– click on the telescope, move the levers till you find the Ursa Major constellation (the correct position can be seen in the image below):
– go out one screen, turn the headpiece to the Uranus symbol (brun)
– click on the 1st, 3rd, 4th and 6th lenses to move them down, leaving the 2nd and 5th lenses up
– click on the telescope to get the achievement
🏆 Toi’ve been tricked! Il…
Here are the correct steps:
– if you followed the steps to get the previous achievement, reset the lenses by pressing the button located right below them
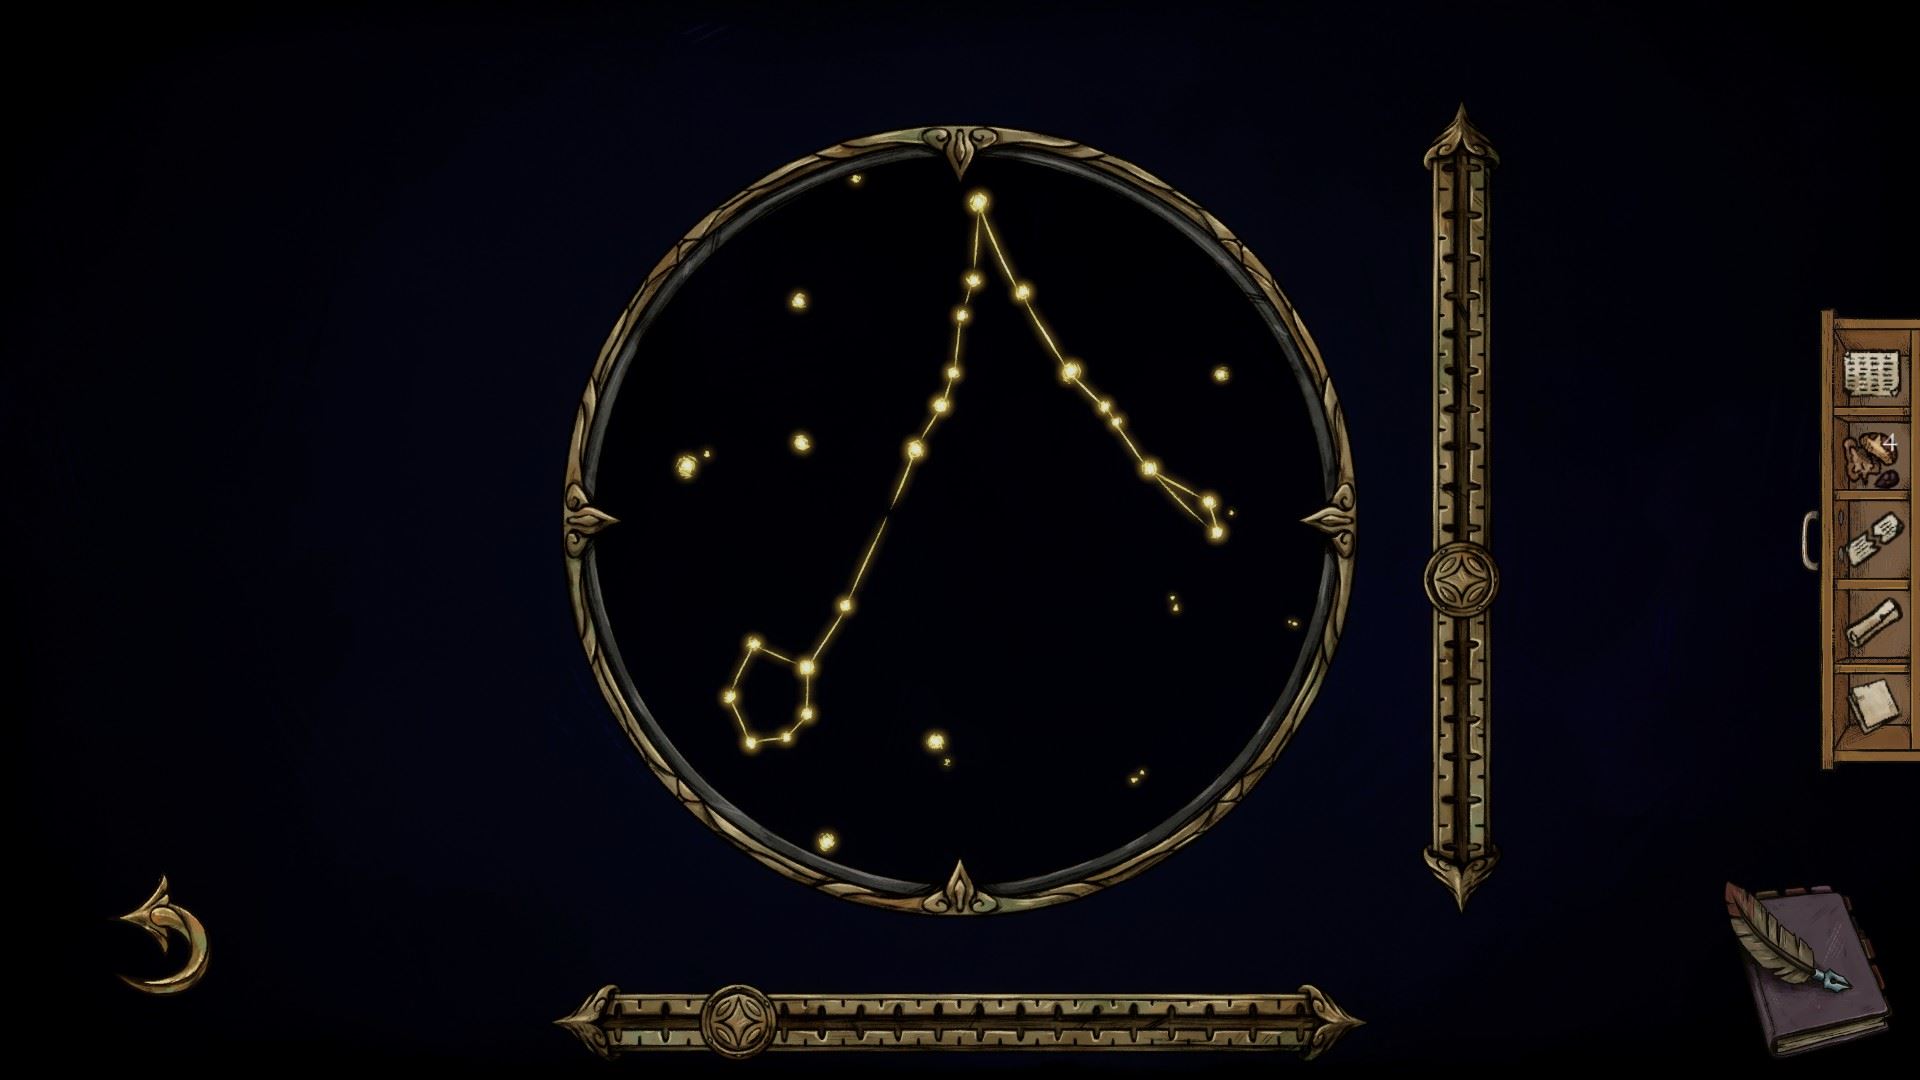
– click on the telescope, move the levers till you find the Pisces constellation (the correct position can be seen in the image below):
– go out one screen, turn the headpiece to the Uranus symbol (brun) – if you followed the steps to get the previous achievement, it should already be set to this
– click on the 1st, 2sd, 5th and 6th lenses to move them down, leaving the two middle lenses up
– click on the telescope and pick up the Uranus tile
– go out one screen, press the button to reset the lenses (right below them)
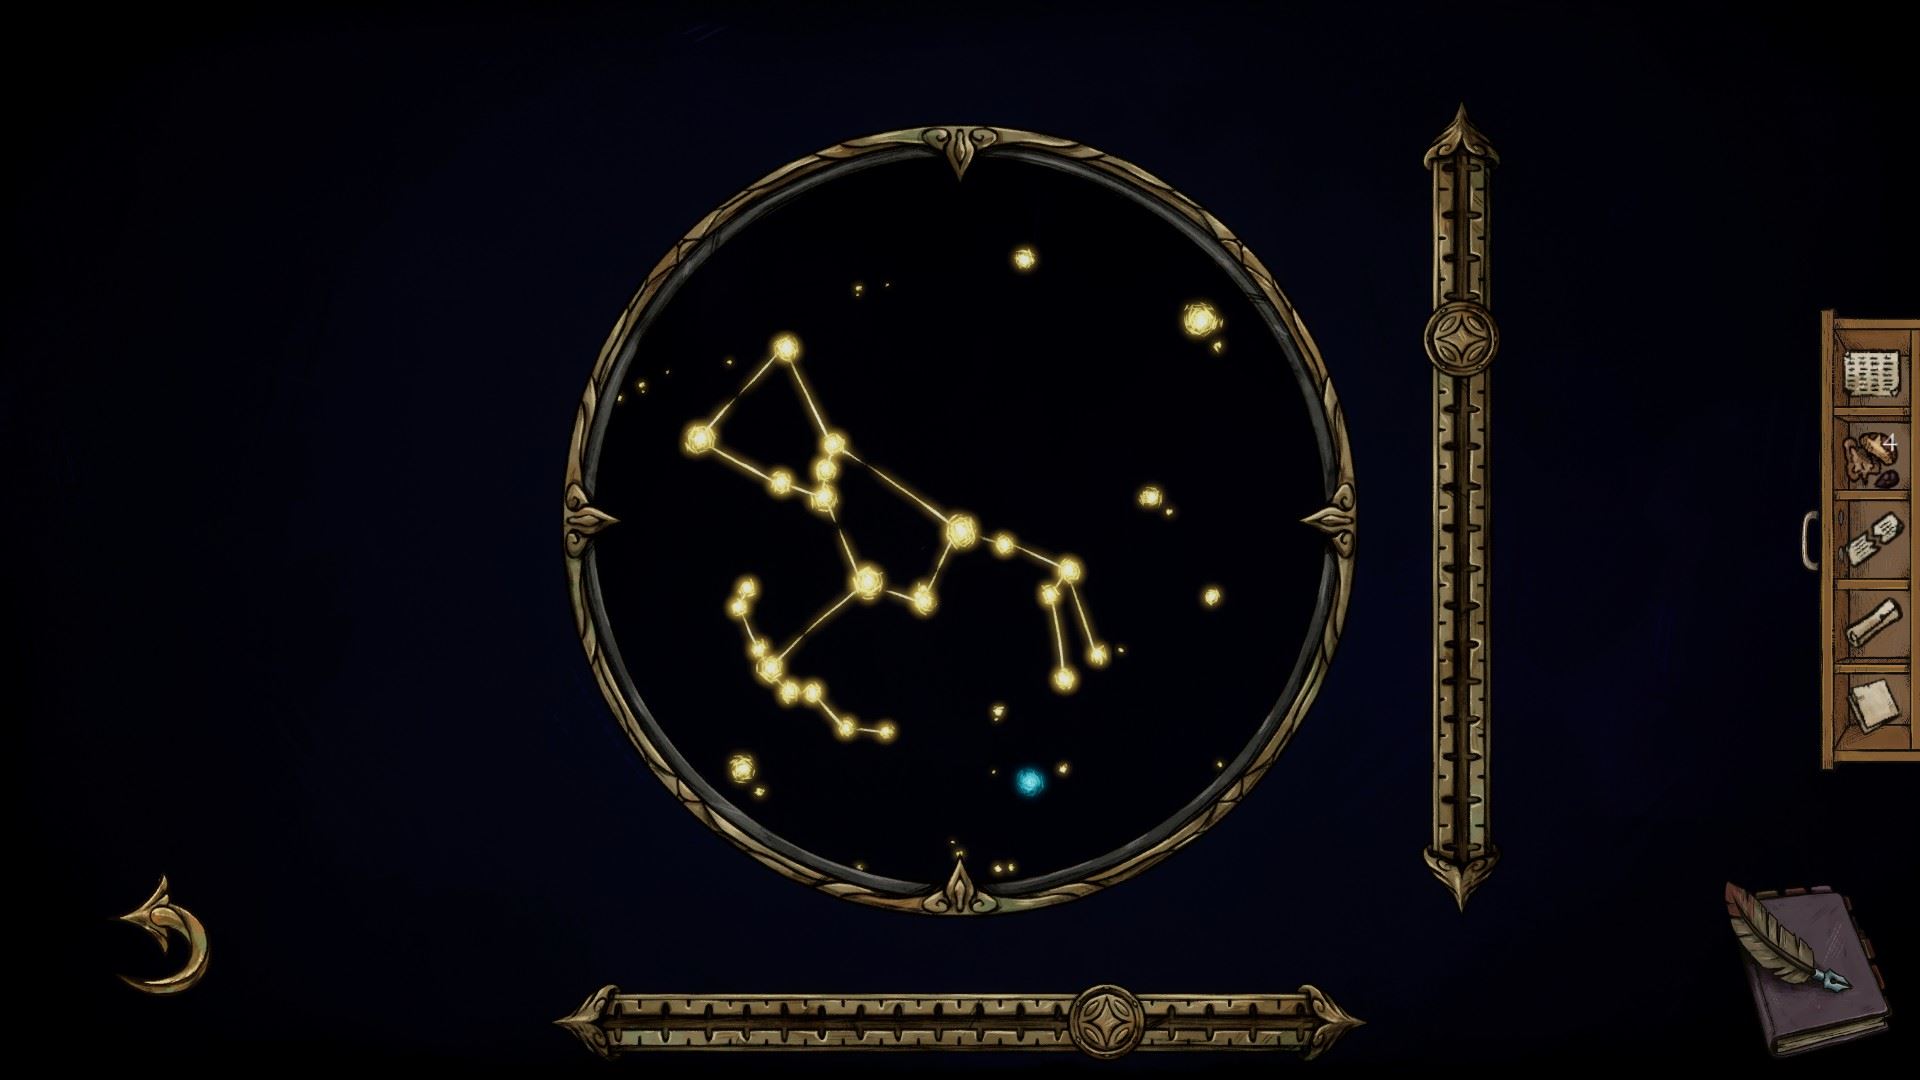
– click on the telescope, move the levers till you find the constellation of Orion (the correct position can be seen in the image below):
– go out one screen, turn the headpiece to the Neptune symbol (dark purple)
– click on the 2nd and 5th lenses to move them down
– click on the telescope and pick up the Neptune tile
This achievement can be obtained any time, but since we’je suis là, click on the raven 20 fois…
🏆 Leave the bird alone
Back side of the room -> Ceiling
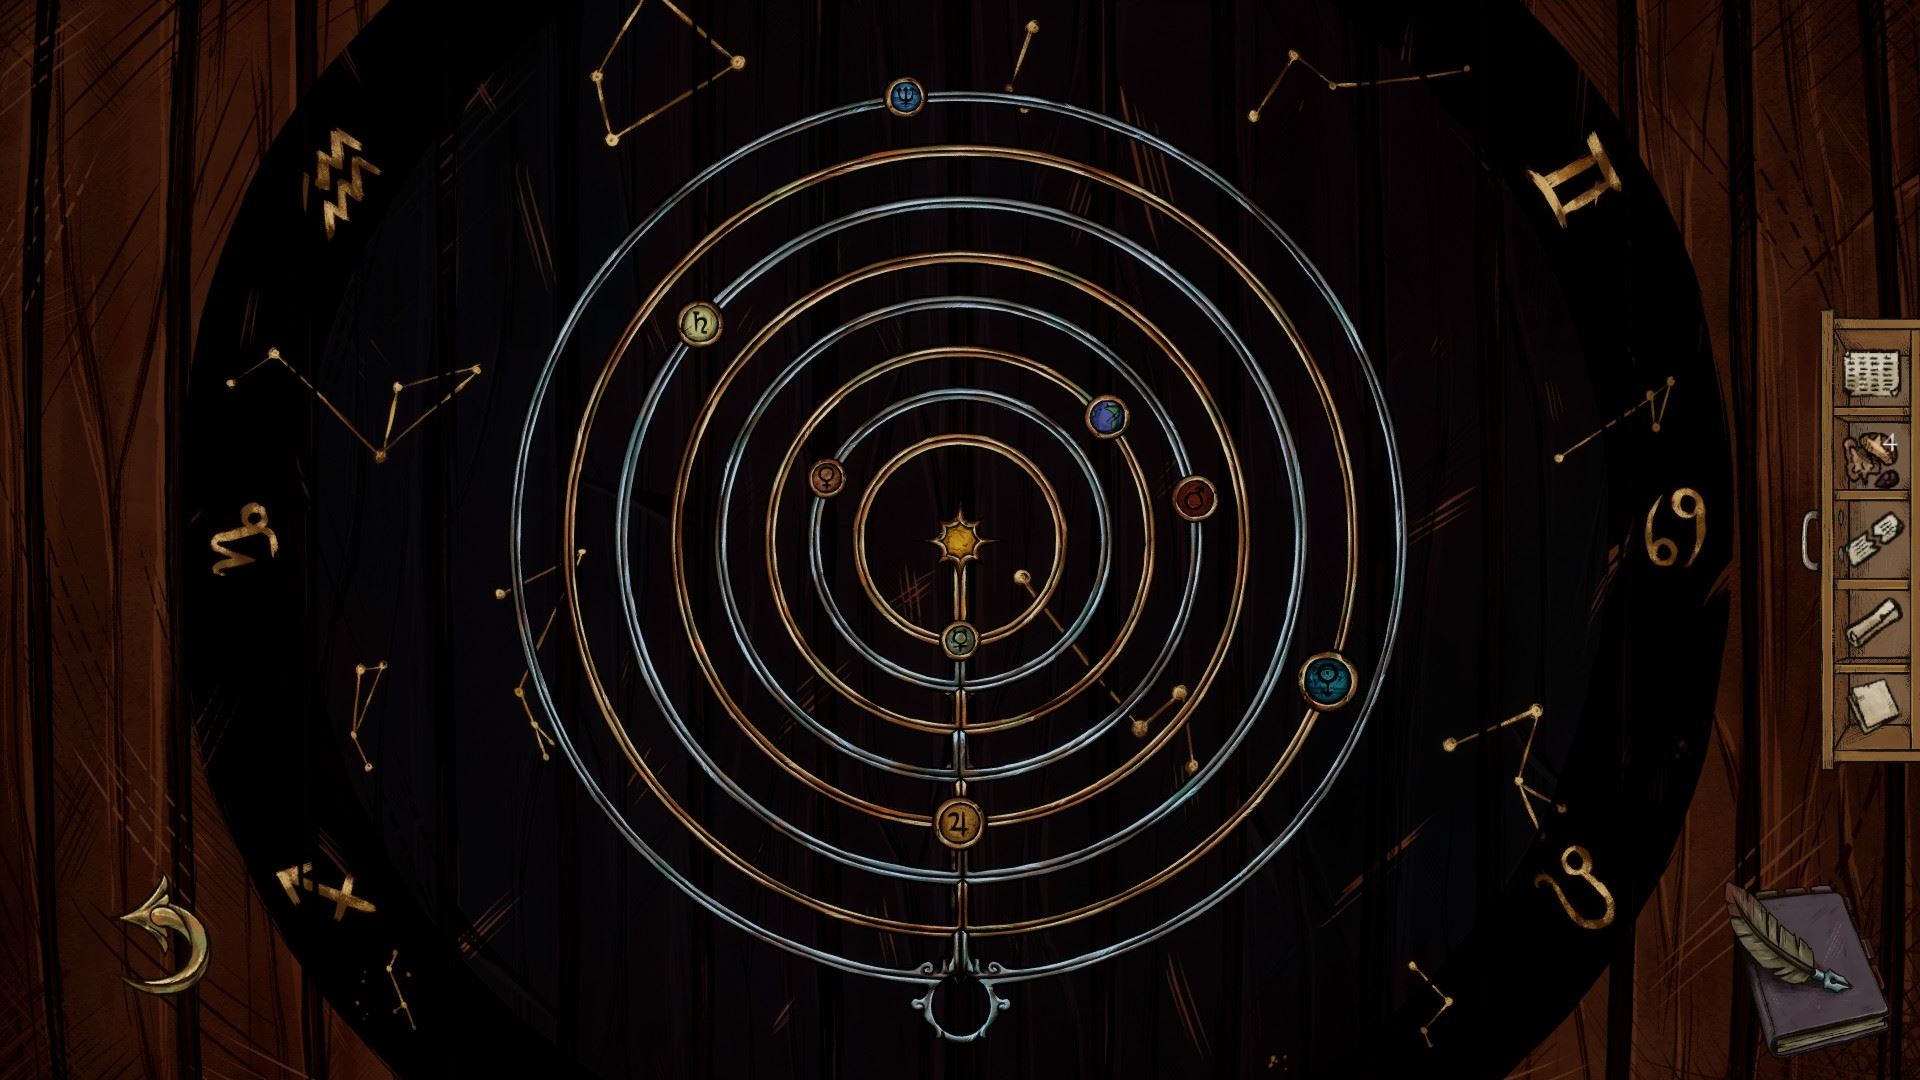
– place the two missing planets on the puzzle board by inserting them through the bottom circle
– arrange them as follows, then pick up the sun disc:
Back side of the room -> Arbre
– place the newly acquired sun disc; pick up the emerald tablet and place it in the niche on the right of the tree
Having placed all 3 sacred objects will trigger the following achievement:
🏆 Holy Trilogy
Back side of the room -> Left shelves
– pick up the time module from the safe
Front side of the room -> Carte
– place the time module, set the coordinates to « Alexandrie », « + », 415 (indice: time and death of Hypatia)
🃏 Tarot Card #3
In the first version of the cosmos model on the ceiling, which planet around the earth did the sun appear as?
Correct answer: 4
(During your second playthrough, pick any of the other wrong answers)
If you answered all 3 questions correctly, you should now receive:
🏆 Vigilant Engrams
🏆 Good bye, Ision
Chapitre 4: M.
Front side of the room -> Bureau
– (skippable in the second playthrough) read the diary; pick up the key
– (skippable in the second playthrough) use the key on the bottom right drawer of the desk; pick up the colored discs
Front side of the room -> Left bookcase
– (skippable in the second playthrough) read the new books that spawned, enfiler’t forget the two new ones on the left of the Cybele puzzle
If you clicked through all the books, you should now receive:
🏆 Literature is the most agreeable way of ignoring life
Back side of the room -> Left shelves
– (skippable in the second playthrough) place the colored discs on the wooden box puzzle from the top shelf (green on top, blue in the bottom left, red in the bottom right slot) to see their corresponding symbols, then pick them up again
– (skippable in the second playthrough) place the time module (from below the map on the other side of the room) into the safe and set the year to +1471 (indice: Corpus Hermeticum book translated by Salvino); pick up Salvino’s diary and the tarot card inside (🃏 Tarot Card #4); read the diary until the end
– (skippable in the second playthrough) close the safe, set the year to +1525; pick up Ynes’s diary and the tarot card inside (🃏 Tarot Card #5); read the diary until the end
🏆 Your dedication has not gone unnoticed
🏆 Hungry for more stories
– (skippable in the second playthrough) one shelf below the safe, click on the tarot card book and go to the end, where you see a page with one button: « Propagé »; this will start a tarot reading and grant you one achievement:
🏆 Do you believe in fortune-telling?
– (skippable in the second playthrough) repeat the tarot reading 4 plus de fois.
🏆 I will not accept my fate!
Front side of the room -> Animals painting
– (skippable in the second playthrough) place the colored discs like so:
red on the lion, green on the swan, blue on the wolf;
you can then see the following numbers:
13 = blue wolf (=Salt), 11 = green swan (=Sulphur), 8 = red lion (=Mercury)
Front side of the room -> Left bookshelf
– place the three symbols based on the previously discovered number links and then pick up the 3 pièces:
Back side of the room -> Arbre
– place the Salt, Mercure, Sulphur symbols (ion this order from left to right) on the highlighted slots of the tree and pick up the diamond pieces
Back side of the room -> Left shelves
– wooden box: insert the diamond-shaped tiles and the colored discs; order the diamonds like from top to bottom like so:
vert – argent – violet – jaune
(hint given by the number of knots and the colors of the threads on the right side of the balcony)
– open the inner slots of the newly revealed puzzle, then fill in the missing pieces located at the edges; pick up the brush and the paint
Back side of the room -> Sol
– place the paint, use the brush to draw the full pattern in one go, without releasing the mouse; pick up the stones for the 4 éléments
Back side of the room -> Arbre
– place the stones for the 4 elements in the highlighted slots
🏆 Fellow Soul
🏆 One night stand
Si tu l'as fait’t use any hints, you should also unlock:
🏆 Do we need this achievement? No one can finish without a hint, droite?
Second playthrough
The second playthrough requires replaying only the first 3 chapitres.
Assurez-vous de:
– pick wrong answers to the quiz questions
– use the hint 5 fois (collect the bribes for the bird, as indicated in the guide and feed them to the raven on the balcony)
This playthrough should award you the following two achievements:
🏆 Need b12?
🏆 Someone should feed the bird.
C'est tout ce que nous partageons aujourd'hui pour cela Havsala: Into the Soul Palace guide. Ce guide a été initialement créé et rédigé par 🍒 Lilly (🌸◠‿◠). Si nous ne parvenons pas à mettre à jour ce guide, vous pouvez trouver la dernière mise à jour en suivant ceci lien.