- Titre: FINAL TAKE
- Date de sortie:
- Promoteur:
- Éditeur:
Information about FINAL TAKE is still incomplete. S'il vous plaît, aidez-nous à remplir les détails du jeu en utilisant ceci formulaire de contact.
Un guide de réalisation détaillé et une procédure pas à pas pour vous procurer votre 100% aussi rapidement et sans effort que possible. Step-by-step instructions.
Feuille de route
- Difficulté estimée: 1/10
- Estimé 100% temps: ~30 minutes – 1 heure
- Réalisations hors ligne / en ligne: 9 hors ligne / 0 en ligne
- Nombre de jeux: 1
- Réalisations erronées: Aucun
- Réalisations manquées: Aucun
Chapitre 1: The Interview

Elevator manager
You have rided an elevator
Dès que vous démarrez le jeu, run straight down the hall and interact with the sign in board near the computer. Exit the room and hook a left to locate the elevator.
Note #1
After the elevator cutscene, enter the first door on your right. The note is between a bed and a wheelchair.
Journal audio #1
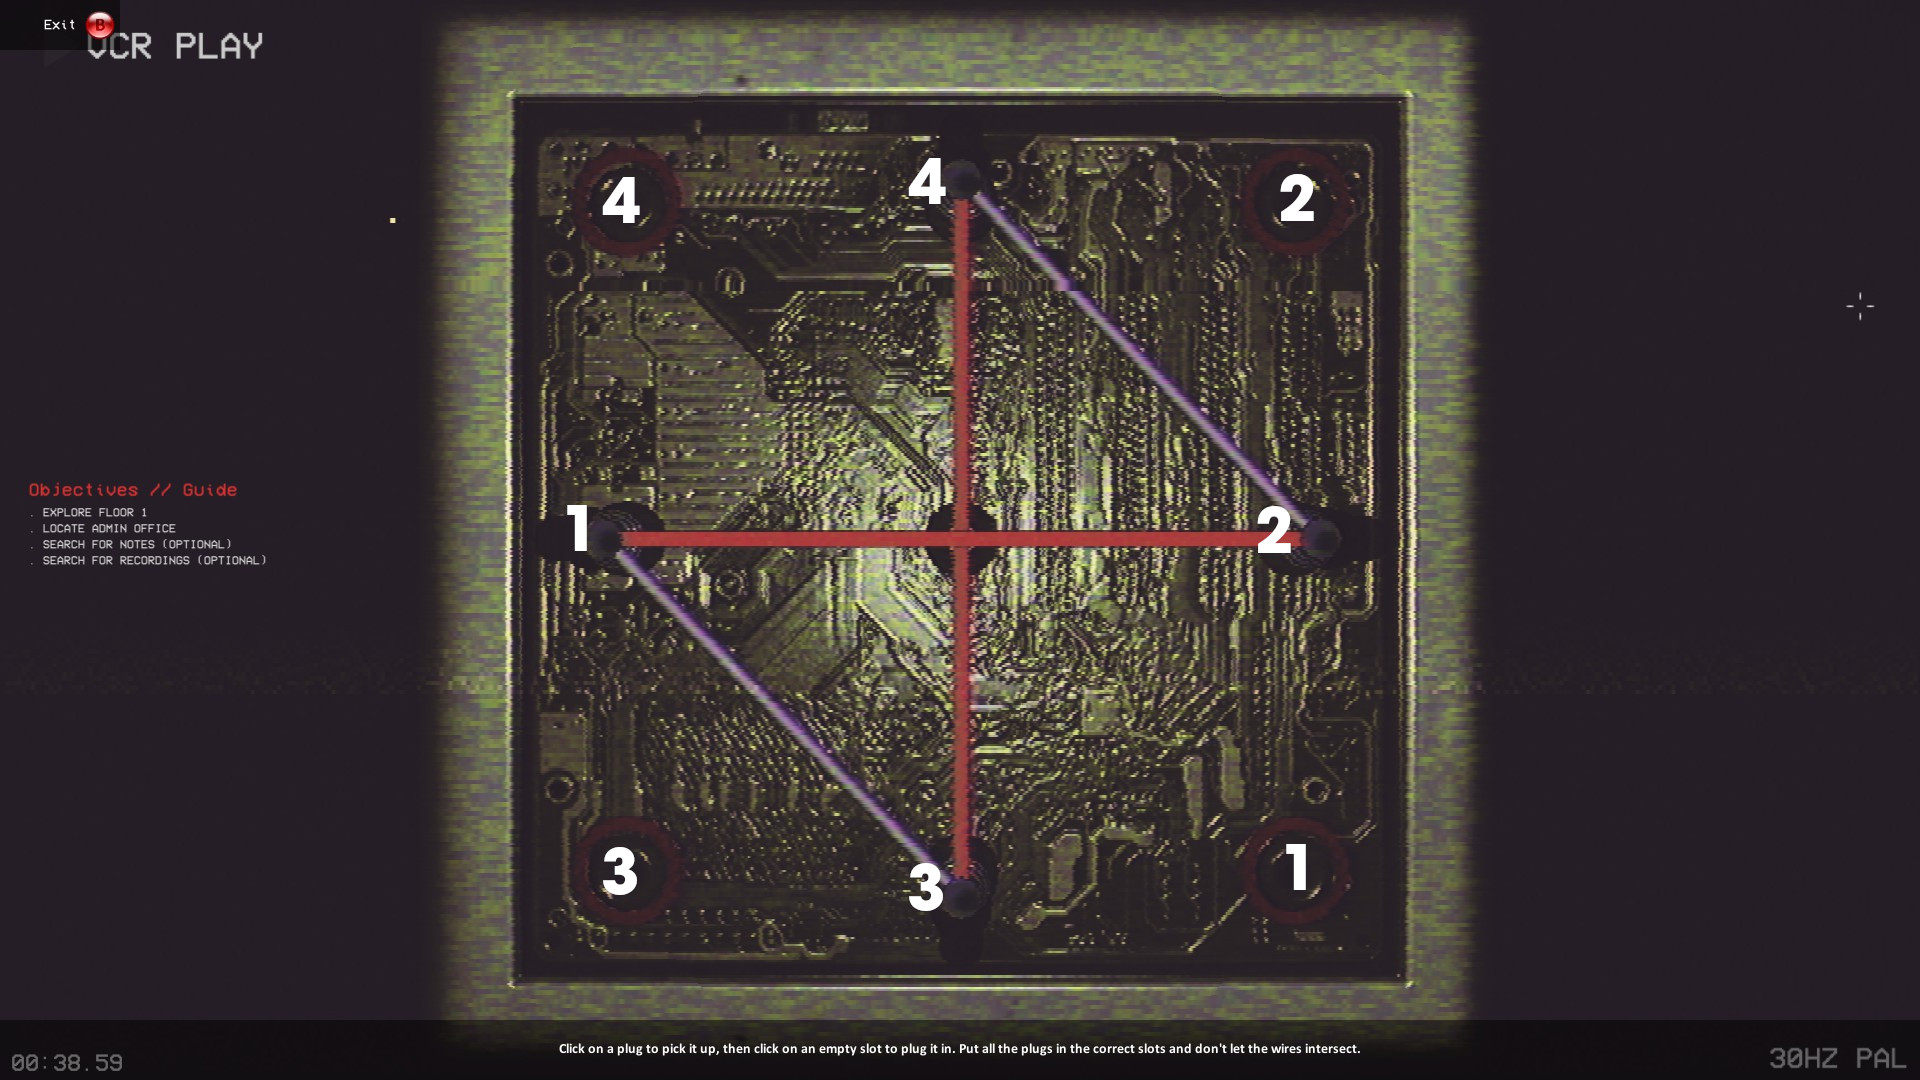
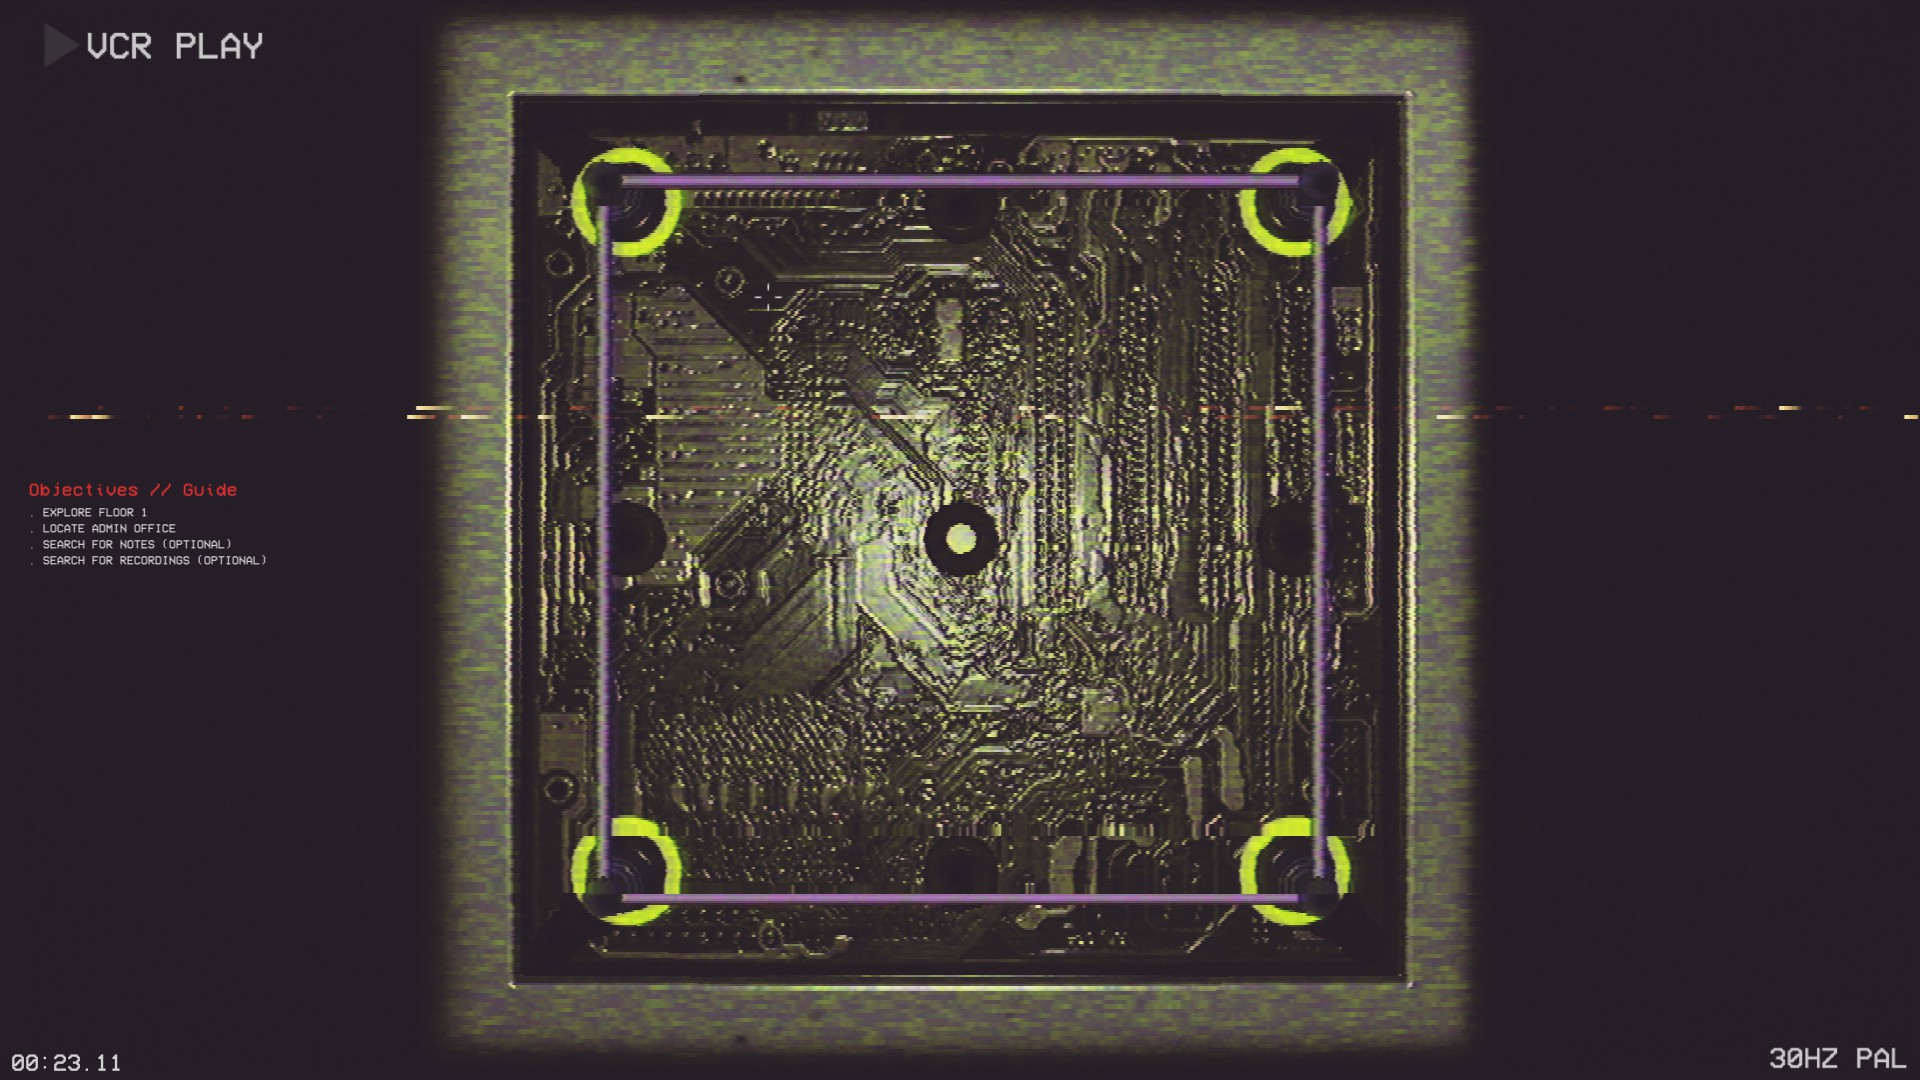
Exit the room and go right. Toi’ll need to interact with the circuit board and make a square with the nodes. Use the photo below as a reference (the last corner needs to be plugged in). Go into the now open door to find the log on the cabinet.
Journal audio #2
Now head back to the stairs near the elevator and go one floor down to the basement. Go through the first hall, down another set of stairs, and into the doorway straight ahead. Hook an immediate right, then look to your right to spot the log.

Archiver
You have found 4 documents and/or audio tapes
Note #2
Now go back to the staircase that led to this area. Facing the same doorway that led to log 2, look to your left and you should see a room with the light on. Go inside to find the Admin Office Key as well as a note on the wall by the door.

Puzzle cracker
you have cracked two puzzles in the game
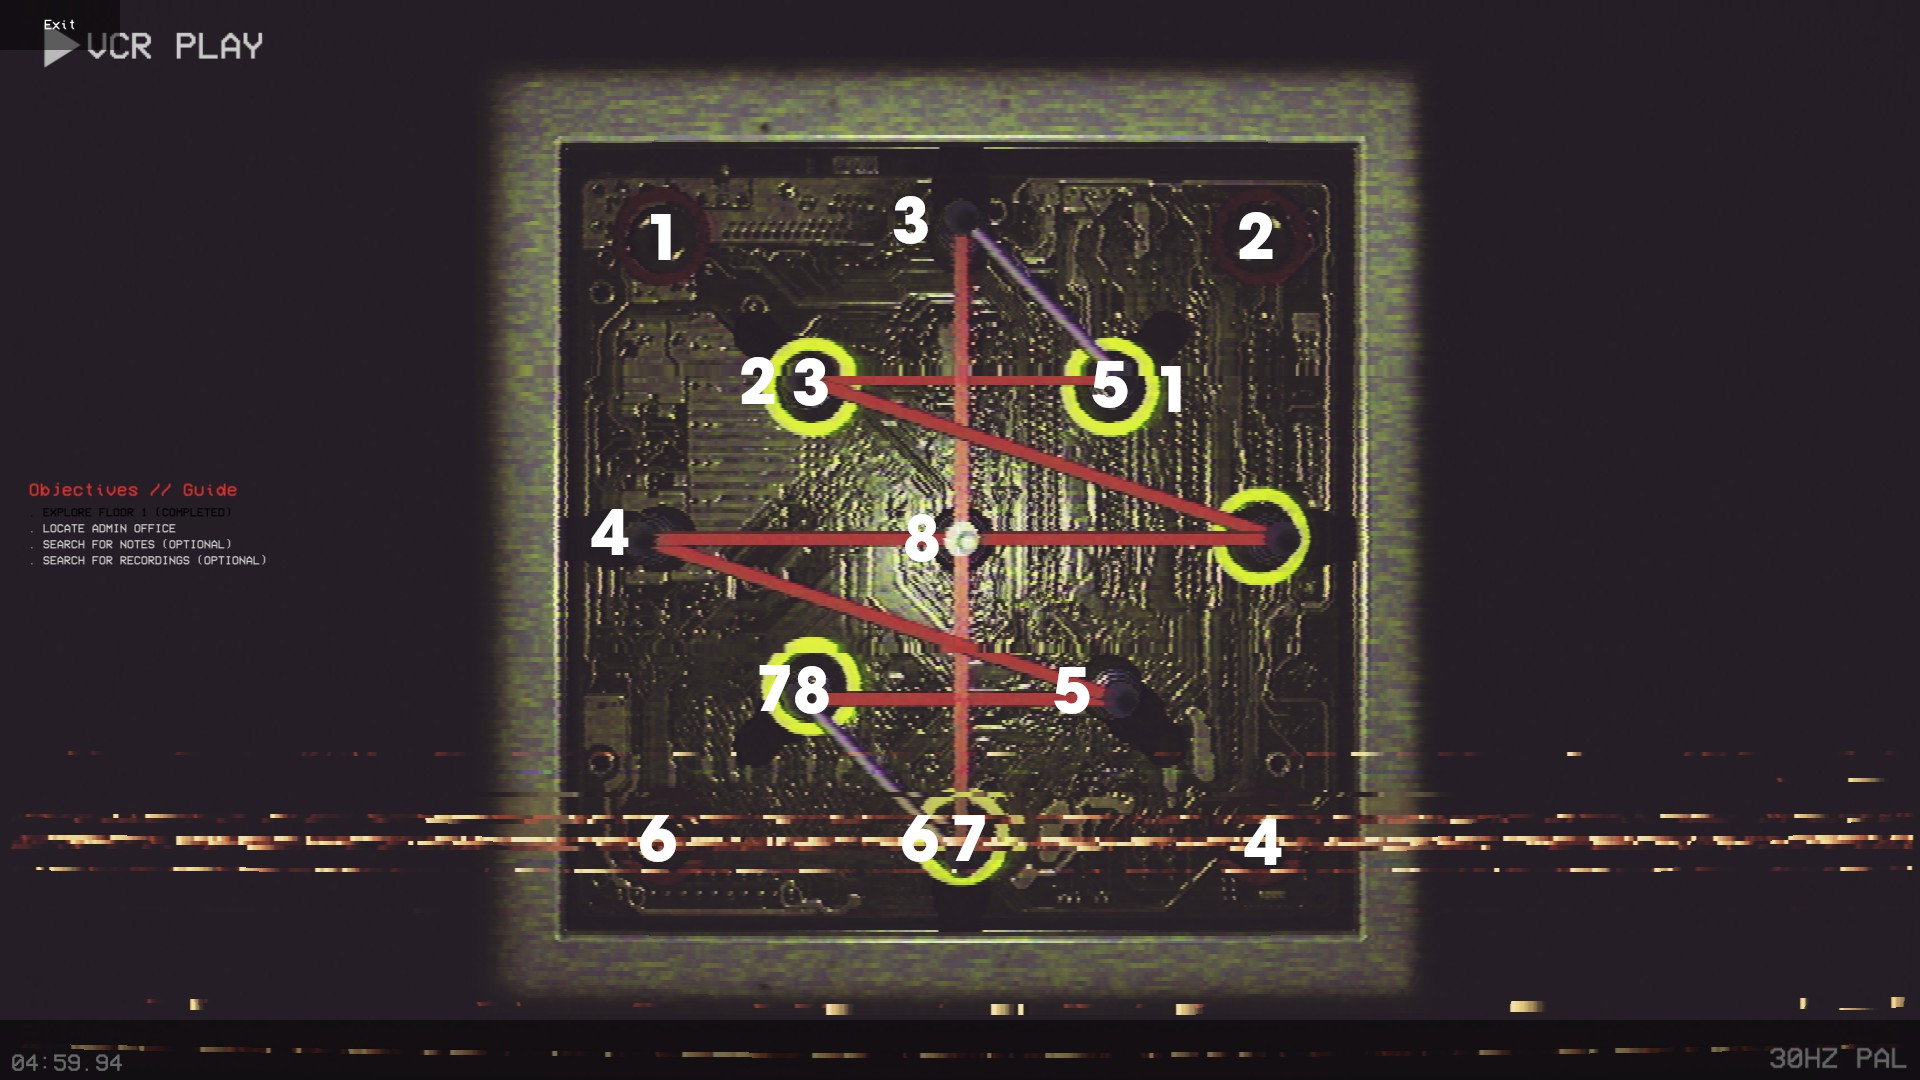
Now head back up to the lobby where the elevator is. Monter 3 more floors (enfiler’t explore the 2nd floor or else a « spooky » ghost girl will constantly be on your ass). Now on the 4th floor, look to your left to find another puzzle box. This one was a jumbled mess, donc je’ve also provided a video walkthrough. Là’s nothing important beyond this point besides more collectibles, which we no longer need on this chapter.

Been scared
you have encountered a monster, and lived through it
Now head down to the 2nd floor and go left to find a hallway with the spooky ghost girl cosplaying a mop. Wiggle past her and go into the door on your right with the TV. Interact with it to end the chapter.
Chapitre 2: Down Memory Lane
Photo #1
As soon as you start the chapter, walk forward to the far wall, then go left across the little overhang thing. The photo is at the end.
Photo #2
Go back and head down the staircase. Look to your immediate left.
Photo #3
To the left of the last photo is a staircase. Enfiler’t go down this just yet. Instead go through the nearby doorway to find another staircase. The photo is just before it.
Photo #4
Go down the staircase near the last photo and look to your left to find the photo on some pipes.

Five to go
you have found 5 photos in second chapter
Photo #5
From the last photo go through the nearby doorway and go left. You should spot another open doorway on your right. As soon as you pass through, turn to your left to spot the photo.
Photo #6
Go back to the hallway we came from and go right this time. Toi’ll emerge into a massive room with exposed pipes. Dès que tu le fais, va à gauche, then take a right. The photo will be on a pillar near the back.
Photo #7
From that photo take a right and go straight. Toi’ll run into a staircase. Go to the front of the stairs, but keep going straight. You should spot an open doorway. Toi’ll spot the photo on a wall to your left side as you go through.

Fully content
you have found all photos in second chapter
Photo #8
Go up the previously mentioned stairs. At the top loop around the right side and run straight as far as you can. The final photo is on a large pipe.
Chapitre 3: Deep Below

I was so ugly as baby
found baby photos in third chapter
As soon as you start the level, go straight and hook a right. Walk a few steps and you’ll see a spooky ghost girl will do a provocative dance. Hook a left and you’ll see an illuminated area just behind an open gate. Go up the stairs past this gate and look to your left to find the photos. Interact with them for the achievement.
After inspecting the photos, go back to where the ghost was and the gate here will now be open. Follow the linear path through to end the chapter.
Chapitre 4: A Dark Past
After starting the level, follow the linear path until you pass an open set of double doors into a room with 3 body bags on tables. Enter the right door and read the note on the far right side. You should now hear a door open. Go back to the body room and enter the left-most door.
Photo #1
After your character blinks in and out of reality she’ll mention something about a prison being next to a hospital. Walk into the doorway directly ahead of you to find the first photo inside.
Photo #2
As soon as you exit the previous room there will be a staircase to your left. Go down it and look in the last cell on the left.
Photo #3
Exit the room and make an immediate right, followed by another left at the far wall. You should spot the next photo.
Photo #4
From the last photo, 180 and go up the far staircase. The photo will be right at the top.

Gave them five
five photos found in 4th chapter
Photo #5
From the last photo follow the catwalk to your right and look in the 2nd cell on your left.
Photo #6
Exit the cell and go left. Hook around the corner to find the next photo on the wall.
Photo #7
Head back to where picture 4 était. To the right of its location is a catwalk that leads to a staircase to the 3rd floor. Au sommet, loop around to your right to find the photo.
Photo #8
Go back down to the 2nd level and go right. Enter the first open cell on your right.
Photo #9
From the last photo, go left across the catwalk and you should immediately spot the next photo above the grated alcove.
Photo #10
Head down the stairs near the catwalk we just crossed. Loop around the left side and go to the far wall. The door on your right will be open with the photo inside.

Finisseur
terminer le jeu
Après avoir tout récupéré 10 photos go back tot he hallway between photos 2 et 3 to spot a door now open to the left. Walk inside and after the movie that’s about to play finishes the achievement will unlock.
C'est tout ce que nous partageons aujourd'hui pour cela FINAL TAKE guide. Ce guide a été initialement créé et rédigé par Stef. Si nous ne parvenons pas à mettre à jour ce guide, vous pouvez trouver la dernière mise à jour en suivant ceci lien.