
- Titre: CounterSide
- Date de sortie:
- Promoteur:
- Éditeur:
Information about CounterSide is still incomplete. S'il vous plaît, aidez-nous à remplir les détails du jeu en utilisant ceci formulaire de contact.
New players should get an in-game mentor ASAP to get free rewards. This is a guide about the Mentor system, including how to get a mentor, what rewards you can get as a mentee, how to complete all of the missions, and answers some common questions.
introduction
CounterSide has a hidden feature for new players that it doesn’t advertise. Which is a shame because it gives free rewards for things you want to be doing in-game anyway!
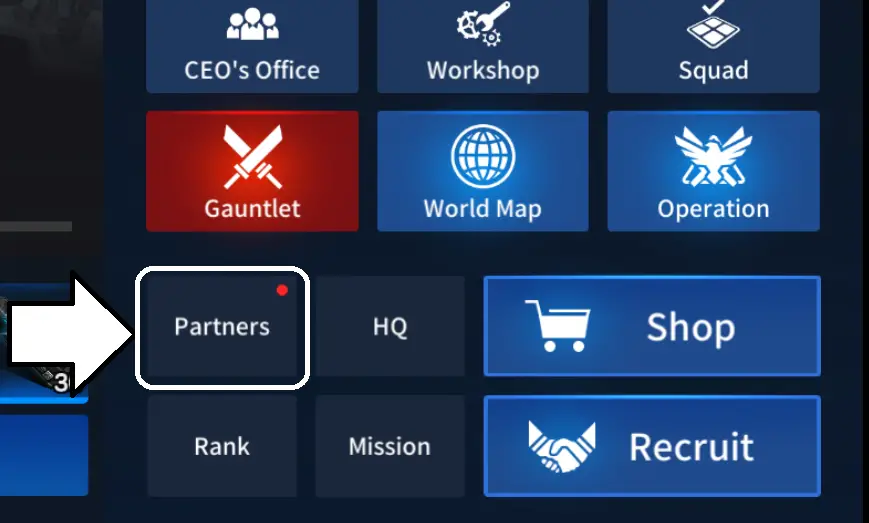
À l'intérieur Partenaires menu (your friends list), là’s a tab on the left called Mentee, which is where you access the Mentee / Mentor system in CounterSide.
It may seem a bit confusing at first but I’ll do my best to break it down and explain how it works.
What is the Mentor System?
The Mentor system is CounterSide’s equivalent of a referral system in other games.
You can enter someone’s business registration number (their player ID), or pick from a list of recommended players, and then add them as your mentor.
Once you have a mentor, you get a set of new missions to complete, and after you complete all of them, you can claim a random SSR character ticket for a free SSR character.
Aussi, if you complete all of your mentee missions, then your mentor will also receive a reward – win/win!
Adding a mentor is a one-way street; ils ne le font pas’t need to approve your mentee request, so once you add a mentor, you can start working on the mentee missions right away.
NOTE: Tu peux’t change your mentor, Alors choisissez judicieusement (unless your mentor dismisses you; plus à ce sujet plus tard).
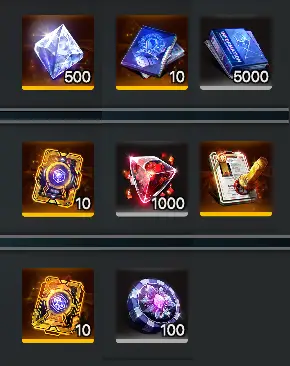
What are the Rewards?
As of September 2022 on the Global server, the main reward of the mentee system is the random SSR character ticket you get for completing all of the mentee missions.

It also gives:
- Quartz (freemium currency)
- S-APT and APT Core tickets (the cubes used to limit break your units)
- Blue tickets (gacha currency for pulling on non-awakened banners)
- Dive currency & Raid currency (Britra)
- Informations (used when skill training, and to start dives & join raids)
- Loyalty contract (basically an « oath ring » that you can use once a unit reaches max loyalty, playing a cutscene, unlocking new voice lines, and preventing them from losing loyalty when failing missions)
None of these rewards are exclusive or « manquable », donc ça’s not the end of the world if you miss out, but at the same time, a free SSR character and a handful of currencies you’ll be running short on as a new player will provide a nice boost to help kick-start your CounterSide journey.
And if you happen to have a good mentor to chat with and help teach you the ropes, that can make a big difference; it certainly did for me.
How do I become a Mentee?
Tout d'abord, il’s important to know that you cannot become a mentee once your account reaches level 26+. c'est à dire. Your account (company level) must be level 25 ou inférieur (inclusive) to become a mentee.
So if you want to become a mentee, il’s best to do this as soon as possible so you don’t risk outleveling it and missing out.
In order to become a mentee, you just need to add a mentor, which is quite simple.
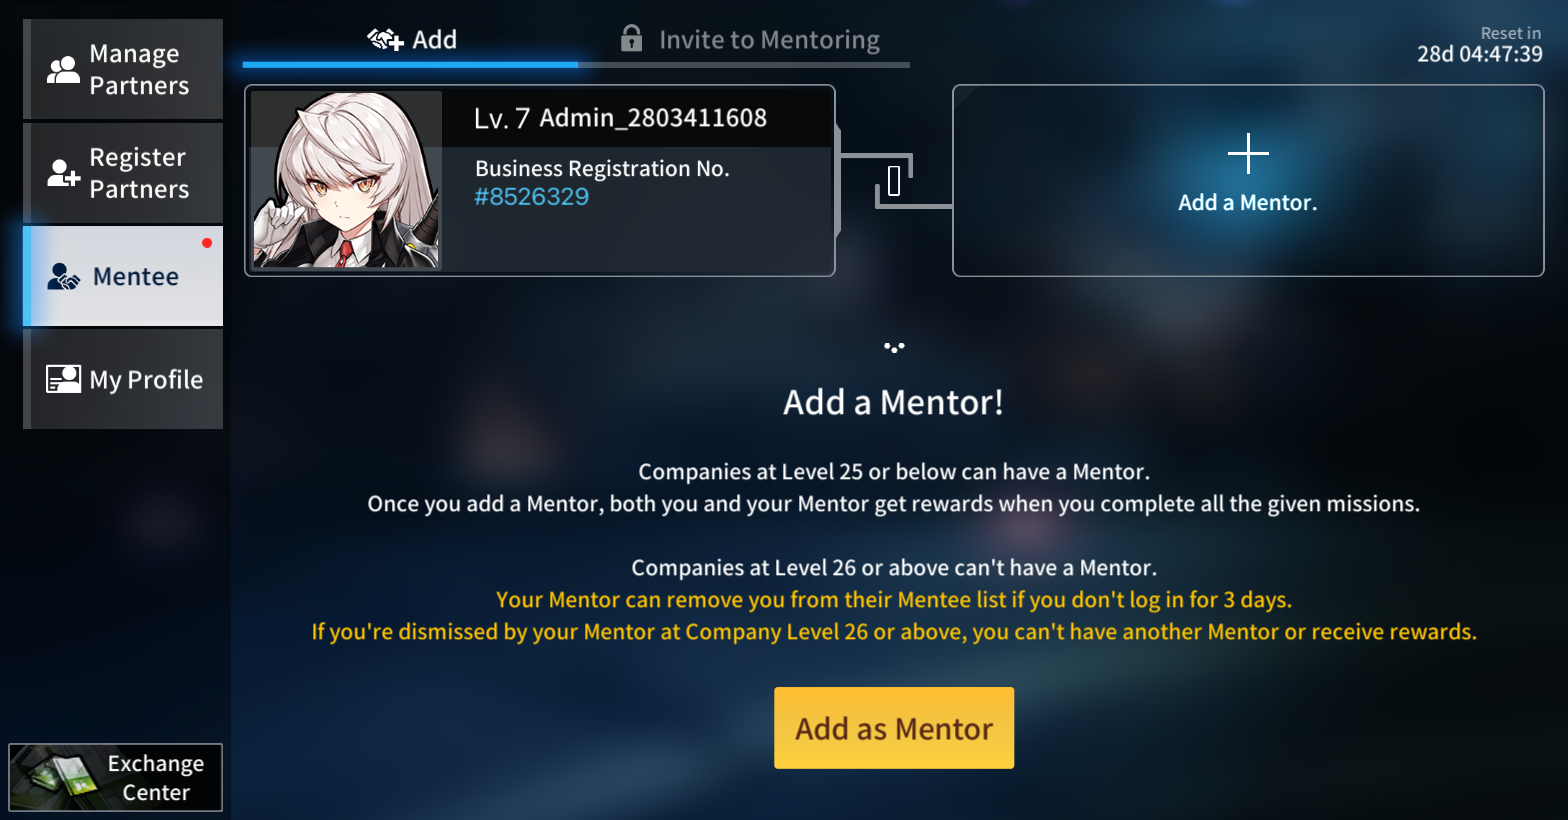
On the Mentee screen, click on either the box on the right with the ‘+’ sign or the button at the bottom of the screen:
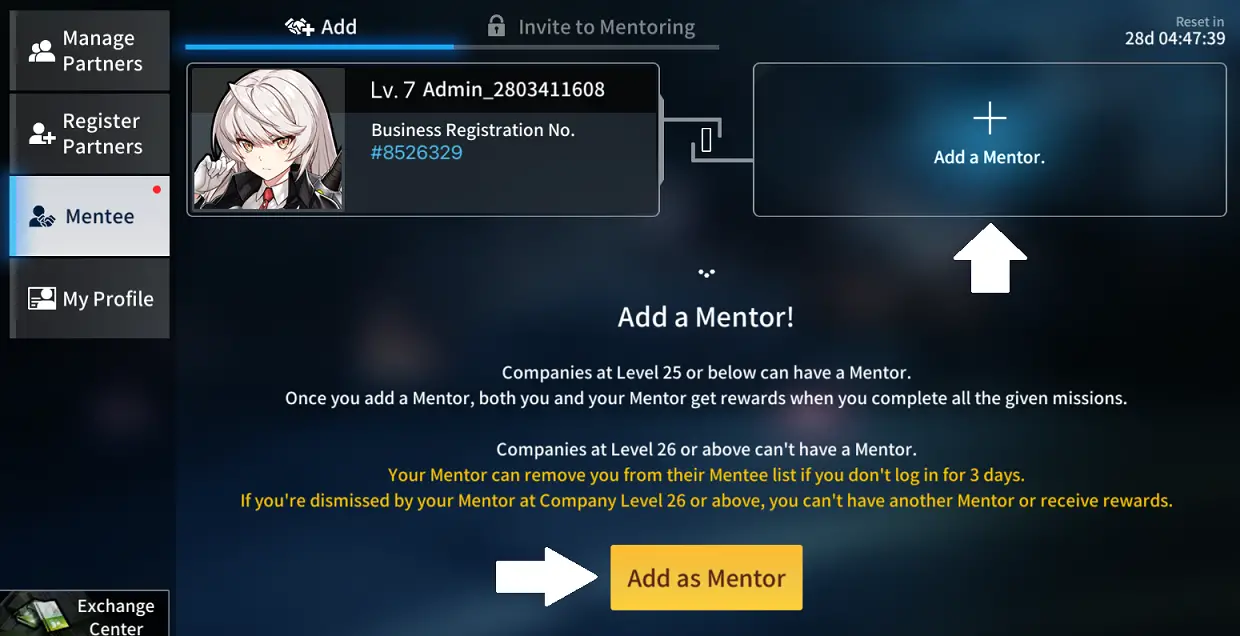
This will bring up a screen with a random list of potential mentors, as well as a search bar where you can enter the name or player ID (business registration number) of a specific player.
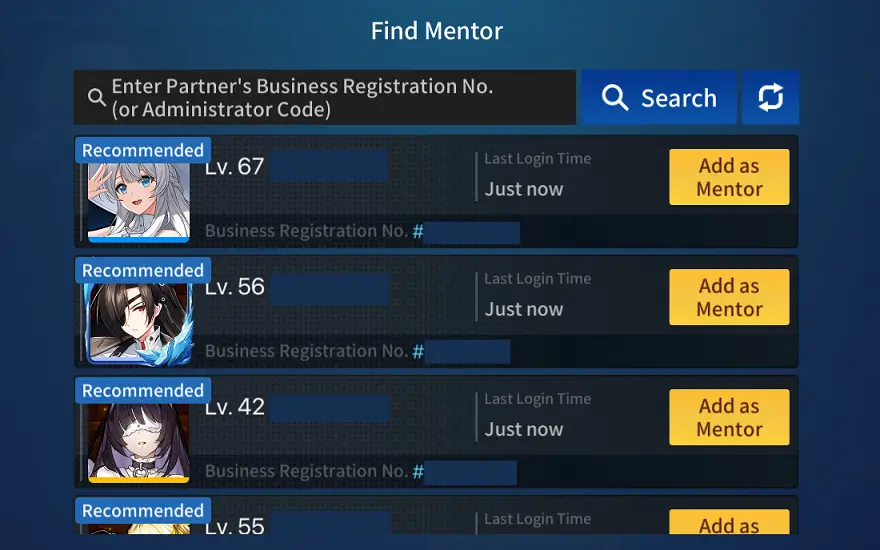
Une fois que vous’ve searched for or picked the mentor you want to add, cliquez sur le “Add as Mentor” button next to their profile.
Puisque tu peux’t change your mentor, Lena will show up and confirm that you’re happy with your selection.

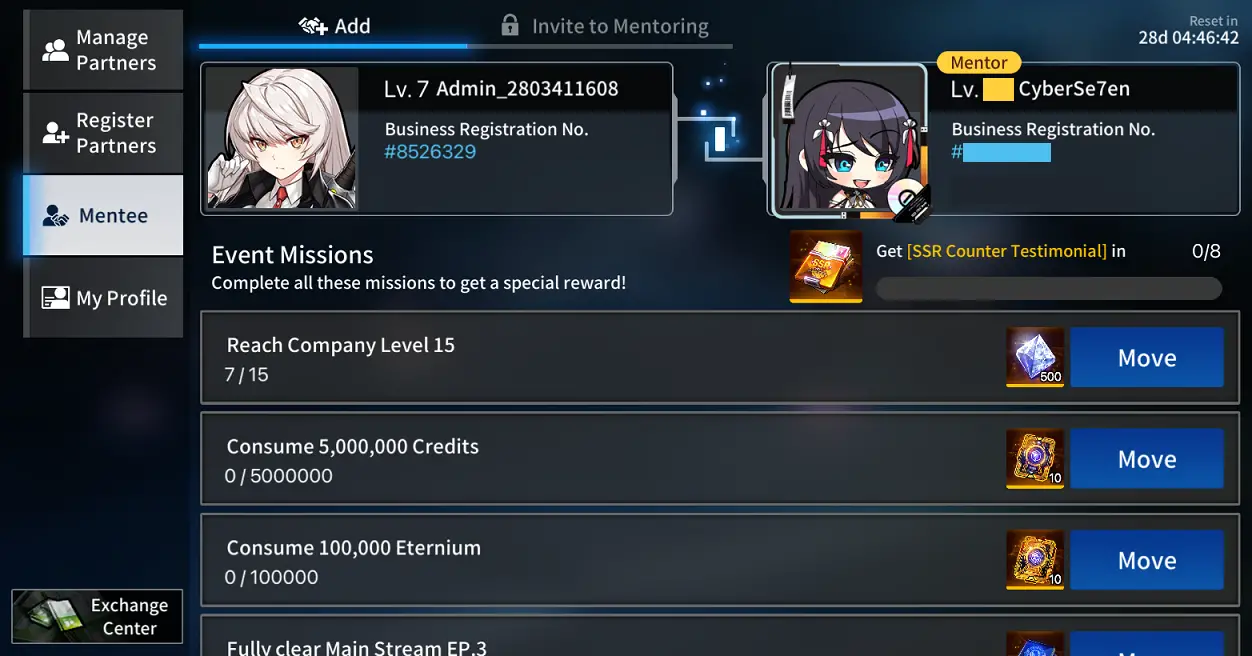
After confirming, your mentor will be locked in, et toi’ll be back on the Mentee screen with a set of new missions to complete.
If you play on the Global server and are finding this guide helpful, consider doing me a favour and adding me as your mentor. 😉 😉
My ID #: 8489092

Mentee Missions
Alors toi’ve added a mentor – super! Now all that stands between you and a free random SSR character is a set of missions to complete.
As of September 2022 on the Global server, the mentee missions are as follows:
Celui-ci’s really simple: get your account to level 15. This will happen naturally just by playing the game.
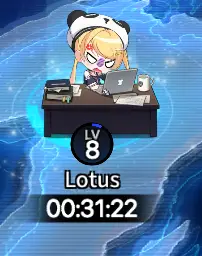
Company level (account level) is the large number you see in the top-left corner of your lobby screen:
Which stages give the most company exp?Usually the highest level / most difficult content you’re capable of clearing.
Unlike some other games, CounterSide doesn’t have dedicated EXP grind stages, so work your way through the main story episodes, do your dailies (supply operations, simulations, histoires parallèles, rotating challenge stages once you can clear them), and farm the hardest event stage that you can clear.
Très simple – joue juste au jeu.
Toi’ll use credits for things like buying items from the daily shop, crafting equipment, upgrading equipment, quickly leveling units with Salary Negotiation (enfiler’t go overboard with this – credits are NOT a throwaway currency in CounterSide!), and probably more that I haven’t listed.
Eternium is the name of the stamina/energy system in CounterSide. Encore, joue juste au jeu (Voir: mission #1).
Clear all of Episode 3 de l'histoire principale (in Normal mode). Toi’ll want to work towards finishing Episode 5 de l'histoire principale, donc toi’ll finish this mission along the way.
Vous ne’t have to 3-medal or 100% the episode for this mission, just clear it.
These are your expeditions / logistics missions / etc., where you can send out units or ship squads on timed missions and they bring back loot once they’c'est fini, with a chance of getting bonus items from “Grand succès” (odds based on the level of your branch manager unit).
On the World Map, you can open branch locations, and each branch can send out 1 dispatch mission at a time.
This mentee mission is time-gated, donc toi’ll need to wait up to a week to finish this one depending on how many branches you have, and how often you can check the game and send your employees back out on dispatches. Dispatch missions of all types count towards this, donc c'est le cas’peu importe si c'est’s Exploration, Exploitation minière, Office Work, La défense, etc..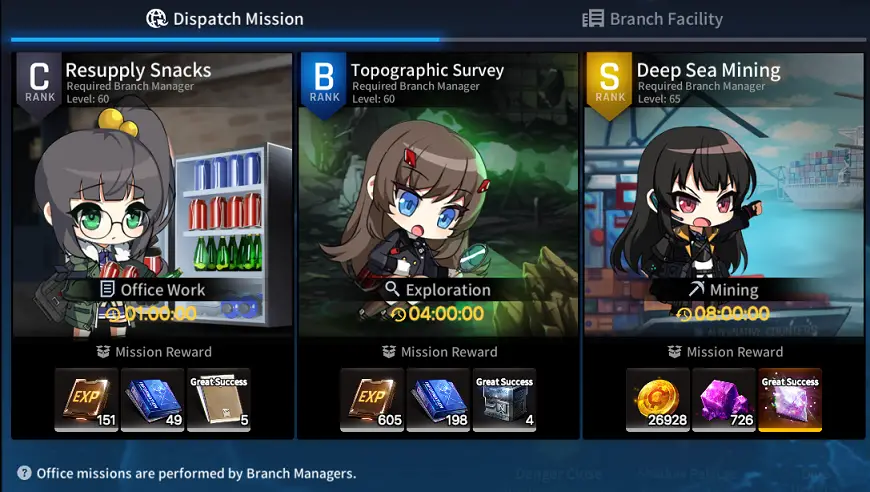
Effacer tout 15 dives, which include the ones in the bottom-right of the World Map screen, as well as any dives which may randomly appear after completing a dispatch mission.
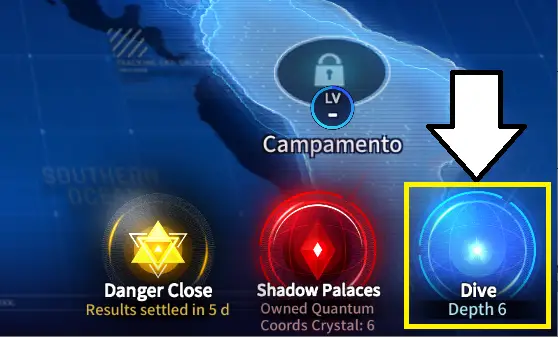
This mission is also related to World Map branches (see mission #5).
On the bottom-left of the World Map, là’s a button labelled “Exploration Status”.
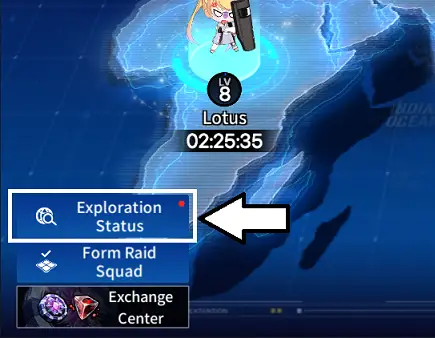
Si vous ne’t see this button, then you haven’t unlocked Raids yet.To unlock Raids, you need to send out dispatch missions from your branches until you randomly get a raid to spawn and then either share it (to your friends and consortium) or kill it.
How do you spawn a raid? Là’s a small chance to spawn either a raid or dive after completing any dispatch mission, et ça’s completely random. Il’s recommended to spam the 1 hour dispatch missions to have more chances at spawning your first raid. Welcome to gacha-within-a-gacha hell. 🙂
Aussi, si tu’ve looked at branch facilities at all, Non, the CSE Passive Radar will not help with this (it increases the chances of finding higher-level raids & dives, NOT the base chance of spawning one in the first place). (Distortions refer to dives and raids collectively, and you can only have one active distortion per branch, so if you have an uncompleted dive on that branch, then you can’t spawn a raid there).
De toute façon, une fois que tu’ve sacked your way to success with your first raid spawn, clicking on the “Exploration Status” button opens a screen with a tab called Support Request, which is where you will see raids discovered and shared by your friends and consortium members.
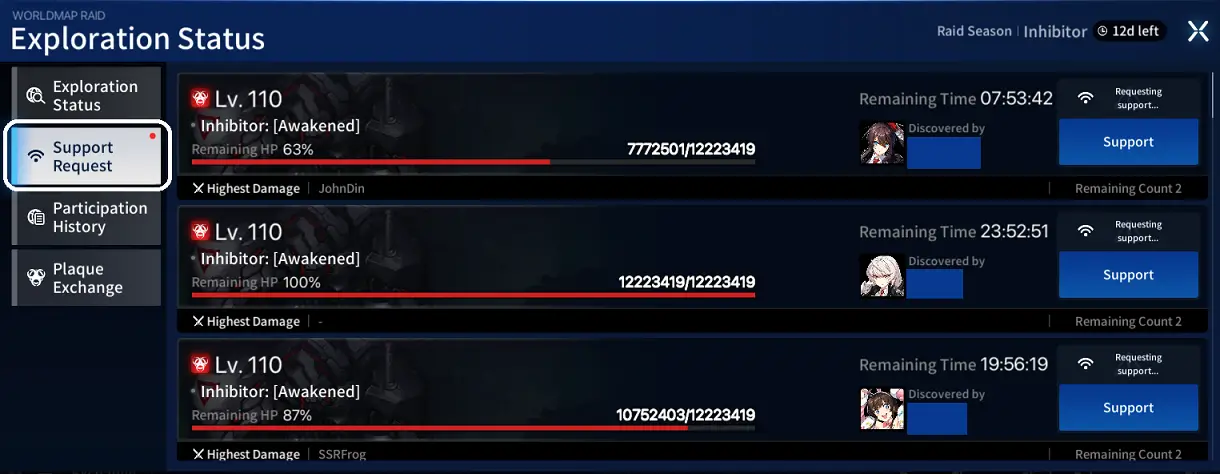
To complete this mentee mission, vous devez “Soutien” and attack a raid 5 fois. Ce n'est pas le cas’t have to be five different raids, but you only get 2 attempts per raid (le “Remaining Count: 2” dans la capture d'écran ci-dessus). After you attack a raid at least once, toi’ll instead see that raid in the “Participation History” languette, alongside your own raids (Que vous’ve attacked them).
Pendant que tu peut attack raids that you discovered, il’s a waste to do so because the raid discoverer is already guaranteed maximum loot when their raid is killed.
Recruter 50 times from any gacha banner, including awakened units (c'est à dire. NOT the Recruit-through-Partners banner). This mission can be more annoying if there are no free recruit events going on.
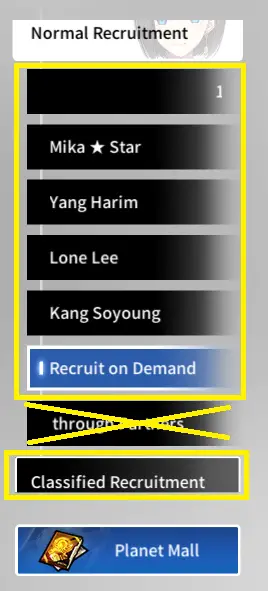
Some advice here: do not spend your quartz to pull on blue ticket banners (including the new player banner the game tries to force you to roll on – you can exit out of the game and reopen it to skip that « obligatoire » pull).

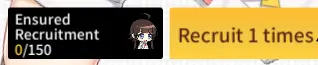
You want to save your blue tickets for banners with pity (“Ensured Recruitment”):
(aussi, Yang Harim is fantastic and highly recommended if you can get her!)
Blue ticket banners do NOT carry this pity over, donc à moins que tu’re rerolling accounts (which you currently CANNOT do on Steam), keep in mind that pulling for a regular banner unit when you don’t have enough blue tickets to pity them can end in disaster…

Next steps and becoming a Mentor
Alors toi’ve gotten a mentor and completed all of the mentee missions.
Félicitations! Quoi’c'est le prochain?
Mentee rewards are a one-time thing per account, so claim your rewards and you’c'est fini. (Good luck with your random SSR ticket!)
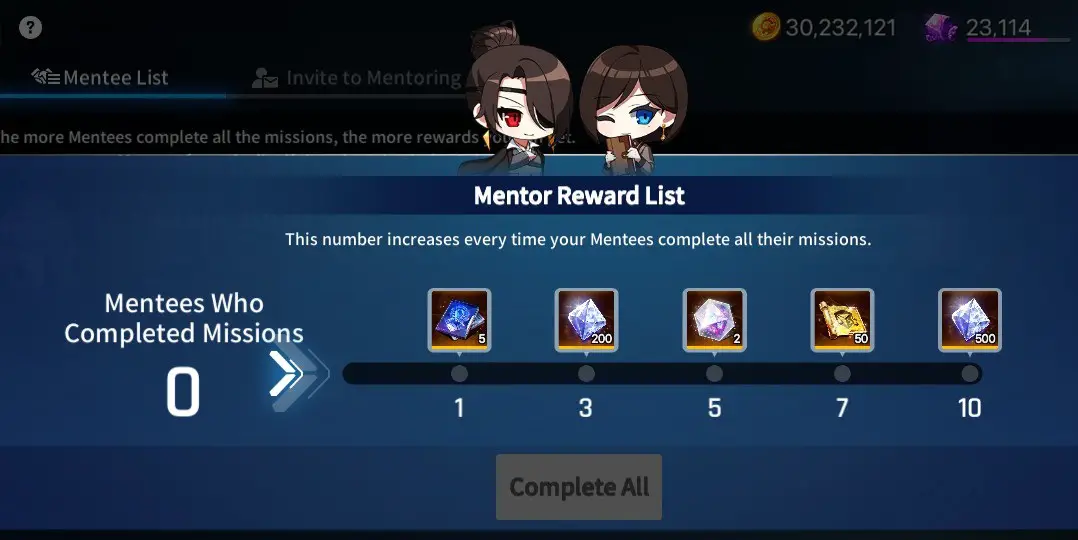
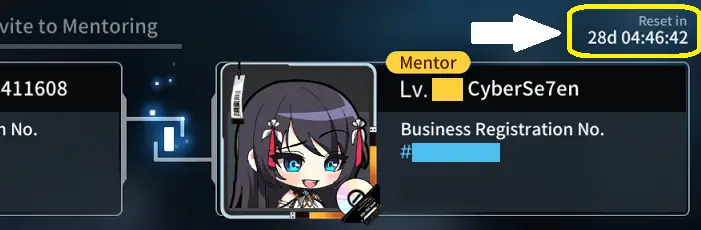
Once you reach company level 26+, you can become a mentor, where you get rewards each “saison” (the time limit in the top-right corner of the Mentee screen) based on the number of mentees you have who finish all of their mentee missions in time.
Getting kicked out of the Mentee system
If you already have a mentor when your account reaches level 26+, then you can still continue with your mentee missions; tu as gagné’t be kicked out because of that.
Si vous avez’t finished all of the missions and you’re inactive for 3 or more days, your mentor can choose to dismiss you, forcing you to find a new mentor.
If your account is already level 26+ when your mentor kicks you, alors vous’ll be unable to add another mentor and be permanently locked out of these rewards.

Even though you can only fully complete the mentee rewards once per account, the Mentee / Mentor system resets roughly every 90 jours, allowing mentors to get more rewards from new batches of mentees.
You can see the time limit for this in the top-right corner of the Mentee tab screen.
je’m not sure what happens if you fail to complete all of the mentee missions before this time limit expires but unless you happened to start playing CounterSide shortly before this reset takes place or you have terrible luck unlocking the Raid system,
je le ferais’je ne prends pas le risque!(Aussi, if this happens to you, let me know what happens and how this part works!)
tl;dr:Enfiler’t slack on your mentee missions and you shouldn’t have any problems! Slacking and inactive mentees make your mentor cry. 😢
C'est tout ce que nous partageons aujourd'hui pour cela CounterSide guide. Ce guide a été initialement créé et rédigé par CyberSe7en. Si nous ne parvenons pas à mettre à jour ce guide, vous pouvez trouver la dernière mise à jour en suivant ceci lien.