

- Titre: Appel du devoir: Opérations noires III
- Date de sortie:
- Promoteur:
- Éditeur:
Informations sur Call of Duty: Black Ops III est encore incomplet. S'il vous plaît, aidez-nous à remplir les détails du jeu en utilisant ceci formulaire de contact.
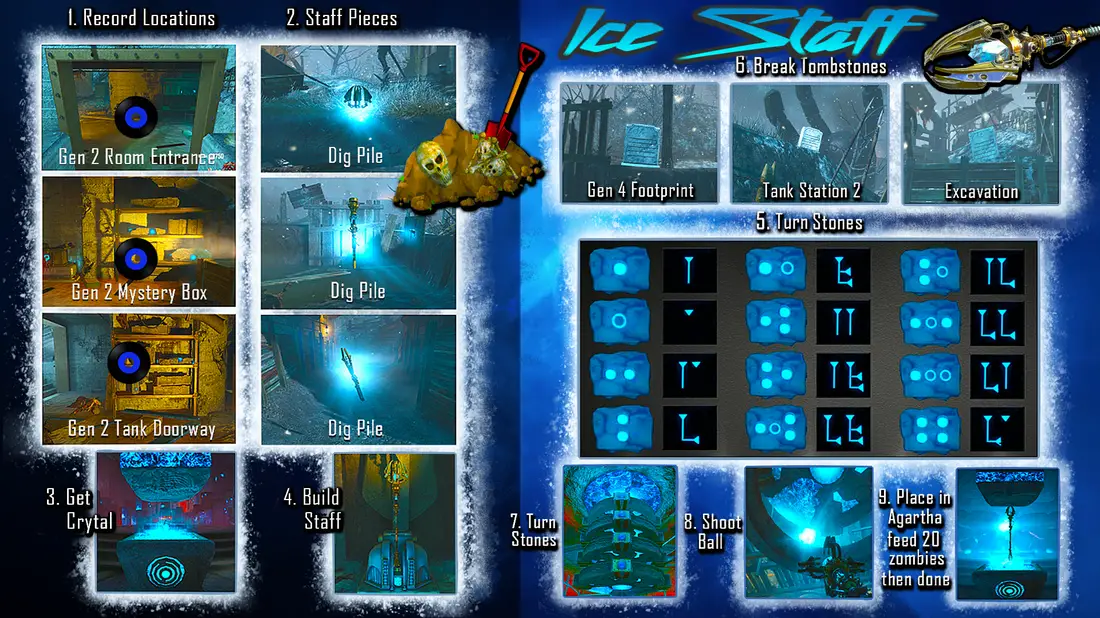
This guide will hopefully help all of you have no issues upgrading the Ice Staff so you can go for them sweet high rounds in Call of Duty: Ops noirs 3.
How To Get Ull’Flèche
Disc Location
The blue disc is always inside the building next to Generator 2. Either on the front table, weapon box shelf or shelf next to the rear door.
Part Locations
The Ice Staff parts have no set locations but they do have specific requirements. Players must wait until it is snowing and then dig up the rubble piles on the floor. Usually this involves opening every section of the map and exhausting every dig site until you get all three.
Black Disc
The Black Disc is used in combination with the Gramophone to open the lower level of the excavation site. Il’s always found in one of three locations:
- On a box, bottom of the walkway leading up the excavation site (Générateur 2 côté)
- On a box, opposite side of excavation site, near the entrance leading to church
- Top of the excavation site, in a wheelbarrow beside PaP
Gramophone
The Gramophone is always inside the central excavation site (dig site), one level downstairs on the floor. Players should place the Gramophone on the table to open the secret sub level with the Staff statues. A good tip is to always open the bottom section of the excavation site and then immediately pick up the gramophone so you don’t need to go back for it later.
Final step
Once you have the parts, disc and gramophone go to Generator 6 (back of the church). Go down the tunnel, place the gramophone on the table and wait for the blue portal to build. Head into the crazy place, get the crystal from the blue pedestal and leave the crazy place by rebuilding the blue portal.
Enfin, go back to the central excavation site, go to the bottom level and build the staff using the statue.
Upgrade Steps
- Solve the Ice Staff Puzzle. With the Ice Staff equipped go to the crazy place through the blue portal. Look immediately upwards and take note of the slabs with blue symbols on them. Aussi, note the blue symbol on the wall. Solve the puzzle by using the Ice Staff to shoot the correct slab on the ceiling that corresponds to the symbol on the wall. Repeat several times.
- Shoot the Gravestones. Leave the crazy place and go back to the outside world. Tirer 3 x gravestones with the Ice Staff and then shoot with a regular weapon.
- Line up the Gems. Go to the lower level of the excavation site (where the Staff statues are) and take note of the circular rings floating above. Each ring has four colors germs on the sides. You must rotate each ring so that all the BLUE gems line up. Pour faire ça, pull the levers which are also located on the lower level of the excavation site, on wooden scaffolding platforms, besides the walkway, etc.. They look like power switches. Once all the rings are lined up, use the Ice Staff to shoot the blue orb at the bottom of the rings to send it upwards and through the rings.
- Charge the Staff (Collect Souls). Ice Staff in the pedestal. Enfin, head back to the crazy place using the BLUE portal. Place the Ice Staff in the pedestal where you originally picked up the gem. Now kill 2-30 zombies in the vicinity to charge the staff.
- Une fois fait, pick up the staff and the upgraded version is yours to enjoy!
J'espère que cela vous aide!
C'est tout ce que nous partageons aujourd'hui pour cela Appel du devoir: Opérations noires III guide. Ce guide a été initialement créé et rédigé par StanLalisa. Si nous ne parvenons pas à mettre à jour ce guide, vous pouvez trouver la dernière mise à jour en suivant ceci lien.