
- Título: Noble Fates
- Fecha de lanzamiento:
- Revelador:
- Editor:
Information about Noble Fates is still incomplete. Por favor ayúdanos a completar los detalles del juego usando esto formulario de contacto.
This guide will be showing you the steps on how to mod Noble Fates. We will be covering the proper setup, making your first mod, source controls, y más.
This guide assumes that you have already read the NF user echo for modding. Located aquí.
I will try to keep repetition to a minimum. If there’s a reference for something it will be linked rather than explained again.
Configuración
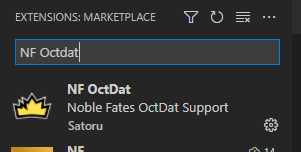
It is recommended to use Código de estudio visual. I have made an extension for octdats to help with modding. You can search NF OctDat in VSC to get it. Alternate link aquí.
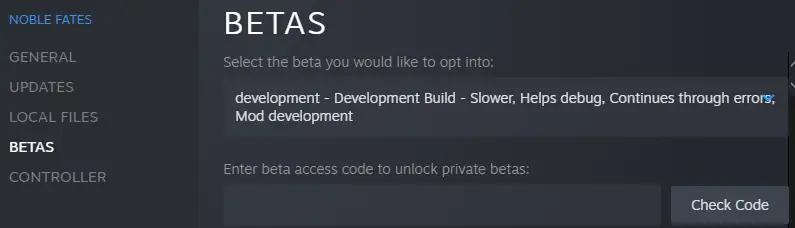
Go to Noble Fates in Steam. Haga clic derecho > Noble Fates > Propiedades > Betas > Desarrollo
The Development branch supports two cmd line options. Combine both to start playing immediately.
- «-skipmenu» skips the main menu and jumps straight to a new game.
- «-skipintro» skips the intro and dumps you in-game.
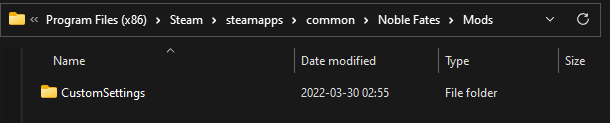
Open the game folder. Create a «Modificaciones» folder if you don’t have one already. Make another folder for your mod.
Create a new text file and rename it MyMod.octdat, or whatever your mod name will be.
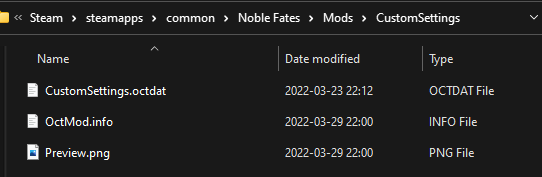
OctMod.info & Preview.png are explained aquí. This is for uploading your mod to the Steam workshop. If you do not wish to upload your mod then you can skip this part.
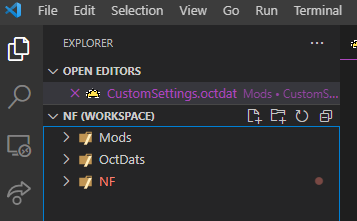
Open VSC and set up a workspace. You can do this by dropping the folders you want into the sidebar.
I generally keep 3 main folders here.
- …\Steam\steamapps\common\Noble Fates\Mods\ – Main game mods folder
- …\Steam\steamapps\common\Noble Fates\Noble Fates_Data\StreamingAssets\OctDats – All the games OctDats
- …\NF\MyMods\OctDats – This is my git repo folder.
When you set it how you like, Archivo > Save Workspace As…
Making your first mod
Open the OctDats folder in your workspace and navigate to Settings > GameSettings.octdat
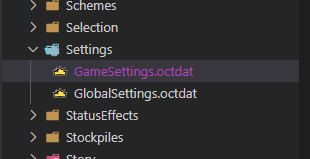
Here is the game’s Raid Chance settings slider.
{
id Oct.Settings.Game.RaidChance
type SliderSettingDefinition
name = Raid Chance
order = -900
categoría = <Oct.Settings.Game>
mín. = 0
máximo = 2
paso = .1
unidad = x
defaultValue = 1
}
Dejar’s break this down a bit first.
The ID is specific to each object. If you want to edit an existing value in the game then you would use the same ID and TYPE. You only need to add the property/value that you wish to change.
Open your octdat and paste the below into it. Set the value to whatever you want.
Save the file and load the game.
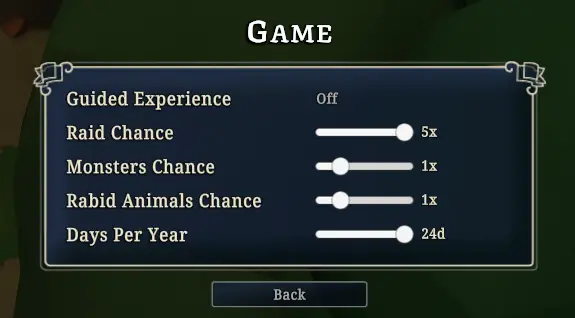
To check this setting you must load into a new or saved game. Opciones > Juego
{
id Oct.Settings.Game.RaidChance
type SliderSettingDefinition

máximo = 5
}
We can see here that the mod does indeed work. Felicitaciones!
Source Control
If you are familiar with this then go ahead and skip this section. De lo contrario, it is highly recommended that you use source control of some kind.
I personally prefer GitLab. En Windows, yo uso GitHub Desktop software. It’s a nice all-in-one GUI. Simple and easy to use. De nuevo, this is my preference and you are welcome to use whatever you like. Even if you use CLI only.
Link to my NF GitLab como referencia.
If you need help there are endless amounts of information on the net about Git and source control. Feel free to ask in the discord for help as well.
Licuadora
Exporting:
- animaciones
- Remove the body/head
- Mark the new actions F (force user)
- Kill any NLA tracks
- Malla
- Apply transforms
- Export settings
- Fbx 7.4 binary
- Escala: .01
- Apply Scalings: FBX All
- Controlar !EXPERIMENTAL! Apply Transforms
- Reforzamiento
- Uncheck Add Leaf Bones
- Primary Bone Axis: Y
- Secondary Bone Axis: -X
- Animación
- Uncheck Key All Bones
- Uncheck NLA Strips
DLL Mods
This guide assumes you have experience in C# and using Harmony/Bepin. Harmony or Bepin are not required.
I would recommend you look at the example DropsMod.
Setting up Visual Studio
You will need to download Visual Studio if you do not have it already.
Opcional: Visual Studio 2017
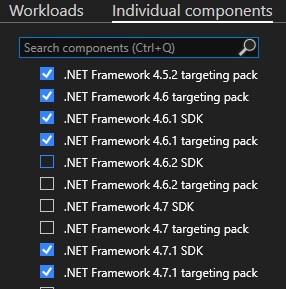
Make sure .Net desktop development workload is checked.
At the time of writing, you should only have to add .Net Framework 4.7.1 SDK to the installation checklist.
//.NET Category .//Code tools Category
.Net Framework 4.6.1 SDK ClickOnce Publishing
.Net Framework 4.6.1 targeting pack Static analysis tools
.Net Framework 4.7.1 SDK Text Template Transformation
.Net Framework 4.7.1 targeting pack
.Net Portable Library targeting pack .//Development activities Category
C# and Visual Basic
.//Cloud, database, and serve Cat.
CLR data types for SQL Server
Data sources and service references
.//Compilers, build tools, and runtimes Cat.
C# and Visual Basic Roslyn compilers
MSBuild
Empezando
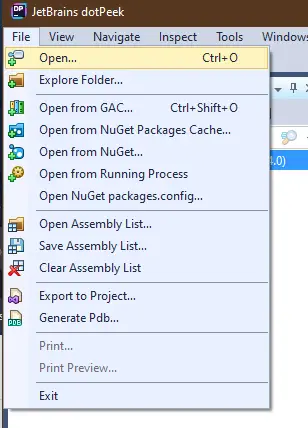
ILSpy & dotPeek are great tools to help view the game’s code. ILSpy is self-explanatory. The info on the linked page will explain how to use it. dotPeek is a separate program.
Open dotPeek. Archivo > Abierto↓
…\Steam\steamapps\common\Noble Fates\Noble Fates_Data\Managed → Assembly-CSharp.dll
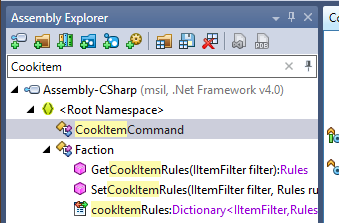
From here you can reference all the games code.
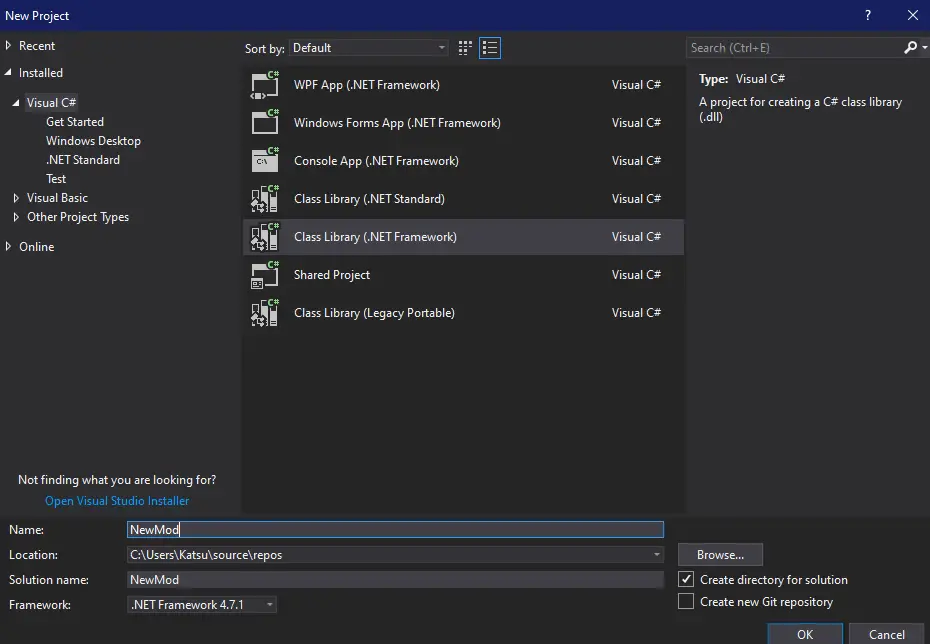
In Visual Studio
Puesta en marcha a new project. Nómbralo. Framework should be set to .Net Framework 4.7.1
Add or remove references as required.

Add References

In my Alchemy mod, I created 2 new commands to accompany the Alchemy job. Básicamente, this is a copy of CookItemCommand.cs
namespace Alchemy
{
public class SynthesizeItemCommand : CraftItemCommand
{
public override string RelevantSkill() => "Alquimia";

public SynthesizeItemCommand(OctSaveInitializer initializer)
: base(initializer)
{
}

public SynthesizeItemCommand(Actor owner, WorkbenchPropActor workbench, ItemRecipe recipe)
: base(owner, banco de trabajo, receta)
{
}

public override string ToString() => this.partial != null ? "Alquimia " + this.partial.item.type.GetName() : "Alquimia " + (objeto)this.recipe;
}

}
In the octdat it is referenced as, commandType = Alchemy.SynthesizeItemCommand
After you build your project you can drop these 2 files into your mod folder. This is all you need.
Eso es todo lo que estamos compartiendo hoy para este Noble Fates guía. Esta guía fue originalmente creada y escrita por Satoru. En caso de que no actualicemos esta guía, puede encontrar la última actualización siguiendo este enlace.