
- Título: Mesa Negra
- Fecha de lanzamiento:
- Revelador:
- Editor:
La información sobre Black Mesa aún está incompleta. Por favor ayúdanos a completar los detalles del juego usando esto formulario de contacto.
By the end of this guide, you will know how to set up a custom singleplayer campaign folder for your modding ventures.
1 – Introducción
Have you ever wanted to go beyond creating maps for Black Mesa and create your own singleplayer campaign like Damocles or Blue Shift? I was once stumped on how to do this myself and searched for tutorials online, but to no avail. Now that I have some knowledge on the subject matter, I felt like it would be beneficial for others to share what I currently know.
Antes de comenzar, it is highly recommended that you install notepad++ instead of using the default notepad.
It is also requerido that you install gcfscape, so that you can extract .vpks.
2 – Setting up the folder
Primero, you’re going to want to navigate to the root Black Mesa directory (this is where bms.exe is).

Próximo, create a new folder. It’s good practice to name this folder a condensed version of your mod’s name. Por ejemplo, I’m going to create a mod called ‘Cool Mod’, so I’m going to name the folder ‘cmod’.

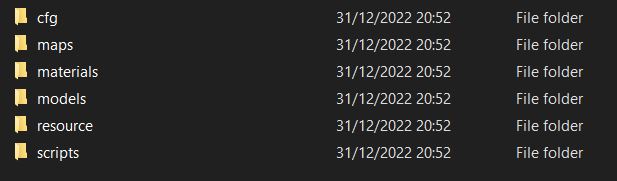
Dentro de esta carpeta, you’re going to create six more folders: ‘cfg’, ‘maps’, ‘materials’, ‘scripts’, ‘resource’, ‘models’.
3 – GameInfo.txt
Próximo, en la carpeta mod, create a new text document titled ‘gameinfo.txt’
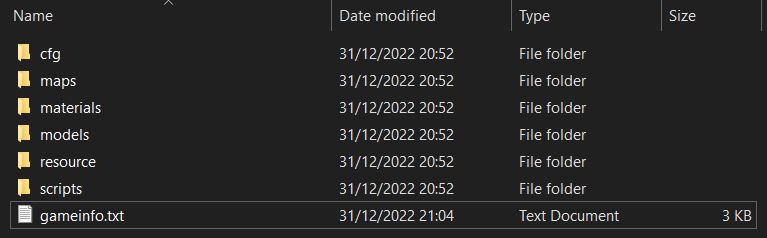
Inside the new text document, paste the following (
nota: this was made using XBLAH’s Modding tool):
// Made with XBLAH’s Modding tool.
// Download it at Github
GameInfo

{

juego "Cool Mod"

gamelogo "1"

revelador " "

developer_url " "

tipo "ambos"

gamelogo "1"

supportsdx8 "0"

supportsxbox360 "1"

nomodels "1"

Nocrosshair "1"

gamedata "../bms"

instancepath "bms/mapsrc/"

oculto_maps

{

background01 "1"

background02 "1"

background03 "1"

background04 "1"

background05 "1"

background06 "1"

background07 "1"

background08 "1"

background09 "1"

background10 "1"

background11 "1"

background12 "1"

background13 "1"

background14 "1"

bm_c0a0a "1"

bm_c0a0b "1"

bm_c0a0c "1"

bm_c1a0a "1"

bm_c1a0b "1"

bm_c1a1a "1"

bm_c1a1b "1"

bm_c1a1c "1"

bm_c1a1d "1"

bm_c1a1e "1"

bm_c1a2a "1"

bm_c1a2b "1"

bm_c1a2c "1"

bm_c1a3a "1"

bm_c1a3b "1"

bm_c1a3c "1"

bm_c1a4a "1"

bm_c1a4b "1"

bm_c1a4c "1"

bm_c1a4d "1"

bm_c1a4e "1"

bm_c2a1a "1"

bm_c2a1b "1"

bm_c2a2a "1"

bm_c2a2b "1"

bm_c2a2c "1"

bm_c2a3a "1"

bm_c2a3b "1"

bm_c2a3c "1"

bm_c2a4a "1"

bm_c2a4b "1"

bm_c2a4c "1"

bm_c2a4d "1"

bm_c2a4e "1"

bm_c2a4f "1"

bm_c2a4g "1"

bm_c2a4h "1"

bm_c2a5a "1"

bm_c2a5b "1"

bm_c2a5c "1"

bm_c2a5d "1"

bm_c2a5e "1"

bm_c2a5f "1"

bm_c2a5g "1"

bm_c2a5h "1"

bm_c2a5i "1"

bm_c3a1a "1"

bm_c3a1b "1"

bm_c3a2a "1"

bm_c3a2b "1"

bm_c3a2c "1"

bm_c3a2d "1"

bm_c3a2e "1"

bm_c3a2f "1"

bm_c3a2g "1"

bm_c3a2h "1"

créditos "1"

}

filesystem

{

steamappid "362890"

toolsappid "211"

searchpaths

{

game+mod "cmod"

game+mod "bms/custom/*"

game+mod "cmod/custom/*"

game+mod "bms/bms_textures.vpk"

game+mod "bms/bms_materials.vpk"

game+mod "bms/bms_models.vpk"

game+mod "bms/bms_misc.vpk"

game+mod "bms/bms_sounds_misc.vpk"

game+mod "bms/bms_sound_vo_english.vpk"

game+mod "bms/bms_maps.vpk"

juego "|all_source_engine_paths|hl2/hl2_misc.vpk"

juego "|all_source_engine_paths|hl2/hl2_sounds_misc.vpk"

juego "|all_source_engine_paths|hl2/hl2_textures.vpk"

juego "|all_source_engine_paths|hl2/hl2_materials.vpk"

juego "|all_source_engine_paths|hl2/hl2_models.vpk"

plataforma "|all_source_engine_paths|platform/platform_misc.vpk"

mod+mod_write+default_write_path "|GameInfo_path|."

juego "bms"

game+game_write "cmod"

gamebin "|all_source_engine_paths|bms/bin"

juego "|all_source_engine_paths|hl2"

plataforma "|all_source_engine_paths|plataforma"

}

}

título ""

Título2 ""

hasportals "0"

advcrosshair "0"

manual ""

icono "resource/icon"

nodegraph "0"

supportsvr "0"

}
Ahora, replace ‘Cool Mod’ with the title of your mod and ‘cmod’ with the abbreviation you previously chose to title the mod folder.
4 – .murciélago
Now we will be creating a new file in the Black Mesa folder
create a new text document, in my case it would be ‘cmod’.

Próximo, change the file extension from a .txt to a .bat.

Próximo, inside the new .bat file, insert the following:
@echo off

if exist "%~dp0\bms.exe" (

comenzar "" "%~dp0\bms.exe" -game cmod %*

) demás (

comenzar "" "%~dp0\..\..\..\..\common\Black Mesa\bms.exe" -game cmod %*

)
Replace ‘cmod’ with the name of your mod folder.
This .bat file essentially acts as the launcher for your mod, so now you should test it out and launch your mod.
5 – Menú
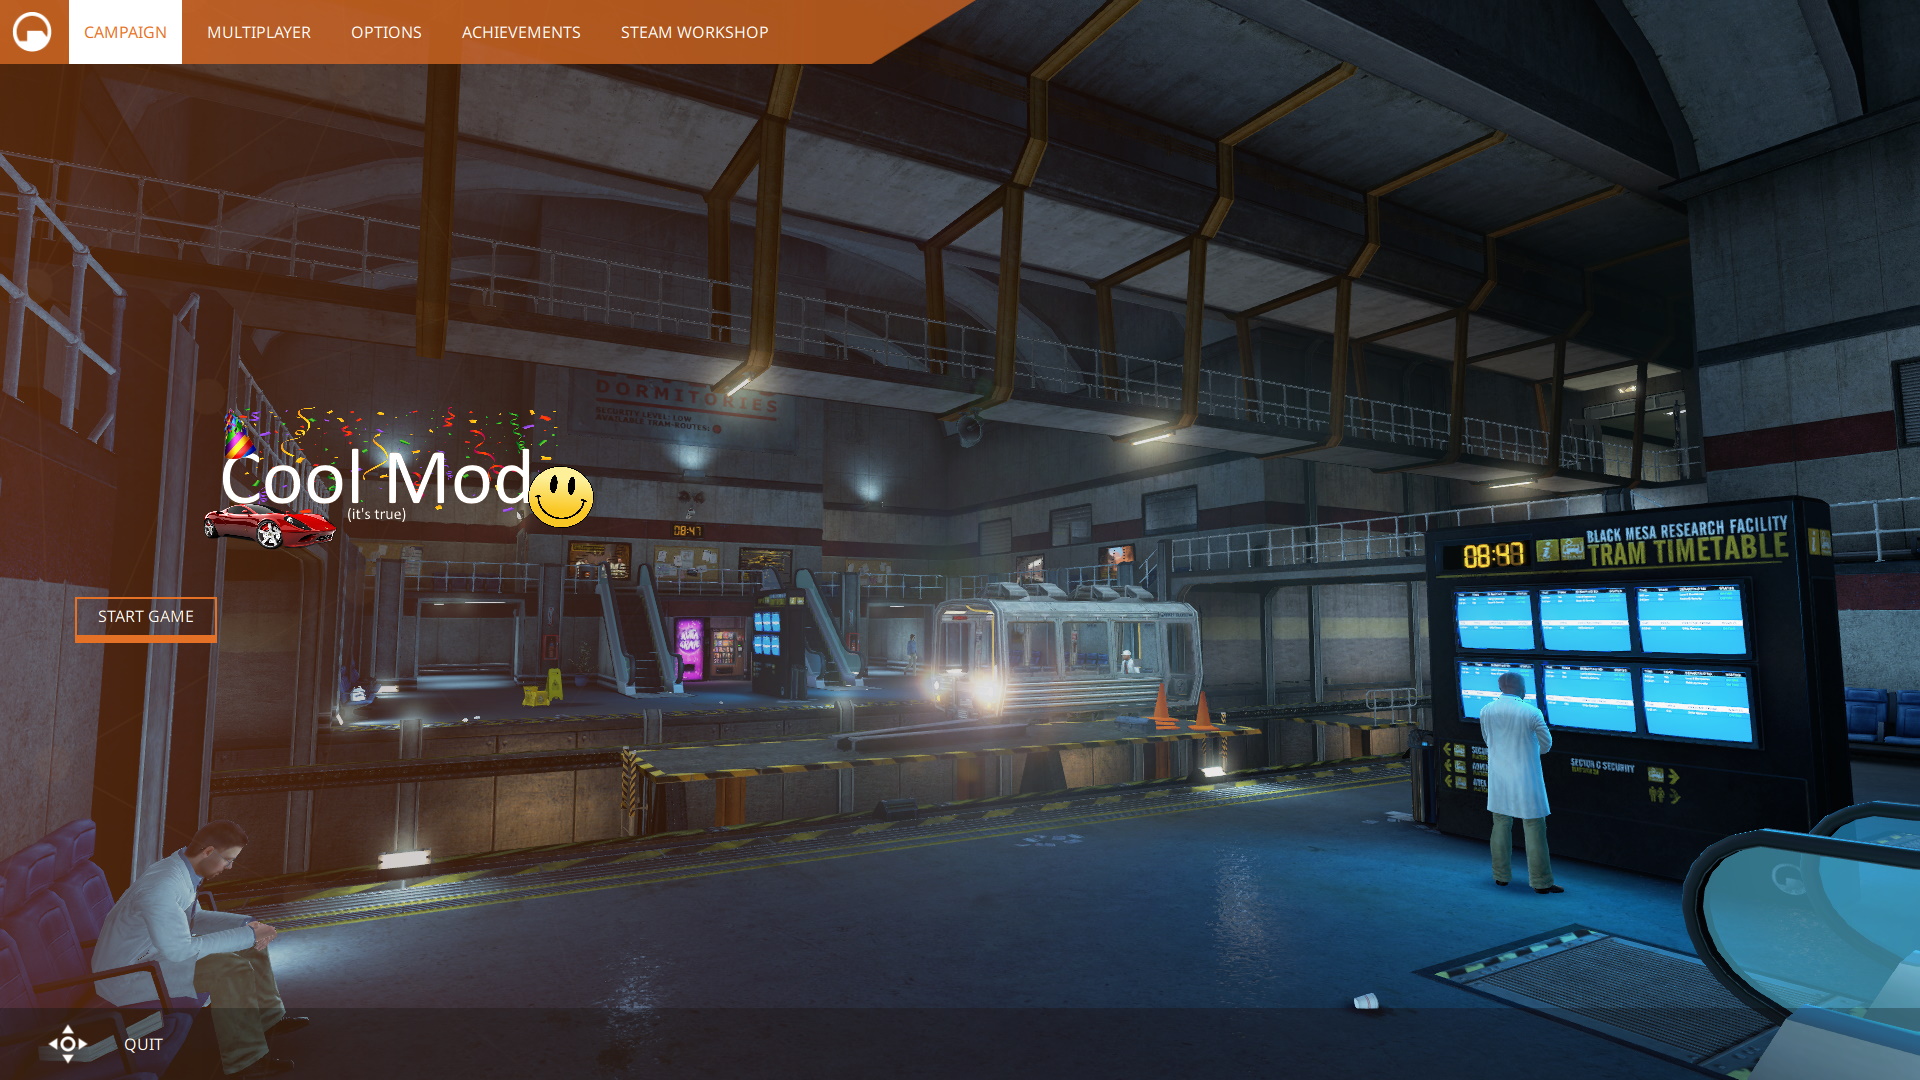
If all has been done correctly, you should see this:
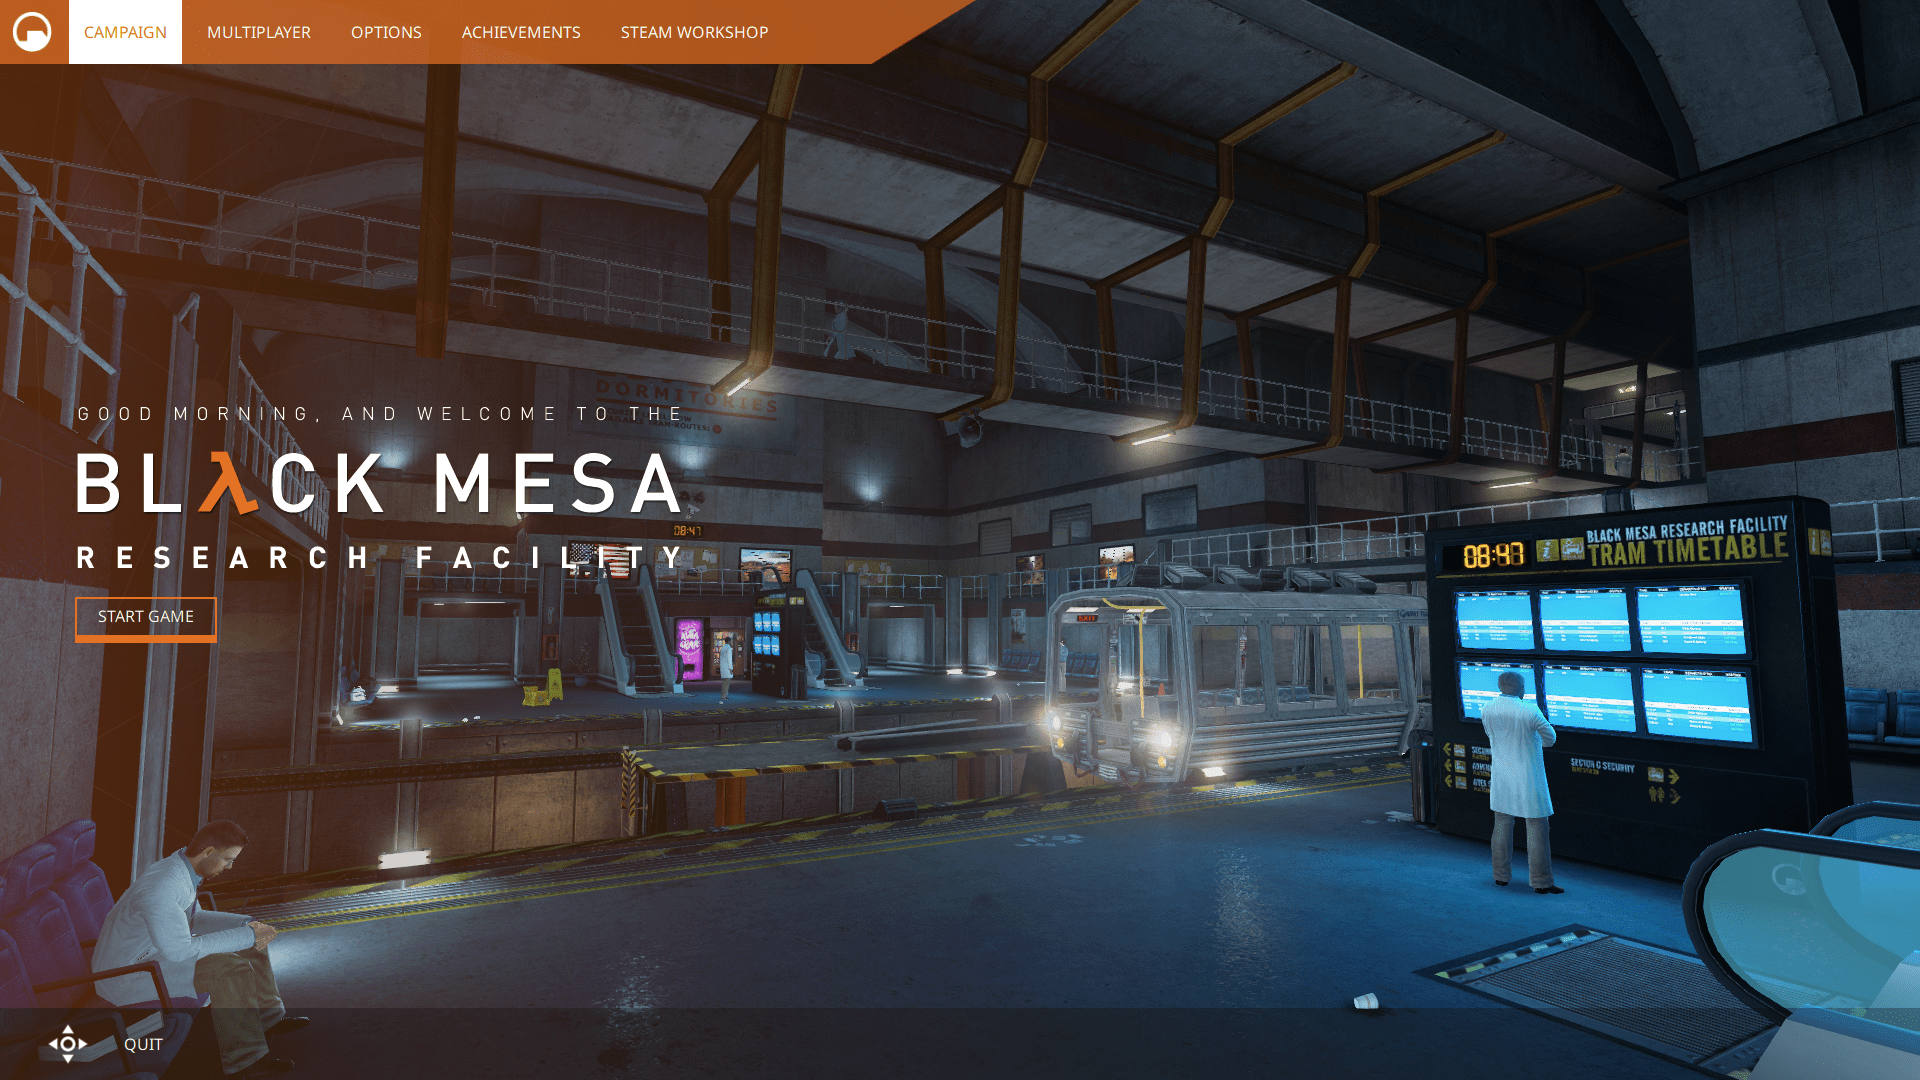
You may be thinking:
«What the hell is going on? Why doesn’t it display the name of my mod as if I were modding hl2?»
Relajarse, we’re going to fix that now.
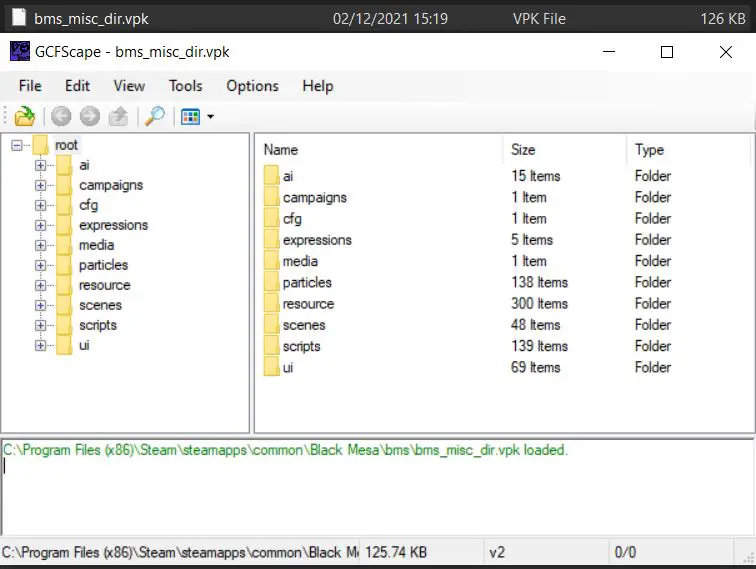
Open gcfscape and navigate to the ‘bms’ folder inside of the black mesa directory. Encontrar bms_misc_dir.vpk and drag that into gcfscape:
Próximo, open the ‘ui’ folder and then the ‘images folder’. Create a new folder inside your mod folder called ‘ui’, and then another folder inside of that called ‘images’.
Select and drag all of the contents of the gcfscape images folder into the images folder of your mod.

Aquí, you may see a familiar image. ‘logo-new.png’, which is the image used for the main menu.

Using an image manipulation program, you can create your own logo and replace the file. En este caso, I created this:

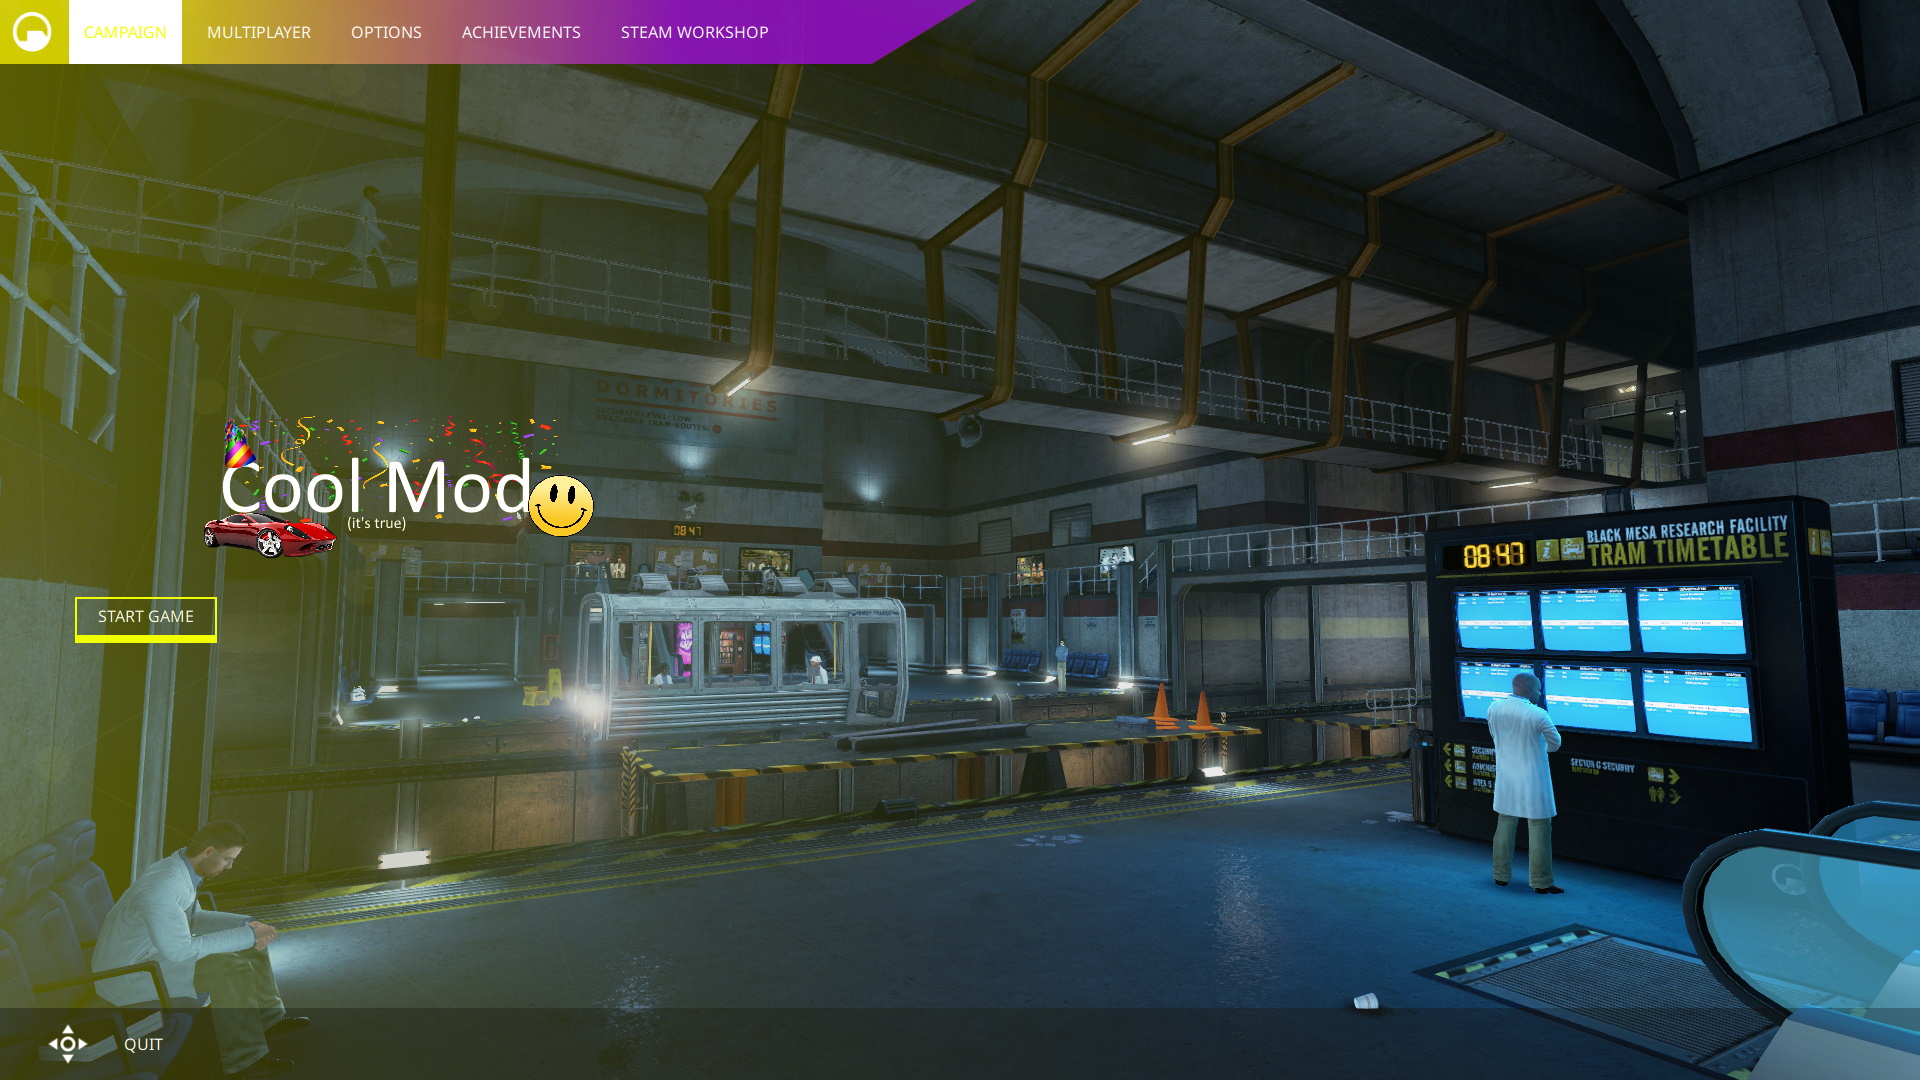
When next loading your mod, you should see your custom logo in action:
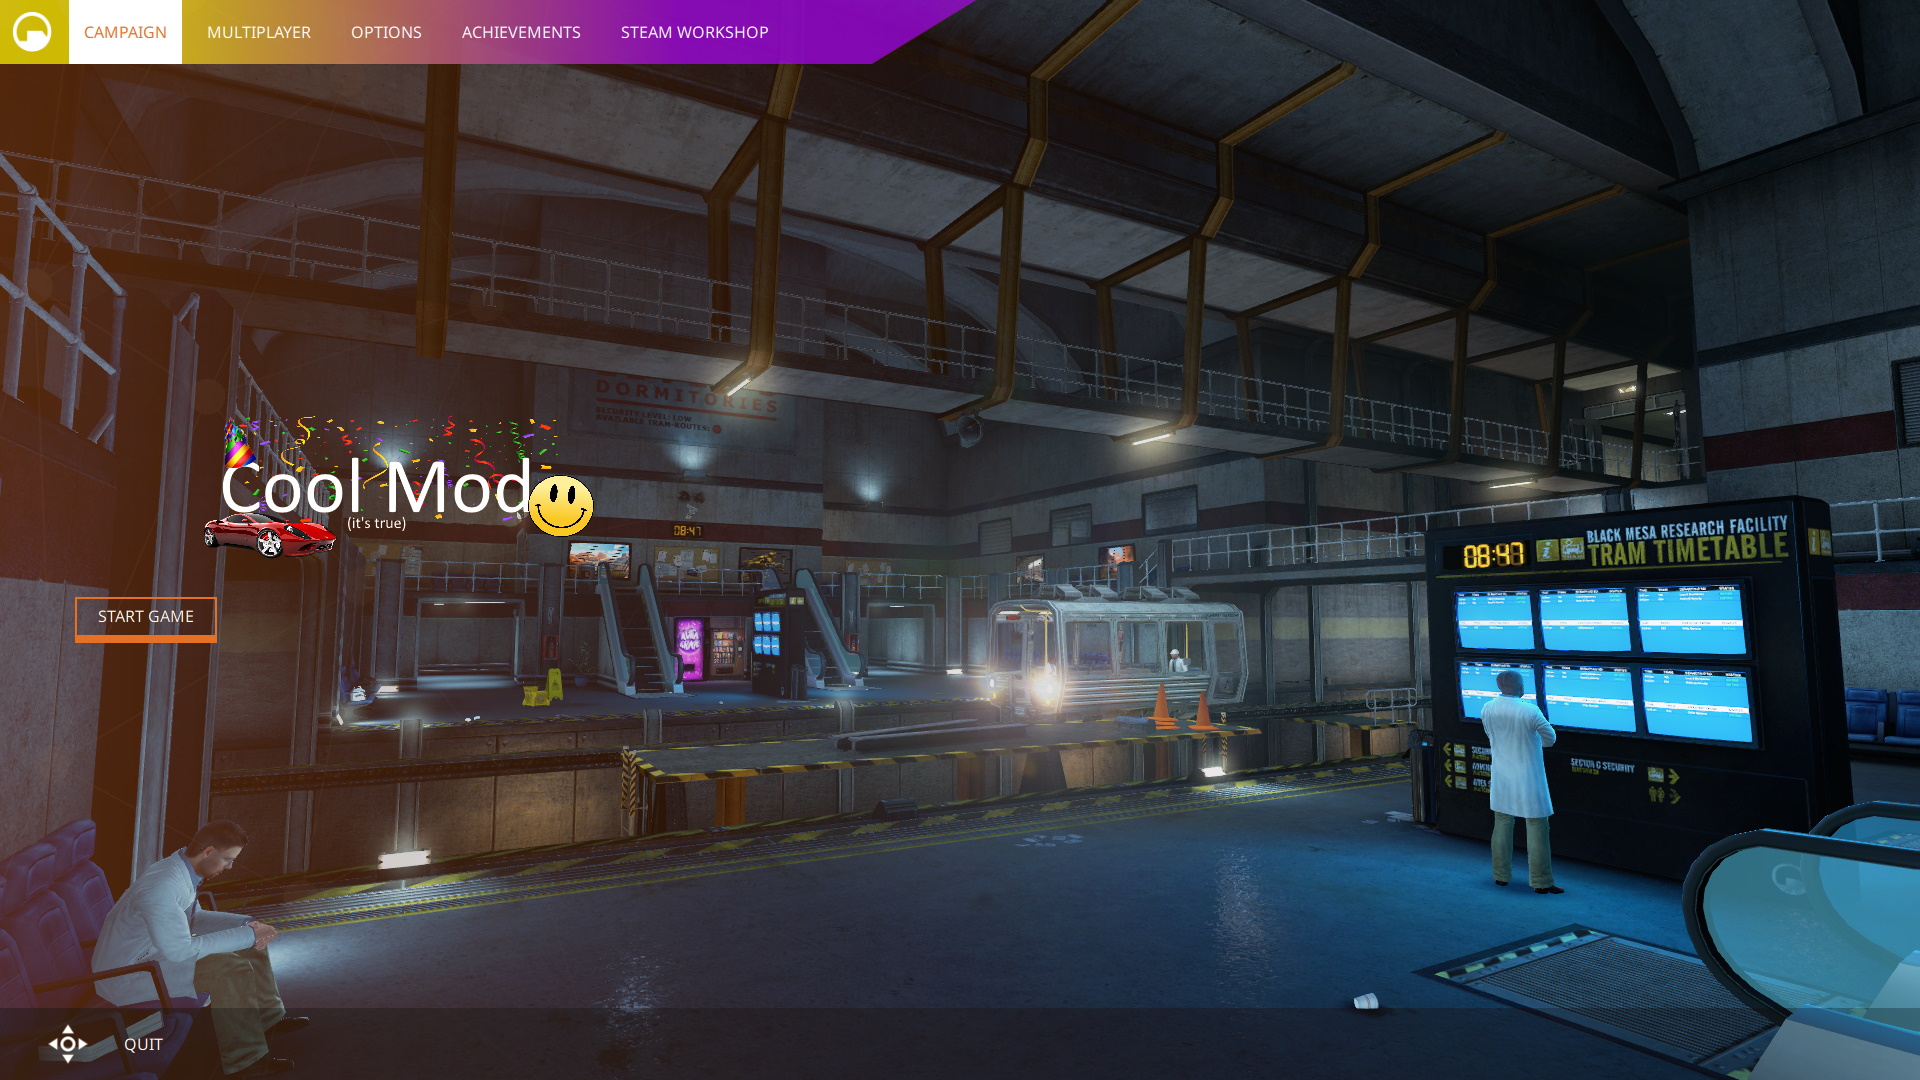
You can also change the colour of the orange navigation bar at the top, by changing the colour of ‘nav-background.png’ using an image manipulation program:
You can then also change the overall ui theme of your mod from orange to and colour you like by editing theme.qml.
Head back to gcfscape and go to the ‘ui’ carpeta. Find a file called ‘theme.qml’ and drag that into the ui folder of your mod.

Head over to line 49 of theme.qml, it should look like: readonly property color highlight: «#e47125»
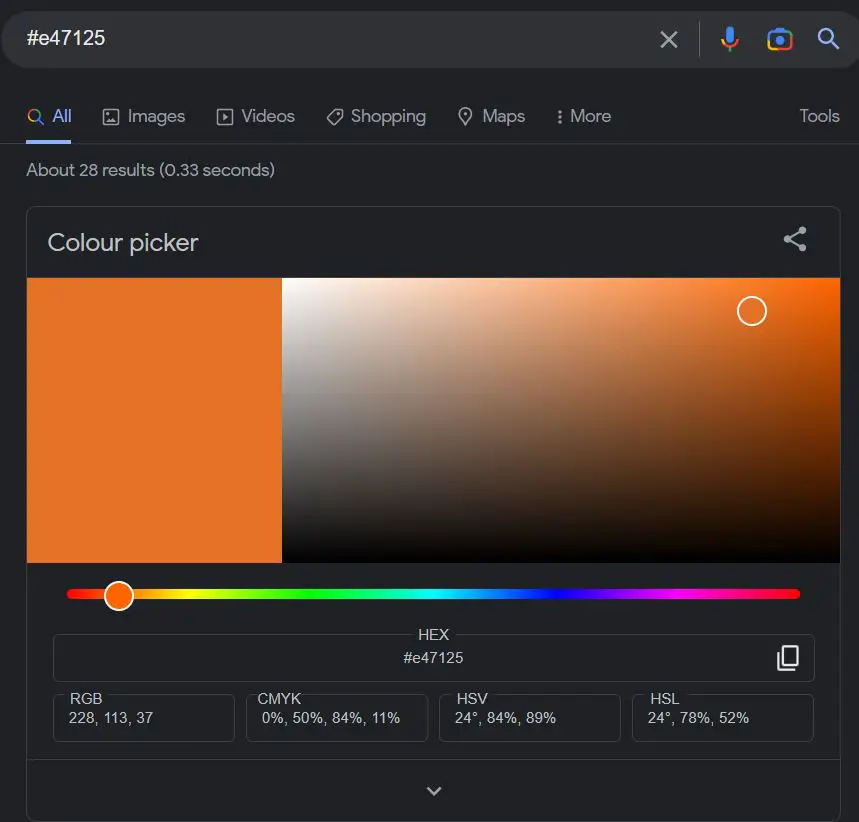
Aquí, we can see that #e47125 is the HEX colour for a shade of orange. Using this tool provided by google, we can get our own HEX colour for the menu
En este caso, I am using #f2ff00, bright yellow.
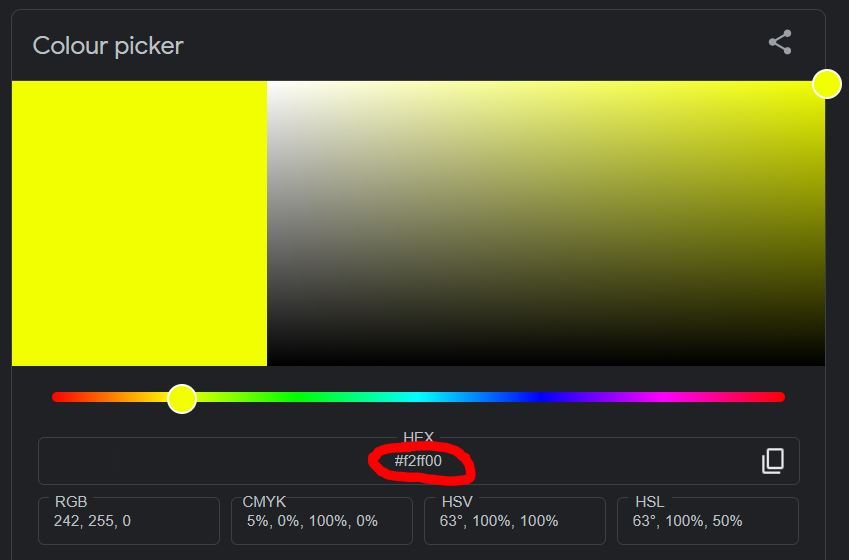
Replace #e47125 on line 49 with a different HEX colour of your choosing.
When you next load your mod, you should see the fruits of your labour:
That is all for this guide at of this current moment. Next time, the guide will be updated with information on how to create chapters.
Eso es todo lo que estamos compartiendo hoy para este Mesa Negra guía. Esta guía fue originalmente creada y escrita por ZombieGrass. En caso de que no actualicemos esta guía, puede encontrar la última actualización siguiendo este enlace.