
- Title: Die Young
- Release Date:
- Developer:
- Publisher:
Information about Die Young is still incomplete. Please help us fill the details of the game using this contact form.
Whether you’re trying to complete an achievement that requires items, running low on molotov parts, or wanting the nearest fuel barrels, you’ll need this list of every item I was able to find and catalog in the game.
About this Guide
This guide contains the locations of all items I was able to find and catalog:
- Regular inventory items (consumables, weapons, etc).
- Special inventory items (keys, documents, etc).
- Crafting materials (Cloth, Scrap Metal, etc).
- Fuel Barrels.
- NPCs and their dropped loot.
- Save points (definitely incomplete list!).
- Buttons.
- Tutorial sections.
The catalog is broken down roughly by area. Within each area they are listed in linear order, as if you were making your way methodically through the level, scavenging every item.
More likely, though, you’re just looking for that one elusive item, in which case, hit Ctrl-F and search the page!
I would be VERY grateful if people could comment with any items I’ve missed. While this list will have ample for anyone’s needs, I’m sure there are items I missed, particularly with the save points.
Achievements that Require Items
I will note in the guide at which point you should (if you are following the guide closely) have encountered the items or locations needed to complete the following achievements:
Locations:
The following achievements are listed in the catalog as completable once you reach the correct location.
- Sewers: Location. No items.
- Harbor Exit 1: Location. No items.
- Harbor Exit 2: Location. No items.
- Live or Die Young: Location. No items.
- Guinea pig: Item: Unknown Drug.
Items:
The following achievements are listed in the catalog as completable once you have encountered enough of the item.
- AA: Item: beer.
- It belongs in a museum!: Item: Ancient idol.
- Brother N.1’s little secrets: Items: 5 documents.
- Headhunter: Items: 20 arrows, 20 NPCs.
- Queen of BBQ: Items: Molotovs and/or torches, 25 NPCs.
- Button Masher: Items: 12 buttons.
- Crafting Master: Item: materials for all craftable items.
- Dog Lover: Items: Dogfood, dog.
- Seven Deadly Arrows: Items: 7 arrows, 7 syringes, 3 packs of poison.
- Rock of Death. Item: Huge Hammer Guy.
- Fast Killer. Item: Huge Hammer Guy.
- Remote control. Item: A button.
Not listed:
The following are not listed in the catalog, as they are neither item-based nor location-based.
- Trust your eyes only. This is completed on playing through without hitting alt. Don’t alt-tab to read this guide! Or if you plan to, remap the alt key.
- (Almost) Pacifist. This is completed by just avoiding killing all the NPCs listed.
- Grim Reaper. I have noted which NPCs do not appear to count towards this achievement. Either the kills for this achievement do not all need to be completed in a single playthrough, or it is broken, as it completed on my second playthrough before I had left the sewers… and before I had ever completed the game and killed the end boss!
- Spare the innocents. This is completed by just avoiding killing the NPCs listed as “Infected” on this list.
- Perfect Stealth. This is completed by just avoiding being seen by the NPCs listed on this list. I am unsure if infected count. I do not believe that it counts either the sewer rats, nor the dogs at the start of the game, as they are unavoidable.
Act I: The Sewers
This is where the game starts.
- NPC: 2 dogs – At the entrance, pipe A1. These can be hurt by thrown stones, or with the stick, but will run away before they can be killed. If you come back with a crossbow, they are gone. Killing them does not seem necessary for the Grim Reaper achievement. They do not appear to mark you as “Detected” for the Perfect Stealth achievement.
- Tutorial: Climbing – Climb up into pipe tunnel A2.
- Weapon/Materials: stick – Pipe tunnel. Weapon/crafting ingredient.
- Tutorial: Melee – End of pipe tunnel A2, for killing the rats.
- NPC: 3 rats – Small junction room after first pipe tunnel. Killable with a stick. No rats appear to mark you as “Detected” for the Perfect Stealth achievement.
- Tutorial: Crouch – The small junction room leads to a smaller pipe tunnel A4 that requires crouching.
- Tutorial: Ladder – Climb up the ladder. The ladder can hurt if you fall down it.
- Weapon: wrench – On the bench in the first room with lockers.
- Materials: cloth, bottle – Climb/drop-down ladder into the sewer, go along dead-end pipe-tunnel B4 to the end. Go back and climb back up the ladder, ready weapon, and jump across sewer to next pipe-tunnel B2.
- NPC: 3 rats – Immediately inside pipe tunnel B2. You can kill these before jumping with thrown rocks if you are wary and trying for the Perfect Run achievement. Continue through the pipe tunnel and climb out of the sewer.
- NPC: man – Inaccessible, crying through a pipe tunnel that is barred at both ends. Does not appear to be necessary to kill for the Grim Reaper achievement, but again, maybe killable with a crossbow? You do not appear to be able to get his attention, so he does not affect the Perfect Stealth achievement.
- Special item: Document – Walk through the door to the right into a passageway. The document is on the highlighted area of the wall at the end of the passage.
- Tutorial: Documents – Pick up the document. The tutorial should make this document impossible to miss.
- Consumable: health-kit – Go upstairs, it’s in a cabinet on the wall of the walkway over the sewer.
- Tutorial: Using Items – Might be better to save the health pack for later.
- Materials: cloth, bottle – Climb/drop-down ladder into the sewer. They are on the watery floor. Climb back up to the walkway once retrieved.
- Materials: 3 wood, 2 binding, 2 scrap metal, cloth – In storage room through the blue door of the walkway. Then walk back out to the walkway, and jump through to pipe tunnel B8.
- Tutorial: Charged Attack – Pipe tunnel B8, for the rats.
- NPC: 2 rats – Pipe tunnel B8.
- Tutorials: Perception, Climbing, Climbing (Handholds) – At the end of pipe tunnel B8 is room to guide you to climb the walls into pipe-tunnel B13. This is the only place in this level other than the first ladder where falling can hurt.
- Material: bottle – Sewer at the end of the pipe tunnel.
- Material: scrap metal: climb out of sewer onto the walkway, it’s on the end near the door.
- Material: cloth – Through the door into the exit room, it’s on the floor.
- Weapon: Crowbar – On the desk of exit room. Also a valuable tool.
- Tutorial: Padlocks – Break tutorial lock to get to the ladder.
- Materials: bottle, cloth – Down the ladder to fuel cans.
- Tutorial: Crafting a Molotov – By fuel cans. Can now craft either 4 Molotovs, or 3 Molotovs and your first torch. Only activate torches when about to strike with them, then switch away once your target catches fire, as they burn out quickly! Note: you cannot hurt yourself with your own Molotovs.
- Tutorial: Throwing Items – Walk through the room onto the walkway.
- NPC: 7 rats – Down sewer below the walkway.
- NPC: infected; Material: binding – Drop down into sewer after flaming the rats, turn right into pipe-tunnel C2, straight across C4 T-junction, and into pipe-tunnel C5. Note, I will list any items I get as loot from each NPC, but they may be randomized.
- Material: bottle – At the end of C5, in another T-junction between C4 and C6.
- Materials: 1 bottle, 1 cloth – In C4.
- Achievement: Sewers – Go along C6, drop down a small section and continue along what might be C7 or C8 now (the name is obscured by flaking mortar). Automatically achieved as you exit.
Note that, unlike many games, you can return back through the tutorial level, all the way to the start at any time before dropping down into the level 3 arena: there are no 1-way gates before that point.
ACT II: The Harbor, West of the Dividing Wall
This section covers your approach and first steps in the refinery until you cross the dividing wall.
Since this is a sandbox level, you can do it in any order, and I’ll try to give directions relative to landmarks on the map.
- NPC: Seagulls – Throughout the level, cannot be killed, not required for the Grim Reaper achievement.
- Materials: cloth, wood, stick – Path on left, northwards from sewer up to another sewer grate.
- Materials: cloth, bottle – At that sewer grate.
- Tutorials: Hiding, Distracting Enemies – In the long grass approaching the gate.
- NPC: baton guard – At the gate. All baton guards drop a baton, and nothing else.
- Tutorials: Perception (Enemies) – Inside the gate.
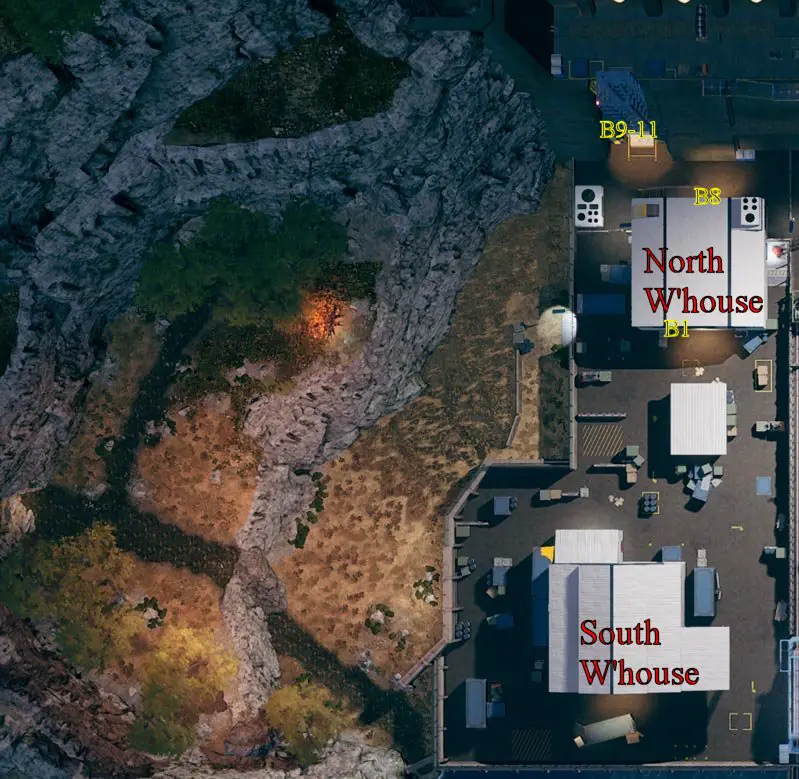
- Button: Button B1 – North Warehouse’s south hangar door.
- Materials: 2 binding, 2 scrap metal, 2 cans of food – Shelving on either side of the hangar door.
- Material: 2 cloth – Top of the North Warehouse’s eastern stairs.
- Material: 4 beers, 2 cloth – North Warehouse’s ground floor, back (north) wall.
- Achievement: AA – Drink 3 beers.
- Fuel barrels – The outside east wall of North Warehouse.
- NPC: baton guard – Patrolling around green office building between North and South Warehouses.
- Weapon, Ammo: a quiver of 5 arrows, crossbow – Green office building.
- Material: bottle – On crate just south of green office building.
- NPC: baton guard – Patrolling around South Warehouse.
- Special Item: Document – On the desk in the office with red doors against the north wall of South Warehouse.
- Consumable: health pack – Office against the north wall of South Warehouse.
- NPC: crossbow guard – Guarding west side of South Warehouse. All crossbow guards drop a crossbow and a number of arrows: I think 4, minus the number they have fired.
- Material: bottle – Behind west guard.
- Material: cloth, scrap metal, binding – Blue storage container against the west wall of South Warehouse.
- Fuel barrels – In blue storage container southwest of South Warehouse.
- Material: binding – Container south of South Warehouse
- Consumable: 3-pack painkillers – Under center shelving stack of South Warehouse.
- Material: cloth – Floor
- Material: 4 beers – Eastern stack of South Warehouse
- Material: Potassium Chloride, 3-pack syringes – After climbing/jumping across the stacks to the broken window, instead of going through it, continue to the center stack.
- Save point – Climbing onto the roof via the stacks.
- Save point – Jumping across to the pipe-bridge from the roof of South Warehouse.
- Save point – Entering the top floor of the eastern Warehouse.
Following items are only reachable after going East and coming back either over the NorthEast Warehouse roof or over the North Warehouse roof.
- Special Items: master key, doc – On the table in an office in North Warehouse, via the roof, jumpable from the infected compound.
- Material: bottle – Office in North Warehouse, jumpable from the infected area.
- Button: #B8 – North side of the North Warehouse.
- Buttons: #B9, #B10, #B11 – Elevator, reachable from North Warehouse Office; or from the top, via the NorthEast Warehouse roof; or from the exit outside the main east gate.
ACT II: The Harbor, East of the Dividing Wall
Moving past the divider wall…
- Consumables: 3-pack painkillers, 3-pack BZD, 2 health-packs – Red first aid container, high up on top of containers. Jump across from pipe bridge, from the roof of South Warehouse.
- Materials: 3 3-packs empty syringes, 3-pack adrenaline – Red first-aid container.
- NPC: dog – Patrolling around the storage container area.
- NPC: crossbow guard – Patrolling around the storage container area.
- NPC: crossbow guard – Patrolling somewhere near the storage container area(?)
- Fuel barrels – In the middle of storage containers.
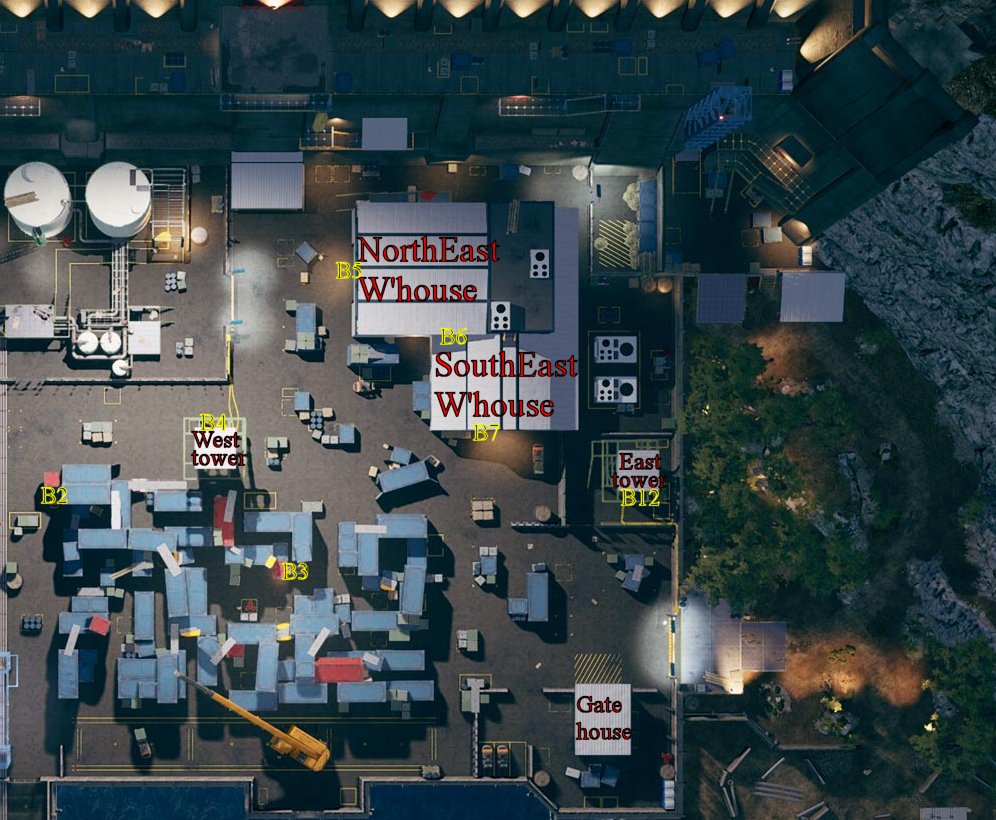
- Button: #B2 – Forklift on the west of storage area.
- Special Item: Idol – Idol is in a container held by a B2 forklift. You have to enter it through the blue container it is against.
- Button: #B3 – Forklift in middle of storage area. It holds a red container, but that container is not open.
- Material: 5 food cans, 10 beer – Tipped red container in the SE of the container stack area.
- NPC: baton guard, dog – Guarding the padlocked SW gate to the infected enclosure.
- NPC: crossbow guard – Top of the western tower, south of infected enclosure.
- Material: bottle – Top of the western tower.
- Button: #4 – Top of the western tower. Opens gate to infected enclosure.
- NPC: 2 baton guards, dog – Outside the main (east) gate to the infected enclosure.
- Material: cloth, binding – Storage room to the northeast on the upper walkway in NorthEast Warehouse.
- Special Item: lab key – Ground floor of NorthEast Warehouse.
- NPC, Materials: 6 Infected, dropping scrap metal, binding, 4 cloth – Ground floor of NorthEast Warehouse.
- Button: #B5 – Hangar door on the ground floor of NorthEast Warehouse.
- Material: gasoline canister, 2 cloth, 2 binding, scrap metal – Storage room on the ground floor.
- Buttons: #B6, #B7 – Hangar doors in SouthEast Warehouse.
- Material: 3-pack empty syringes, 3-pack potassium chloride – Center stack in SouthEast Warehouse.
- Material: binding – Long blue container south of NorthEast Warehouse.
- Material: cloth, scrap metal – Room through the top door in NorthEast Warehouse, on same stairs as the lab.
- Weapon: crowbar – Room through the top door in NorthEast Warehouse.
- Consumables: health pack, unknown drug, 3-pack painkillers, 3-pack BZD – Lab, up southeastern stairs in NorthEast Warehouse.
- Special Item: Document – Lab
- Materials: 2 cloth, 3-pack potassium chloride, 2 3-packs syringes, 3-pack adrenaline – Lab
- NPC: baton guard – Eastern gate.
- NPC: baton guard – Patrolling East Tower compound.
- NPC: crossbow guard – Eastern gate.
- NPC: dog – Outside Gatehouse.
- Fuel barrels – East of Gatehouse.
- Weapon: 3 quivers of 5 arrows, crossbow – In Gatehouse.
- Material: cloth – East Tower compound.
- Fuel barrels – East Tower compound.
- NPC: baton guard – Guarding gate to East Tower.
- NPC: crossbow guard – Top of East Tower.
- Material: bottle – Top of East Tower.
- NPC: 4 dogs – NE kennel pen.
- NPC, Materials: 22 infected, dropping 9 scrap metal, 11 binding, 2 cloth – Infected area.
- Button: #B12 – Top of the eastern tower, opens the main eastern gate.
- Material: Fuel barrels – In the middle of the infected enclosure.
ACT II: The Harbor, Up the Elevator
Up the elevator, for the alternative path to the exit; and also what happens after you get past the refinery.
- NPC: Crossbow guard – Walkway at top of the elevator.
- Materials: 2 cloth, scrap metal – Walkway
- Materials: bottle, 2 wood, 3 scrap metal – Down ladder into the passageway in-floor grating on the walkway
- Fuel barrels – Room through the door at end of the passageway.
- Material: 2 cloth – Room through the door at end of the passageway.
- Weapon: shovel – Jump over the railing in the room, go downstairs.
- Special Item: doc – Back up to the walkway, through green door at end into the control room.
- Consumable: healthpack – control room.
- Material: 2 bottles – control room.
- Materials: 2 scrap metal, cloth – South door from the control room, down the ladder, down steps onto a balcony, jump over end of the balcony to the ledge, down another ladder to a dead end.
- NPC: Crossbow guard – Walkway on the south side of the control room.
- Materials: scrap metal, cloth – Passageway via steps down off walkway near the broken elevator.
- Materials: cloth, bottle, wood, scrap metal – Hole in the floor in the passageway.
- Weapon: wrench – Hole in the floor in the passageway.
- Materials: binding, scrap metal – Room through green door at end of the passageway.
- Material: stick – Downstairs from the room, along the passageway, down more stairs, jump over the barrier in corner of the room.
- Material: scrap metal – Same room.
- Material: stick, binding, cloth, 2 bottles – Through the doorway to next room, with torch tutorial.
- Fuel barrels – Same room.
- NPC, Materials: 5 infected – Down ladder into the dark passageway. I did not record what they dropped.
- Materials: stick, cloth, binding – Through dark Infected passageway, up the ladder at the end to a new passage.
- Weapon: 2 batons – Through door into the blinking-light room.
- Save point – Through the red door to the outside.
- Fuel barrels – Downstairs, between the steps and ramp down to the grassy area.
- NPC: dog – Patrolling the grassy area.
- NPC: dog – Outside main gate.
- NPC: 2 crossbow guards, 2? dogs – Outside main gate.
- Save point – Walk through the cave, and out the other side.
- Save point – Jump over the platforms and look out over to the boat.
Act III: No Escape
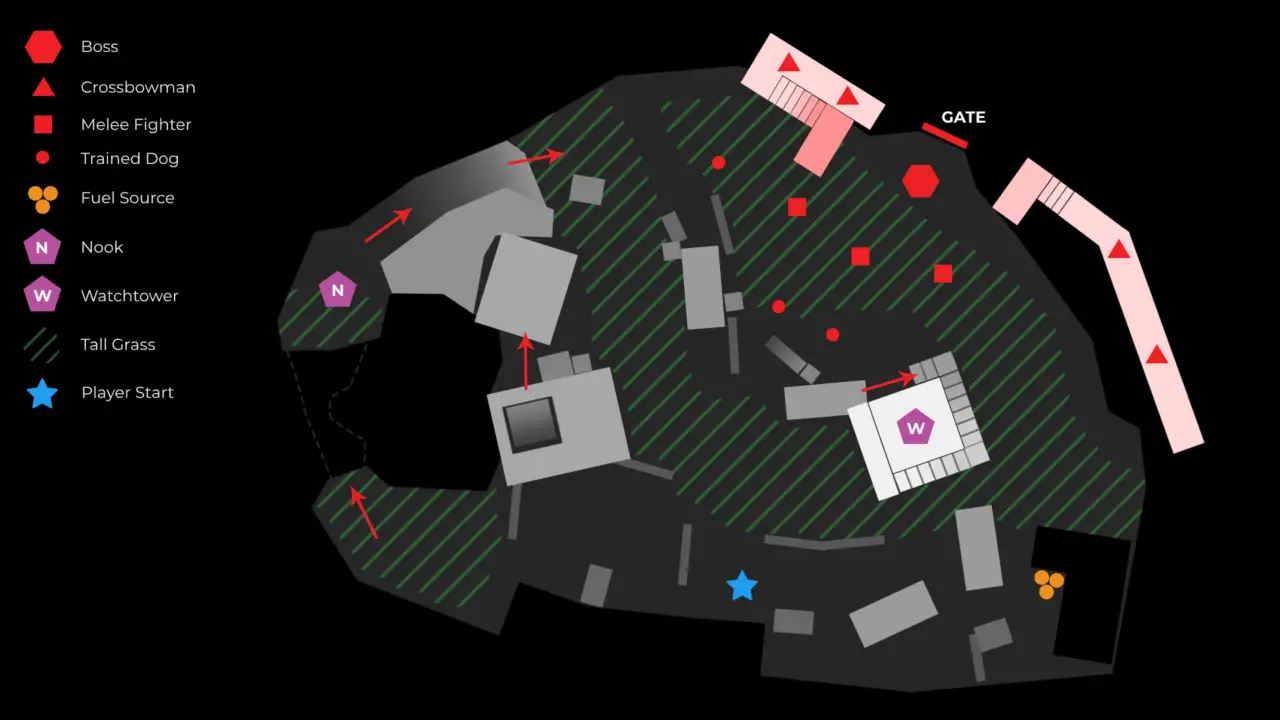
The endgame is an inescapable arena-style level.
- Material: cloth – Top of blue box right of the entrance.
- Material: cloth – Roof in front of the nook.
- Material: bottle – Through nook, in the passageway leading up to nook.
- Material: bottle – SE corner of the western grassy patch.
- Materials: 2 bottles, 2 cloth – Floor of shack S of the nook.
- Weapon: quiver of 5 arrows – Floor of shack S of the nook.
- Material: health pack – Western wall in the shack.
- Weapon: harpoon – Locker in the shack.
- Materials: bottle, 2 cloth – South of shack, in a paved area.
- Materials: bottle, cloth – N of the shack, against the cliff.
- Weapon: 2 quivers of 5 arrows, crossbow – Top of the tower.
- Materials: 2 bottles, 2 cloth – Top of the tower.
- Material: cloth – Top of a blue container leading to the tower.
- Materials: bottle, cloth – In front (N) of that container.
- Material: bottle – At bottom of the ramp-up to that container.
- Materials: 2 bottles, cloth – Blue container open both ends, at bottom of the ramp to another container.
- Material: cloth – W of that container.
- Materials: bottle, cloth – By barred sewer exit to the east.
- Material: bottle – Far SE of grassy area.
- Material: bottle – Far eastern gap south from the grassy area to a paved area, between a blue container and fence
- Fuel barrels – Far east of the paved area.
- Materials: bottle, 2 cloth – Floor near fuel barrels.
- Material: bottle – S of a southernmost blue container.
- Material: bottle – N of a southernmost blue container.
- Materials: bottle, cloth – Just E of the gate, behind some pallets.
- NPC: 3 baton guards, 3 dogs – At the point, you entered from.
- NPC: 4 crossbow guards – 2 on each of North and East elevated platforms.
- NPC, Special Item: Huge Hammer Guy, drops sewer key – Running around.
That's everything we are sharing today for this Die Young guide. This guide was originally created and written by Farrier. In case we fail to update this guide, you can find the latest update by following this link.