
- Titel: NavalArt
- Veröffentlichungsdatum:
- Entwickler:
- Herausgeber:
Information about NavalArt is still incomplete. Bitte helfen Sie uns dabei, die Details des Spiels auszufüllen Kontaktformular.
This guide will aim to show you how to build a ship with realistic-looking shapes and forms based on real-world designs seen during the early 20th century (the 1900s to 1940s).
- In part 1, the guide covers general design principles and guidelines for ship hull form, Form, and styles.
- In part 2, I will demonstrate how you can replicate a real-world design in-game accurately, using the Imperial German ship SMS Konig as an example.
General Guidelines
Ship hullform and length-width ratio by type.
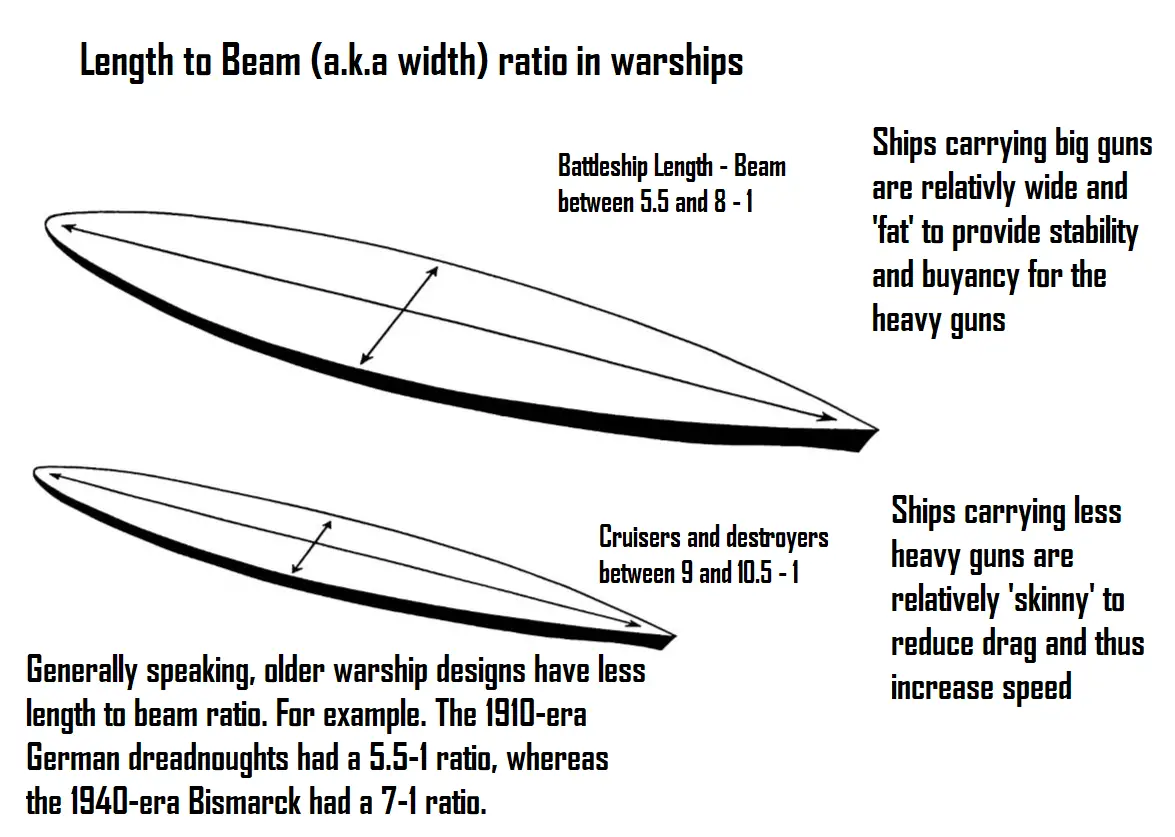
Aside from size, the length to beam ratio is the easiest way to distinguish battleships from smaller ship types like cruisers and destroyers. It also shows what historical era your ship design is from. More modern ships tend to be proportionally longer than older equivalents. Because more modern designs are usually faster and need to be sleeker: z.B. 30-knot battleships and 33-knot cruisers in the 1930s compared to 20-knot battleships and 25 knots cruisers in the 1900s.
The L-B ratio of battlecruisers and aircraft carriers tends to be 10-20% greater than battleships. Beispiel: the 1900s battlecruiser Von Der Tann has an L-B of 6.4 im Vergleich zu 5.5 for a battleship of the same era. The WW2 battlecruiser B-65 has an L-B of 9.1 im Vergleich zu 7.5 for a WW2 battleship. This reflects the fact that battlecruisers and carriers are faster than battleships but not as fast as cruisers.
Not included in this image are destroyers. Allgemein gesprochen, destroyers are shaped like cruisers, but often with an even boxier rear and steeper curves at the bow, resulting in a bigger flat-sided section in the middle.
Ships’s Superstructure and Upperworks
You can get a bit creative with building all the stuff on the top of the ship hull, Jedoch, there are a few things to keep in mind when doing so.
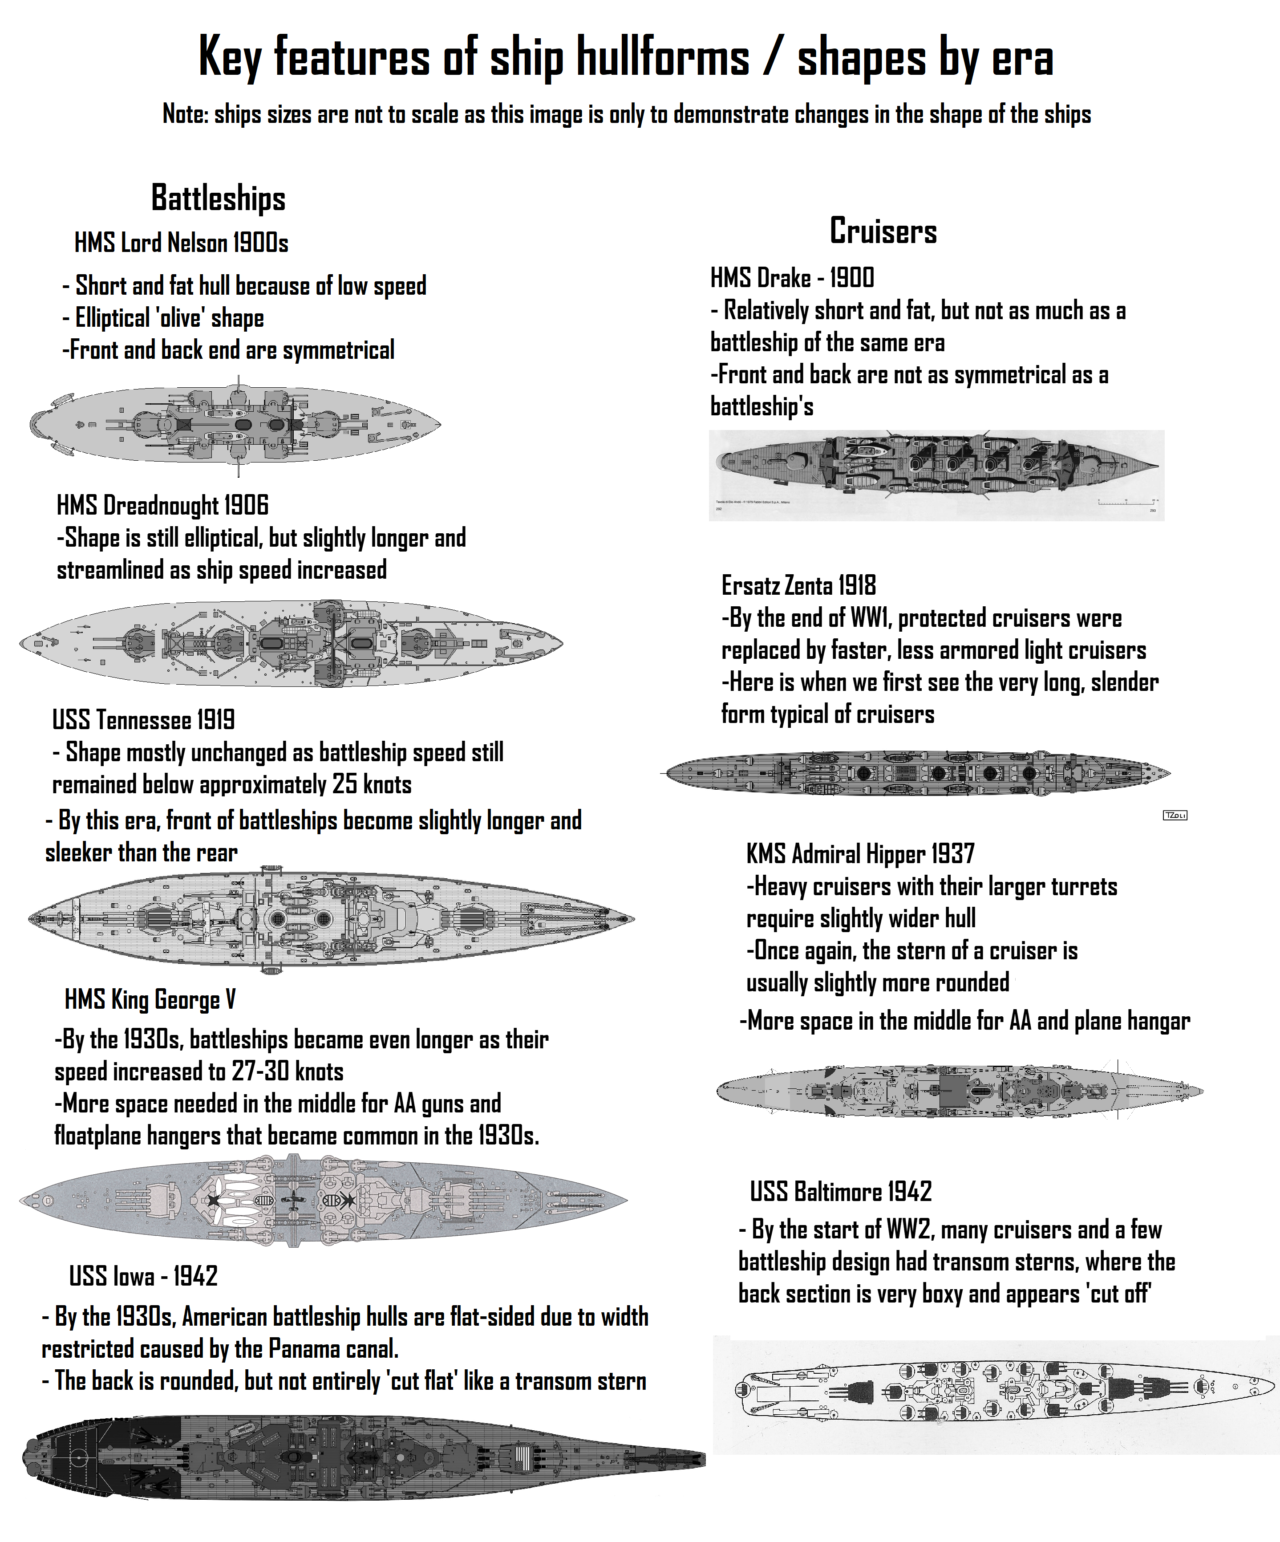
1. The superstructure is supposed to contain the bridge, Kommandozentrale, AA guns, and housing for some of the crew. Therefore it needs to be sufficiently big to contain these things. The 1900s and WW1 era ships tend to have smaller superstructures, usually a small cylindrical conning tower, a few fenced-off platforms, and a few masts. Ships designed in the 1930s and later feature bigger, boxier superstructures because of the need to contain many more rangefinders, Radar, AA guns, and their crew.
2. Have multiple rangefinders spread out across the superstructure. Even a small destroyer should have at least two rangefinders. Battleships often have two types of rangefinders. 2-3 big ones for the main guns and 4-8 small ones for the secondary or AA guns. Make sure to space them out across the superstructure so that they can’t be all destroyed by a single hit.
3. It is easier to build the superstructure from the bottom up. For stability and structural reasons, a ship’s superstructure becomes smaller and lighter as you go higher. Typical ship designs start with an elevated block/deck section, followed by a tower-like or box-like bridge, followed lastly by masts and observation spots up top.
4. Superstructures need to be shaped in a way that minimizes interference with turret rotation. In parts closer to the main turrets, design them to be wedge-shaped so that the turrets can have the best possible arc of fire.
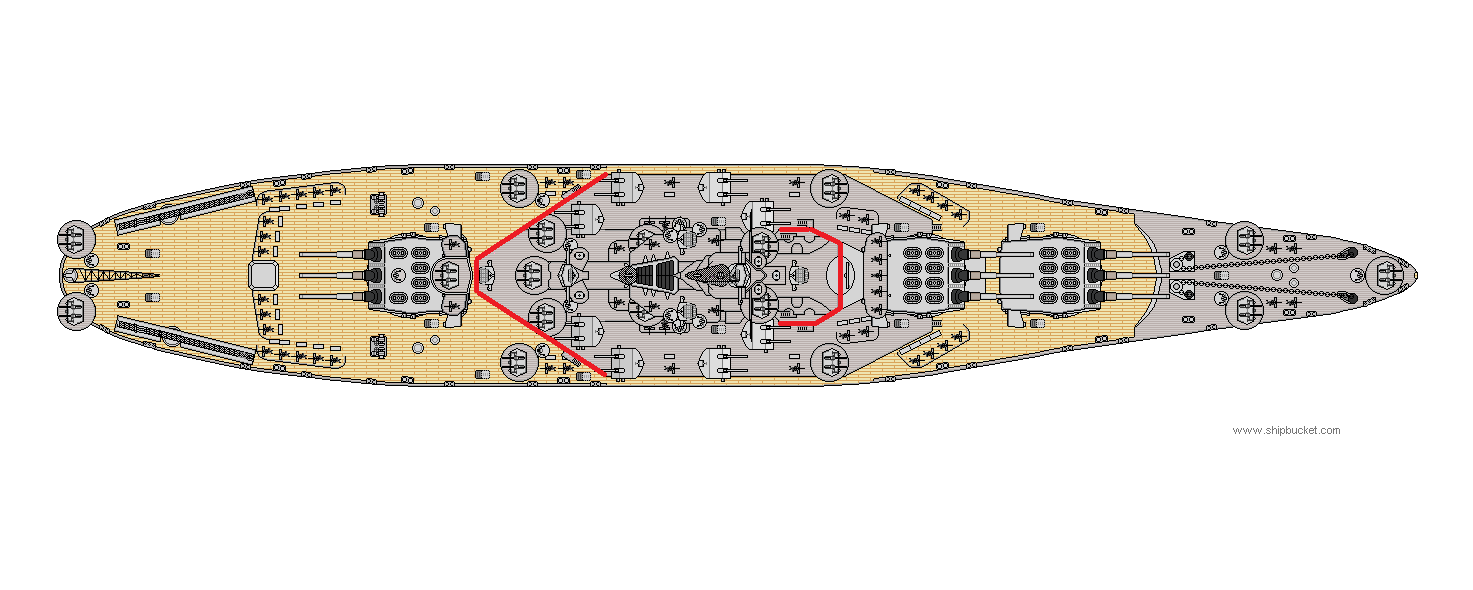
The superstructure of South Dakota is outlined in red here. Notice how the front and rear ends are wedge-shaped, this provides space for the turrets to rotate more to the sides.
5. Historically, older warship designs typically have more funnels/chimneys while more modern designs will have fewer, but bigger chimneys. Zum Beispiel, the Queen Elizabeth class BB was built with two chimneys in the 1910s but was redesigned with a single huge chimney by 1930.
The 1910s Chester-class cruisers had 4 chimneys, while the 1940s Cleveland class had 2. Do not place anything right behind the funnels, as they would be covered in smoke and soot IRL.
Building a Hull Using References – SMS Konig
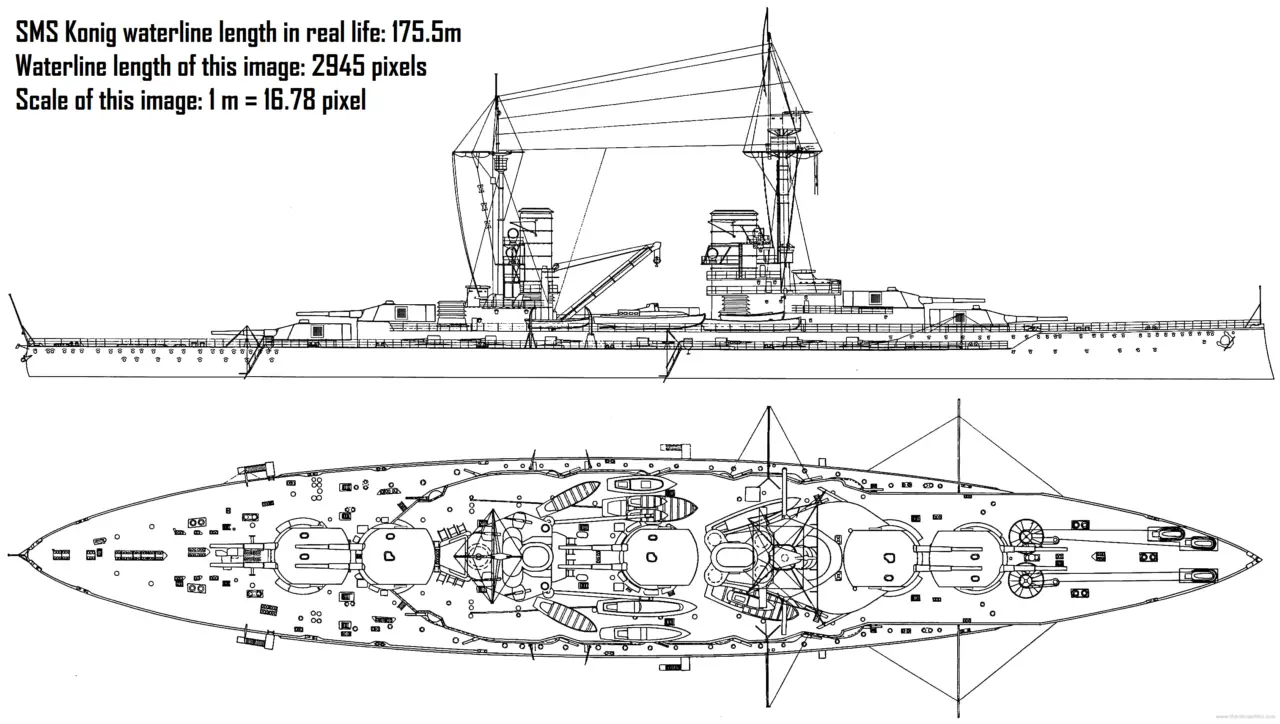
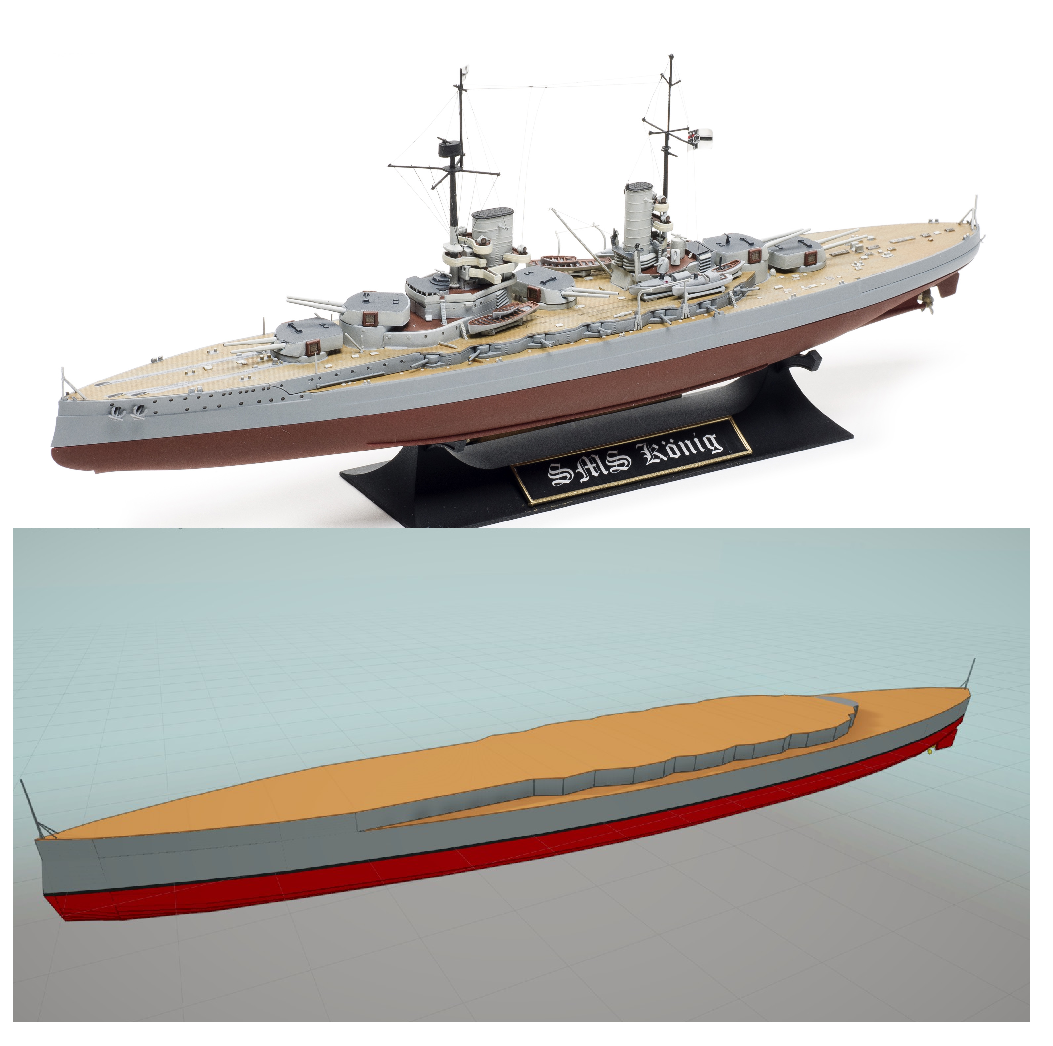
We start out the replica building process by finding a blueprint of an IRL warship online. This image of the SMS Konig is ideal, it shows both the top-down and side view of the ship, with clear, easily visible lines denoting the overall shape of the hull. It is also a relatively easy design to replicate, being a WW1-era dreadnought, it has a simple elliptical hull and relatively simple superstructures.
Using MS Paint, Photoshop, or whatever software you have, calculate the scale of the image. For example in this image, Konig’s hull is 2945 pixels in length, and the ship IRL had a length of 175.4 Meter. 2945 geteilt durch 175.4 means that this image here shows a scale of 1 m = 16.78 Pixel, remember this number.
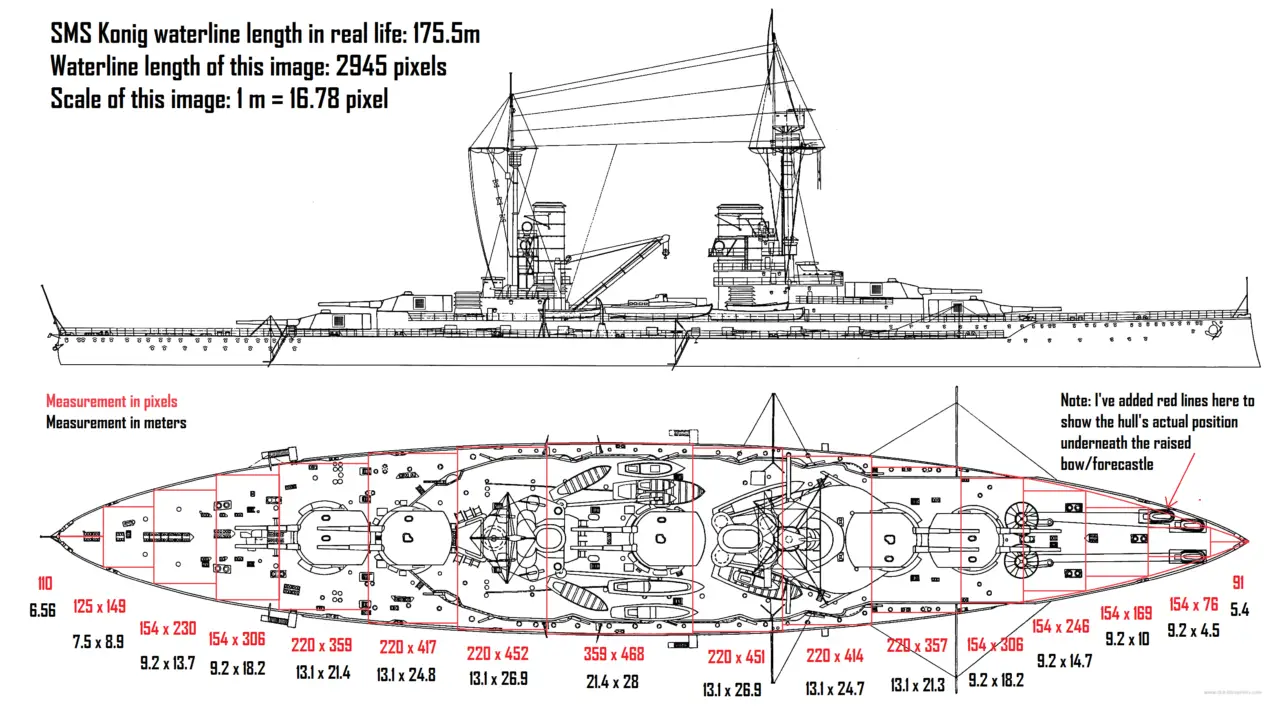
Nächste, divide the hull into a series of rectangles and make note of their size in pixels. (When you draw rectangles in MS Paint, its size in pixels will be shown on the bottom left corner) Make sure the rectangles do not overlap each other and extend fully to the outer edge of the hull for maximum accuracy. Danach, convert the measurement in pixels to measurement in meters using the 16.78 Figur. It’s a little tedious, but now you have the numbers needed to replicate a ship extremely accurately.
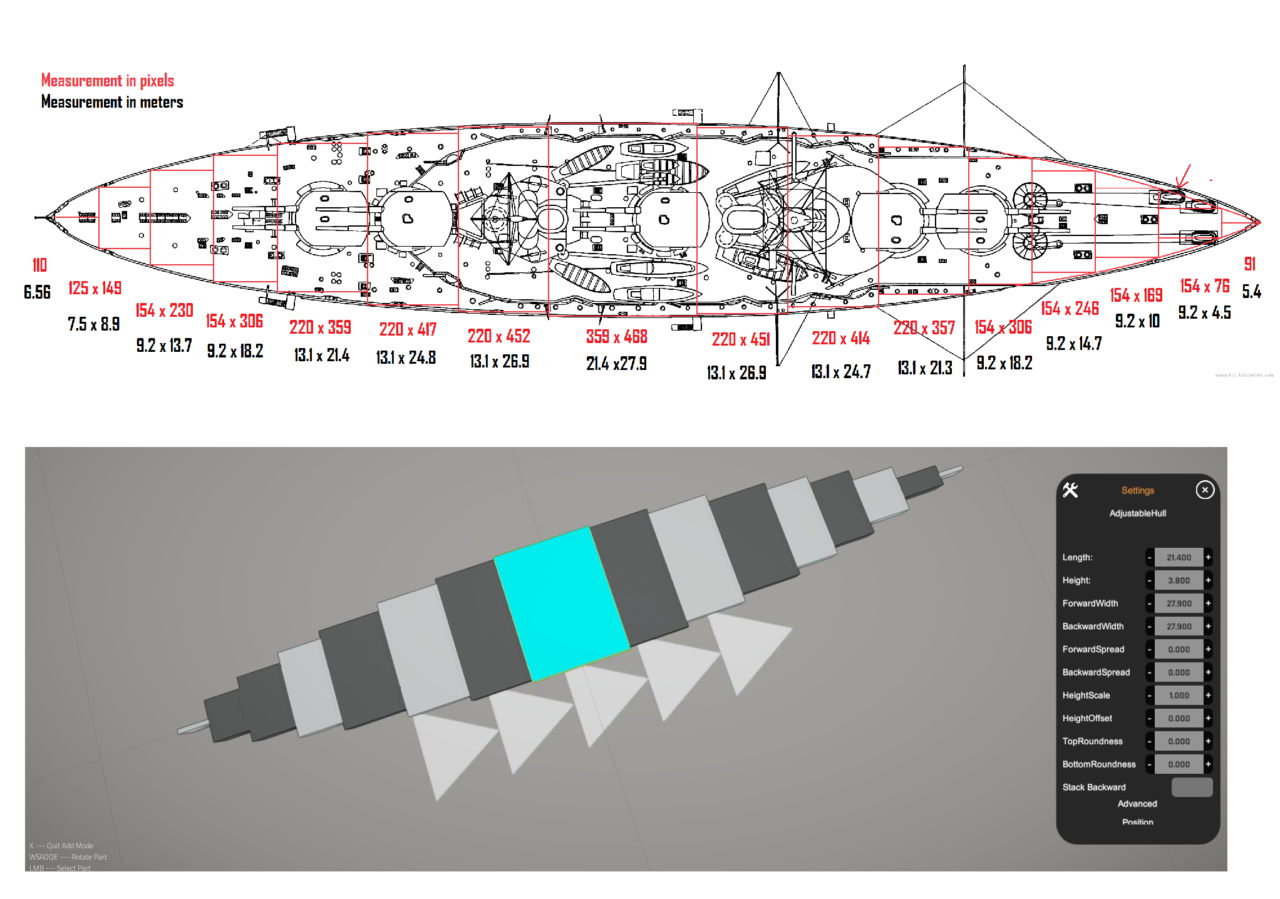
This is what the hull should look like with the correct length and width of each rectangle. Nächste, adjust the forward or backward width of each so that they match the width of the adjacent rectangle.
What it looks like after the widths are adjusted and the hullform smoothed out. This shape can now become the foundation for adding other layers, such as a thin layer above to represent the wooden deck, and a larger rounded layer below representing the portion of the hull that’s below water.
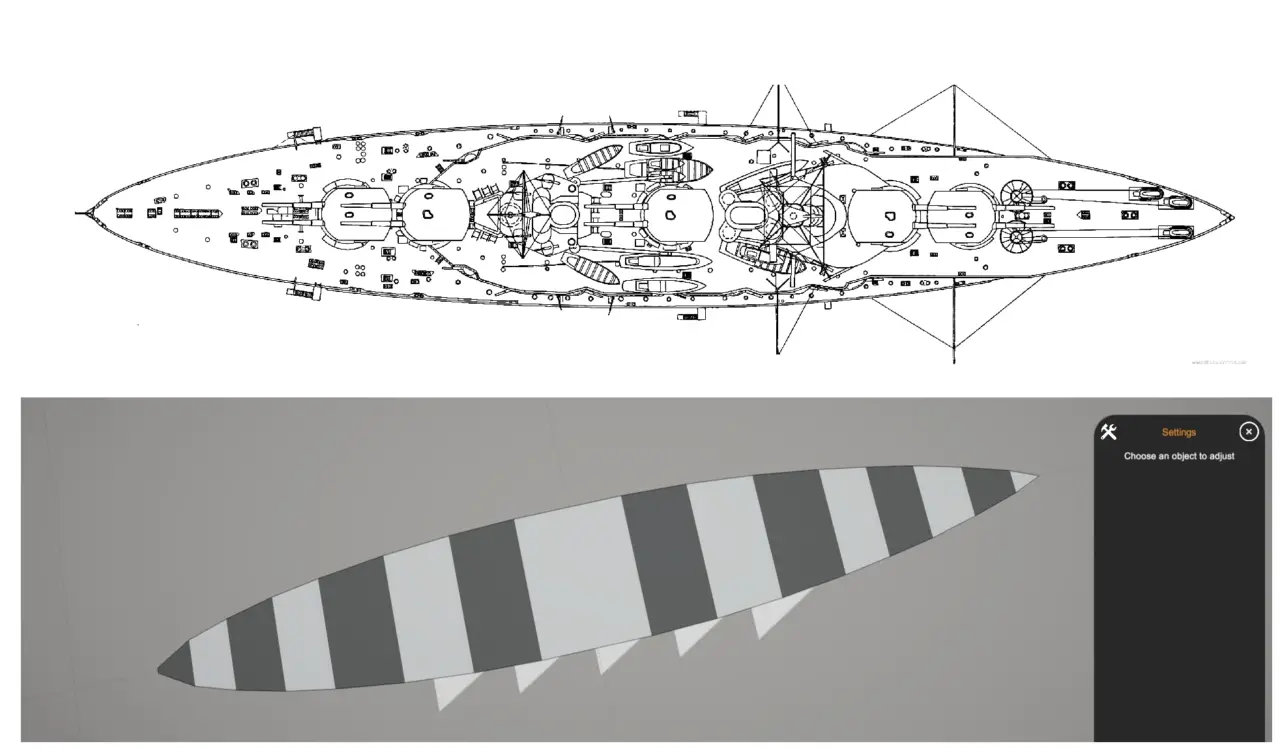
By using the same pixel measurement technique, I estimate the above-water section of the hull to be 3.8m in height. This diagram doesn’t show the underwater part of the ship, but Wikipedia says it’s 9m deep. Jedoch, keep in mind that as of early 2021, NavalArt’s calculation of buoyancy is wrong and ships tend to float too high.
Aus diesem Grund, you should reduce the size of the underwater section by about 25%, here 9m is reduced to 6.4m. This is what the hull looks like after the 3.8m upper section in grey and the 6.4m underwater section in red. I’ve also added a tiny 0.3 m middle section painted in black to represent the waterline.
Building the Superstructure Using References- SMS Konig

Now we move on to the superstructures, the part of the ship that’s above the ‚hauptsächlich‘ deck covering the entire length and width of the ship. On many WW1-era and earlier warships, including Konig here, there is often a smaller, raised deck. Hier, I’ve highlighted a chuck of this raised section in green, and estimate it to be about 2.4m in height. Nächste, we apply the pixel-measuring technique again to replicate the shape of the raised deck, note all the triangular ‚grooves‘ for the casemate secondary guns to rotate in.
Upper deck completed.
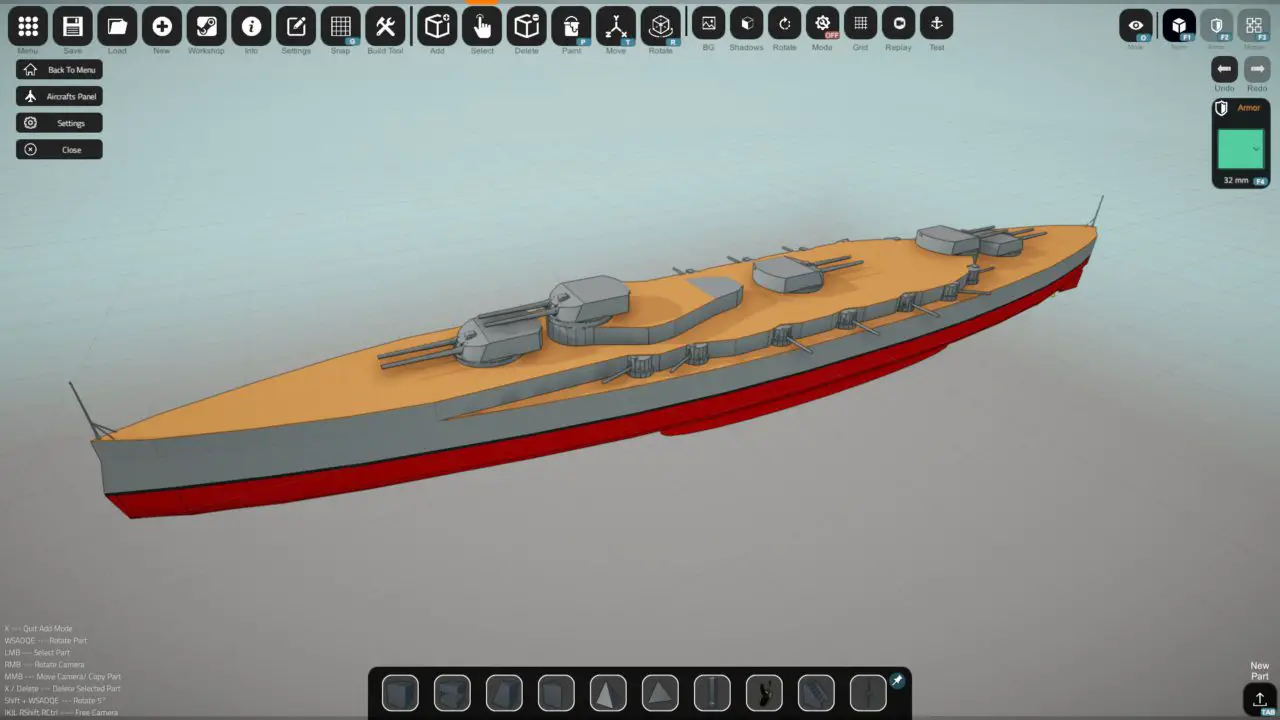
Now add your main and secondary turrets. Remember that you can use the pixel/meter scale to calculate where the turrets should be placed. For the Konig, the center of its 1st turret is 41m behind the very front of the ship. You can create a 41m long block and use it as a measuring stick to figure out which position is exactly 41m behind the ship’s bow.
An dieser Stelle, you’ve added all the major components of the ship, so go on a test drive to see if the ships‘ balance and weight look correct. If the hull looks like it floats too high or too low in the water, now is the time to adjust armor values and correct this. However keep in mind that as of early 2021, armor and weight value calculations are entirely incorrect, with armor weight calculation based on block volume rather than by surface area. Don’t expect to put on realistic armor thicknesses
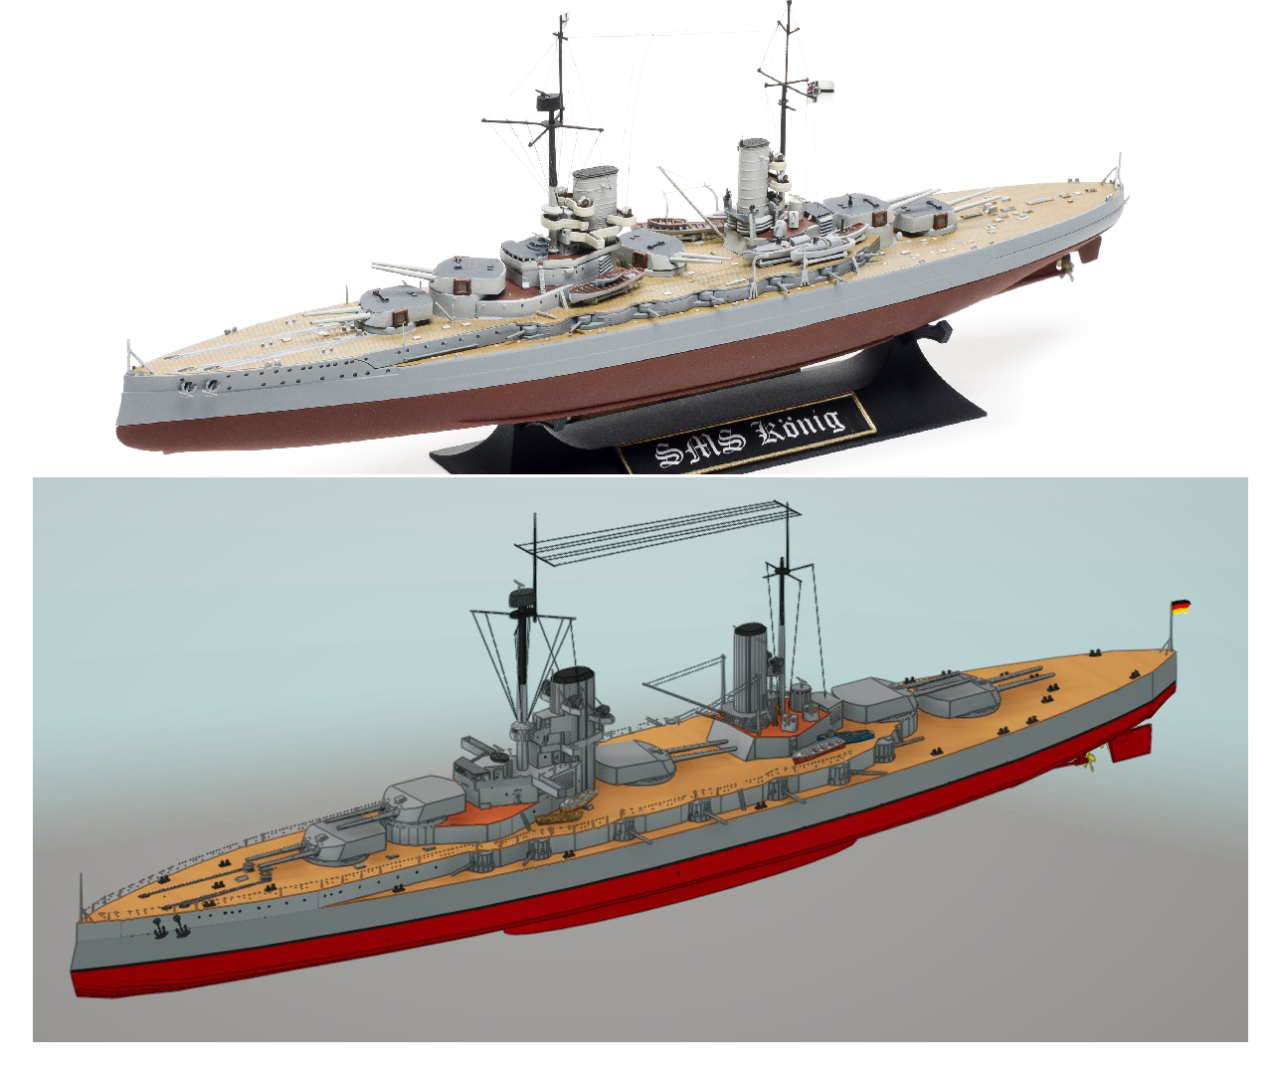
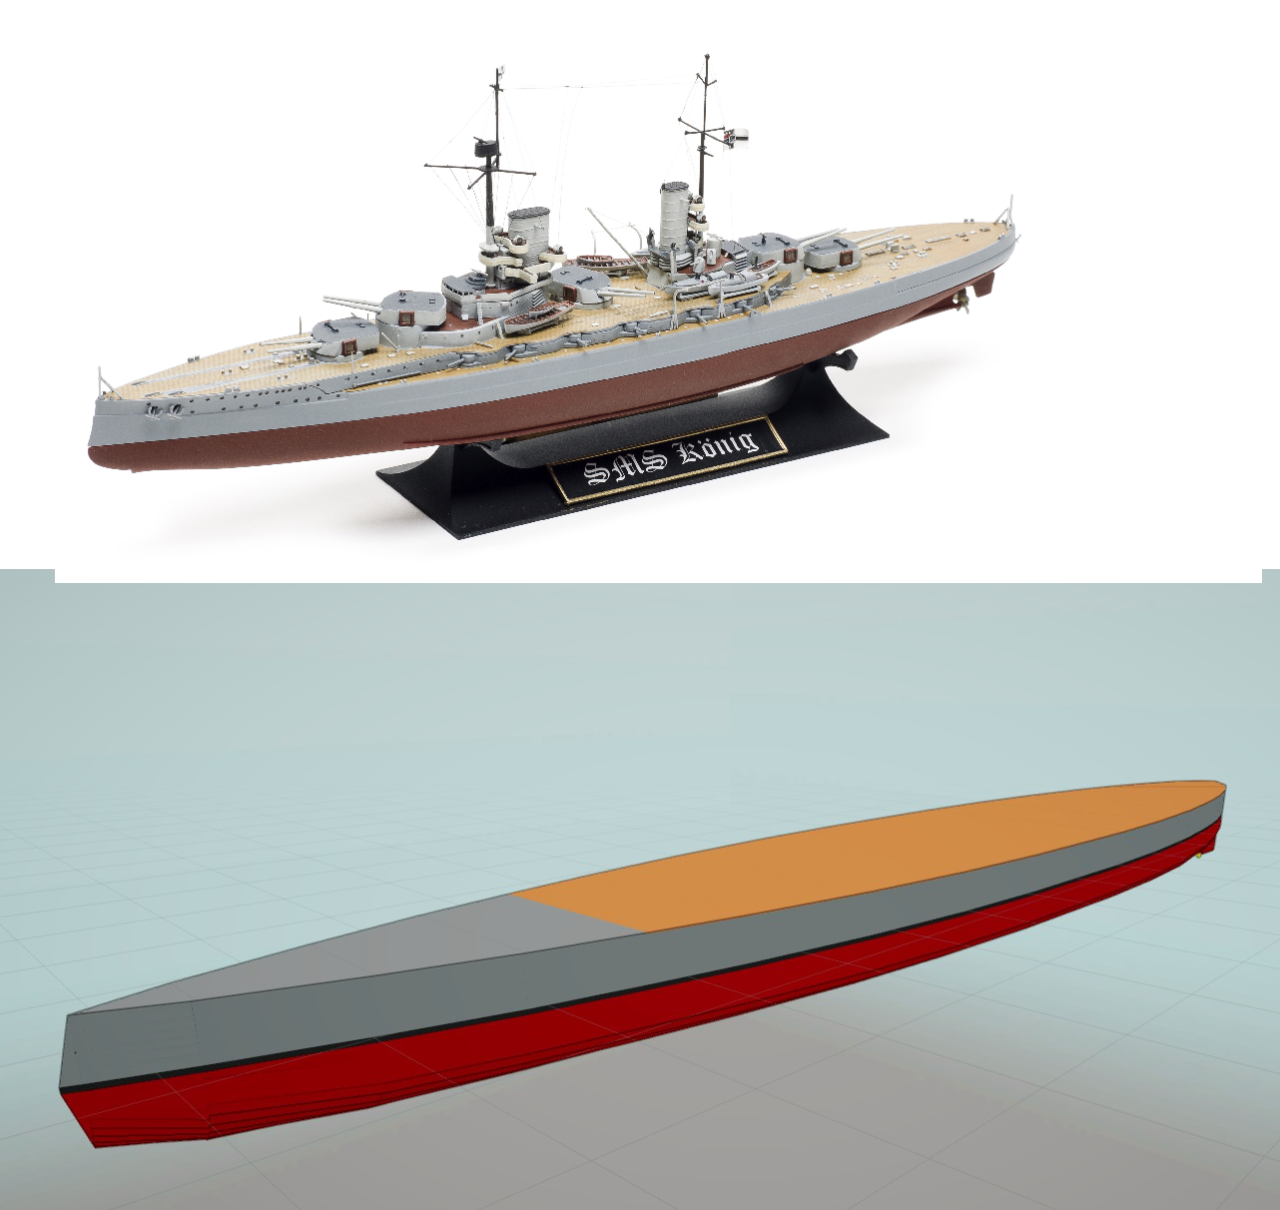
Now with the bridge, masts, small boats and decorative items added. Because these items are relatively light and small, this stage of the building won’t change the ship’s performance and balance much. The completed in-game Konig is compared to a model I found online.
Das ist alles, was wir heute dafür teilen NavalArt Führung. Dieser Leitfaden wurde ursprünglich erstellt und geschrieben von SovietCheeze. Für den Fall, dass wir diesen Leitfaden nicht aktualisieren können, Sie können das neueste Update finden, indem Sie diesem folgen Verknüpfung.