- Titel: Hot Brass
- Veröffentlichungsdatum:
- Entwickler:
- Herausgeber:
Information about Hot Brass is still incomplete. Bitte helfen Sie uns dabei, die Details des Spiels auszufüllen Kontaktformular.
Some helpful tips for unlocking all of the available achievements.
Einführung
This game is somewhat straightforward in terms of achievements, so the guide can be mostly considered a Collectible location guide with some tips on other things along the way.
General achievements
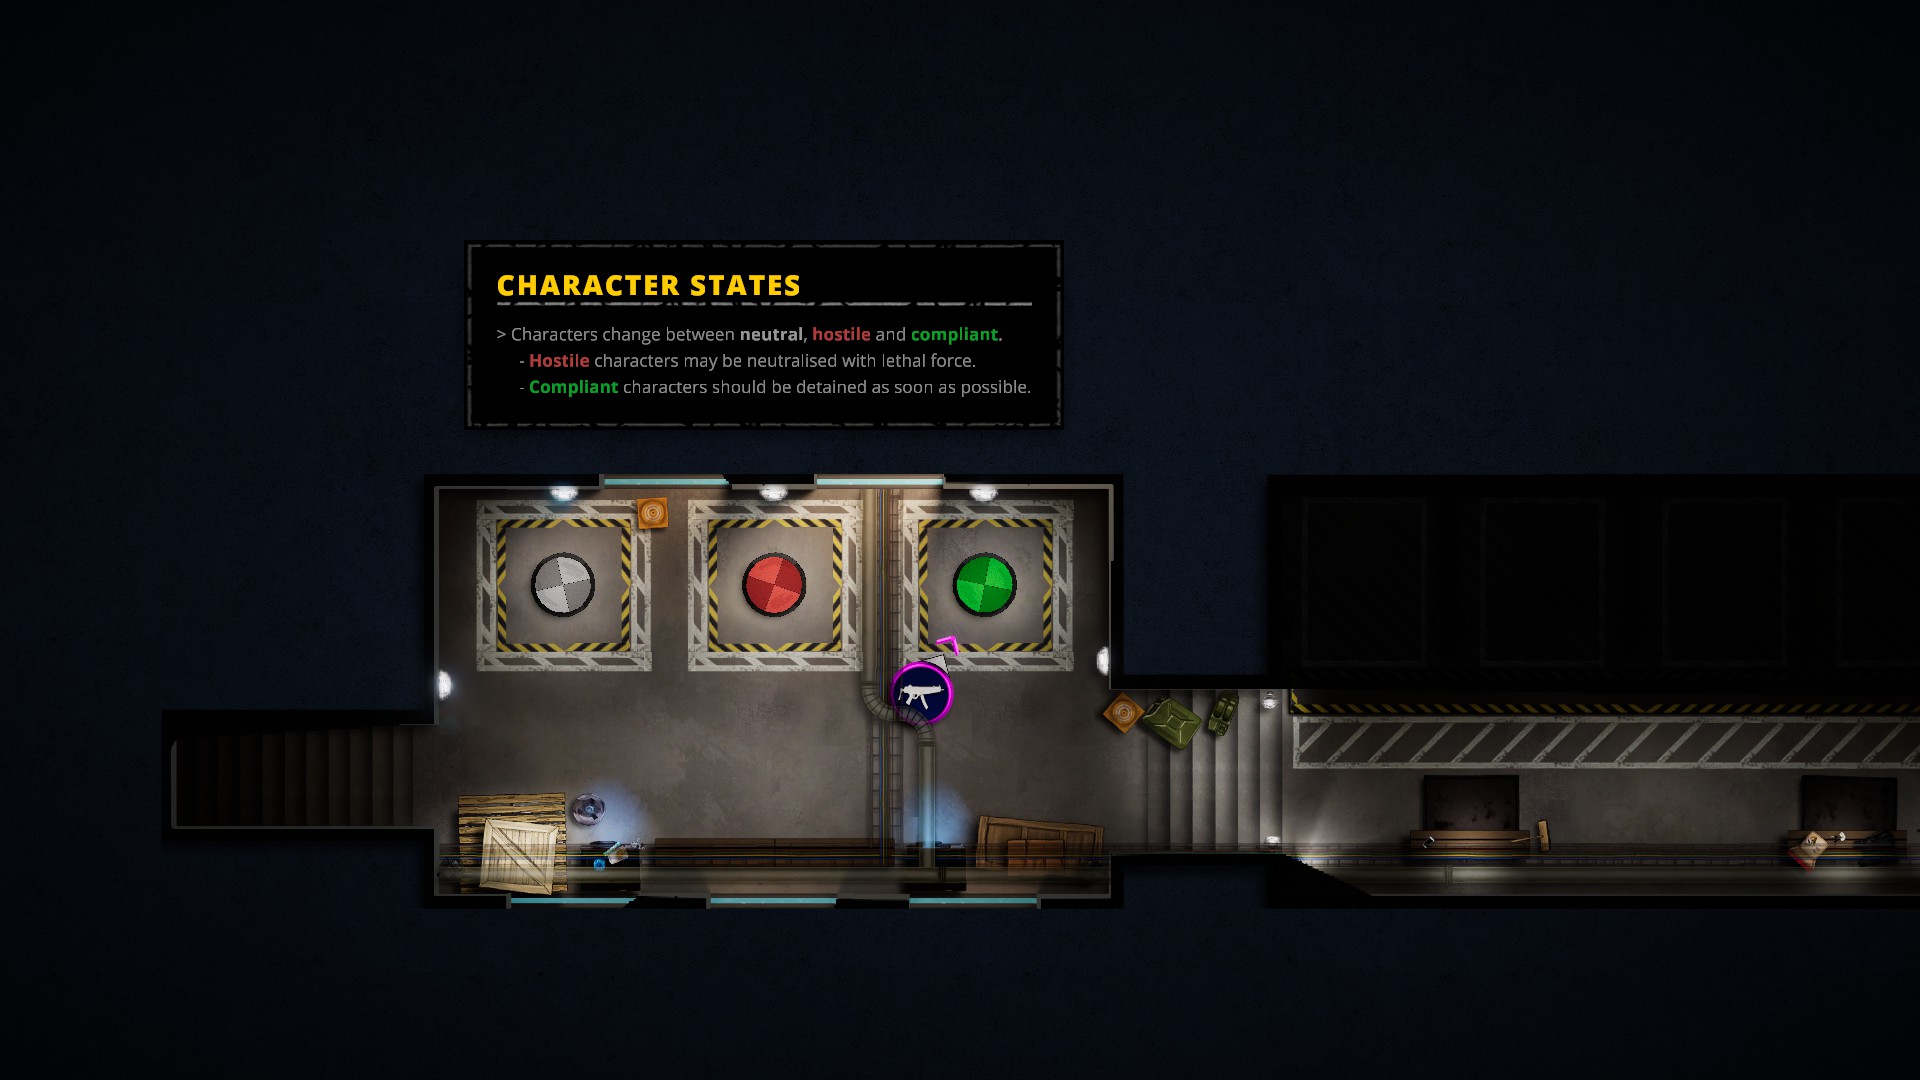
These achievements are not tied to any specific missions, but most of them will require a certain effort in each of the mission nonetheless.

Always Our Goal
Complete a non-tutorial mission without casualties.

Goldstandard
Complete all missions without casualties.
One important thing to note:
beliebigcasualty counts! So if the enemy started shooting at you and you killed them back – although justified, this is still a kill and it’s a casualty, so you will need to be extra careful. Tazing, atemberaubend, constantly shouting, usw. should sooner or later lead to the submission. A single shot from a low damage weapon like pistol also works, aber nicht immer, so this is a risky option.
In case of multipled hostiles surrendering, make sure you grab all their weapons first, because while you will be cuffing one suspect, others can grab the weapons back and start shooting at you. While doing a speedrun though, this can be actually to your advantage, because you will have a right to kill which is faster than cuffing.
Auch, it might be useful to progress a bit futher in the game and at least unlock Less Lethat X26 which will make the subdue progress considerably easier. Default magazine have only 12 shots though, so on bigger missions I took Ammo Bag or sometimes even two to have 24 Und 36 ammo correspondingly.

Bring Order to Chaos
Complete all missions.
Es gibt insgesamt 16 Missionen, so successfully completing them with any results will unlock this achievement.

To Your Taste
Unlock all modifiers.
Modifiers are used in the Arcade mode of the game and are completely locked in the beginning. As you keep playing and unlock modifiers, they will allow tweaking such things as difficulty, time of the day, reinforcements and so on. Details are available in the each mission’s section, but here is the list of modifiers if you are looking for a specific one:
Mission 1 – Schwierigkeit
Mission 2 – Friendly Fire
Mission 3 – Sichtfeld
Mission 5 – Shared Field of View
Mission 6 – Uhrzeit
Mission 7 – Scatter Spawn
Mission 8 – Laichen
Mission 9 – No NPCs
Mission 10 – Hostiles only
Mission 11 – Musik
Mission 12 – Verstärkung

Full Arsenal
Unlock all equipment.
Basically this summarizes all other achievements that are unlocked after obtaining pieces of equipment. Details are available in the each mission’s section, but here is the list of items if you are looking for a specific one:
Mission 1 – Ammunution Bag
Mission 2 – SPAS-12 Shotgun
Mission 3 – TRR8
Mission 4 – Mittlere Rüstung
Mission 5 – Nachtsicht Schutzbrille || G17 SD
Mission 6 – Door Ram
Mission 7 – Granate
Mission 8 – Thermal Vision Goggles
Mission 9 – Schwere Rüstung || Less Lethal X26
Mission 10 – Locken
Mission 11 – M4 || Modell 700
Mission 12 – Stinger
Mission 13 – Gas Mask
Mission 14 – Smoke Grenade
Mission 15 – Ballistischer Schild
Mission 16 – Less Lethal Bean Bag Shotgun || Less Lethal OC-BALL

Game Night
Recover all collectibles.
Collectibles in this game look like a square blueprints thingies that are slightly pulsating with color. There are three collectibles on smaller maps and four on bigger maps. Details and screenshots with locations are available in corresponding mission’s sections of the guide.

Challenges Accepted
Vervollständigen Sie alle Herausforderungen.
There can be from 2 Zu 4 challenges per mission. Usually there is an item unlock, a modifier unlock and a speedrun. Keep in mind that when completed, a challenge stays unlocked for good (after you finished the mission that is, completing the challenge without completing the mission won’t give any results), so there is no need to complete all challenges in one attempt (which is sometimes simply impossible).
Mission 1 – Special Weapons and Training
Collect all evidence while sliding. Evidence will be in the very last room of the mission, so basically you will need to come close to the table, press Space (standardmäßig) to slide and while sliding press E (standardmäßig) to pick up evidence on the go.
Belohnen: Keiner, just a challenge medal.
As soon as possible. Very vague description, nicht wahr?? To complete this challenge you will need to cuff a green dummy at the last floor of the mission.
Belohnen:
Ammunition Bag. This is also a separate achievement –
Haustier des Lehrers– Unlock the Ammunition Bag.
Complete the mission in less than 2 Minuten.
Belohnen:
Difficulty modifier. This is also a separate achievement –
Schneller Lernender– Unlock the Difficulty modifier.
The first collectible is in the room where you need to cross the lasers while crouching. To get the collectible you will need to slide on the crates though, so slide, grab the collectible, get back and move through lasers while crouching to proceed with the mission.
The second collectible is in the room where you are training picklocking and opening the door.
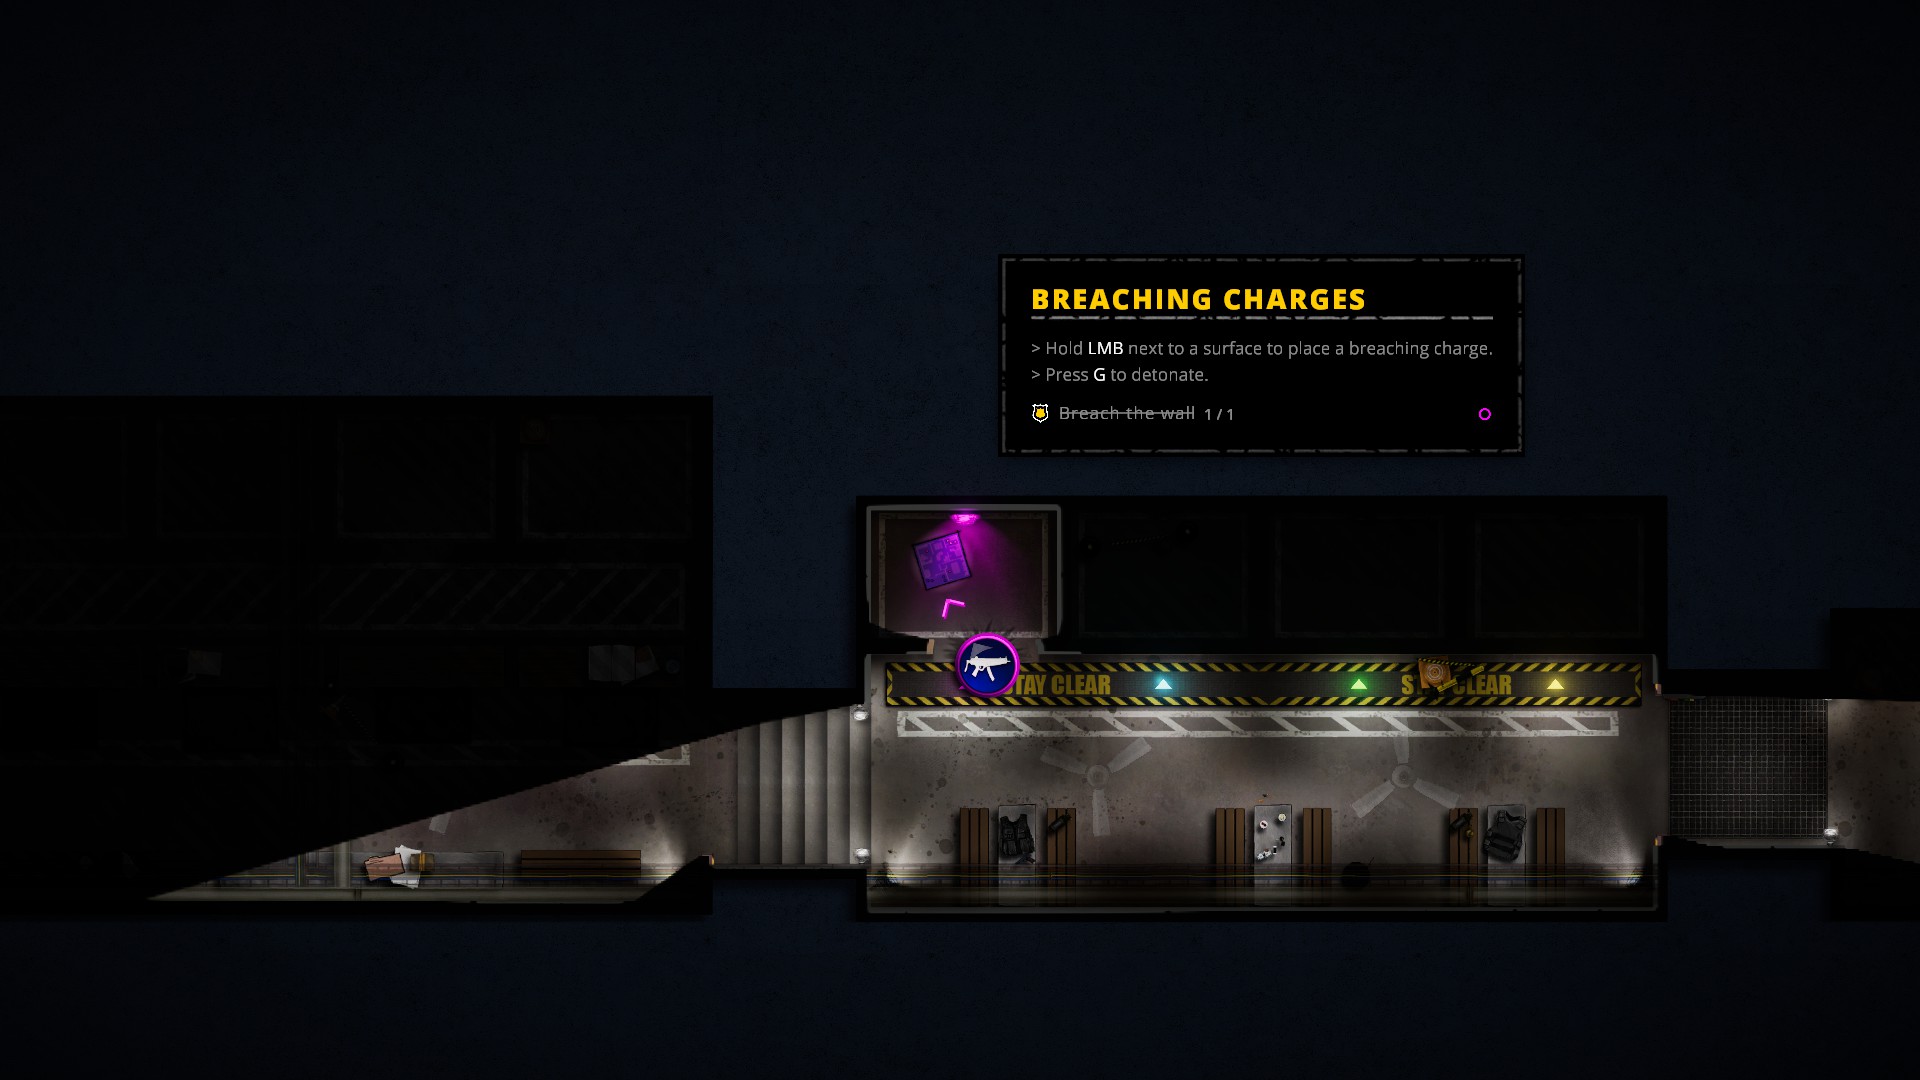
The final collectible is in the room where you are training breaching the door with a charge.
Mission 2 – Real-world Experience
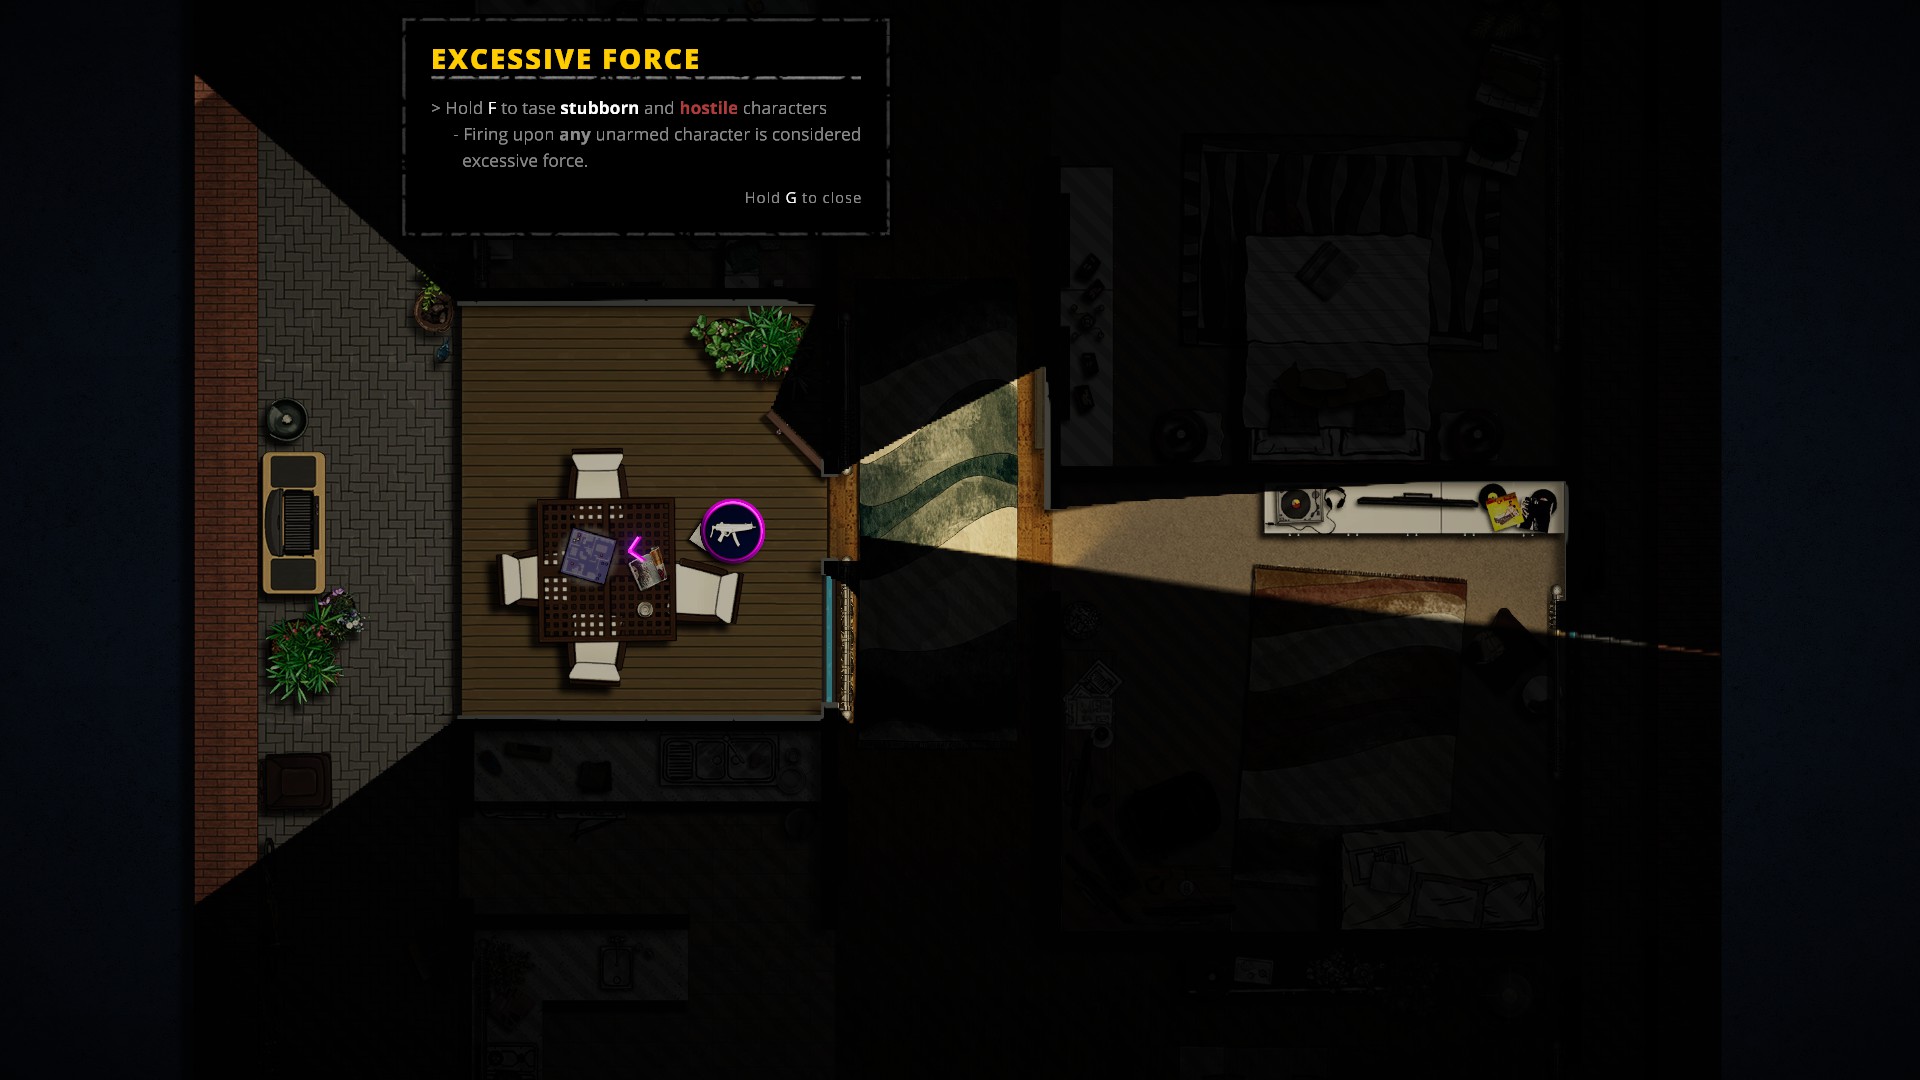
Surprise the unarmed hostile. There are two hostiles in this mission – one in the far left room who is unarmed and one in the far right room who is armed with a shotgun. What I did is went outside and threw a flashbang through the window in the room with the unarmed hostile. He got surprised for real.
Belohnen: Keiner, just a challenge medal.
Detain the armed hostile. Basically you will need to subdue and cuff the hostile in the far right room who is holding a shotgun. What I did is opened the door so that the enemy won’t see me, threw a flashbang and jumped in shouting my ass off.
Belohnen:
SPAS-12 Shotgun. This is also a separate achievement –
Applied Learning– Unlock the SPAS-12.
Complete the mission in less than 1 Minute.
Belohnen:
Friendly Fire modifier.
Collectibles in this mission are all lying in the open. The first one is on the table in the dining room.
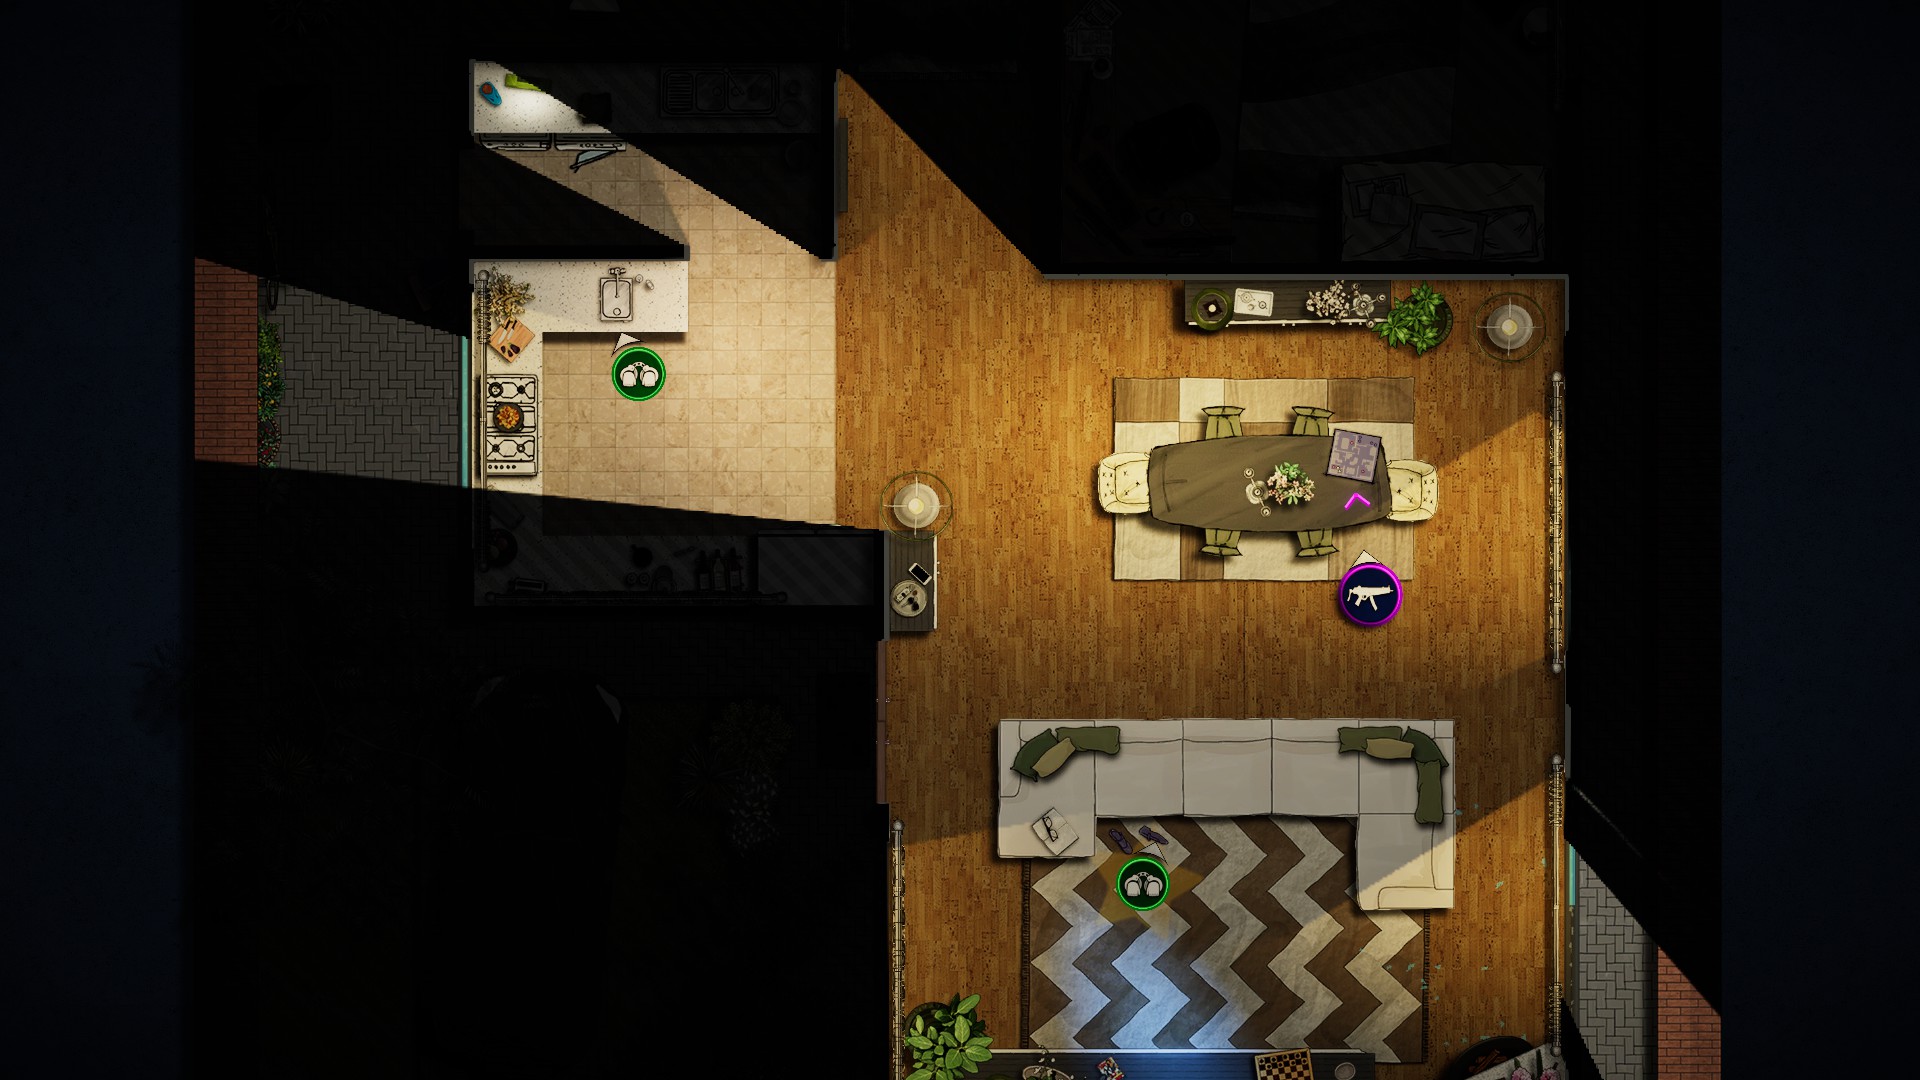
The second one is in the room which seems to be an office or something.
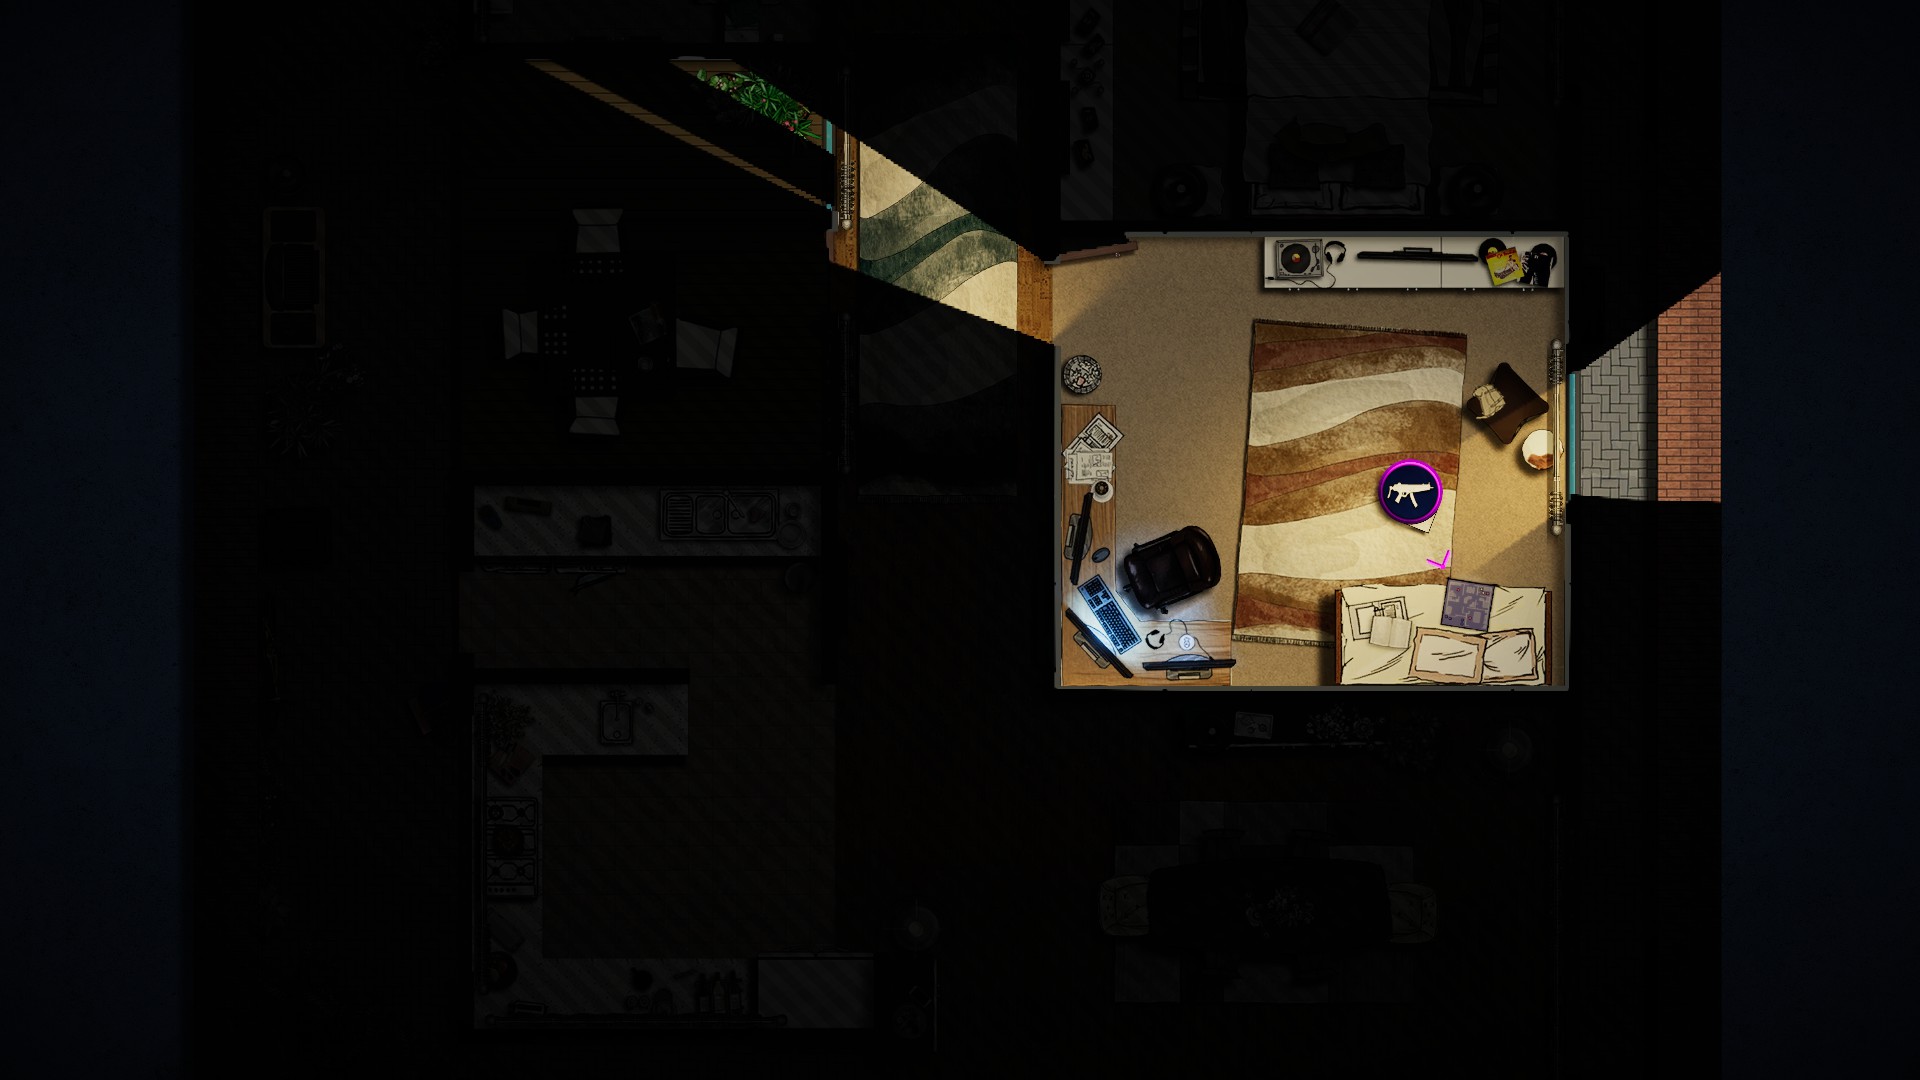
The final one is outside on the table.
Mission 3 – Inconvenience
Take a shortcut inside. What I did is planted a breaching charge in the wall right at the mission spawn and entered the mall this way. Saves a lot of time!
Belohnen:
TRR8. This is also a separate achievement –
Wall Burrow– Unlock the TRR8.
Complete mission in less than 2:20 Minuten. This is the first mission where you can get seriously shot, and if wounded you are significantly slowed, so my recommendation is not to hesitate to shoot guys dead if they do not surrender and start shooting first. Also keep in mind that there is a small dead end outside the west part of the Mall that needs to be scouted in order to complete „Inspect all rooms and areas“ Objektiv. I hate speedruns, Wirklich.
Belohnen:
Field of View modifier.
If you are doing a breach entry right from the start, you will end up in the storeroom with the first collectible.

The second collectible is in the main Mall room at the cashier place.
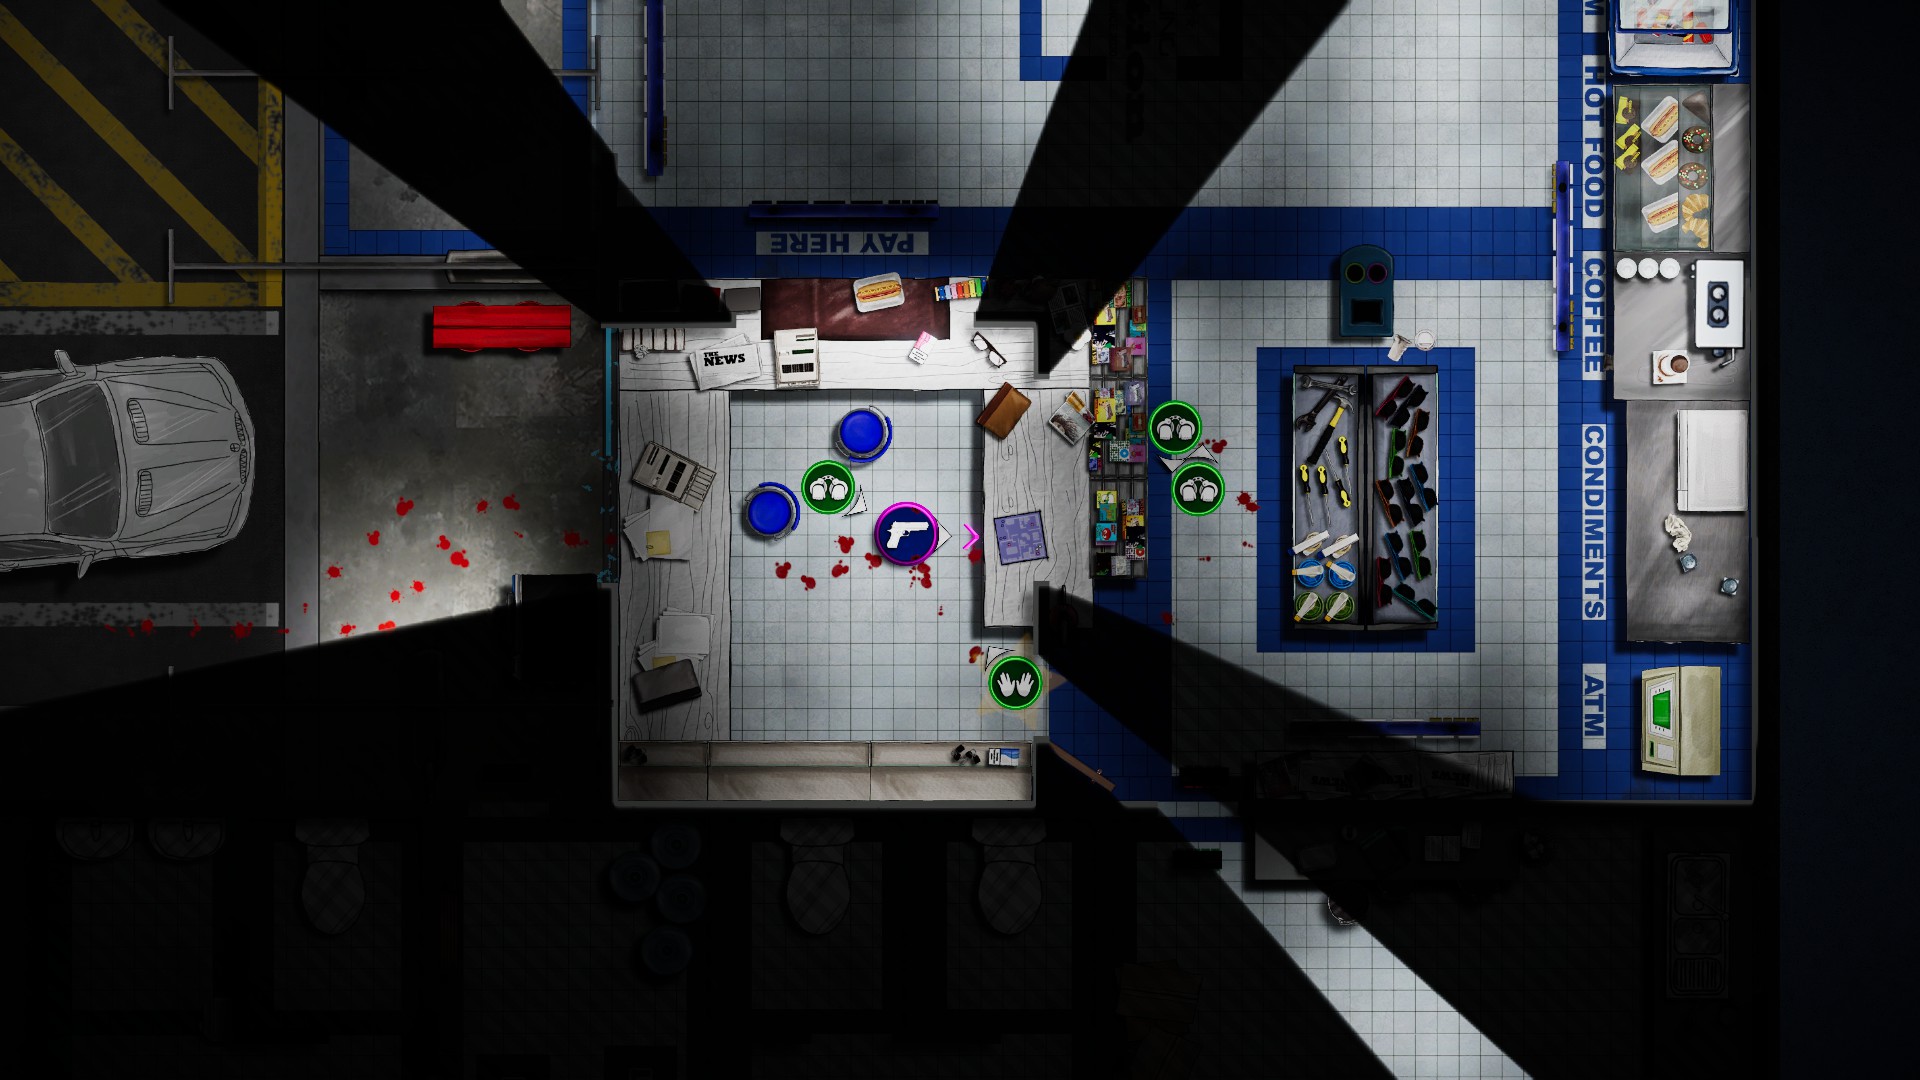
The final collectible is in the Mall owner (Administrator?) Büro, right at their table.

Mission 4 – Remote Monitoring
Detain two hostiles. Quite a straightforward one, arrest two bad guys (ideally always arrest everyone at least once per mission for the Gold Standard achievement – complete all missions without casualties).
Belohnen:
Mittlere Rüstung. This is a also a separate achievement –
Just In Case– Unlock the Medium Armor.
Complete the mission in less than 1 Minute.
Belohnen: Keiner, just a challenge medal.
Keep in mind that the hostiles are very aggresive in this mission, and chances are that you might contain / shoot everyone before you could effectively search the house. So make sure you enter the rooms with the collectibles first. Otherwise there might be a situation when the last room you open will immediately complete the room search objective and end the mission without giving you time to pick the collectible in that room (especially true if you will be clearing the house from north to south).
Also, if we are going from north to south the first collectible is in the small closet area.
The second collectible is on the fridge in the kitchen area.

The final collectible is in the small room at the southeast part of the house.
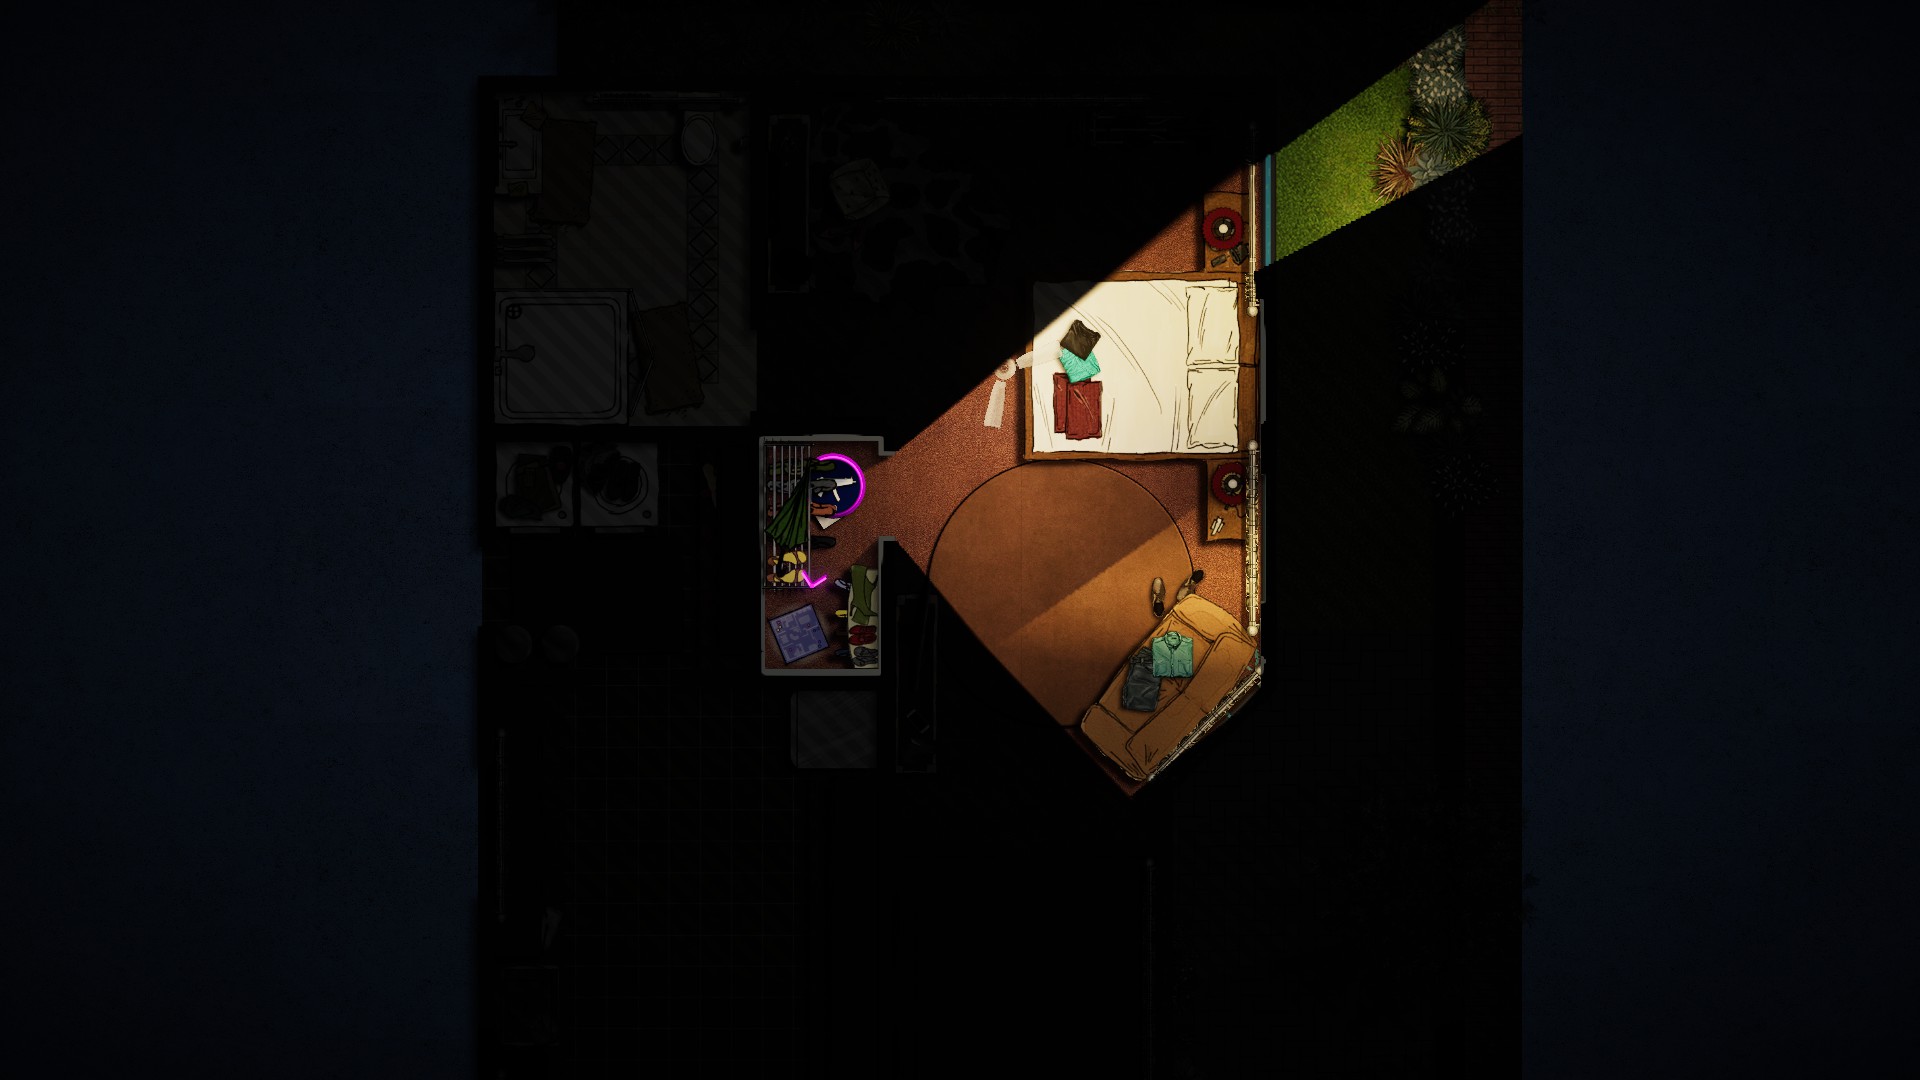
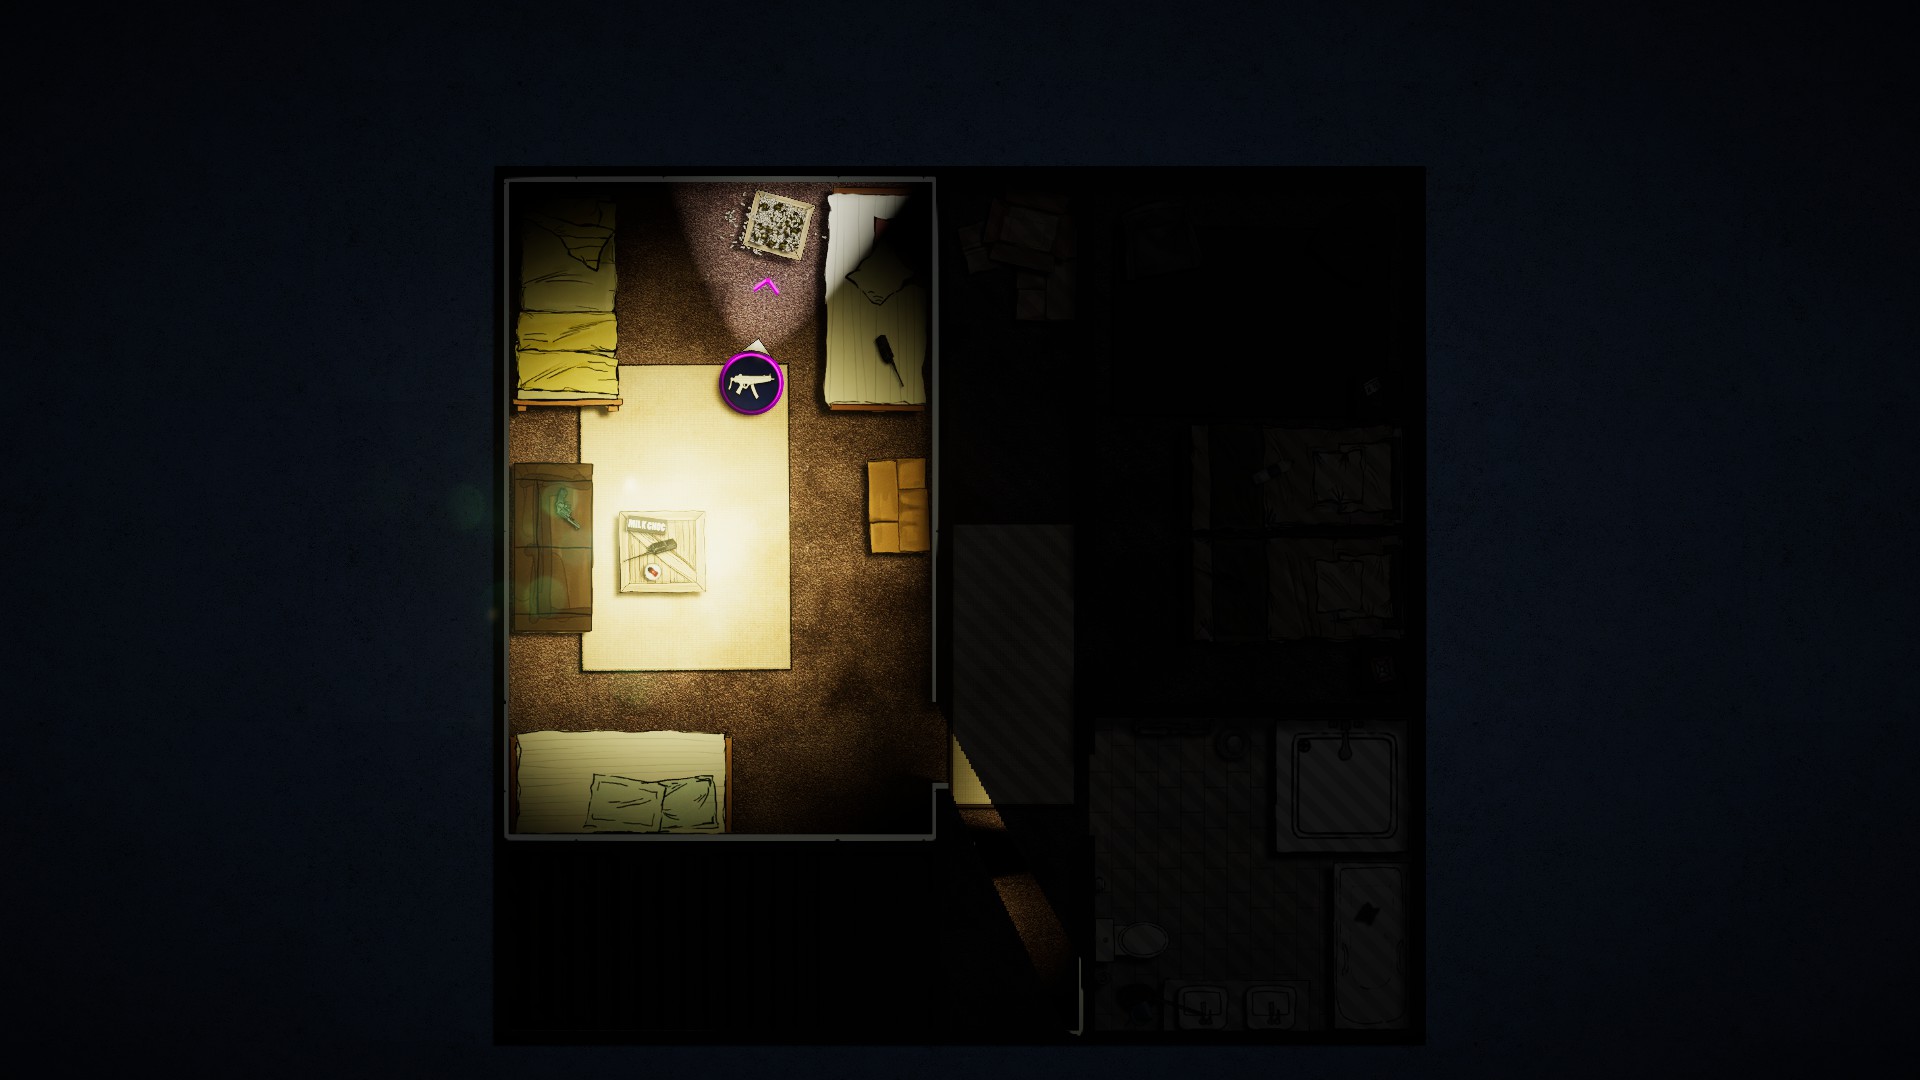
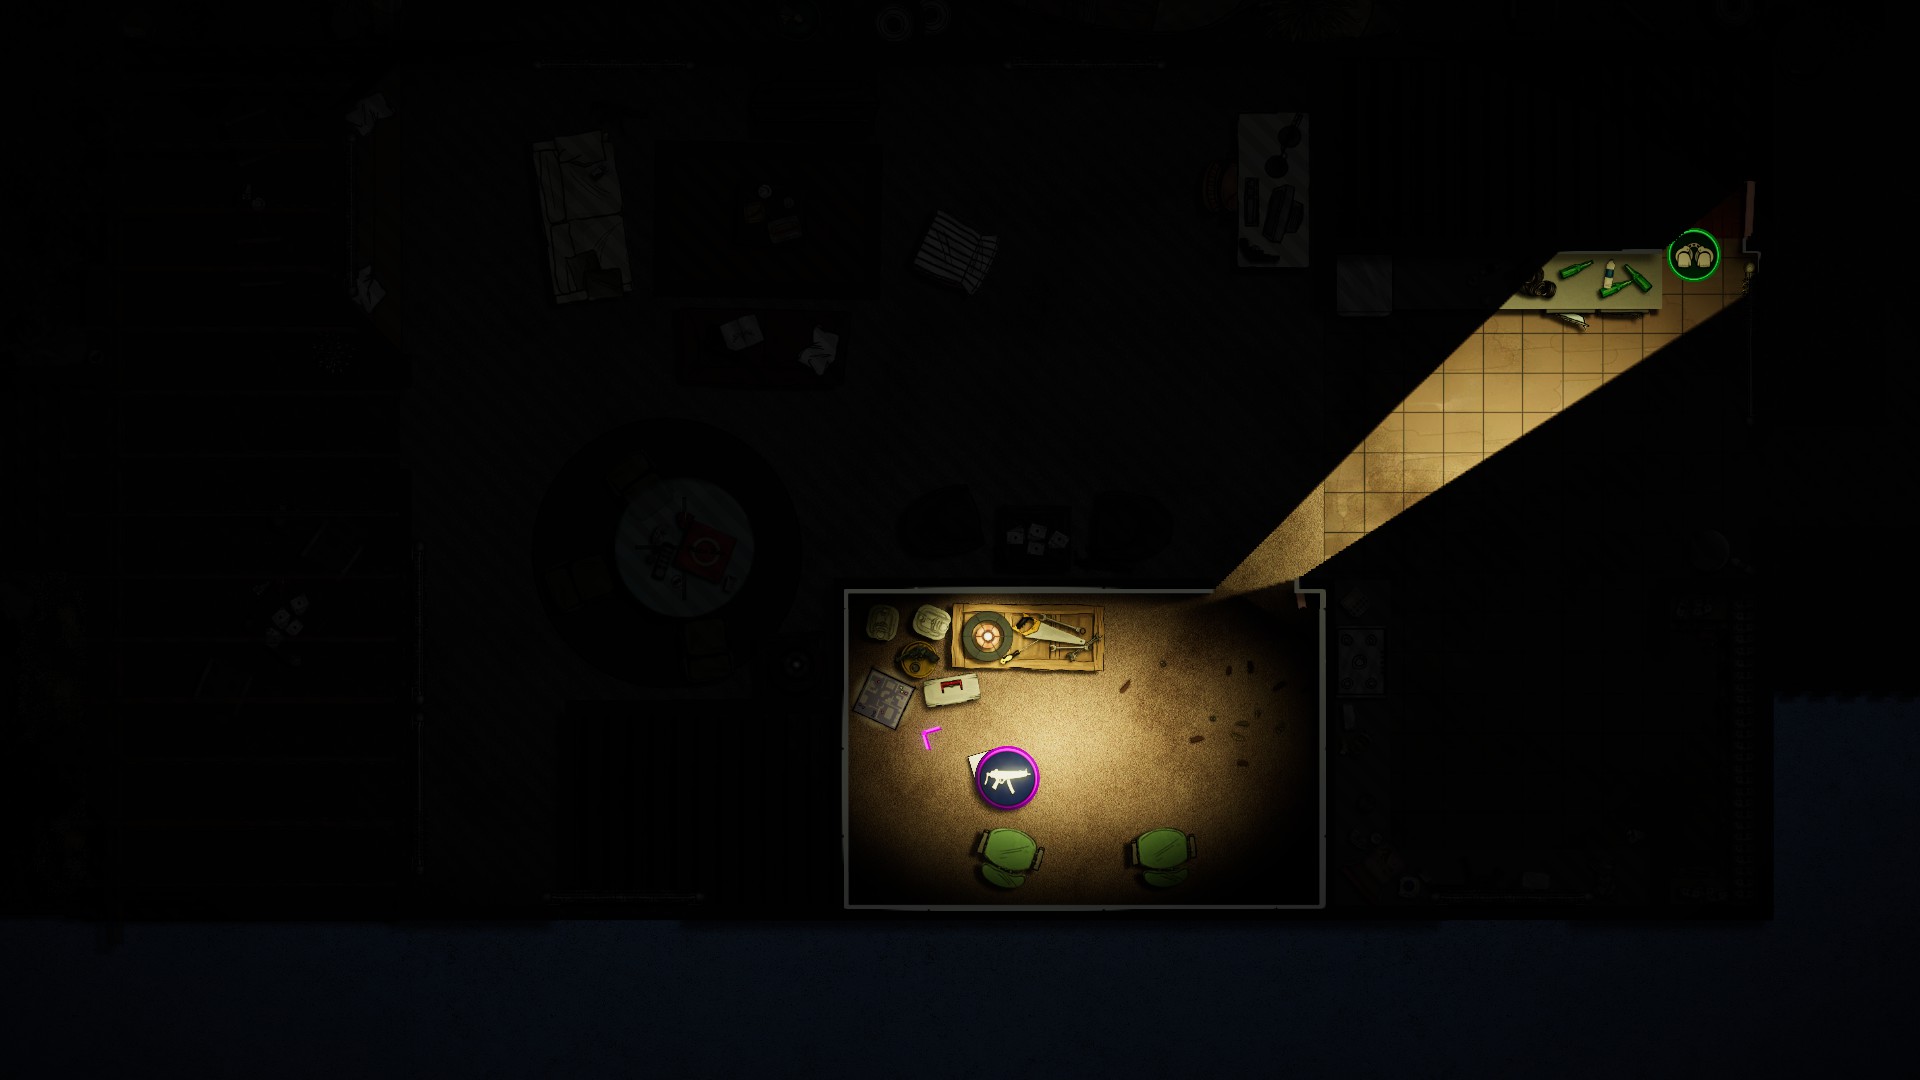
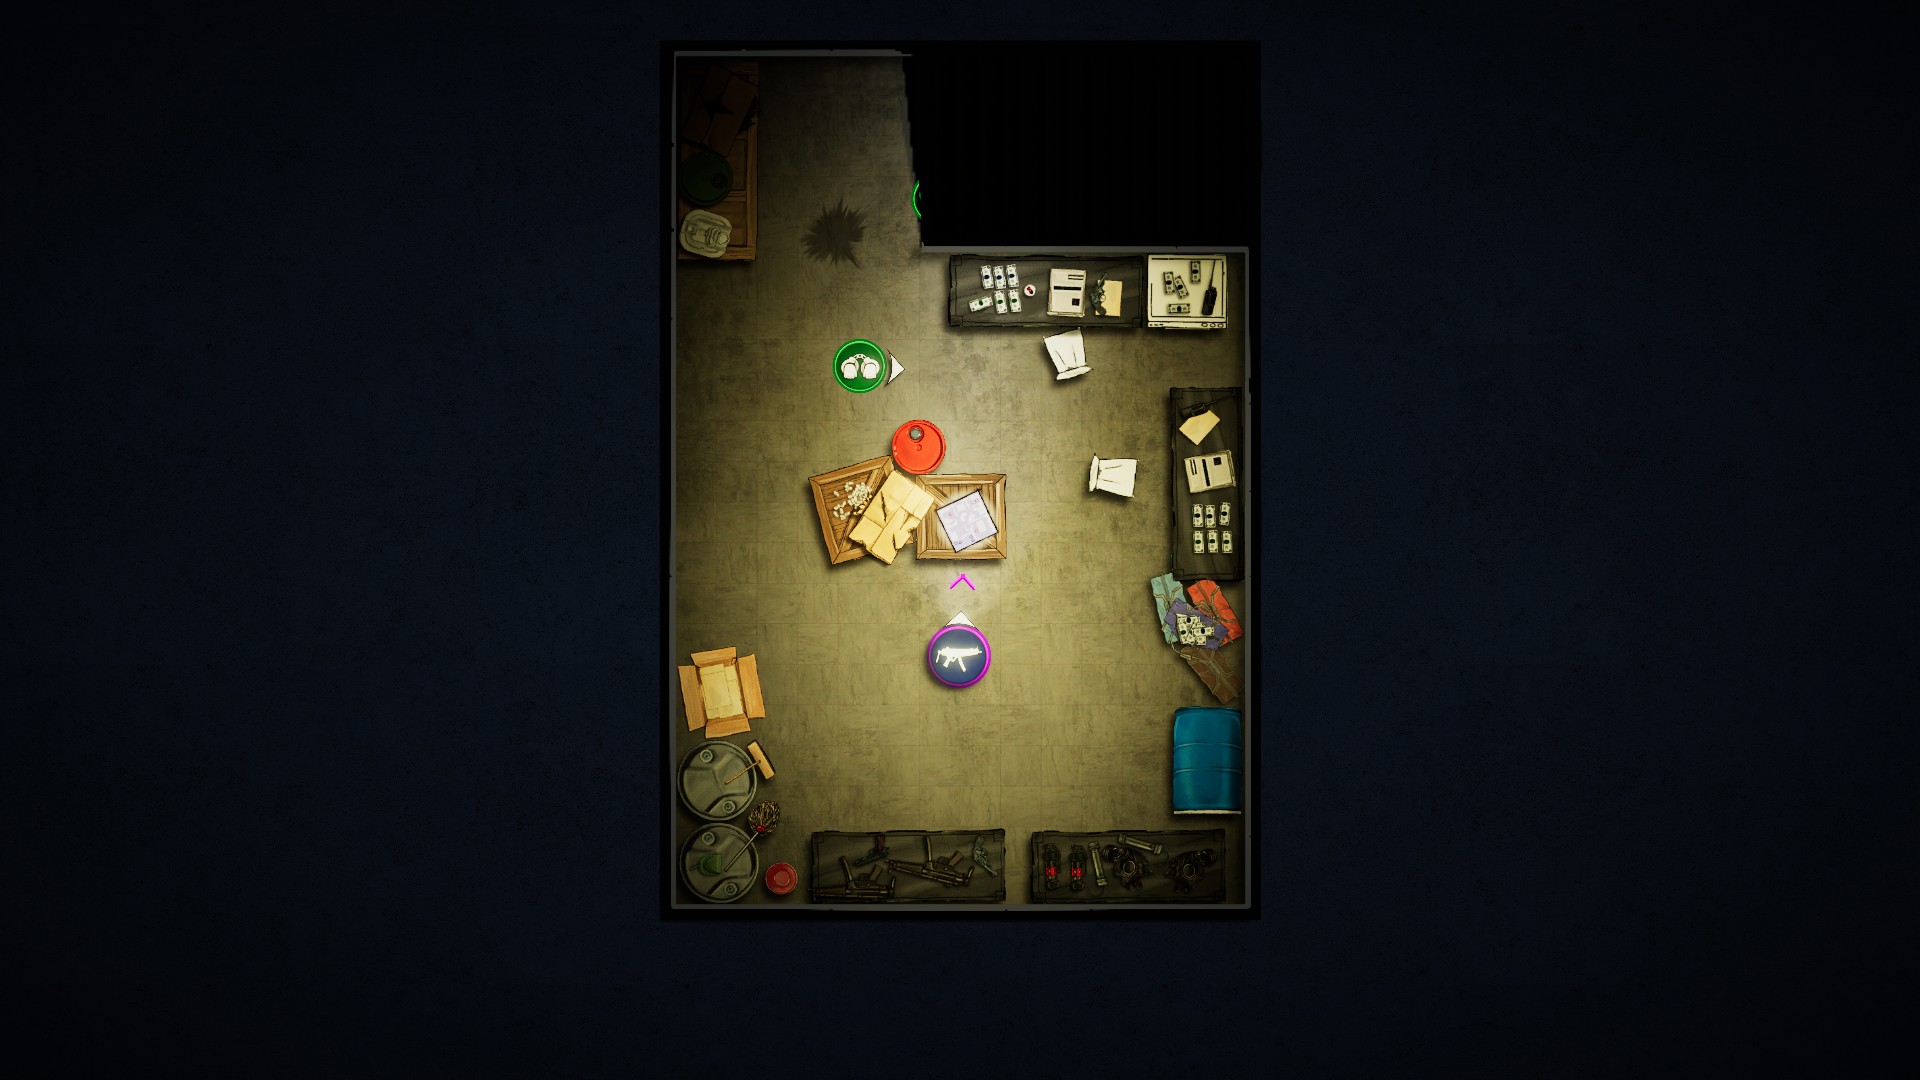
Mission 5 – Heimkehr
Cut the power. This is not a challenge but rather a separate achievement that can be unlocked for the first time in this mission. The interactible electrical box is located on the north outside wall of the left building. There will actually be an electricity icon on the map if you press TAB (standardmäßig). Approach it and cut the whole map out of juice.
Locate Piper with UDC. This challenge needs you to locate Piper quietly, so that he doesn’t start running, and you can use UDC while he stays in the room. This is something still a bit confusing to me and I’m not sure I understood how the alarming in this mission works. I’ve tried cutting the electricity first and moving through the area silently and stuff, but there was always a guy outside that saw me and warned Piper who immediately start running. Funny thing is that the first try I DID NOT cut the electricity and moved in the light, there were just a couple of people outside the house blocks who didn’t cause any alarms and surrendered almost instantly. daher, I was able to silently search every single room until I found Piper and arrested him, which effectively resulted in completing all challenges in this mission at once (except for speedrun) and finishing without any casualties. But since Piper’s location seems to be a random place out of several rooms, this might have been just a stroke of luck.
Belohnen:
Nachtsicht Schutzbrille. This is also a separate achievement –
Voyeur– Unlock the Night Vision Goggles.
Prevent Piper from firing. I’ve made about 4 tries for this mission, and even though the first three failed miserably, he didn’t use his gun even once, also ja, just don’t let him start shooting.
Belohnen:
G17 SD. This is also a separate achievement –
Unterdrückung– Unlock the G17 SD.
Don’t raise the alarm. In the tries I failed there were some bad guys outside who resisted my attempts to subdue them and started shouting „Laufen!“ and things like that immediately triggered Piper to leave his room and start running to the northeast part of the parking lot. I did this challenge together with Voyeur, and it appears that you just need to keep silent, search one room at a time, and get a little lucky.
Belohnen:
Shared Field of View modifier.
Complete the mission in less than 5 Minuten.
Belohnen: keiner, just a challenge medal.
The map is relatively big but with a single floor, so I’ve arranged all collectible in one screenshot.
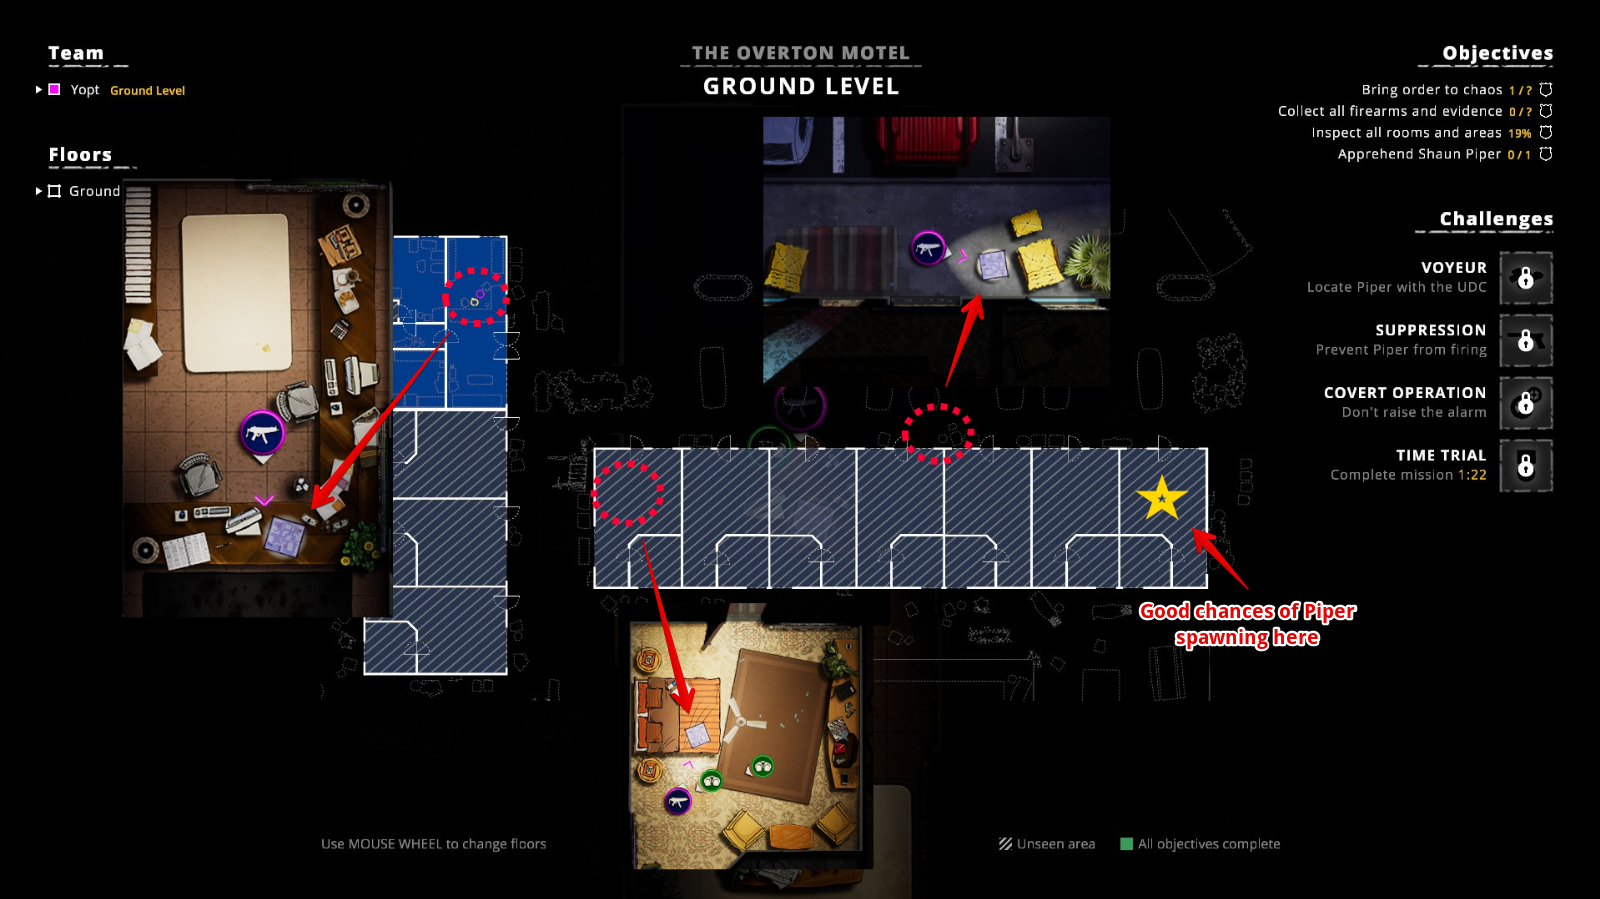
P.S.: If you are struggling with any of the challenges or a speedrun on this mission, I can recommend to keep restarting the level and immediately run straight down from the respawn point to the far right room (marked with a star on the screenshot above). The chances are relatively high that Piper will be in that room which will easily grant you many challenges at once if you use the UDC on the door and apprehend him with a taser.
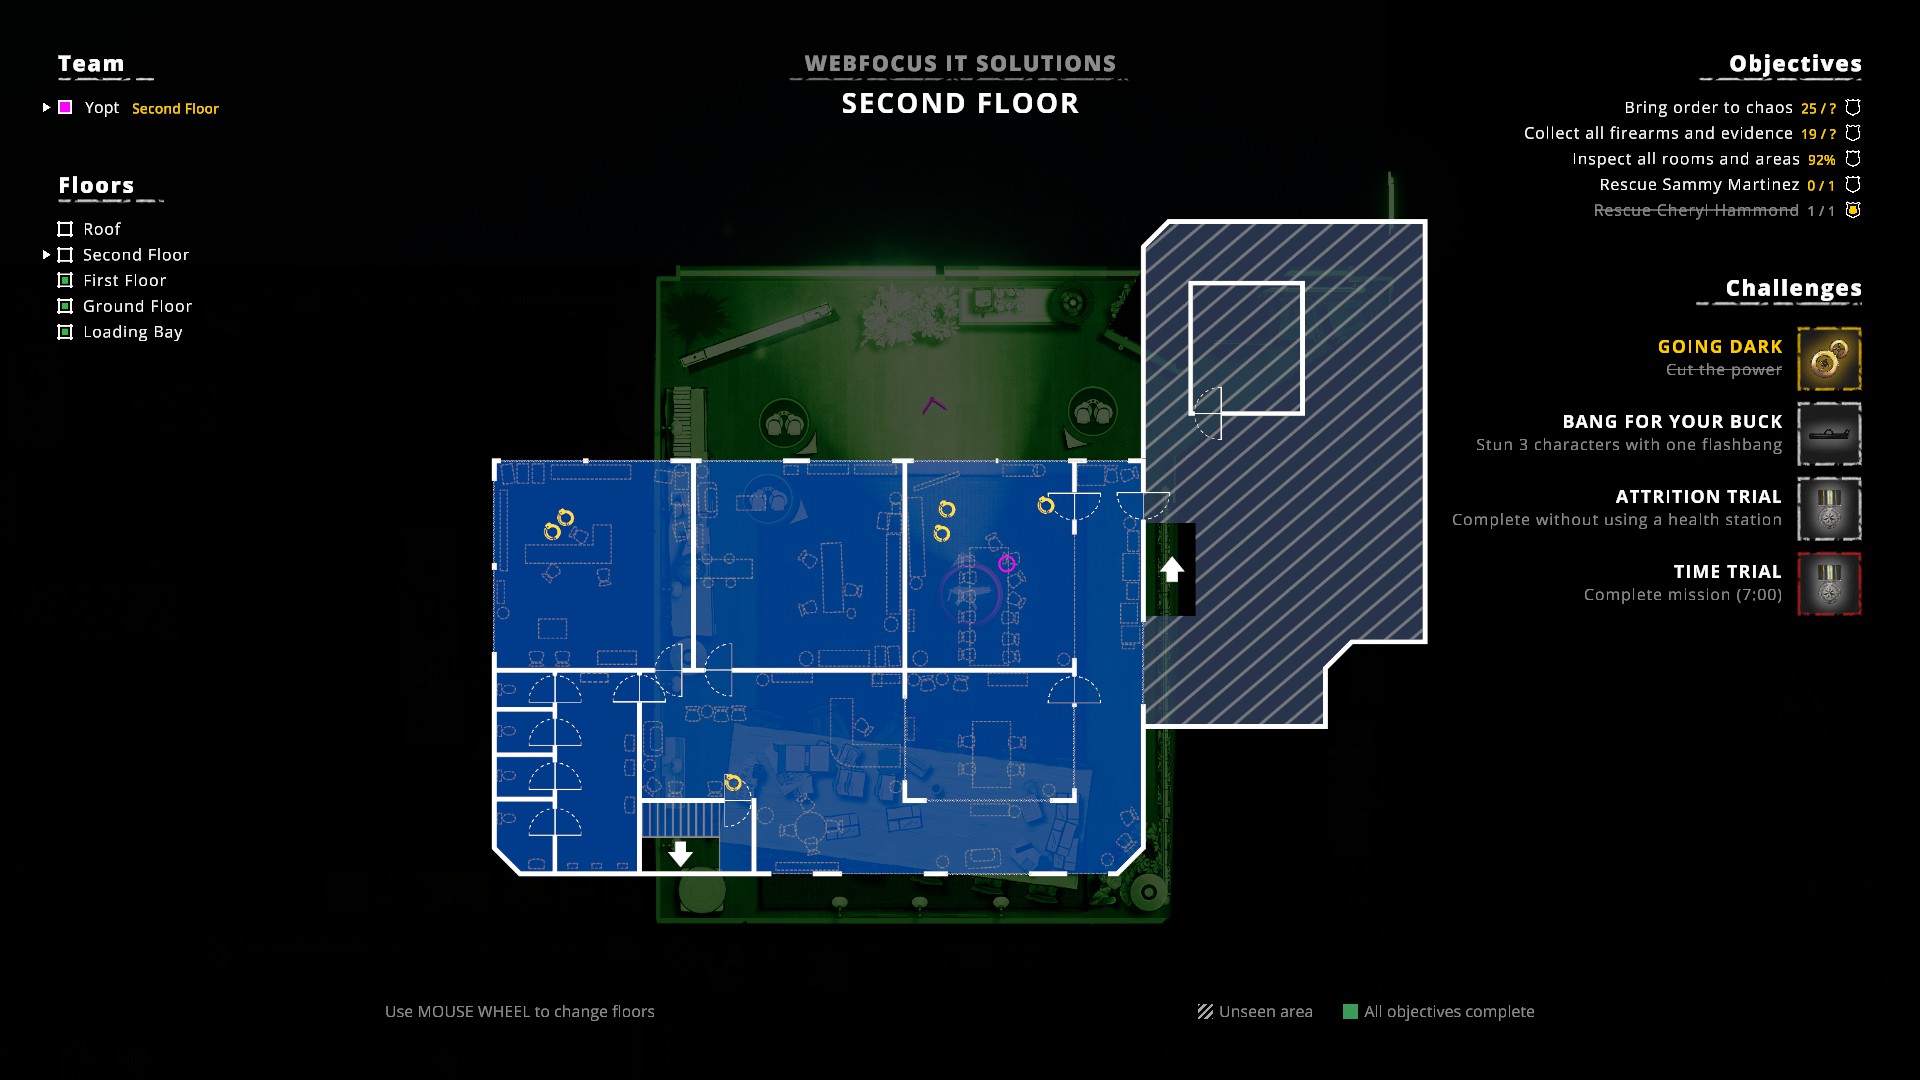
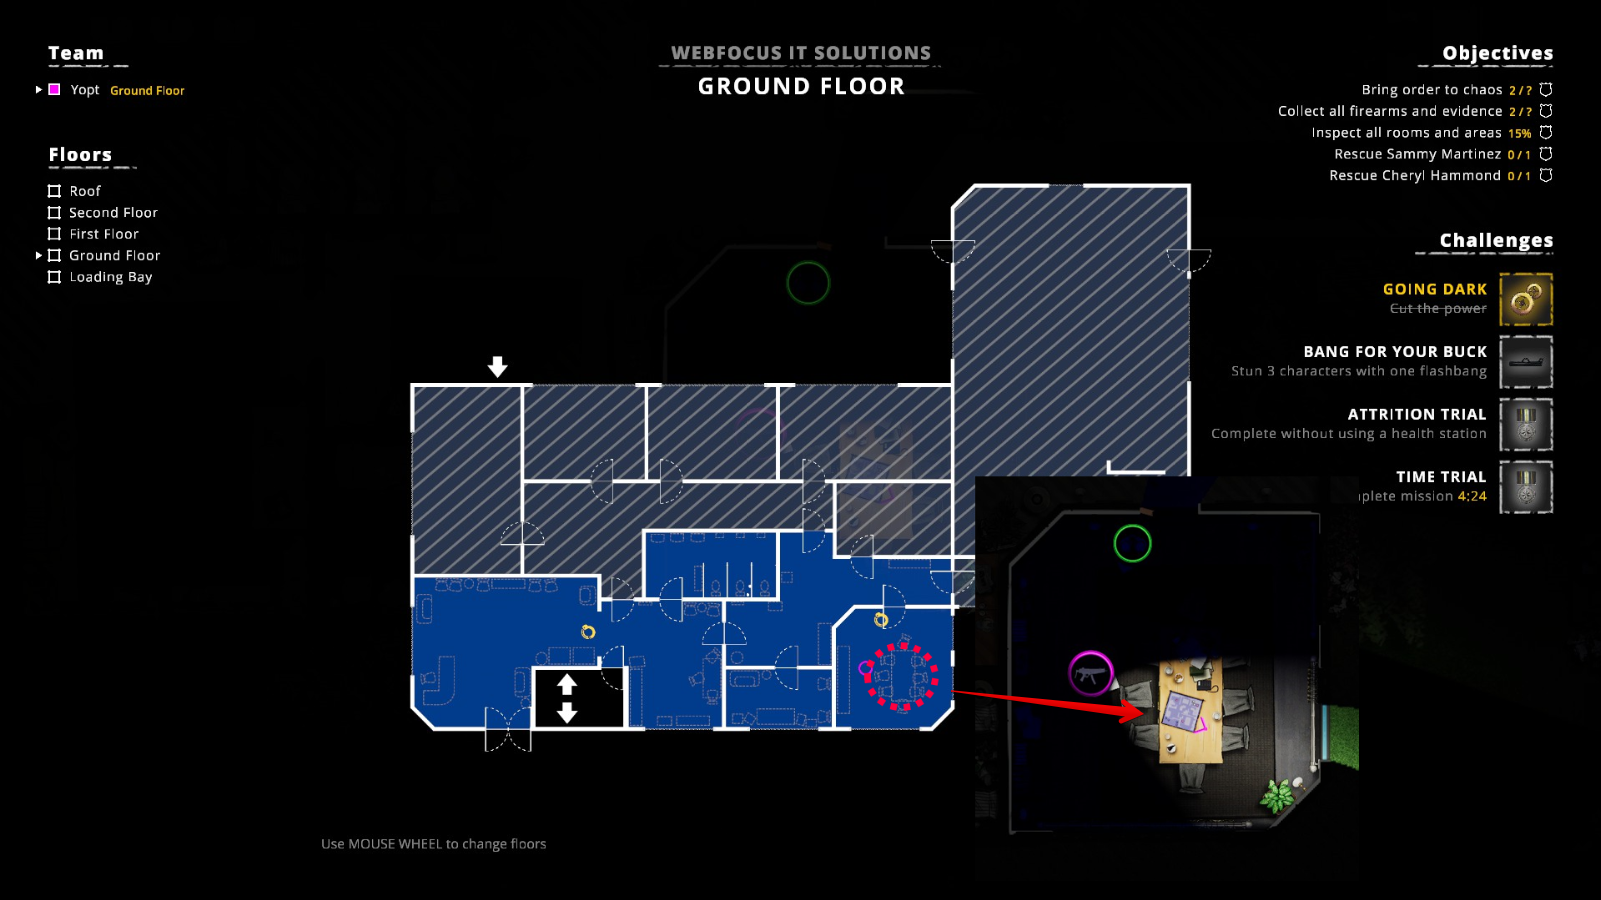
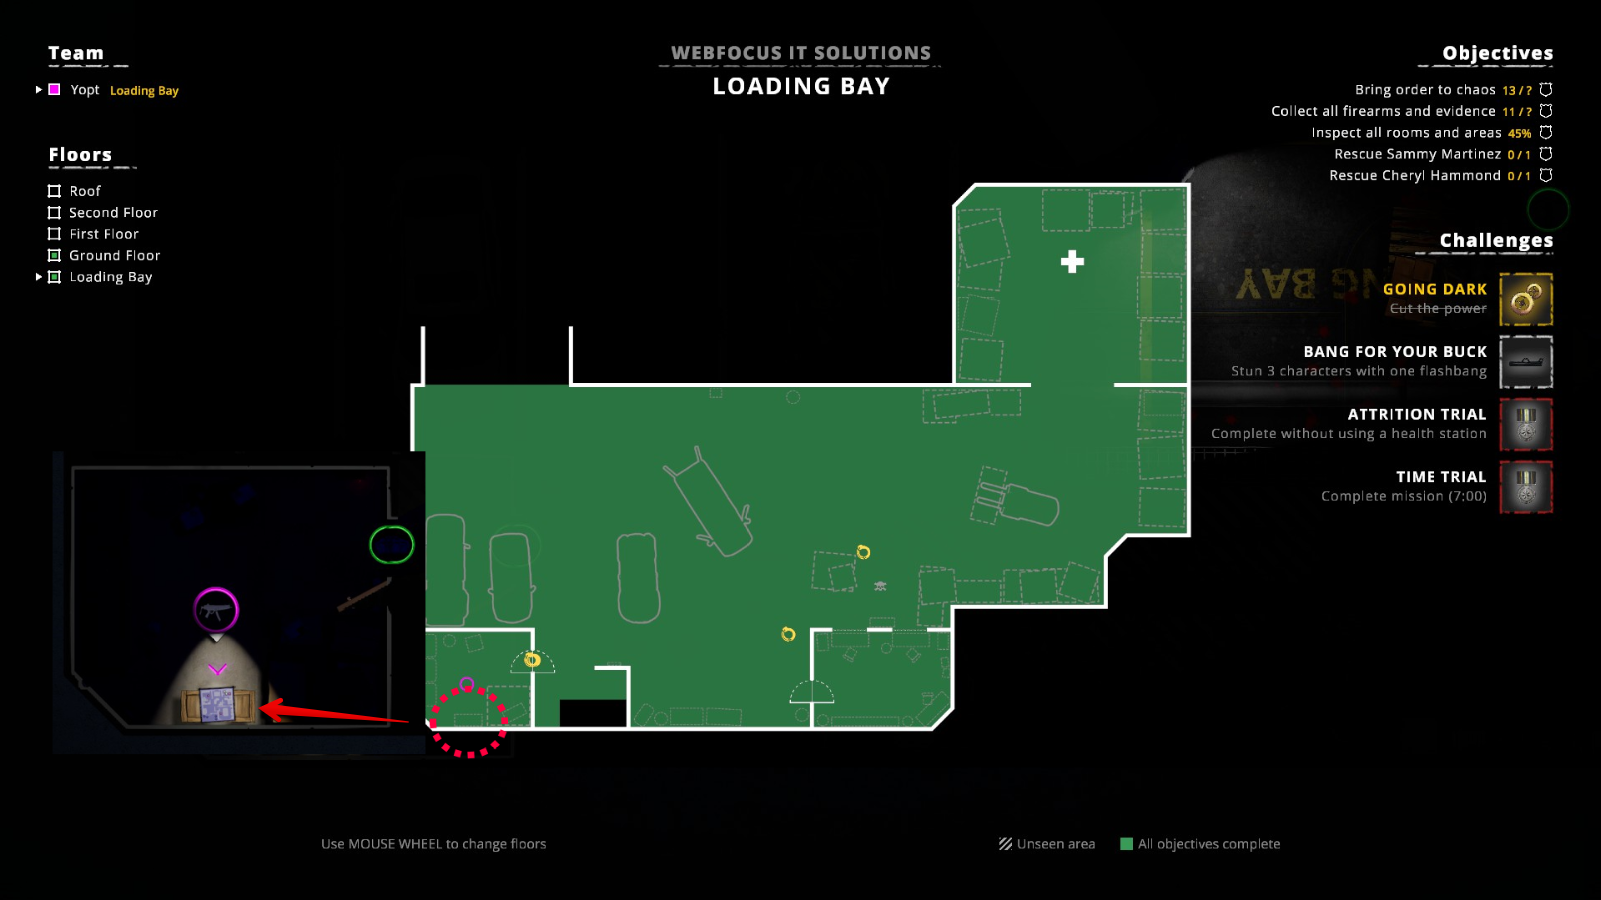
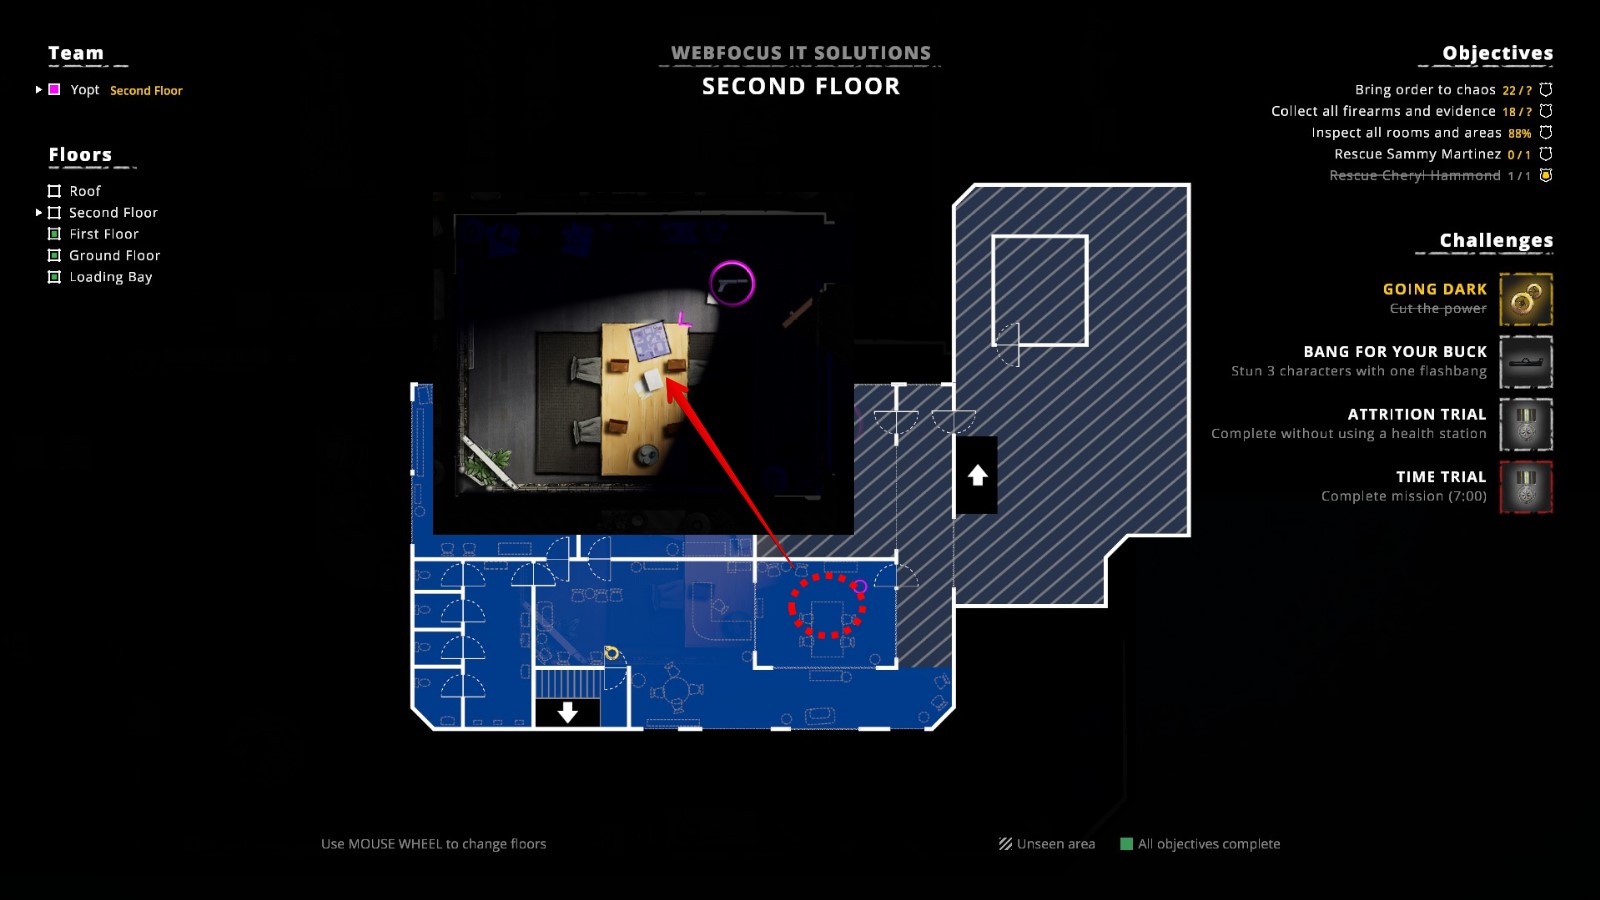
Mission 6 – The Hammond Kidnapping
Cut the power. Unlike Mission 5 this is a challenge here and opportunity to unlock the corresponding separate achievement if you haven’t done it in mission 5. Es gibt 4 power boxes in this mission, basically one at each level except for the roof, therefore each power box will only cut the electricity on the floor, not the whole building.
Belohnen:
Time of Day modifier.
Betäuben 3 characters with one flashbang. Location and grouping of enemies is somewhat random, I’ve made a lot of tries on this level and at times there were three people in the Hammond’s room, sometimes on the Ground Floor at the huge shopping (?) area in the east part of the building. But I think almost always three people were in this room on the Second Floor, so it should be the safest option if nothing else works.
Belohnen:
Door Ram. This is also a separate achievement –
Klopf Klopf– Unlock the Door Ram.
Complete without using a Health station. Health station is located in the Loading Bay below the Ground Floor. I didn’t find any good use for it anyway, because in most cases it was faster to restart the mission that drag myself all the way down to heal.
Belohnen: keiner, just a challenge medal.
Complete the mission in less than 7 Minuten. There is a lot of area to cover across multiple floors and a lot of armed hostiles. For the speedrun I highly recommed to shoot bad guys on sight as soon as their circle turned red. Töte sie, pick their weapon and continue clearing the floor ASAP. Keep in mind that Hammond is held hostage on the Second Floor in the room that is barricaded, hence for this particular mission there is a Breaching Charge in your equipment that can’t be swapped for anything else, because it is the only way to reach that room.
Belohnen: keiner, just a challenge medal.
Huge map means more collectibles than usual – 4. The first one is on the Ground Floor here:
The second collectible is in the Loading Bay which is below the Ground Floor. It’s in the same room with the power box.
The third collectible is on the First Floor (don’t confuse with the Ground Floor) in the far east open space room.

The final collectible is on the Second Floor in the what appears to be a conference room here:
Mission 7 – Arrest Warrant
Locate the grenade stash. The stash is basically a square crate located on the second floor with grenades hidden in the mesh. Just approach it and the challenge will be completed.
Belohnen:
Granate. This is also a separate achievement –
Detective Vendrell– Unlock the Grenade.
Complete the mission in less than 1:45 Minuten. Bringing a Door Ram is highly recommended as a lot of doors will be locked in this mission.
Belohnen:
Scatter Spawn modificator.
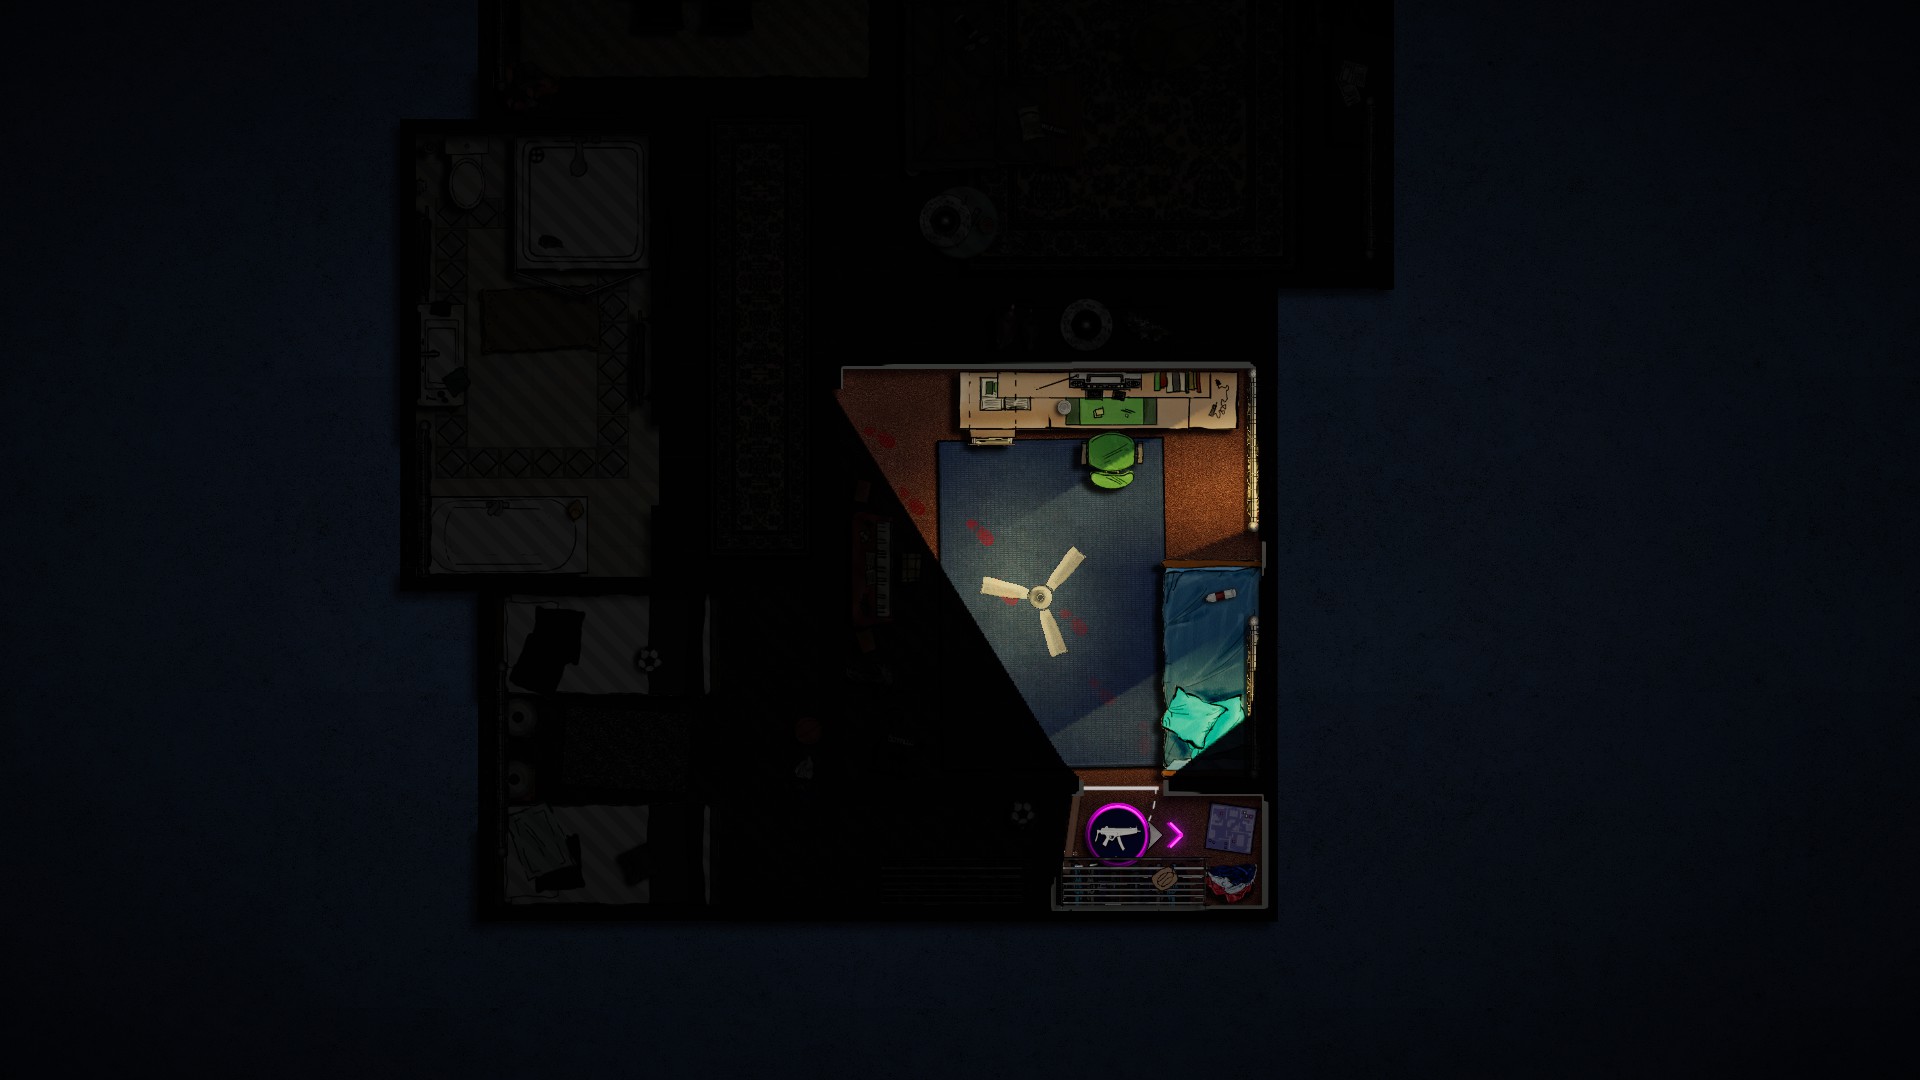
Drei Stockwerke, one collectible on each. The first is in workshop-like room on the Ground Floor.
The second is in the center of the Basement.
The final one is on the Second Floor at the end of the narrow corridor.
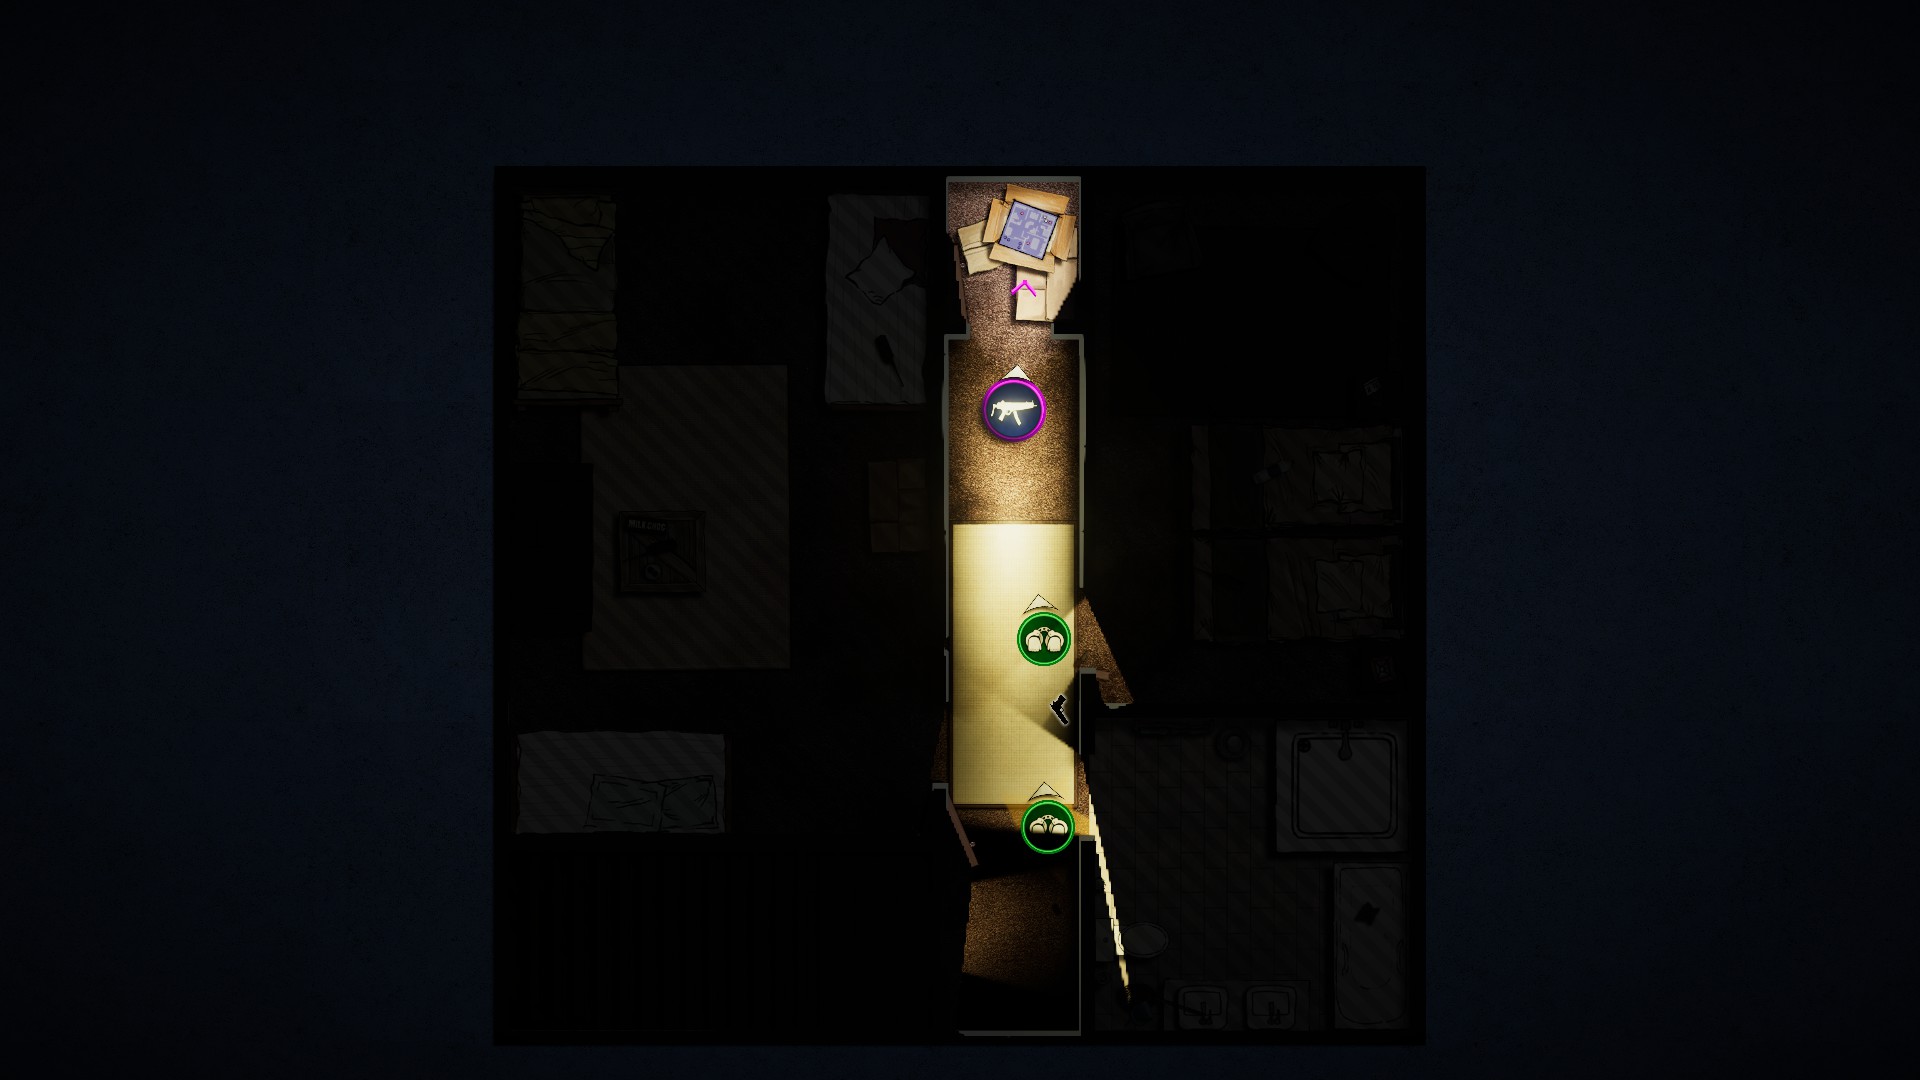
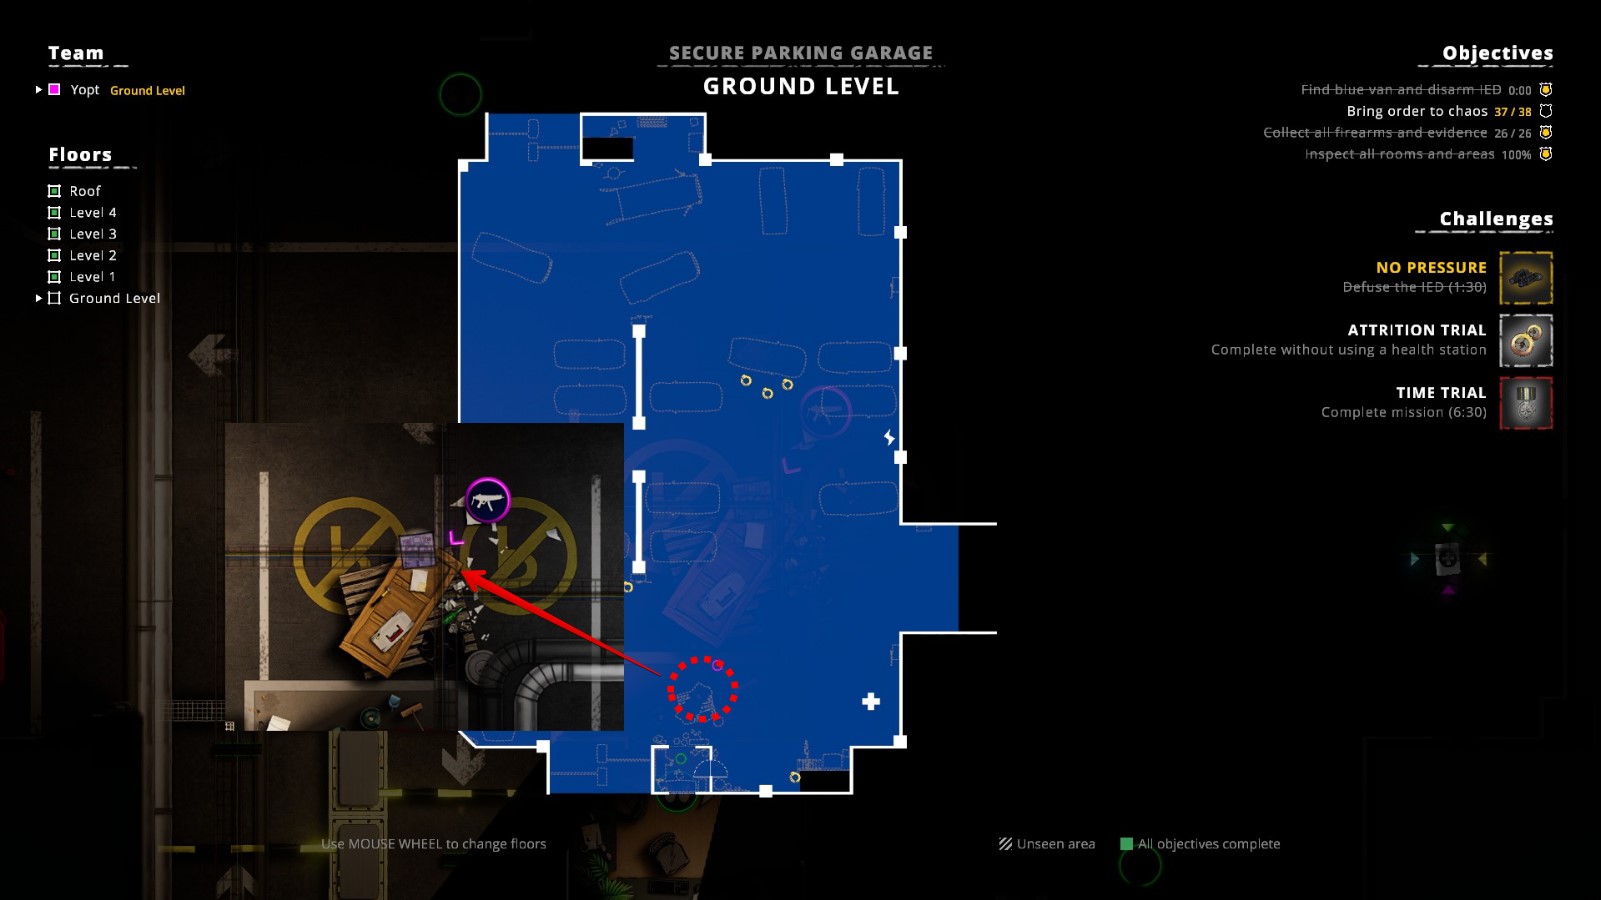
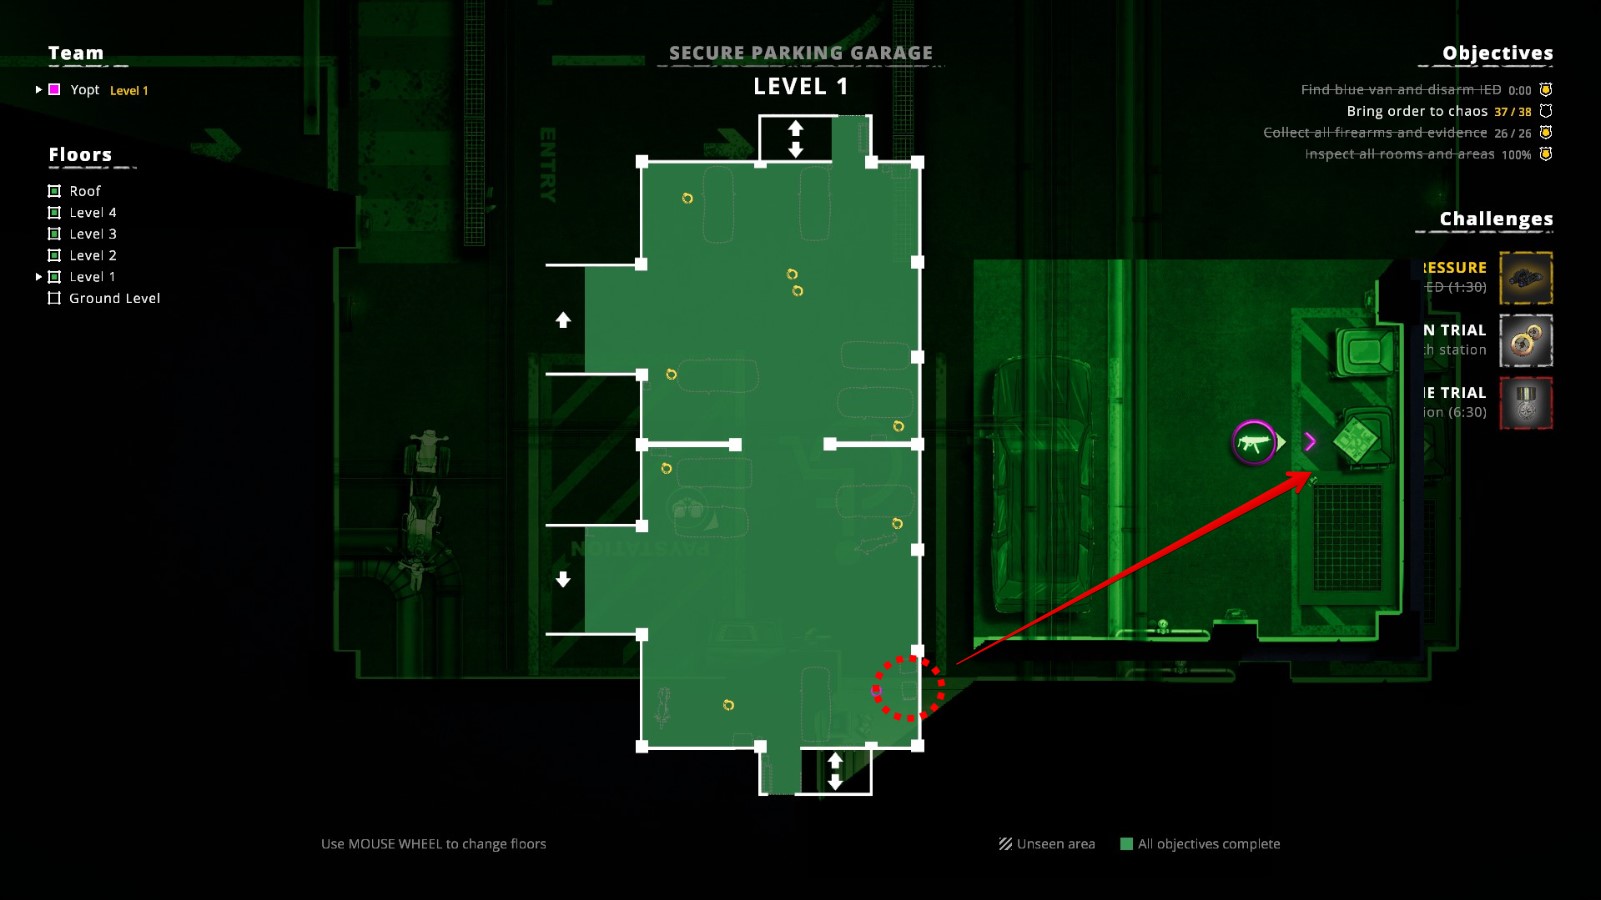
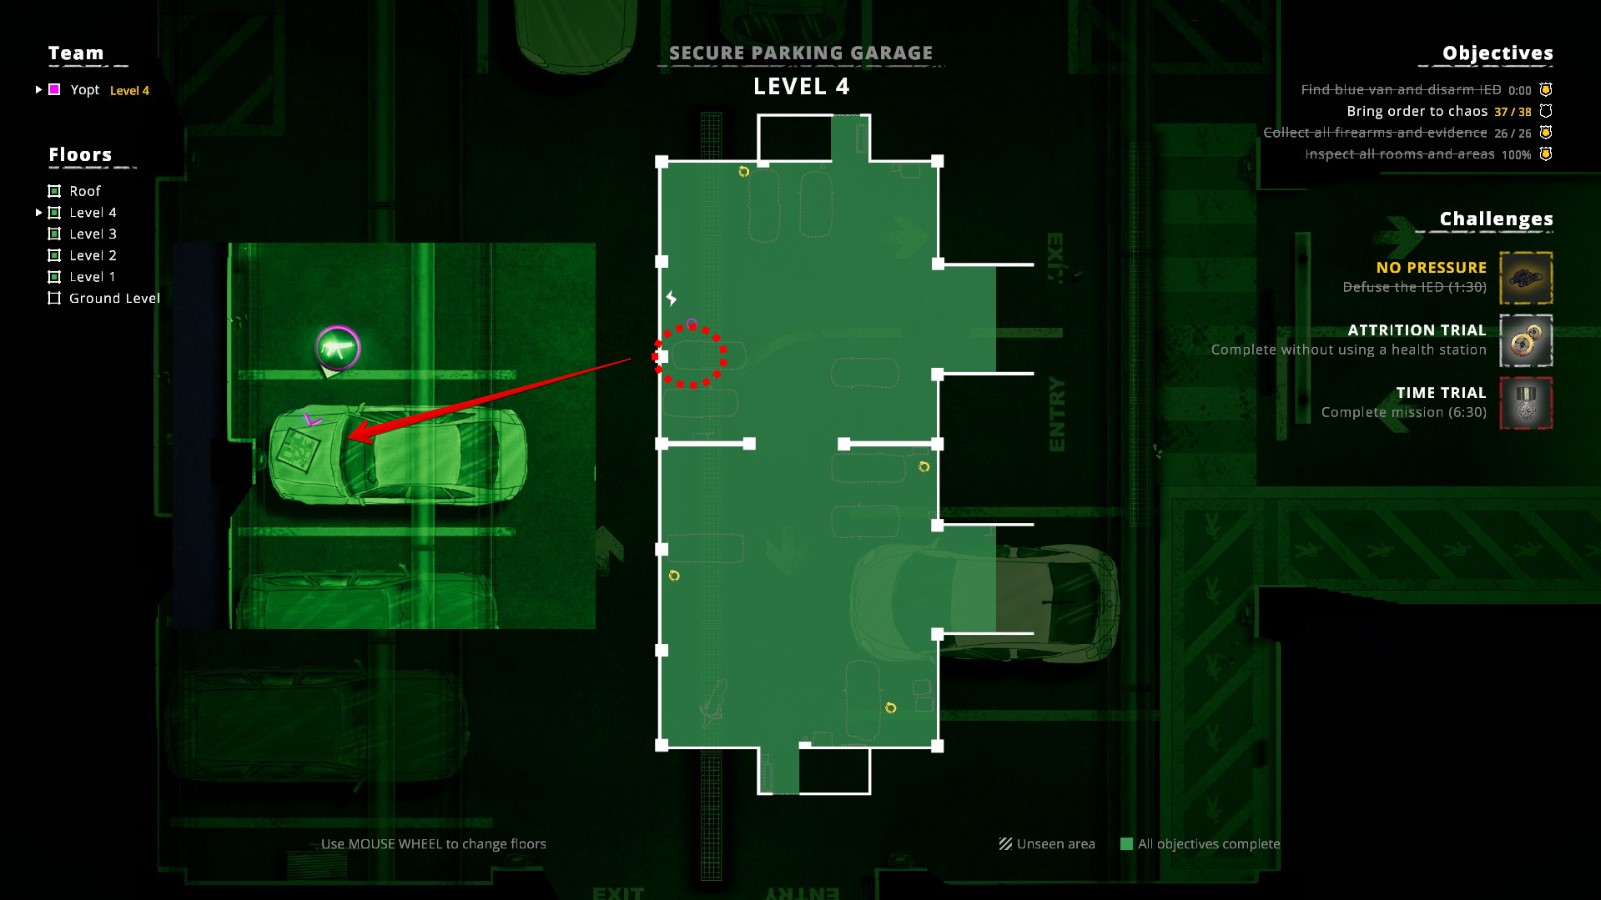
Mission 8 – Improvised Explosive Device
Defuse the IED in less than 1:30 Minuten. Explosive device is always in a big blue van, but the van itself can be on different floors each time. From what I’ve experienced it’s either Second Floor or Third Floor. The back foors if the van will be locked, so you will need to pick lock first and then disarm the bomb in the same you cut the power box.
Just FYI: The time for defusal is still limited, so even if you won’t make it in 1:30 make sure you disarm it ASAP in any case. You will periodically hear a single beep in the mission and at some point the beep will start constantly ticking – it means the bomb will explode real soon and cause the game over if you won’t defuse it!
Belohnen:
Thermal Vision Goggles. This is also a separate achievement –
No Pressure– Unlock the Thermal Vision Goggles.
Complete mission without using a health station. There are two health stations located on the Ground Floor of the parking lot.
Belohnen:
Spawn modifier.
Complete the mission in less than 6:30 Minuten. A lot of hostiles means plenty of tries, and the ticking bomb won’t make it easier as well. As with all speed runs my only recommendation is to shoot the bad guys dead the moment they turn red, this saves time for cuffing them. If you do things quickly, you should be able to sweep every floor one by one going from the Ground Floor and disarm the bomb before it goes boom even if the van will be on the Third Floor.
Belohnen: keiner, just a challenge medal.
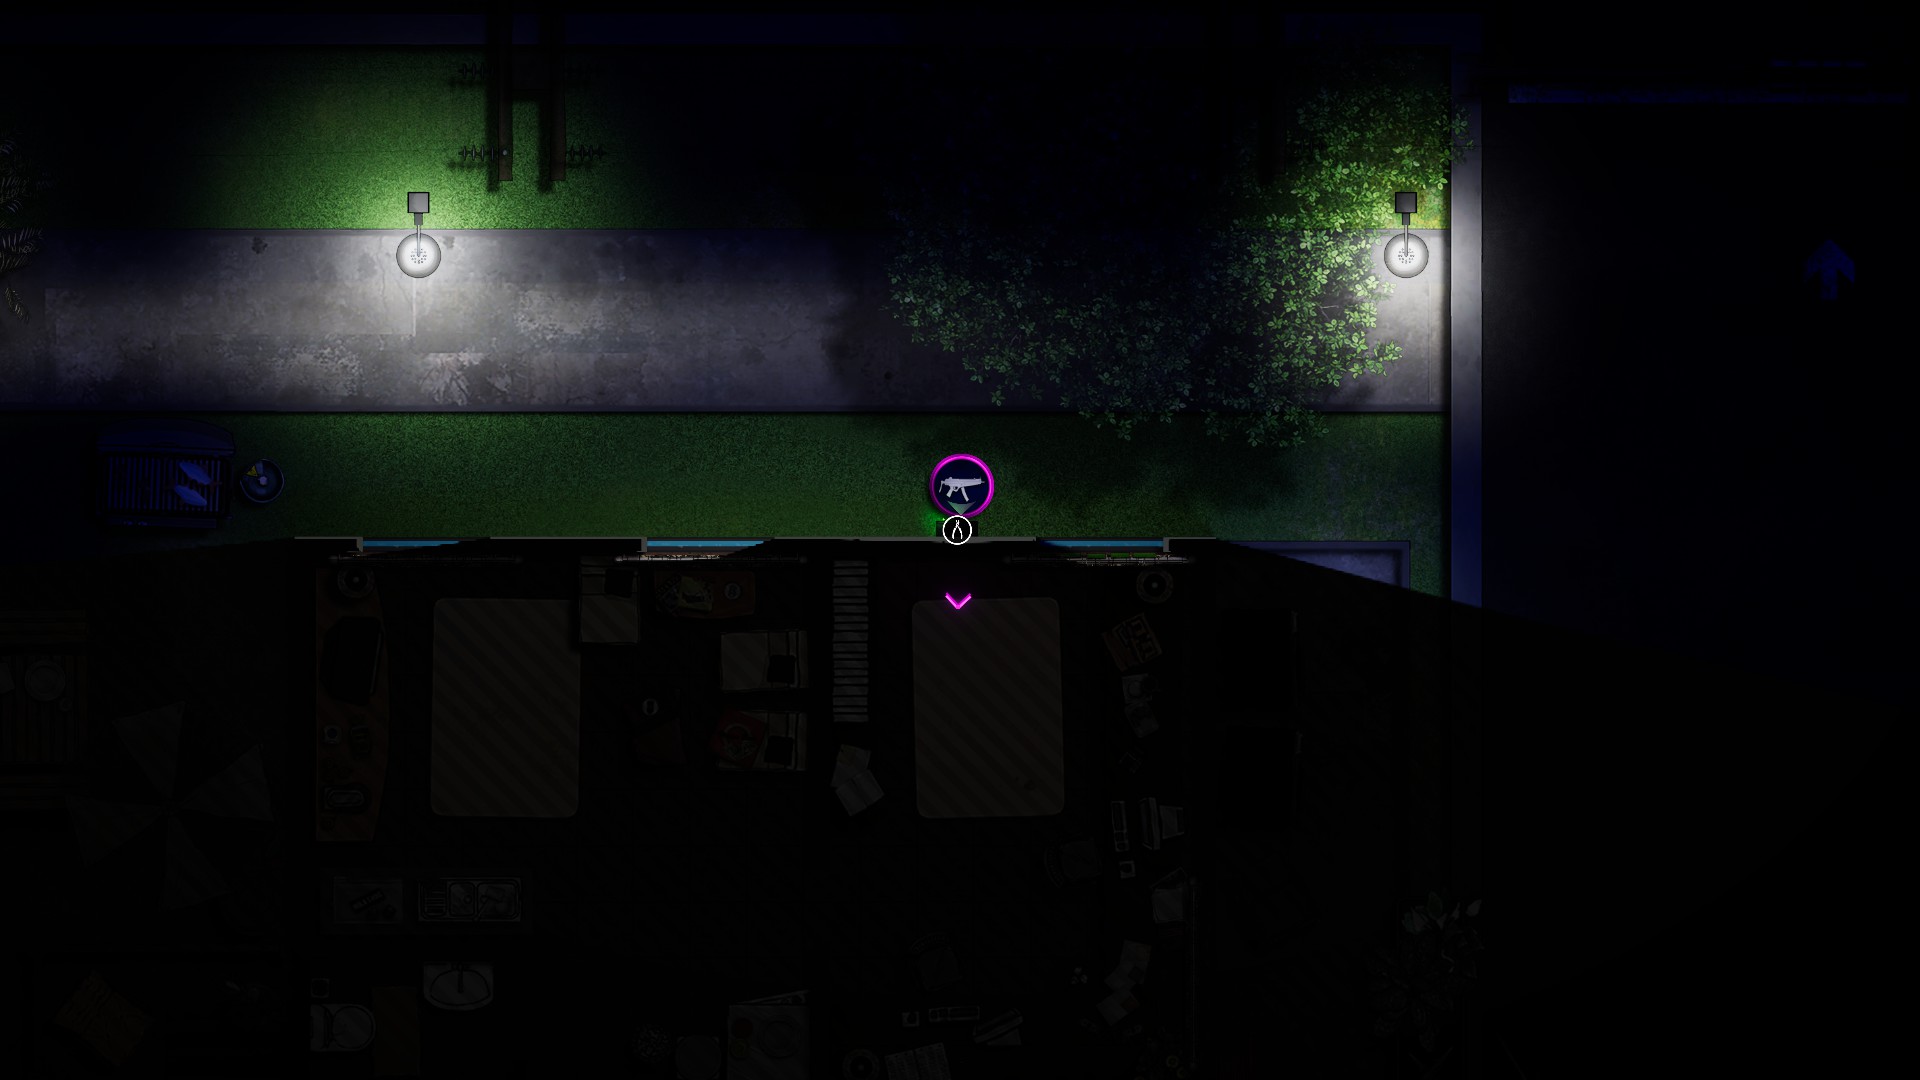
Big map with 4 collectibles scattered on the Ground Level, Eben 1, Eben 4 and Roof Level.
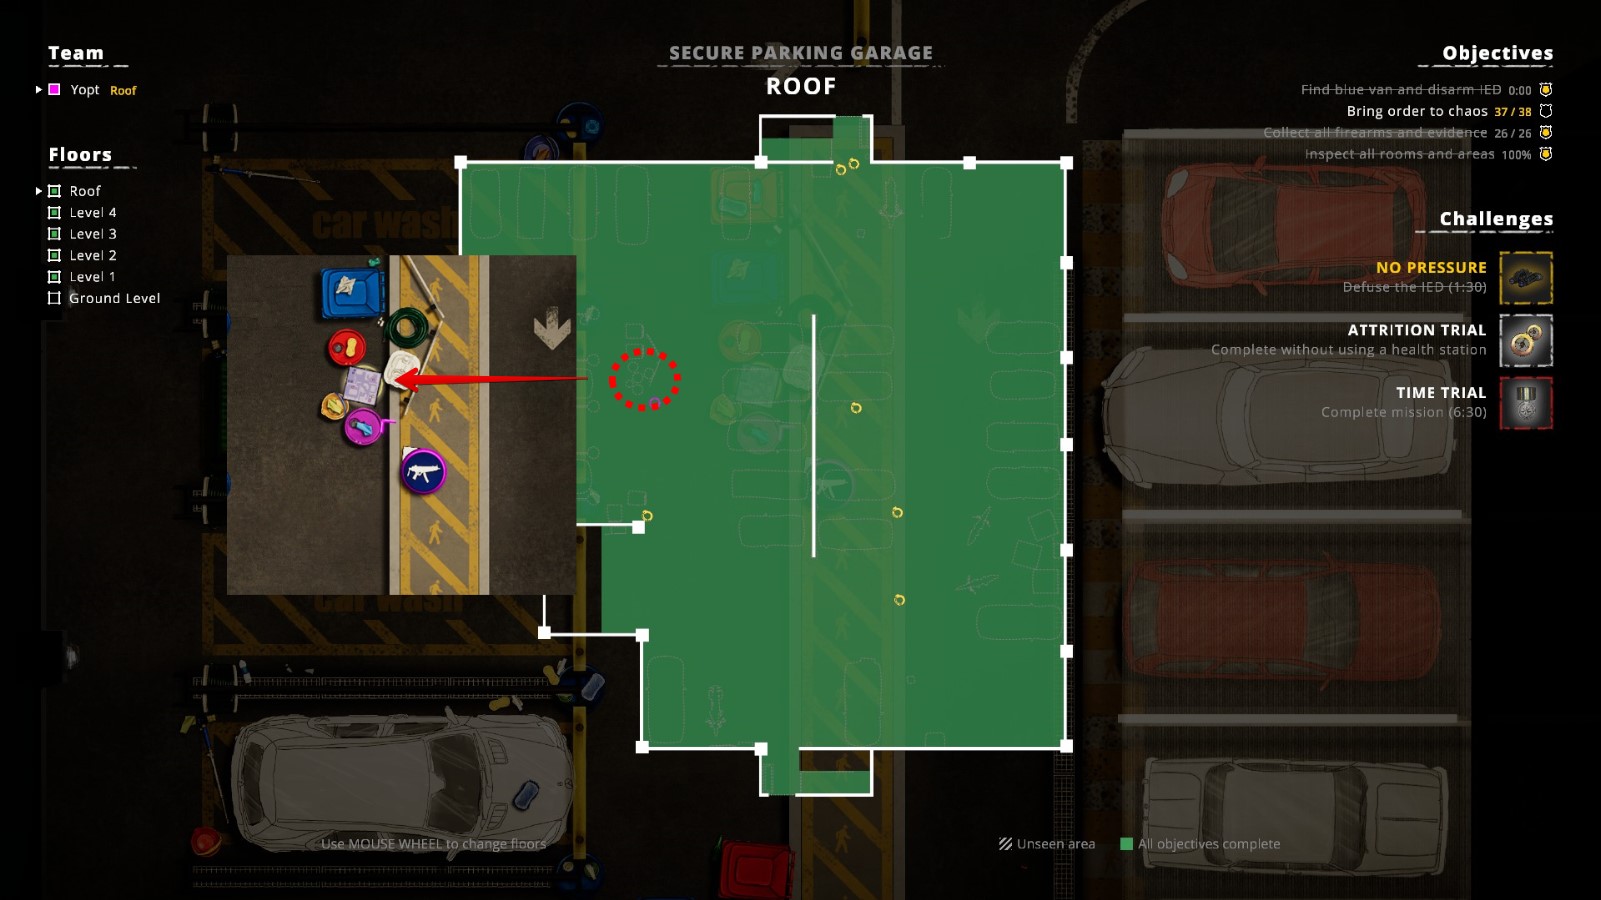
P.S.: It took me a lot of tries to finish this level solo without casualties. A lot of hostiles in huge open spaces are a real trouble. I’d recommend to play the next level first and unlock a tazer gun. Although its range is limited and it can shoot only 1 non-lethal round at a time, it can still help a lot.
Mission 9 – The Liu Crime Syndicate
Reach the meeting in 0:30 Minuten oder weniger. The meeting is taking place in the basement with plenty of hostiles in the room. Just rush to this room and then clean other floors.
Belohnen:
Schwere Rüstung. This is also a separate achievement –
Just Encase– Unlock the Heavy Armor.
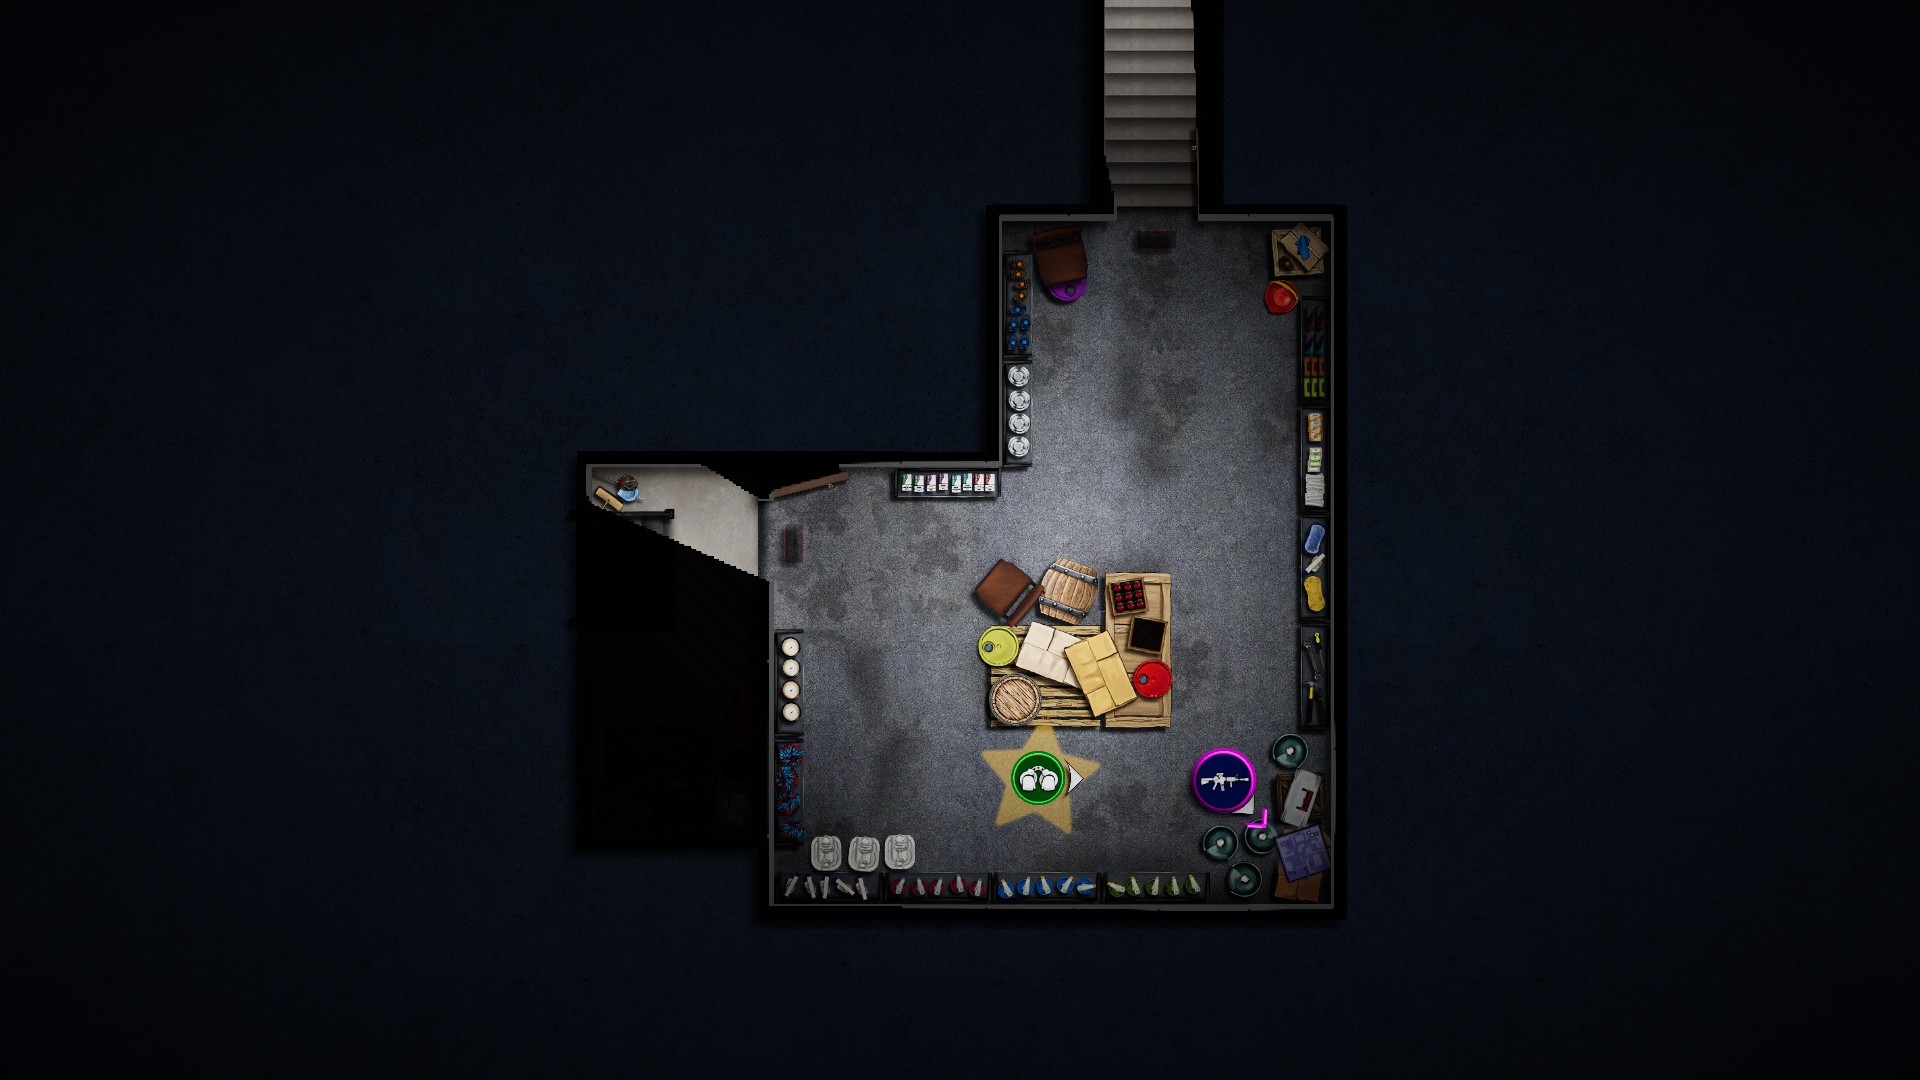
Discover the shocking secret. What a pun! For this challenge make sure you grab a Breaching Charge, otherwise you won’t be able to access the secret. On the First Floor of the building you will see an enclosed squared room in the north part. Use a breaching charge on the wall and approach the revealed crate with equipment.
Belohnen:
X26. This is also a separate achievement –
Walled Off– Unlock the Less Lethal X26.
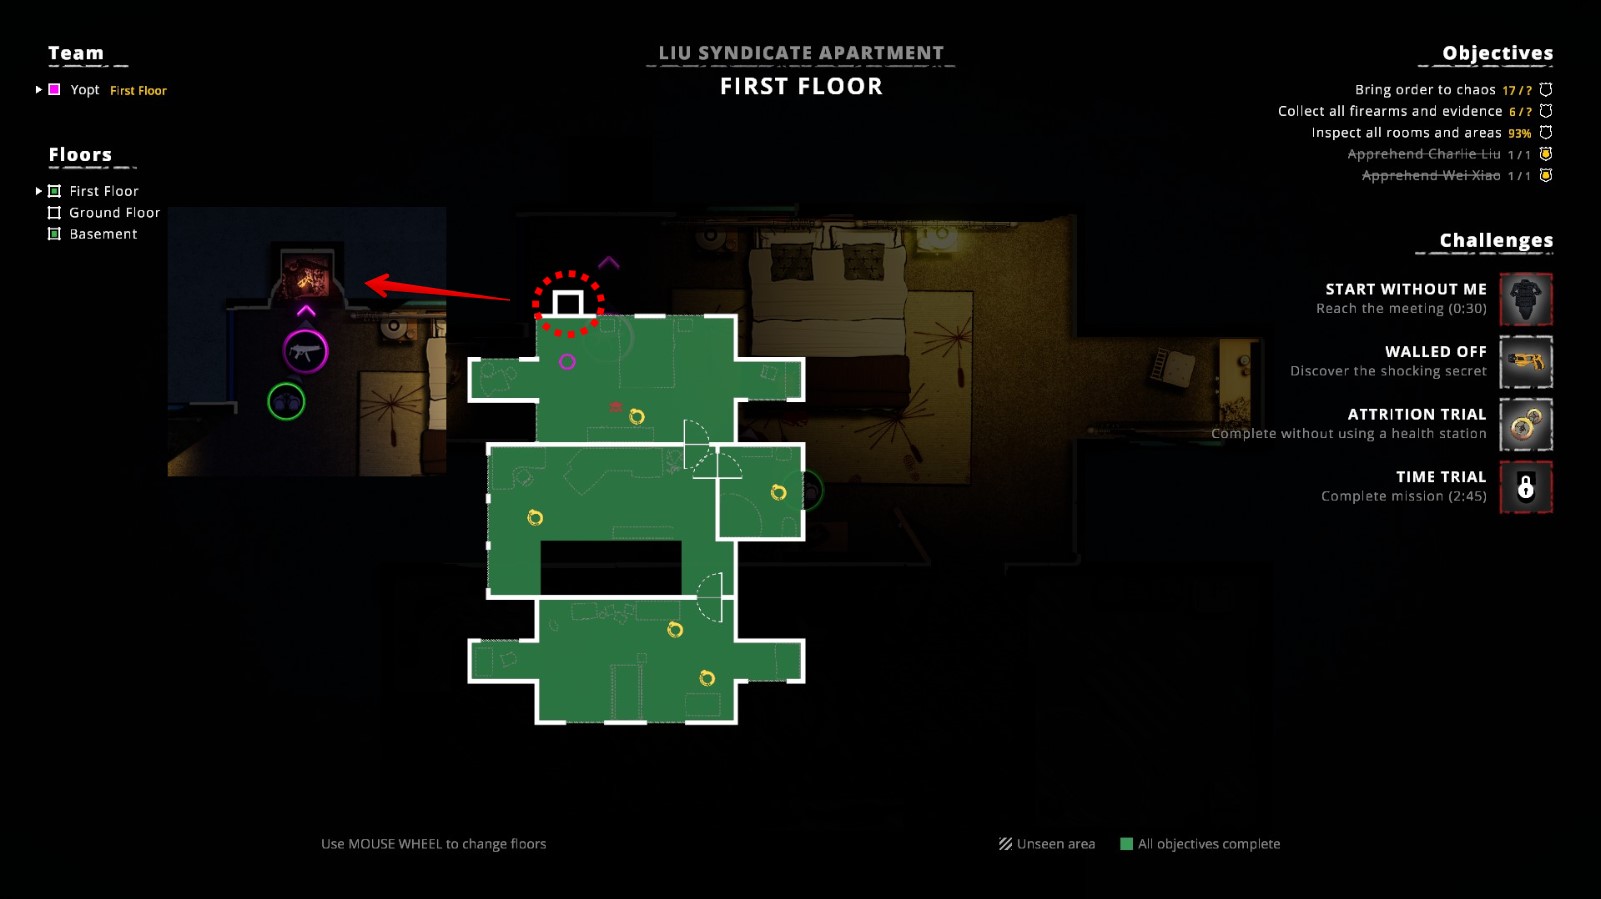
Complete the mission without using a health station. The health kit is located in the basement in the big room with bad guys, a good flashbang will solve all your problems.
Belohnen:
No NPCs modifier.
Complete the mission in less than 2:45 Minuten.
Belohnen: keiner, just a challenge medal.
Three floors of the building, one collectible on each. The first is on the Ground Floor on the sofa in the main room.
The second is in the basement on cardboxes immediately to your right.
The final is on the First Floor on the sofa right near the stairs.
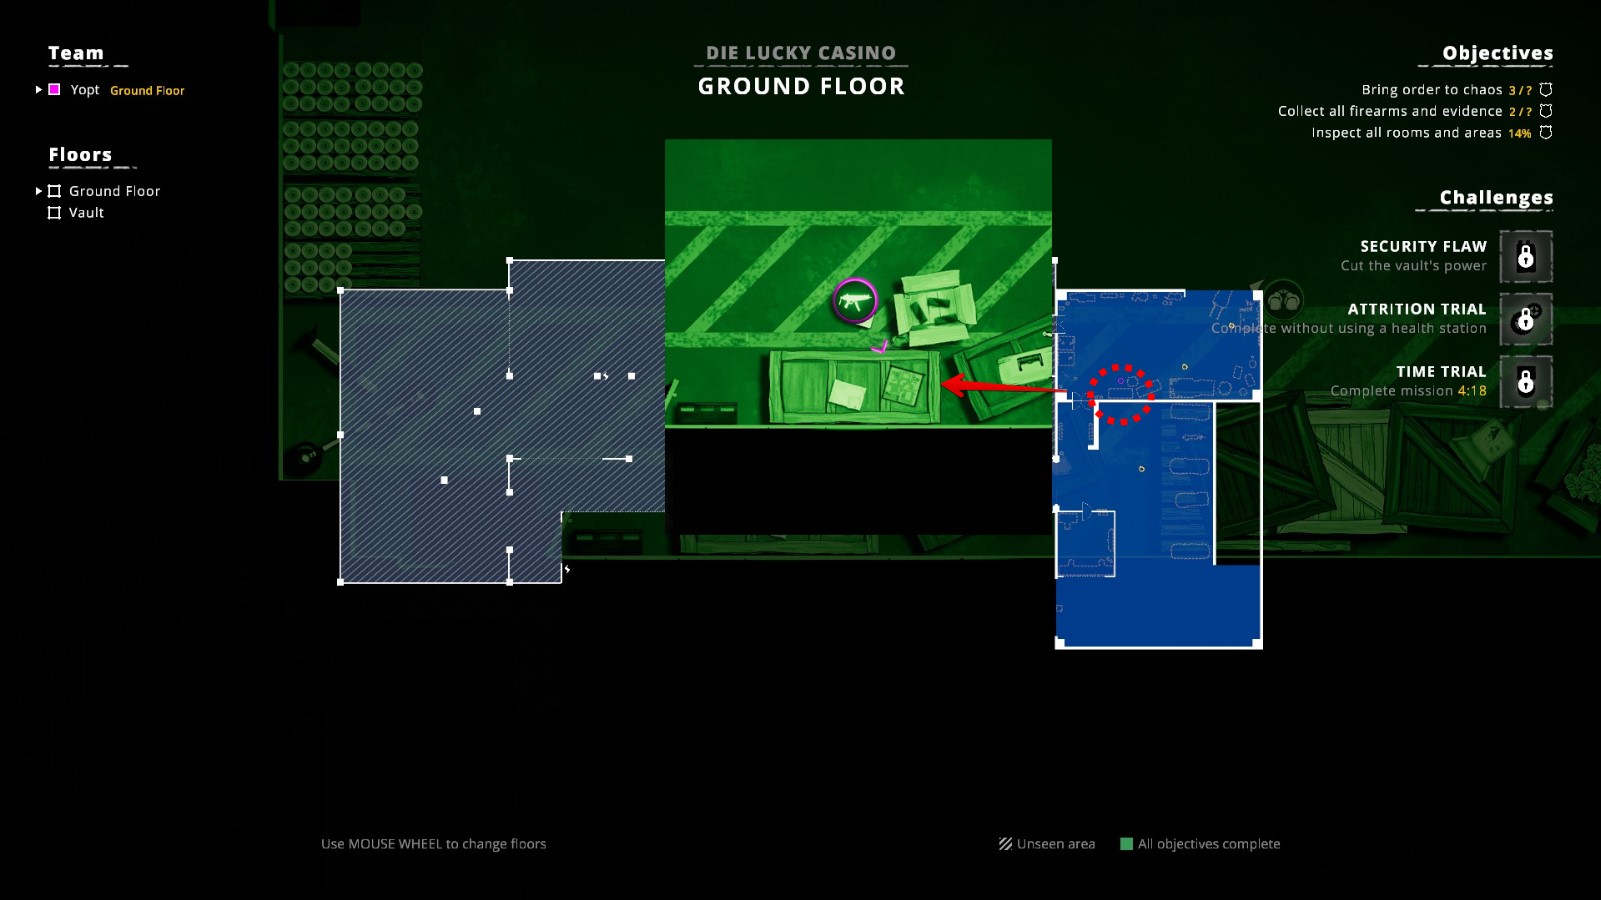
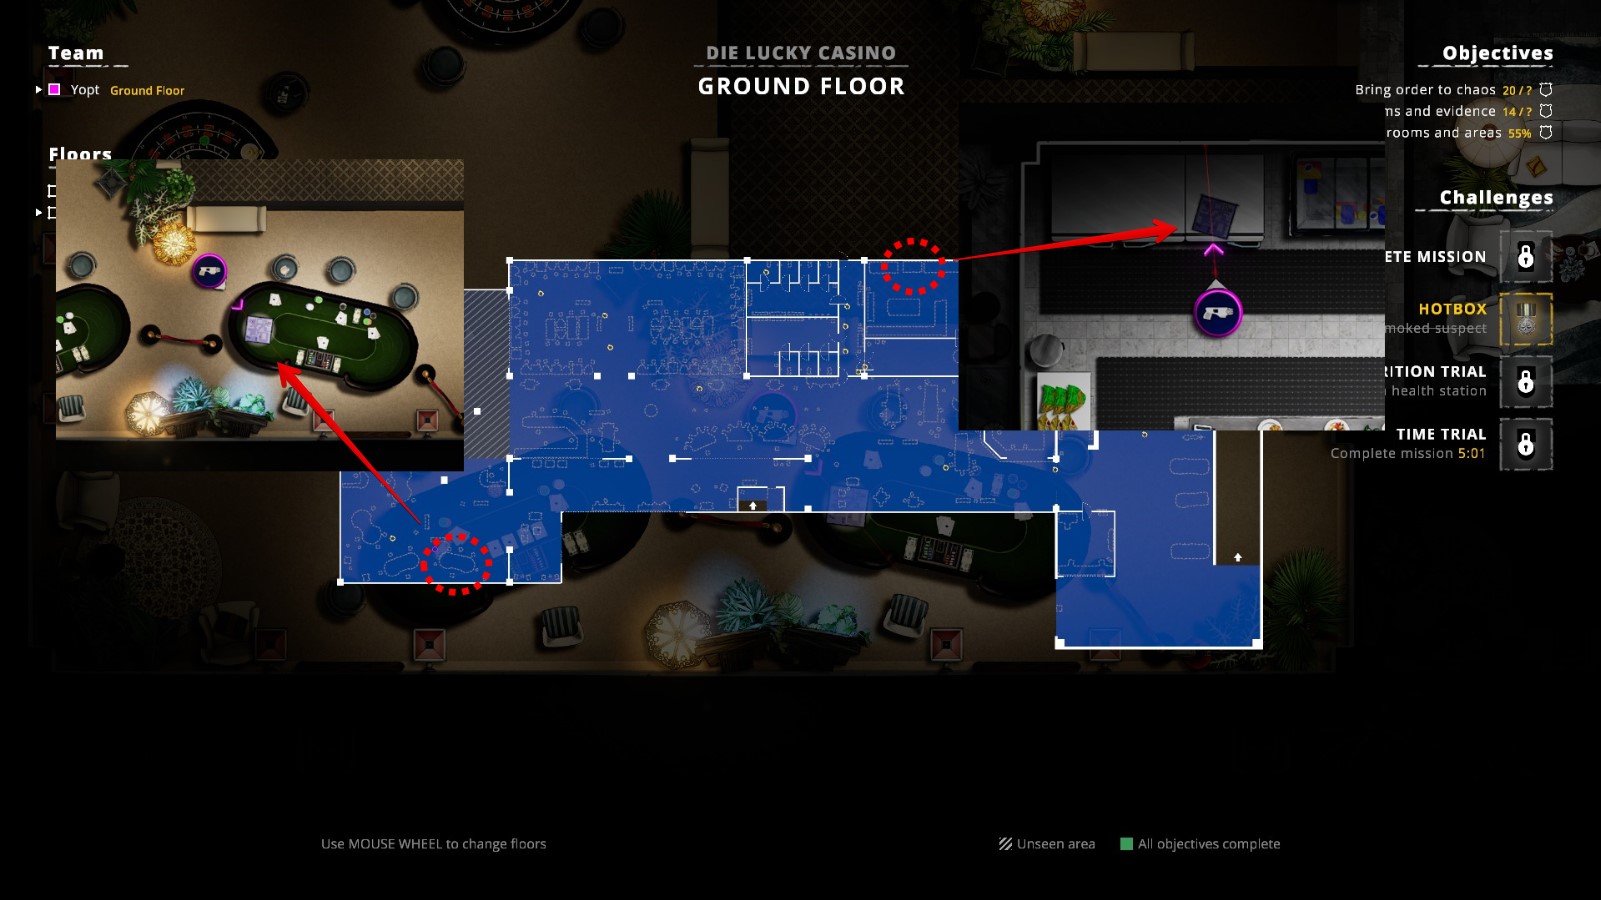
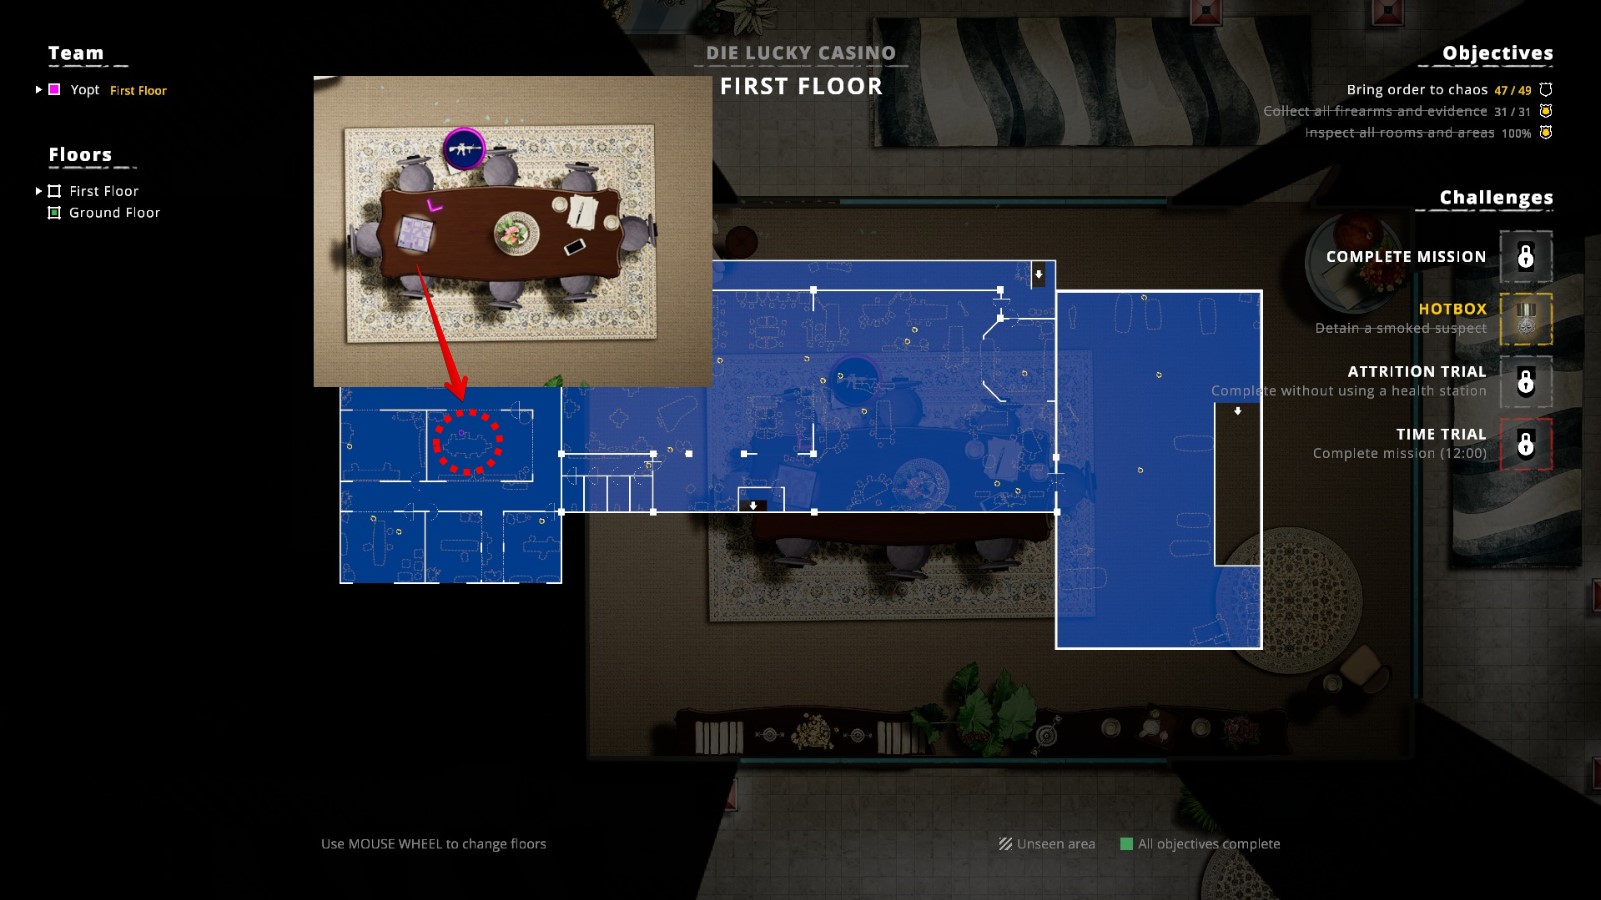
Mission 10 – Die Lucky Casino Heist
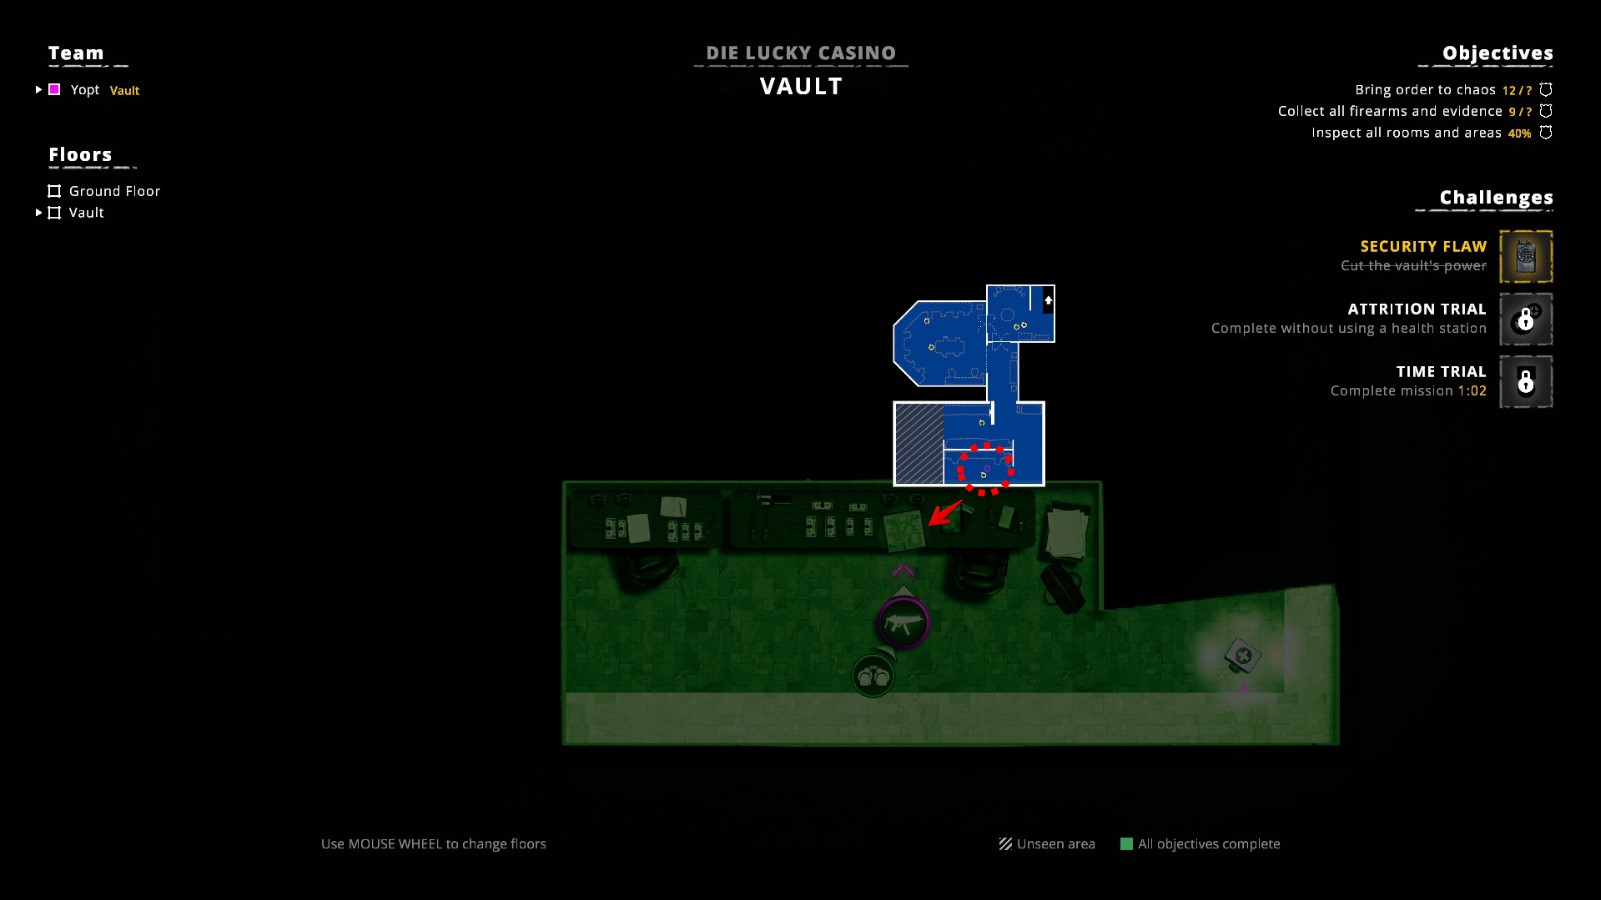
Cut the Vault’s power. The vault is located on a separate floor and can be accessed via the stairs in the northeast part of the casino. The Power Box is right next to the stairs.
Belohnen:
Locken, this is also a separate achievement –
Security Flaw– Unlock the Lure.
Complete the mission without using a health station.
Belohnen:
Hostiles only modifier.
Complete the mission in less than 7 Minuten. This will require some practice, but if anything my attempts felt way more meaningful after I started clearing the map from right to left instead of rushing the left side of the building straight from the spawn point.
Belohnen: keiner, just a challenge medal.
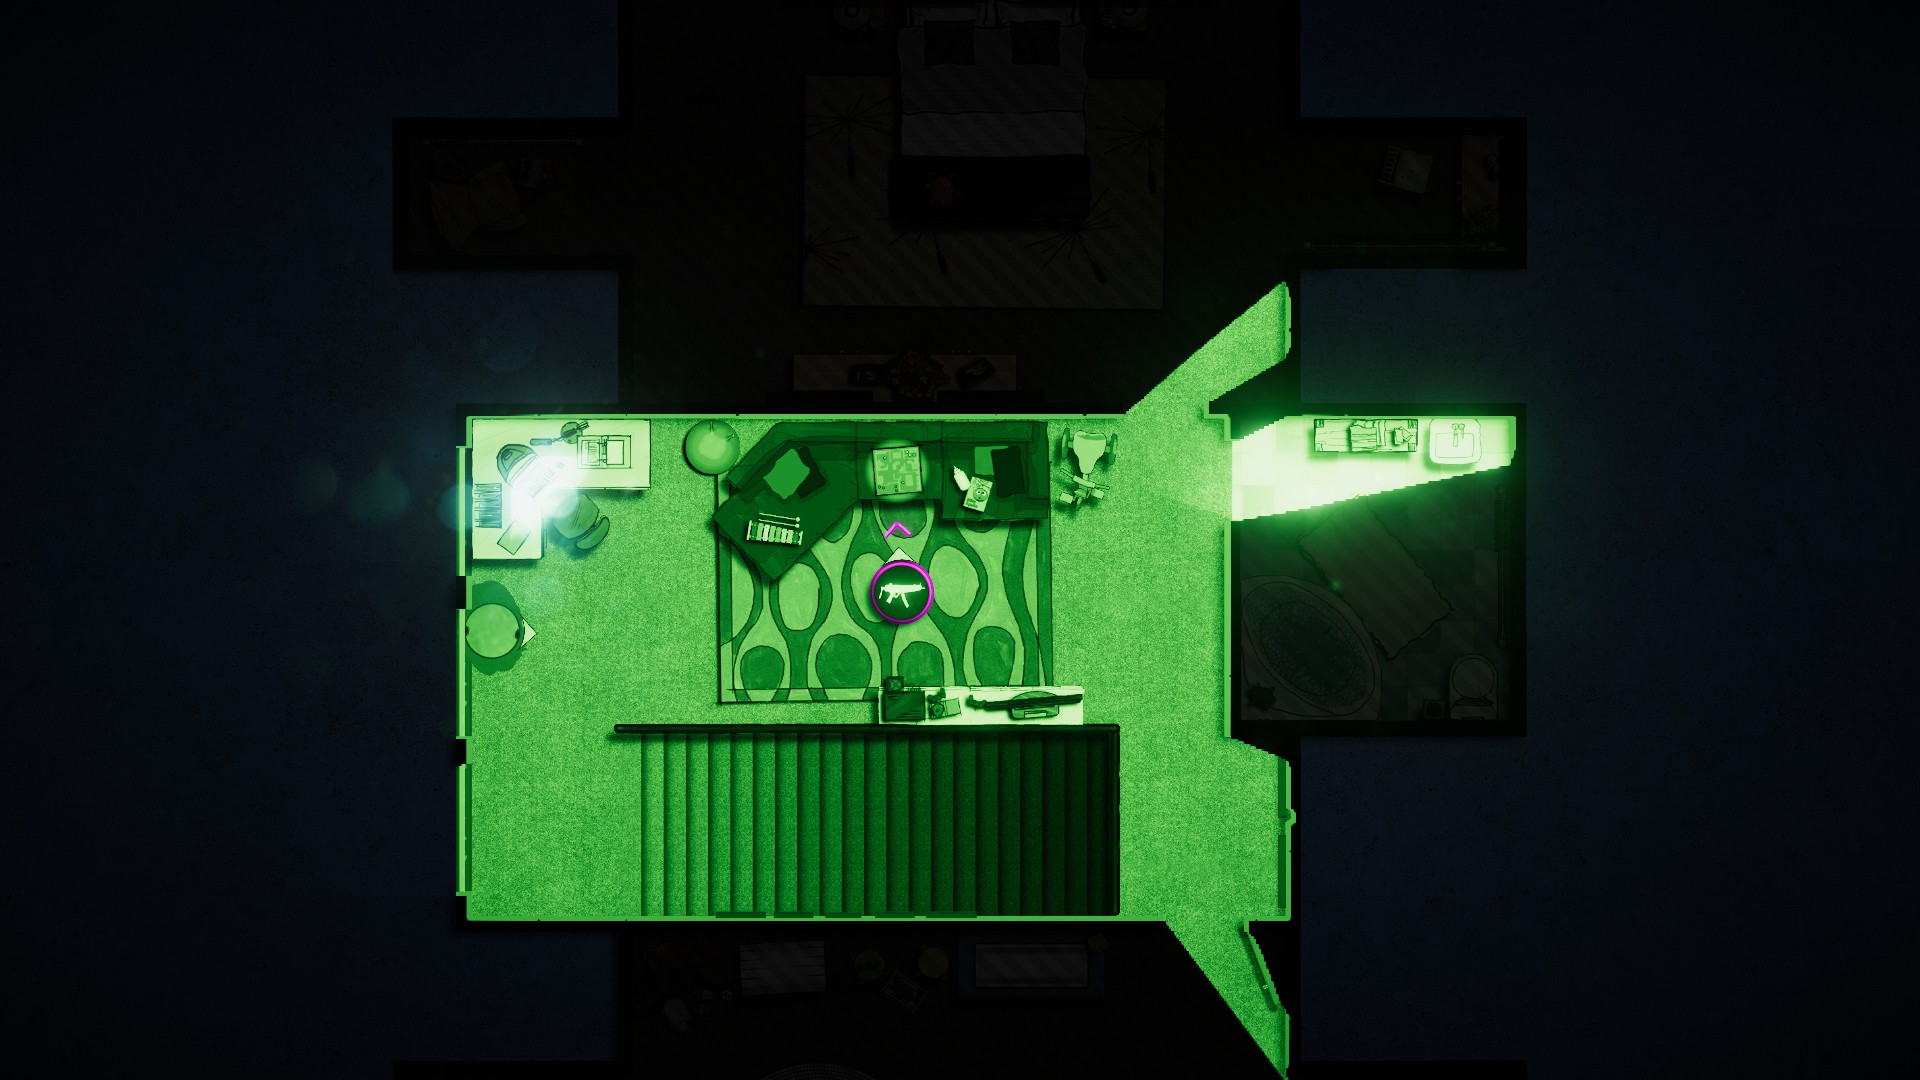
The map is rather big, but only three collectibles here. Two are on the Ground Floor and one is in the Vault.
Mission 11 – Calefaction
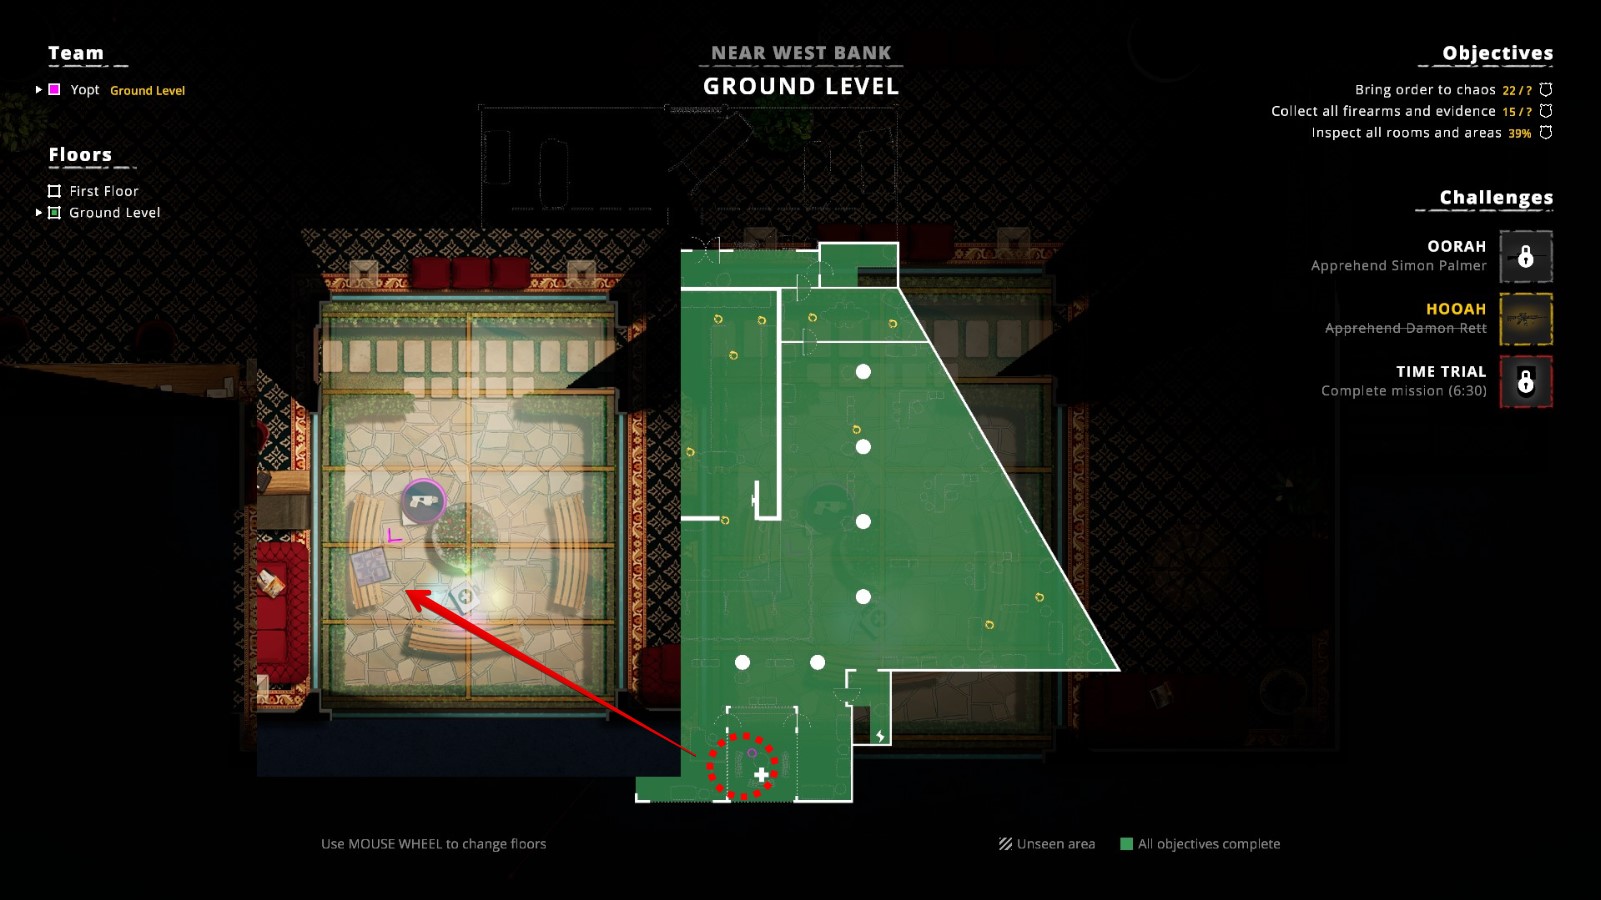
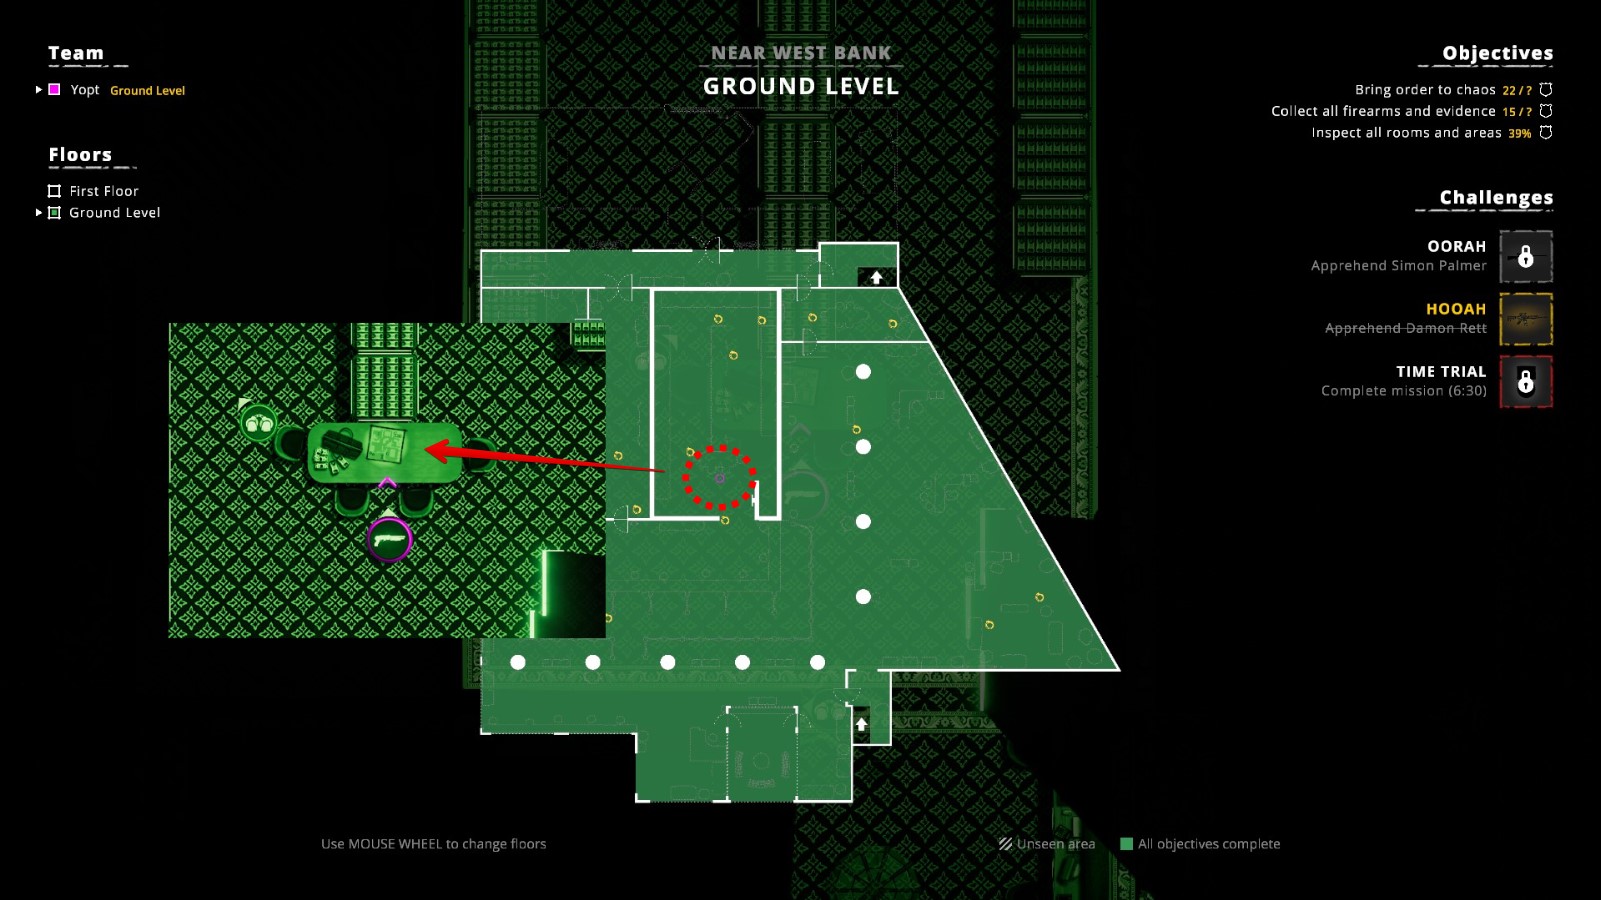
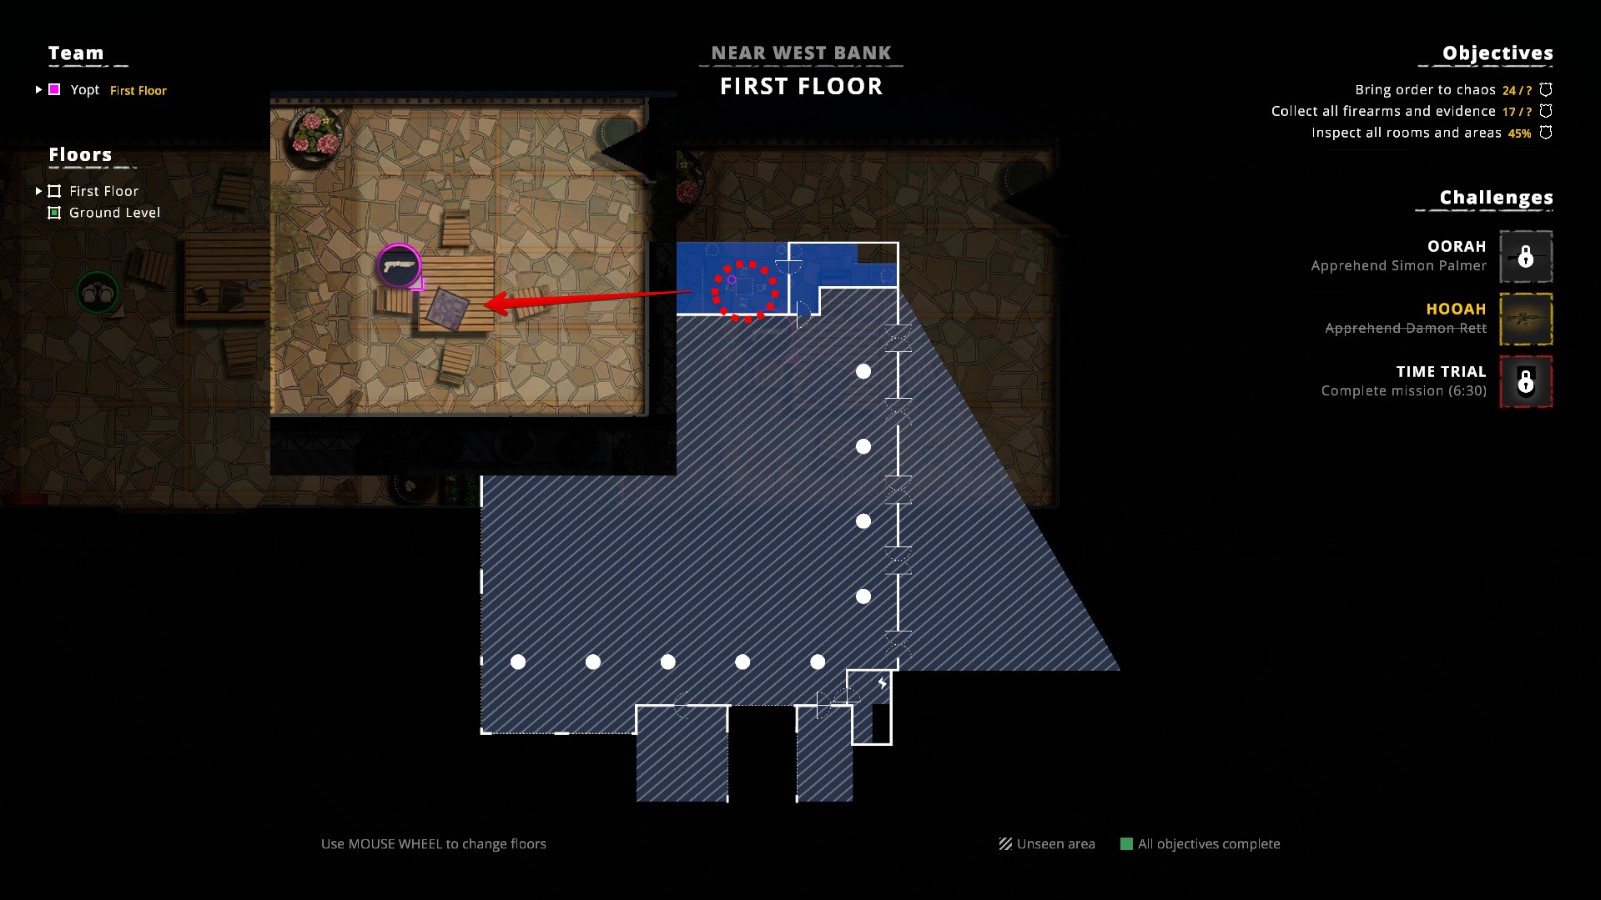
Apprehend Simon Palmer. He is located on the First Floor and uses an M700 sniper rifle just as many other of his buddies on this flloor. This rifle appears to be one shotting you even through the Heavy Armor, so exert caution.
Belohnen:
Modell 700, this is also a separate achievement –
Oorah– Unlock the Model 700.
Apprehend Damon Ratt. He is located on the Ground Floor and together with some of his buddies uses M4 that can also pack a real punch.
Belohnen:
M4, this is also a separate achievement –
Hooah– Unlock the M4.
Complete the mission in less than 6:30 Minuten. Enemies are VERY lethal here, so utilize crouch and keep unpolitely asking to raise their hands before shooting them down.
Two collectibles are on the Ground Level and one is on the First Floor, which makes 3 in Summe.
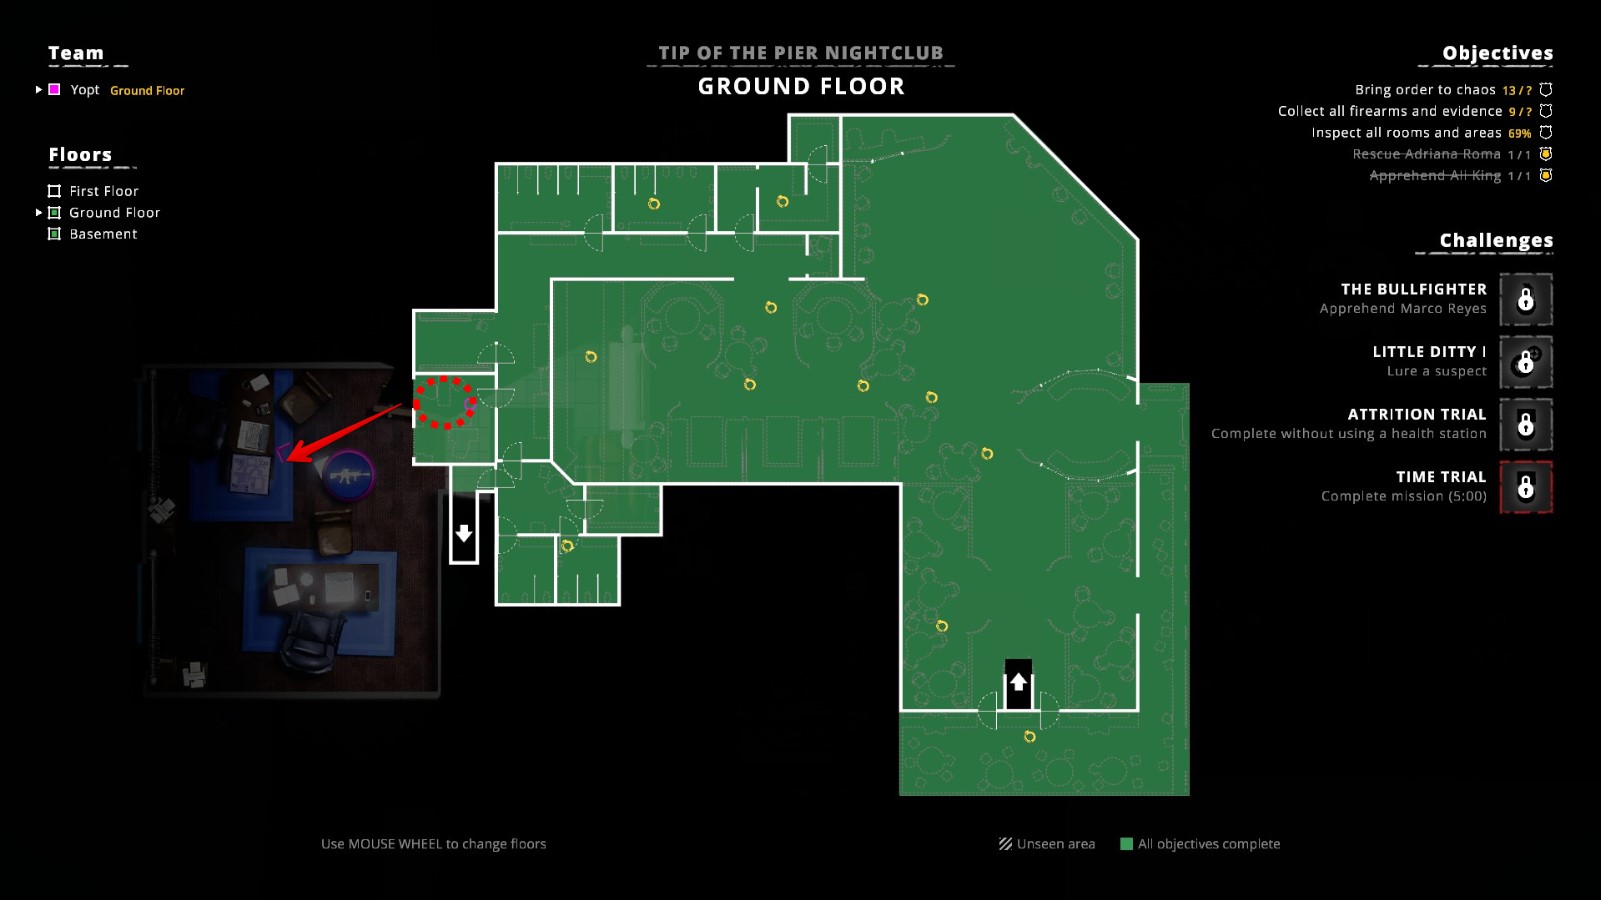
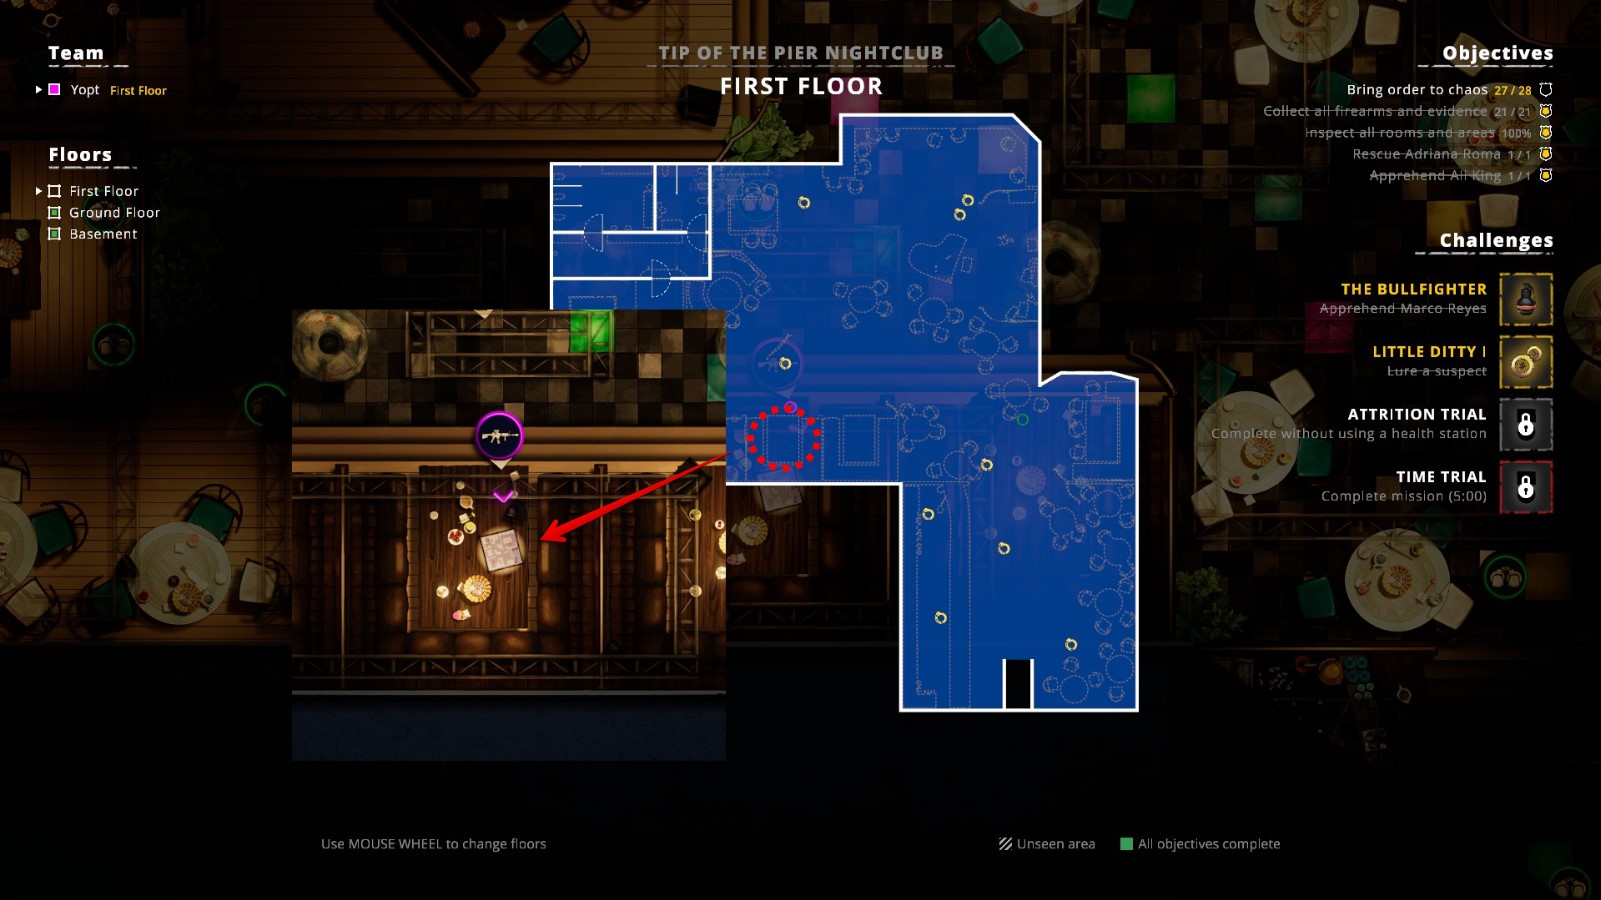
Mission 12 – Dance Dance Retribution
Apprehend Marco Reyes. It’s one of the objectives and can’t be missed, so nothing special to note here.
Belohnen:
Stinger. This is also a separate achievement –
The Bullfighter– Unlock the Stinger.
Lure a suspect. Lure is unlocked in Mission 10 and basically it’s a grenade-like device that can be thrown in front of you and then make some sounds by pressing G (standardmäßig). Successfully draw attention of someone and the challenge will be completed. I personally haven’t used anywhere but this challenge, cause flashbangs/stingers and ammunition bags are way more helpful.
Belohnen:
Music modifier.
Complete the mission without using a health station.
Belohnen: keiner, just a challenge medal.
Complete the mission in less than 5 Minuten. Be careful when entering the second floor as you might get instantly attacked and often killed or wounded.
Belohnen: keiner, just a challenge medal.
Three collectibles here: one in the Basement right where you start the mission, one on the Ground Floor to the cabinet immediately to your left, and one on the First Floor lying on the table.
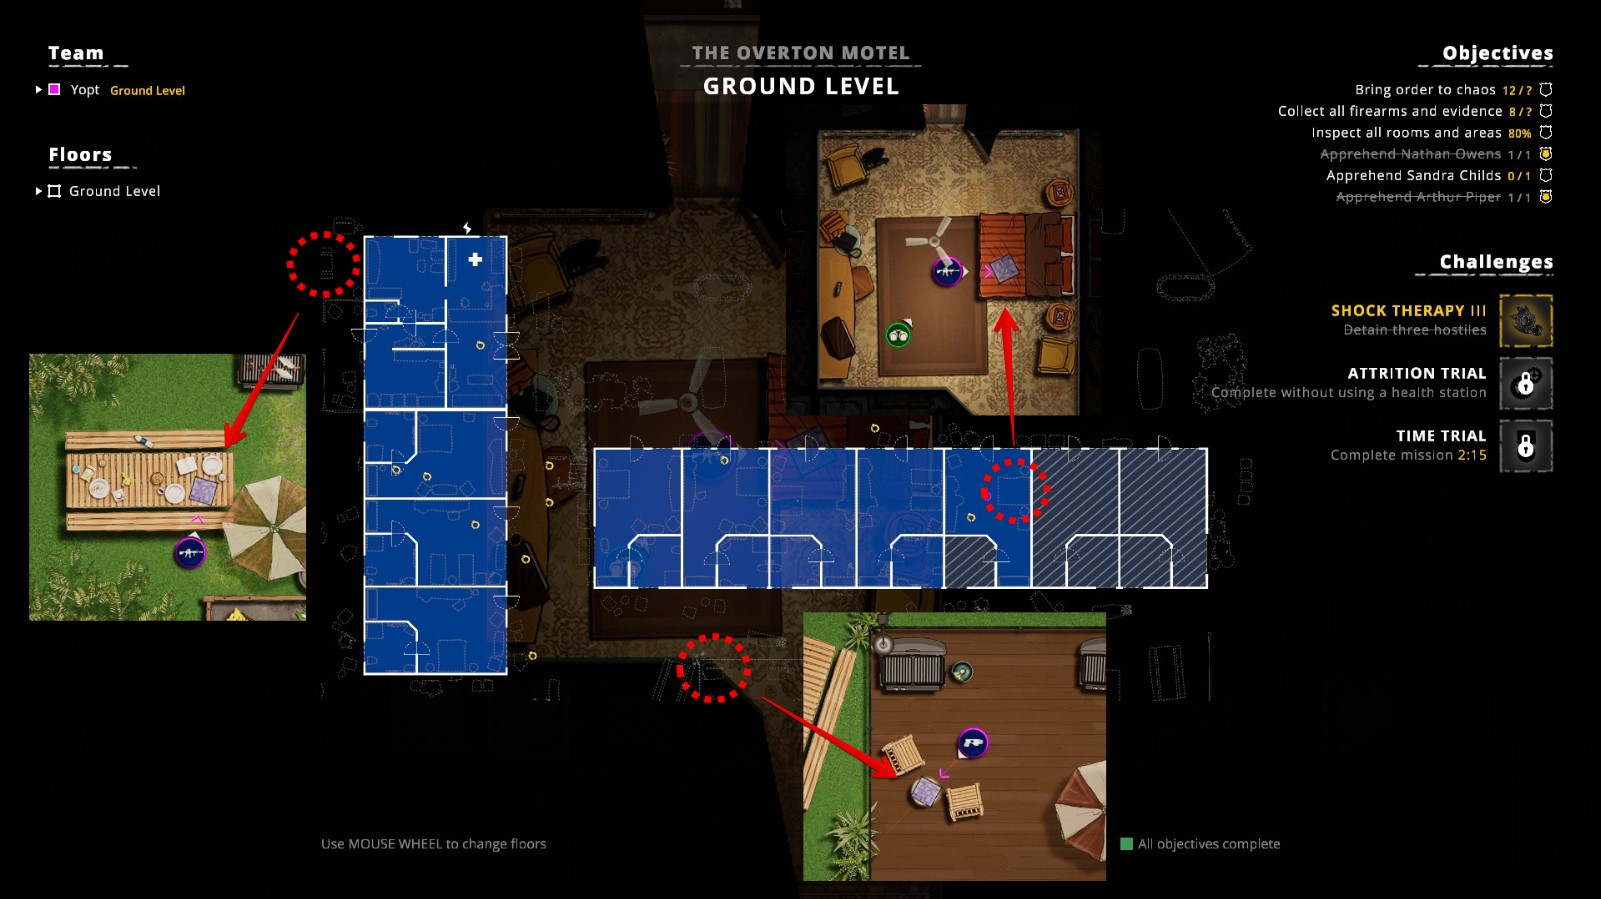
Mission 13 – Bushwhacked
Detain three hostiles. You are very likely to get it naturally, but in any case keep in mind that you will need this challenge reward to be able to complete a challenge in the next mission.
Belohnen:
Gas Mask. This is also a separate achievement –
InVader– Unlock the Gas Mask.
Complete the mission without using a health station.
Belohnen:
Reinforcements modifier.
Complete the mission in less than 7 Minuten. Einerseits, you’ve already played on this map on Mission 5, so the layout is the same. But you will still need to be really quick, because as soon as you deal with everyone who is present on the map from the beginning additional reinforcements will arrive that will also need to be dealt with in the time limit of 7 Minuten.
Belohnen: keiner, just a challenge medal.
Three collectibles here with two of them located behind the buildings and one inside the motel room.
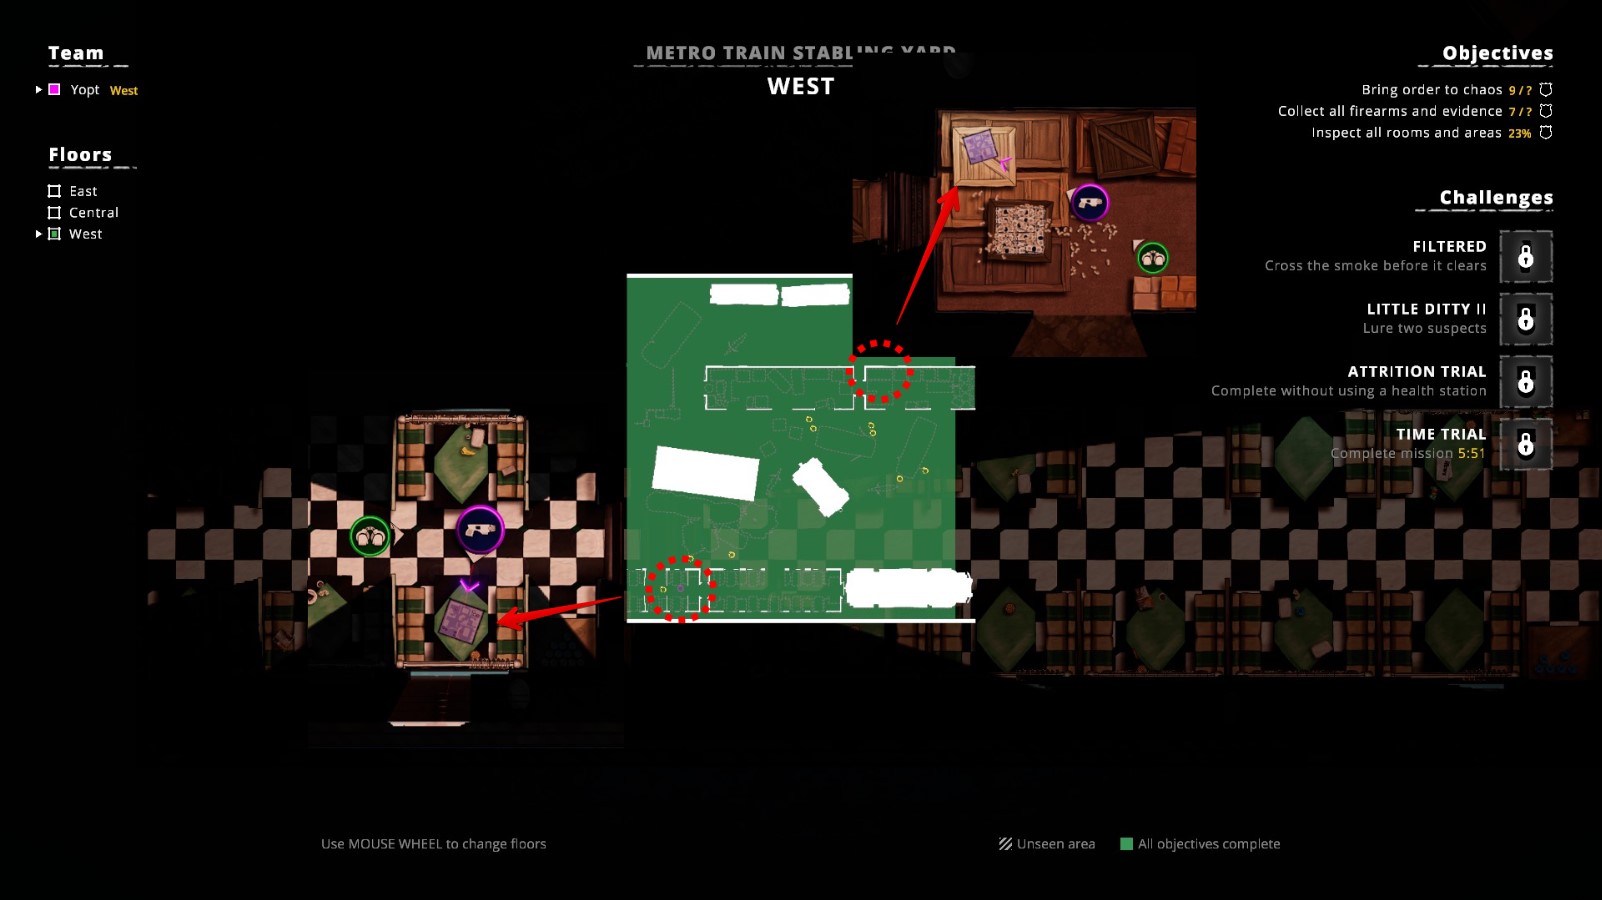
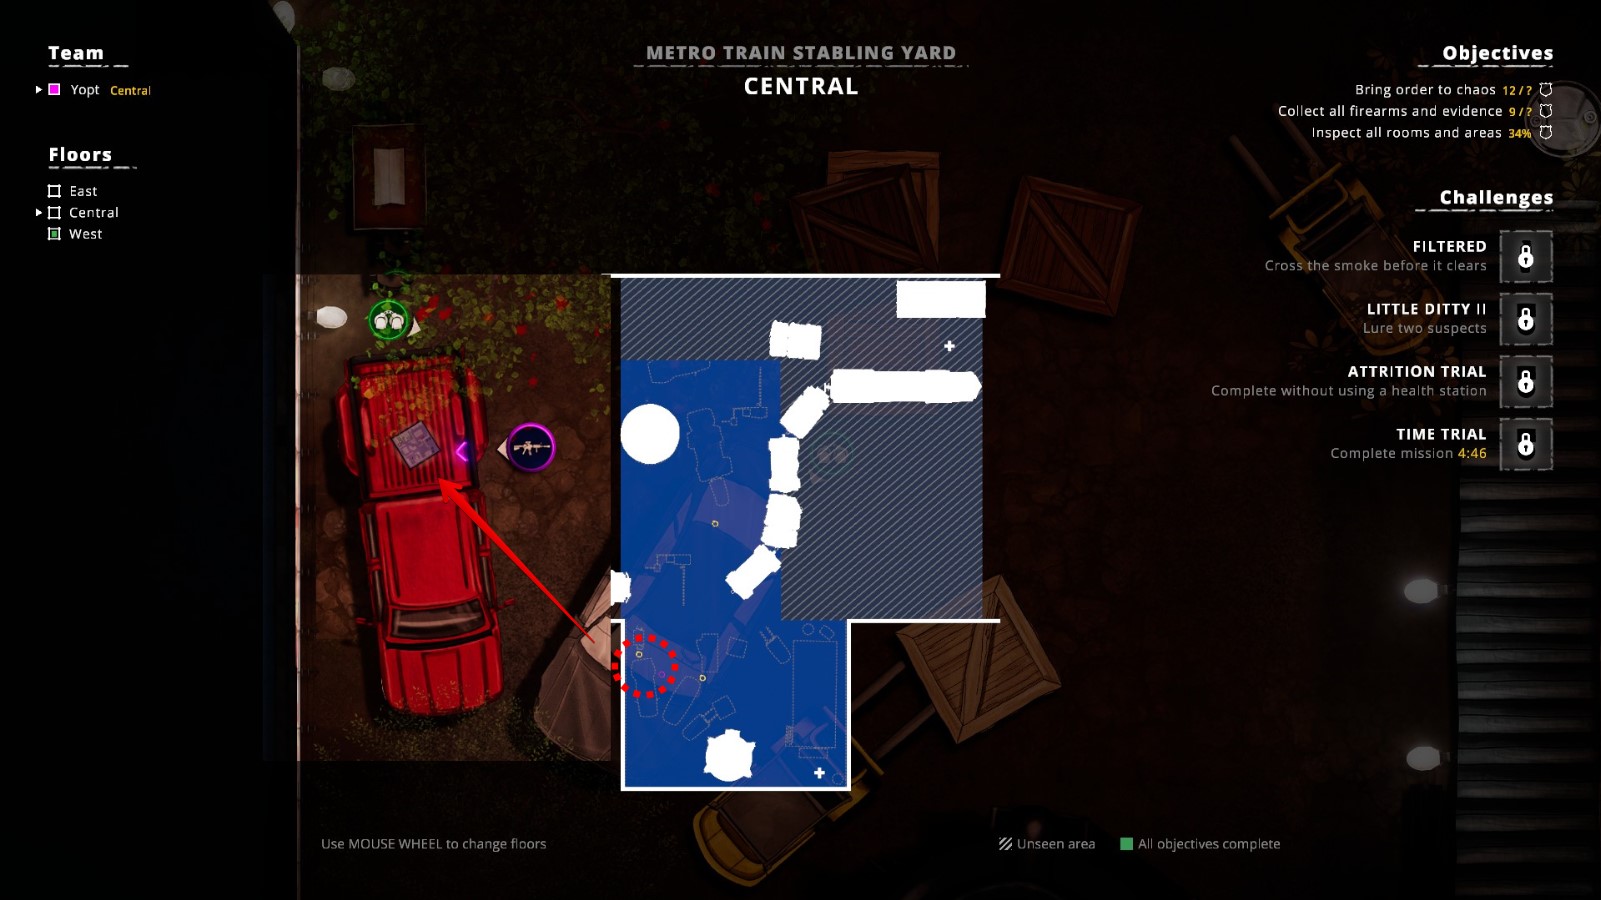
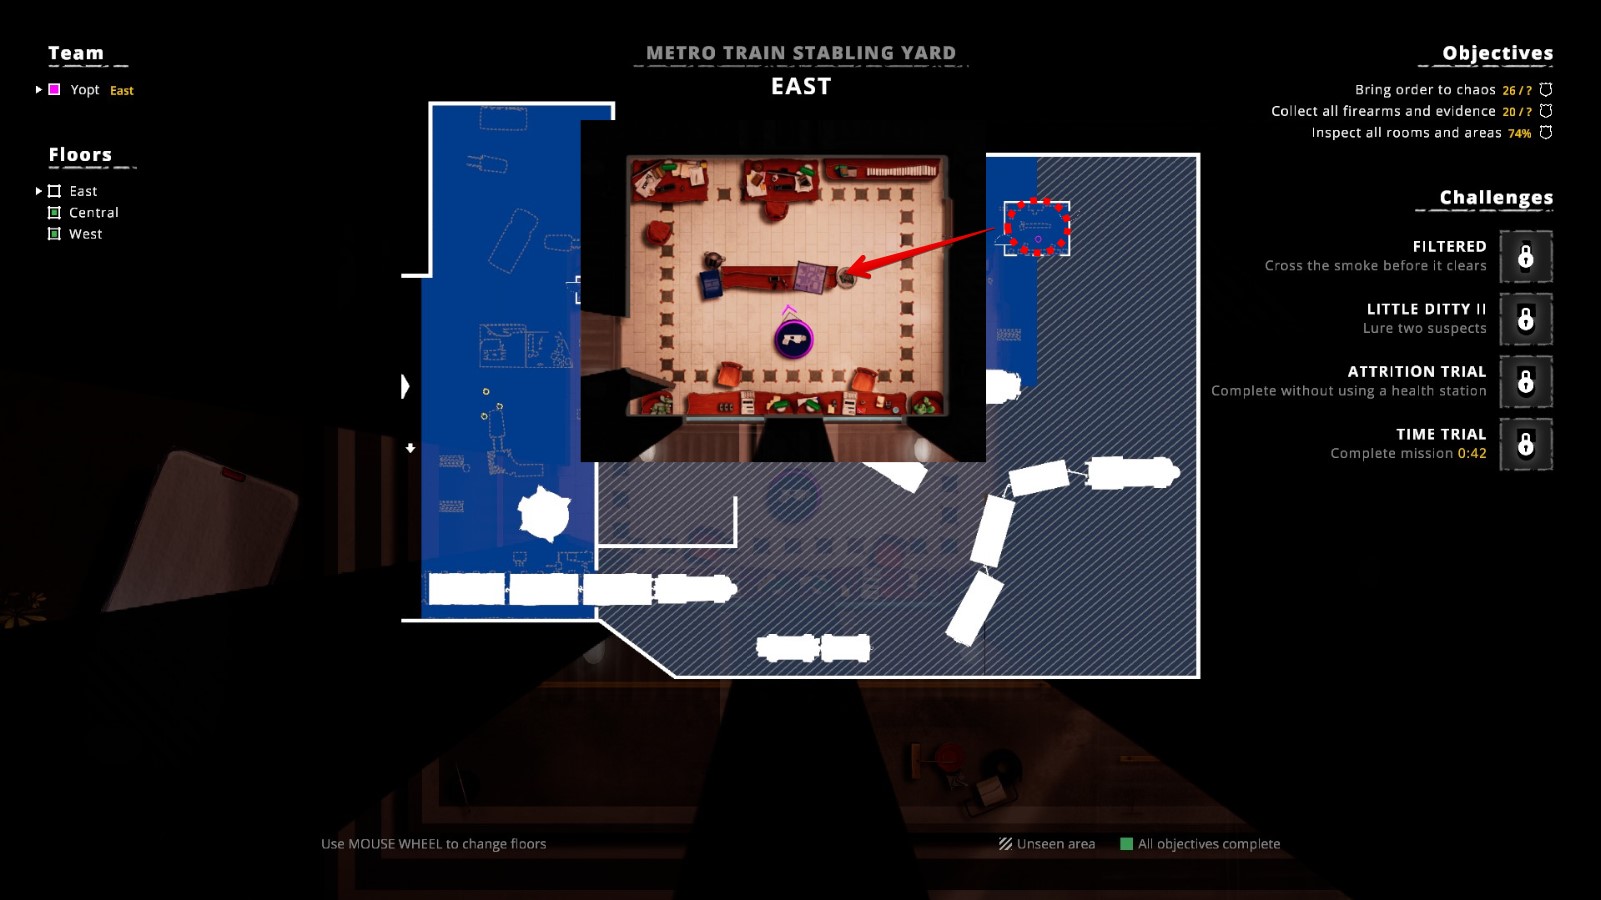
Mission 14 – Tracking Contraband
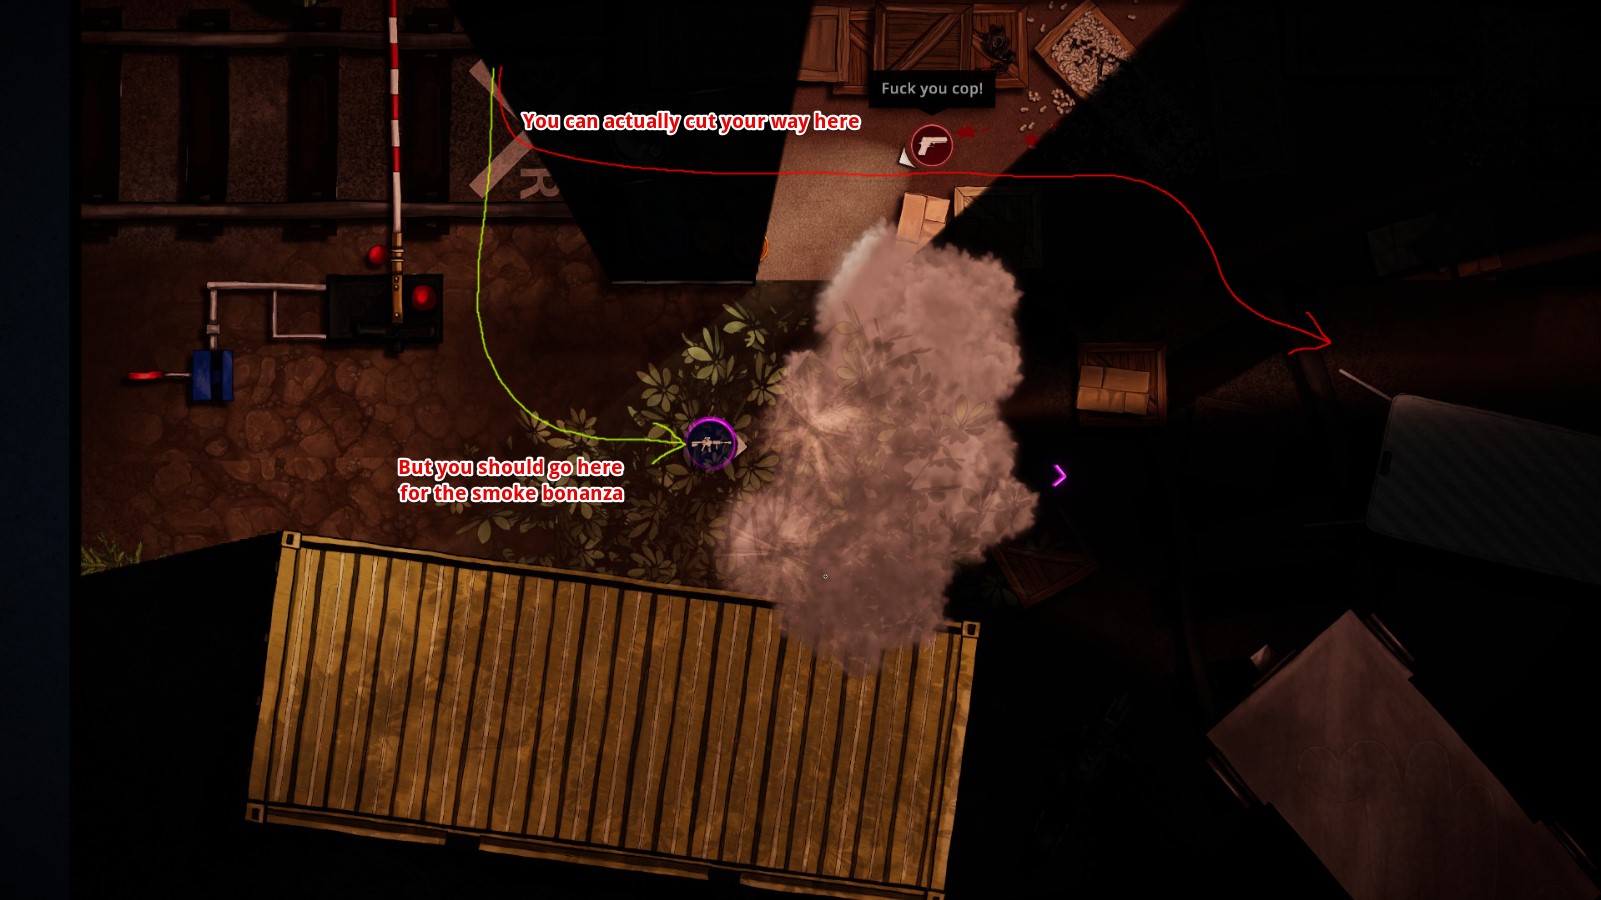
Cross the smoke before it clears. This challenge requires a special mention. Das Wichtigste zuerst – you will need a Gas Mask equipped (it is unlocked as one of the challenges in the previous mission). Jetzt, initially I thought that I need to cross any smoke grenade thrown at me, but for some reason that didn’t work. After some random trial and error it turned out that there is a scripted event of sorts that triggers after you cross a certain area. The reason it wasn’t triggering for me all this time, is because I always cut my way through the wagon, but for this smoke wall to trigger you need to make sure to go around the wagon where you will get swarmed with smoke grenades. Just cross the smoke with a gas mask and the challenge will unlock. Please note that cutting your way through wagon and then returning to the scripted event location doesn’t seem to work. Here is the screenshot where you presumably trigger the mass grenades. It’s in the very beginning of the map, you just walk down and then right and boom.
Belohnen:
Smoke Grenade(surprise!). This is also a separate achievement –
Filtered– Unlock the Smoke Grenade.
Lure two suspects. Perhaps the easiest way to do that would be still entering the wagon after you cross the smoke wall and throwing a Lure somewhere between two white vans that are right next to that smoke wall location. Es gibt 3 suspects there and more often come to investigate.
Belohnen: keiner, just a challenge medal.
Complete the mission without using a health station.
Belohnen: keiner, just a challenge medal.
Complete the mission in less than 8:10 Minuten.
Belohnen: keiner, just a challenge medal.
Big map with three floors, Also 4 collectibles in total, 2 on the first floor (Westen), 1 on the second (Zentral) Und 1 on the third (Ost).
Mission 15 – High Chance of Demands
Und das ist es, this looks a bit… weird and lazy as a challenge?
Belohnen:
Ballistischer Schild. This is also a separate achievement –
Herr. Anderson– Unlock the Ballistic Shield.
Detain a smoked suspect. For this make sure to grab a Smoke Grenade and Gas Mask. Find a suspect, throw a grenade at him, go shouting in their face and finish with a cuffing procedure.
Belohnen: keiner, just a challenge medal.
Complete the mission without using a health station.
Belohnen: keiner, just a challenge medal.
Complete the mission in less than 12 Minuten. This map is a bit annoying to speedrun, because the area to cover is really big and plenty of suspects on the first floor will be active at once. Usually this doesn’t cause too much trouble, because after you complete „Inspect all rooms and areas“ task antyhing that you might have missed (suspects and evidence) shows on the map. But here the zoom is so awful that I on some tries I had to spend a minute searching the map for that last grey circle aka suspect.
Belohnen: keiner, just a challenge medal.
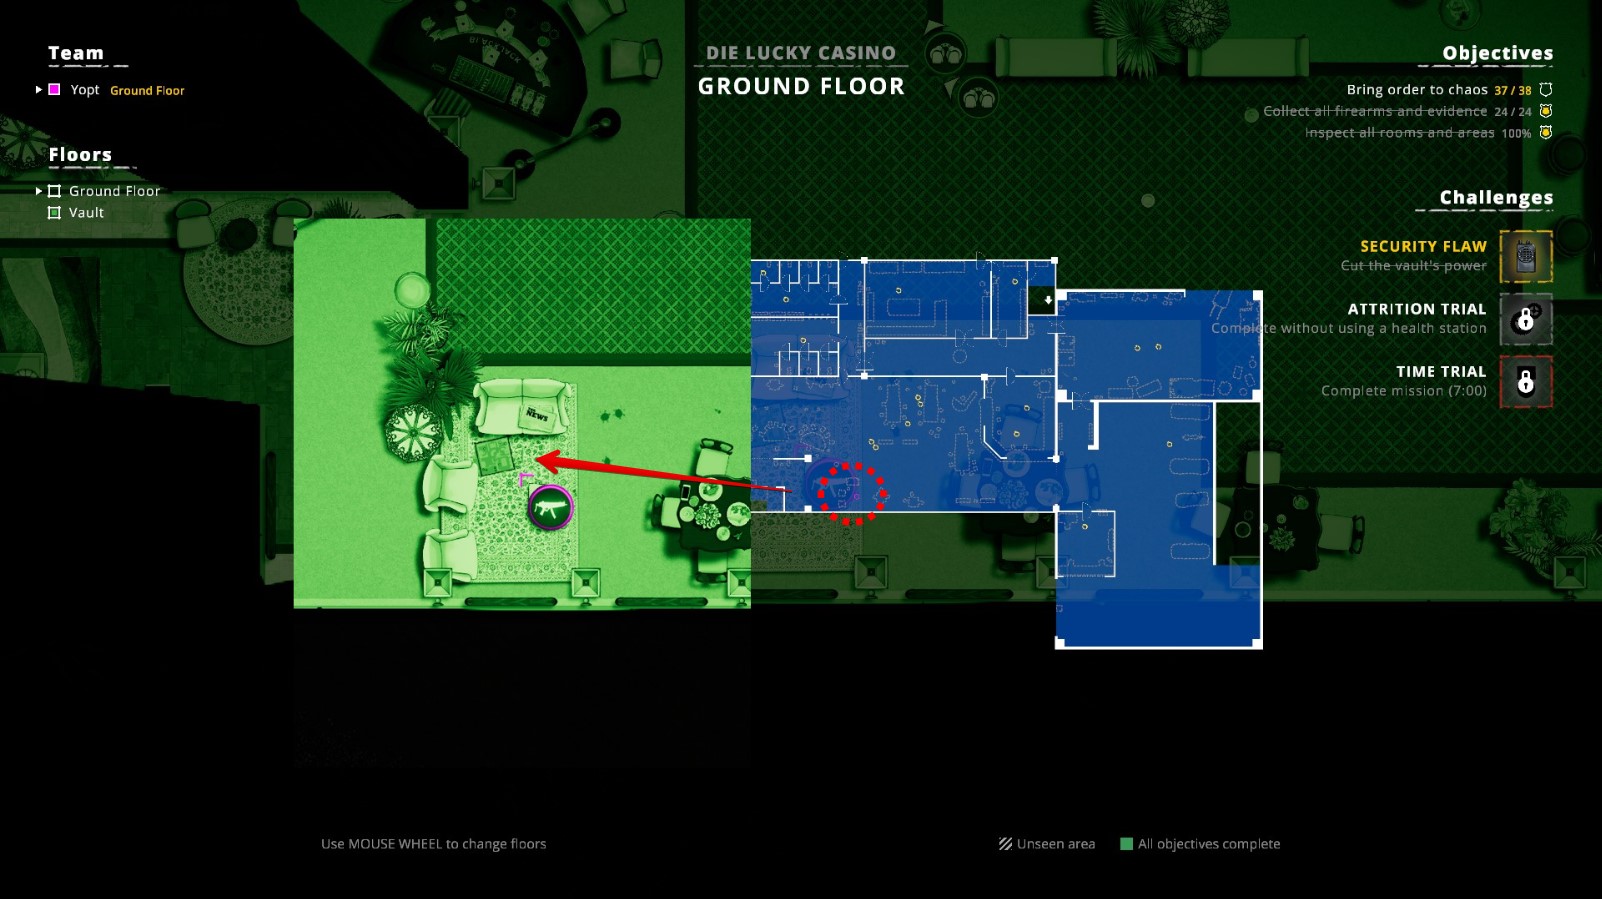
We are back on the Casino map from Mission 10, now without a Vault but with whole extra floor available. Dennoch, nur 3 Collectibles here: 2 on the Ground Floor and 1 on the First Floor.
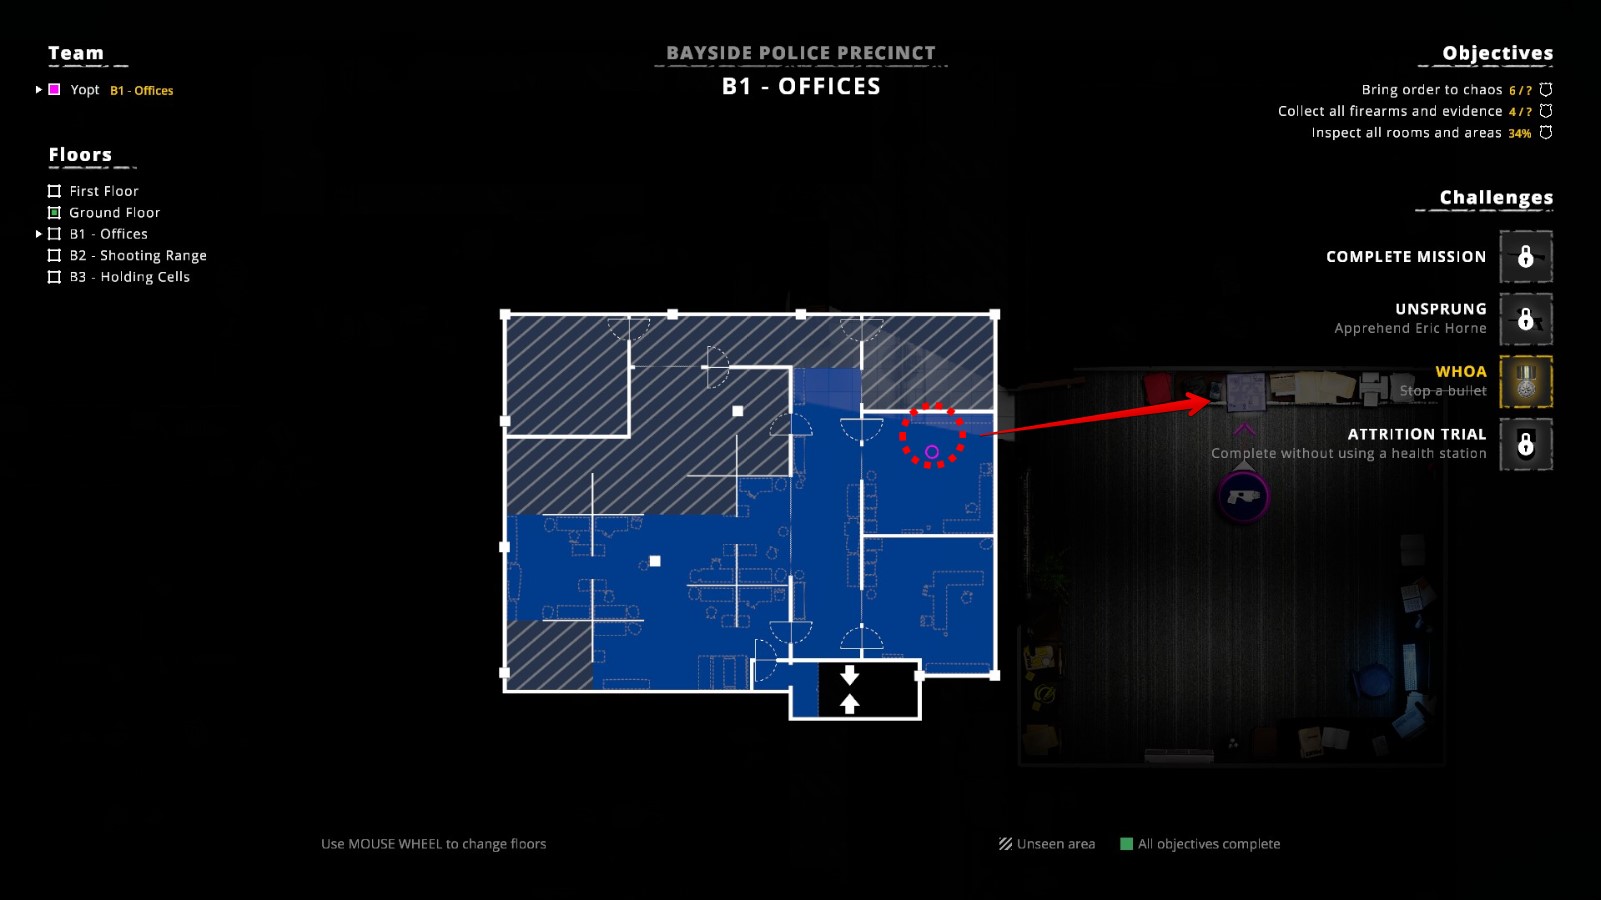
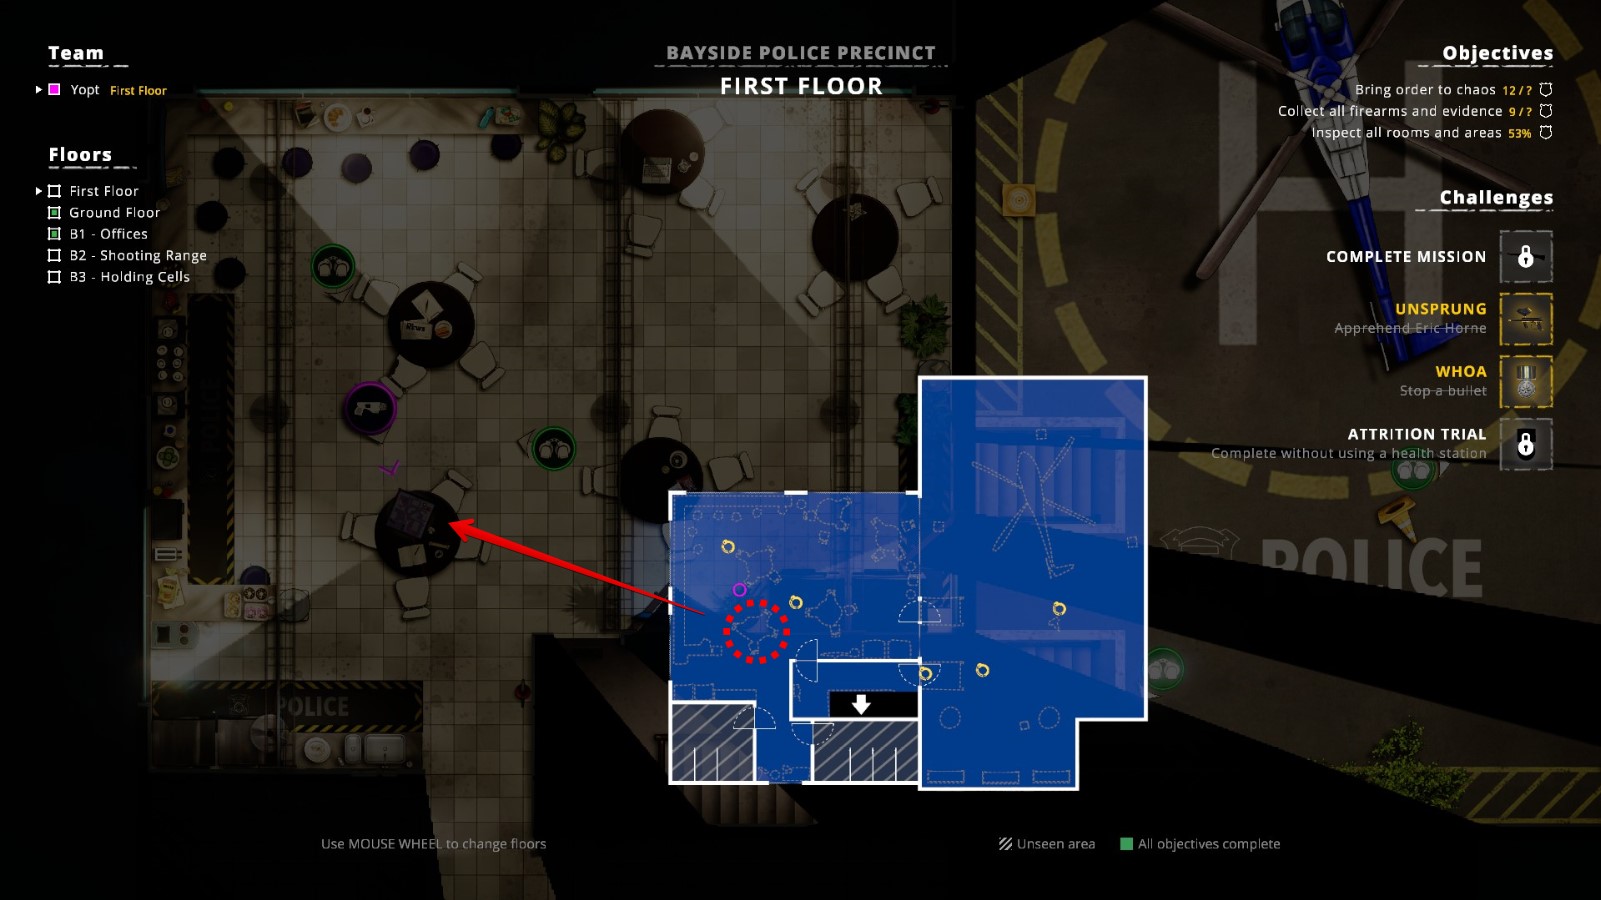
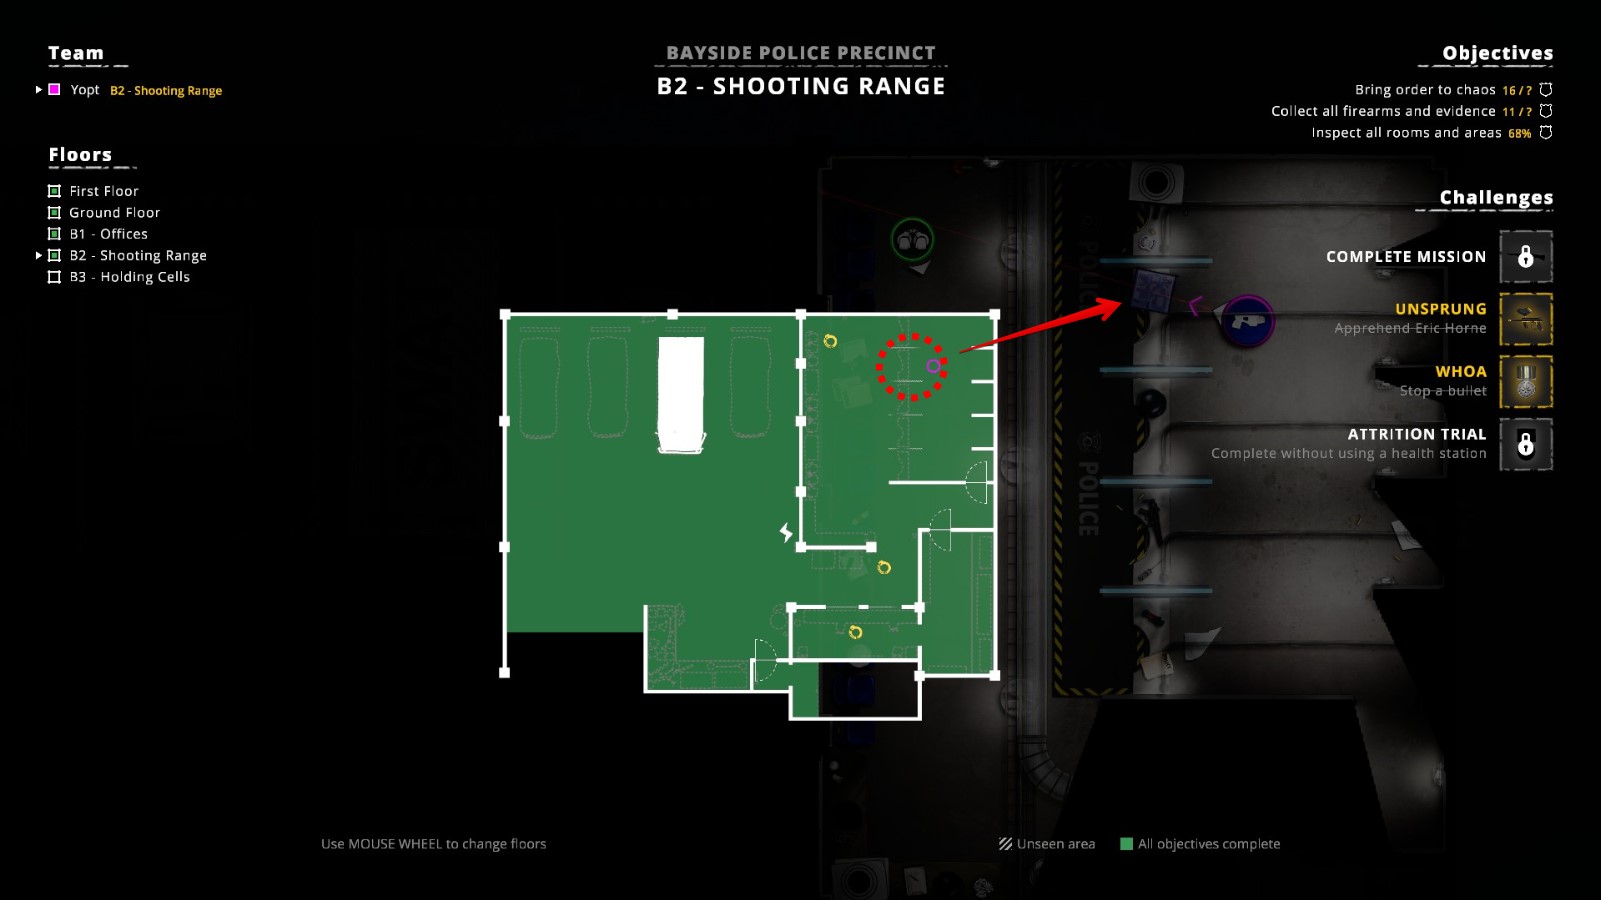
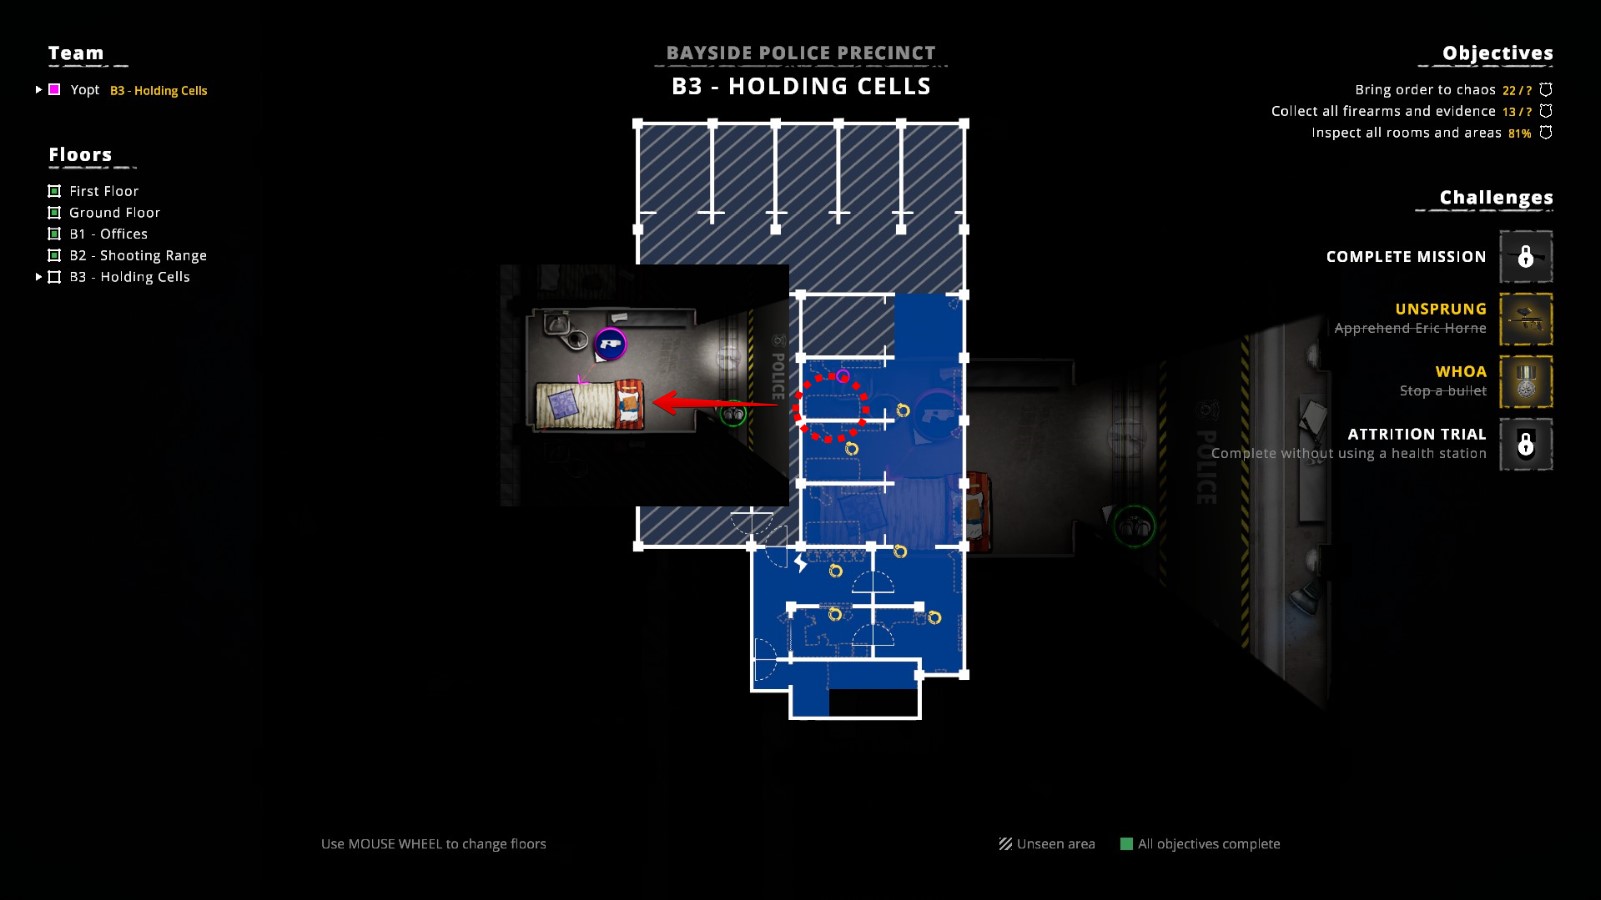
Mission 16 – Assault on Bayside
Another wierd „Herausforderung“ as if the dev team ran out of absolutely any ideas.
Belohnen:
Less Lethal Bean Bag Shotgun. This is also a separate achievement –
Unsprung– Unlock the Less Lethal Bean Bag Shotgun.
Apprehend Eric Horne. And again a wierd thing: Unsprung is the name of the achievement that unlocks the Less Lethal Bean Bag Shotgun. This challenge is named Unsprung, but unlocks OC-Ball gun and a separate achievement with another name.
Belohnen:
Less Lethal OC-Ball. This is also a separate achievement –
Less Lethal OP-Ball– Unlock the Less Lethal OC-Ball.
Stop a bullet. You will need to equip a Ballistic Shield for this mission and sucessfully deflect a bullet with it.
Belohnen: keiner, just a challenge medal.
Complete the mission without using a health station.
Belohnen: keiner, just a challenge medal.
Es gibt 5 floors in this mission and 4 Sammlerstücke, one at each of the following floors: B1, Erster Stock, B2 and B3.
P.S.: All in all this is a very strange mission. In previous missions the difficulty spike and map size were steadily increasing, Und 2-3 previous missions were quite tough to solo. Then goes this mission 16 where the difficulty drops significantly all of a sudden. This one is a gathering of relatively small rooms with somewhat few suspects. I mean this is the only mission that I completed with 5 Sterne (Abzeichen) on the very first attempt. And that’s with an equipped Ballistic Shield that simply takes space while playing solo and prevents taking any useful primary weapon.
Abschluss
Despite a strong focus on co-op, the game can be actually quite enjoayble in solo and all achievements can also be unlocked in solo. I was playing this one not so long after Door Kickers and I think I enjoyed Hot Brass slightly more, perhaps because it’s more simplistic in its nature, but nonetheless is very solid (except for a last mission maybe) and very well done.
Das ist alles, was wir heute dafür teilen Hot Brass Führung. Dieser Leitfaden wurde ursprünglich erstellt und geschrieben von Yopt. Für den Fall, dass wir diesen Leitfaden nicht aktualisieren können, Sie können das neueste Update finden, indem Sie diesem folgen Verknüpfung.