Beginner-friendly strategies to help you understand the paddle system and control the board how you want it
Study the board before fights
At the beginning of any fight, you have unlimited time to look at the board. Once you press SPACE, your ball spawns and so do enemies and the fight begins.
If you don’t launch your ball in 5 Sekunden, it will automatically fire off your paddle. This is a very short span of time but it actually feels longer because the game is so fast-paced.
This means you should use the time BEFORE the fight (before you press space) to study the board configuration so that you can see which bricks to hit and which to avoid, as well as where your upgrades are located before the board refreshes.
You should also use this time to read the screen, especially the information on the fight that’s on the right side of the screen. Here’s what it says on the Hydra at Storm Level 15 Zum Beispiel:
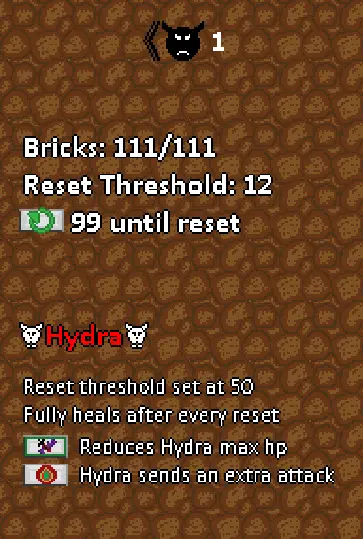
The game tells you that if you hit the first bricks you will reduce the Hydra’s max HP (good and proper method of killing the Hydra), and if you hit the poison droplet bricks the Hydra will send an additional attack (schlecht).
Read this information before fights start, especially when it’s your first time playing! Many new players don’t look at it and lose their run because they don’t realise the mechanics of the fights they get into.
Your most important ally is Zeit! Once the fight starts, it has to end in two ways: either you die, or the enemy dies. There’s no way to slow down fights or get a breather once it starts. Get all the time you can before the fight!
How the ball moves
One thing that seems to confuse people when they start out the game is understanding how the ball moves on the board.
It does not move like you’d typically expect a ball to move in a breakout game, but you can actually use this to your advantage once you get used to it.
The game explains in a tip (they appear before fights start):
„The ball always bounces in the direction away from the center of the brick it hits“
This means that the ball (and multiballs, which are the smaller ones that sometimes appear depending on your relics or brick upgrades) will go UP if it hits the upper portion of a Vertikale Ziegel.
Ein weiteres Beispiel: the ball will go LEFT if it hits a horizontal brick on its left side.
The angle at which the ball bounces off bricks is determined by the distance from the center.
This is not included in the tip, but it works exactly the same way on the paddle(S).
The ball is not affected by gravity and will sometimes (oft) move erratically. Jedoch, with experience, you’ll quickly learn to predict the movements and will see patterns emerge.
Zum Beispiel, it’s very difficult to get the ball to start combos — das heißt, get stuck between a row or line of bricks and bounce off each other. It will often come back down to the paddle, so you can’t rely on passive moments to do the work for you.
Another pattern you’ll see often is that the ball comes crashing down at a very soft angle, which makes it almost impossible to catch it with your paddle because it can only go so fast. In diesem Fall, it’s better to use a recall with CTRL — more on recalls in the next section.
(The developer also told me that he had tried a more conventional breakout ball movement but it made the game too easy, this system is more challenging and I tend to agree).
Use recalls
You can use recalls twice per refresh, but this is only the default setting which can be changed by your relics and character.
Recalls are used with the CTRL key and will bring the ball back to your paddle so that you can launch it again.
Recalls are actually very important and new players tend to forget they exist. Every time you don’t catch the ball and it falls below the board, you lose 10 PS. Recalls can also get you out of a tight situation, for example if you’re going to be hitting a brick that will damage you (as seen in some elite and boss fights) or it takes too long to come back to your paddle.
The best time to use a recall in my opinion is as soon as it will be useful. Du bekommst nur 1 per refresh, and sometimes refreshes can take a while to trigger, but there’s no point holding on to your recall if it can be useful because you’ll get it back eventually.
When you launch the ball, it goes up in a straight ball (but you can control this as well, we’ll see in the next section). This means you can also use recalls to snipe bricks that you need to destroy. Zum Beispiel, it’s possible to snipe the hydra bricks in the first boss fight if they’re exposed and you use a recall.
One way to bypass the recall limit is by having relics that lower your refresh threshold or upgrade your recall limit, which can get OP. But you can also let the ball fall and take the 10 HP damage and it will work like a recall.
Control the paddle launch angle
You can actually control the initial launch angle of the ball by using the keyboard. This is not very well-known and I found out by pure luck the first time.
When the ball is on the paddle waiting for you to launch it, if you don’t move when you press SPACE to launch the ball, it will go straight up in a 90° Winkel.
If you are moving left or right, it will launch the ball in a 45° angle in the direction you are moving.
If you keep SHIFT pressed while moving the paddle, you will move very slowly and the ball will launch at approximately a 10-15° angle for more precise controlling.
Going up in a 90° angle is actually rarely useful, unless you want to snipe a specific brick. The reason for this is that if you hit the ceiling at a precise 90° Winkel, the ball will come straight back down onto your paddle and you will lose time for nothing. Essentially you’ve wasted a cycle not hitting anything.
Using angles when launching the paddle is preferred as it can help you get it in hard to reach places to try and get a combo going.
Understanding board refreshes
Once you’ve destroyed a certain number of bricks (decided per fight, per Storm Level, and per relics and other upgrades), the board will automatically refresh and you will get your recalls back.
Refreshing the board means that it will bring back all destroyed and damaged bricks to full health and will put your brick upgrades back on the board in random bricks.
Refreshes cannot be controlled directly, they will happen as soon as the threshold is reached. You can see the threshold as well as how many bricks you still need to break on the right side of the screen during a fight.
Refreshes are generally good, although they can sometimes prevent you from hitting a brick you were gonna hit and wanted to hit when the board is getting empty. A brick can spawn on your ball which will make you hit it.
Since you attack every time you break a brick, refreshes are important to win and it’s a viable strategy to increase refresh thresholds when you can with upgrades.
Eigentlich, something that is often overlooked by new players is that the merchant (gold coins icon on the map) can sell you an upgrade to increase the refresh threshold, it’s on the right side of the screen and costs 15 Gold.
[[Increasing your refresh threshold can be very valuable for certain fights more than other]
[Betrachten Sie es so : if you focus on destroying all the upgraded bricks at each refresh, the refresh threshold dictates the number of weak unupgraded bricks you have to destroy before all the cool upgraded bricks show up again. The higher the threshold, the more upgraded bricks there is]]
Keeping an eye on refreshes is not mandatory to win at lower Storm Levels, but it’s important to start keeping an eye on it to plan your tactics during a fight.
Das ist alles, was wir heute dafür teilen Brick Odyssee Führung. Dieser Leitfaden wurde ursprünglich erstellt und geschrieben von Derekt. Für den Fall, dass wir diesen Leitfaden nicht aktualisieren können, Sie können das neueste Update finden, indem Sie diesem folgen Verknüpfung.