
سيوضح لك هذا الدليل كيفية استخدام أداة تحرير لعبة Save تسمى Flowey's Time Machine للتلف.
مقدمة
إذا وجدت هذا الدليل أثناء البحث عن شيء لقراءته, أهلاً! يهدف هذا الدليل إلى إظهار كيفية تشغيل جهاز Flowey's Time Machine, أداة خارجية للتأهيل.
الآن, ما هو آلة الوقت في Flowey?
بعبارات بسيطة, آلة الوقت Flowey (FTM) هي أداة لتغيير ملف Save الخاص بك. مع هذه الأداة, يمكنك منح نفسك العناصر, اختر نقاط تفرخ محددة, وفعل المزيد. بمجرد أن تفهمها, استخدام البرنامج ليس صعبًا للغاية.
لنبدأ دون أي تأخير مزيد من التأخير.
تعلم التصميم
أول الأشياء أولاً, تحتاج إلى الوصول إلى موقع GitHub من هنا.
سنركز على الصف العلوي, بالضبط حيث يتم وضع الشعار:

إلى اليسار, هناك شيء يسمى “المسبقة المدمجة,” وعلى اليمين, ستجد “الإعدادات المسبقة الخاصة بك.”
ال “المسبقة المدمجة” (معروضة أدناه) هي بالضبط ما تبدو عليه—إعدادات ما قبل الصنع المصنوعة من قبل الخالق. افتراضيا, تم تعيينه لبداية الأنقاض, مباشرة بعد مقابلة توريل. عند النقر فوق “تبدأ الأنقاض,” القائمة ستنزل, الكشف عن المزيد من خيارات الإعداد المسبق.

هذه الإعدادات المسبقة تأتي مع سيناريوهات محددة:
- بلا معركة:
- ينقلك إلى قاعة الحكم خلال طريق الإبادة الجماعية, قبل مواجهة بلا.
- أنت مجهز بفطيرة butterscotch, قطعة الثلج x3, شريحة لحم الوجه, والبطل الأسطوري x3.
- Undyne لا يدوم:
- يضعك مباشرة قبل الجسر في الشلال على طريق الإبادة الجماعية, قبل مواجهة Monster Kid.
- أنت تمتلك قطعة الثلج x3, رواد الفضاء, مهجور كيشي, شاي البحر x2, و Butterscotch فطيرة.
- لا أحد (النهاية العادية):
- يضعك في الحاجز, على استعداد لمواجهة Asgore في طريق محايد.
- ترسانةك تشمل شريحة لحم الوجه, كريم لطيف x2, فطيرة butterscotch, والبطل الأسطوري.
- لا أحد (النهاية الحقيقية):
- يضعك في الحاجز, على استعداد لمواجهة ASGORE في طريق مسالم حقيقي بعد إقامة صداقة مع الجميع واستكمال المختبر الحقيقي.
- يعكس مخزون العنصر الخاص بك اللقاء العادي ASGORE.
- أوميغا Flowey:
- تهبطك في خضم معركة أوميغا فولاي, محاصرين في عالم Flowey.
- السلام الحقيقي إنهاء:
- يسقطك في معركة الخاتمة المسامية الحقيقية.
ستة مسبقات تقدم بالفعل الكثير من الخيارات! بالإضافة إلى ذلك, هناك إدخالات اسمها “sys_info_962” و “sys_info_963” هنا. هذه تأتي حيز التنفيذ إذا كنت ترغب في تطبيق عواقب الإبادة الجماعية على ملف حفظ الخاص بك. “System_information_962” يظهر إذا قمت بمسح عالمك, و “System_information_963” موجود إذا باعت روحك.
بعد اختيار الإعداد المسبق الخاص بك, انقر فوق “حمولة” لتنفيذ الإعدادات المحددة.
الآن, دعنا نغير انتباهنا إلى الجانب الأيمن من الشاشة—ال “الإعدادات المسبقة الخاصة بك” قسم:

بمجرد ضبط تفضيلاتك, إنقاذهم للاستخدام في المستقبل هو نسيم. ببساطة انقر فوق “يحفظ” وتعيين اسم إلى الإعداد المسبق الخاص بك. ال “جديد” الخيار هو إنشاء مسبقات جديدة, و “يصدّر” يتيح لك مشاركة الإعداد المسبق الخاص بك مع الآخرين. يجب أن تكون الأزرار الأخرى واضحة لك لفهمها.
الآن, دعنا ننتقل إلى القسم أسفل الشعار:
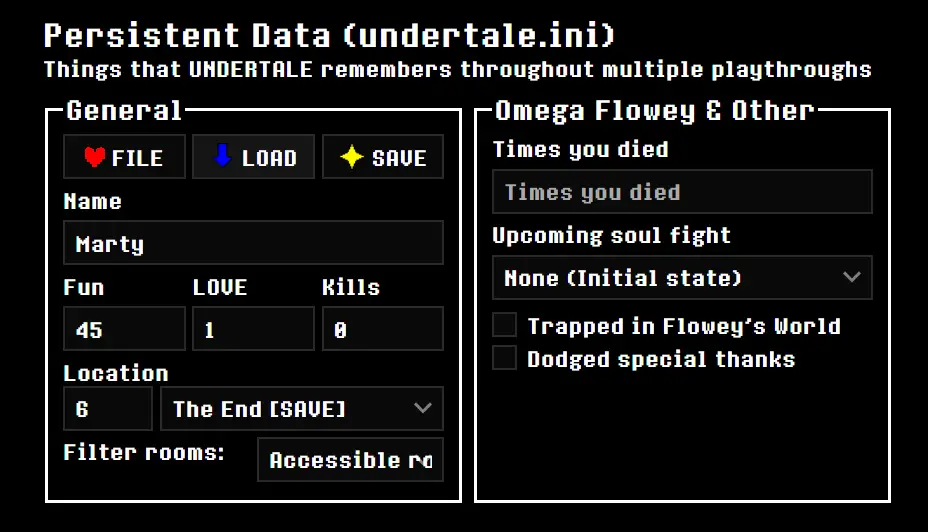
في هذا القسم, يمكنك تعديل اسمك, قيمة ممتعة, وغرفتك الحالية (يتم ضبط الموقع تلقائيًا). يتم تخزين هذه التغييرات في “endertale.ini” الملف والاستمرار عبر العديد من عمليات اللعب. هنا, يمكنك أيضًا تعديل حالة Omega Flowey (مثل موقفك في المعركة أو إذا كنت قد هزمته بالفعل) وأوضح ما إذا كنت تهرب من الاعتمادات في نهاية الخاتمة المسامية الحقيقية (هذا يفتح الباب السري في سنودين). إذا كنت تهدف إلى تجربة تعهد مع ملف حفظ تم تغييره, اترك المرشح دون أن يمس. اختر خيار التصفية وحدد “جميع الغرف” إذا كنت ترغب في استكشاف المناطق التي يتعذر الوصول إليها عادة.
الآن, دعنا نتعمق في الصف السفلي المعقد على ما يبدو, مصمم للتحرير “file0”:
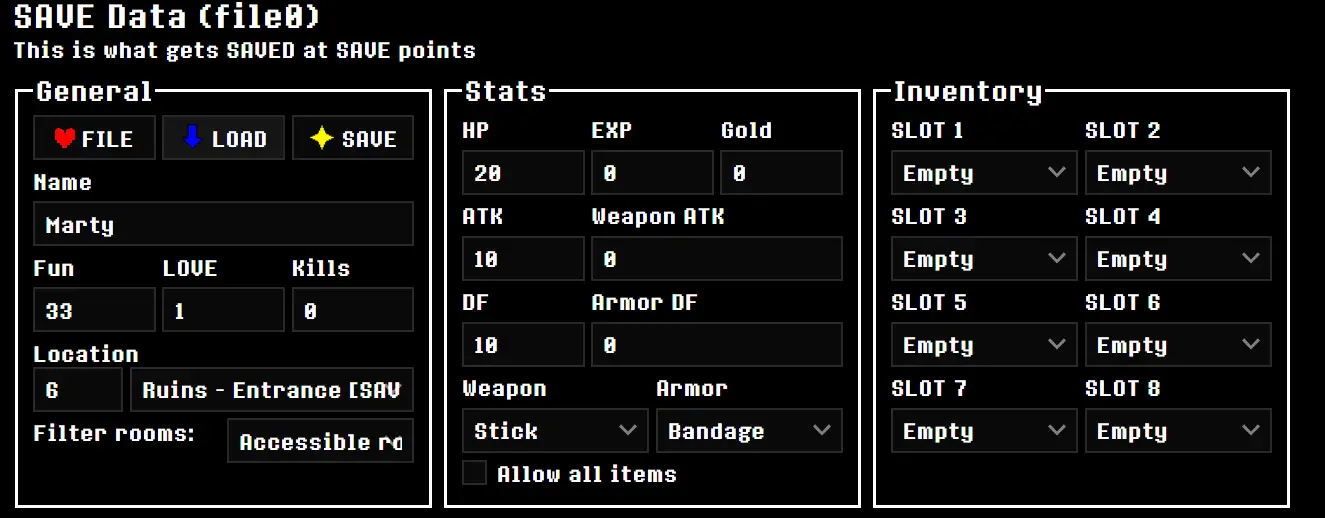
قطعاً, يتناول هذا القسم حصريًا “file0.” يخزن هذا الملف Undertale حفظ البيانات (لا بيانات غير مستمرة) في نقاط حفظ محددة. هنا, لديك القدرة على تغيير المعلومات مثل من تم هزيمة, مخزون العناصر الخاص بك, مستواك, درعك, وأكثر من ذلك بكثير. في قطاع الدروع والسلاح, هناك خانة اختيار تتيح لك تحديد كل عنصر متاح للدفاع (تتراوح من لا شيء إلى الحلم السيئ, وربما أكثر). لكن, كن حذرًا, نظرًا لأن محاولة اختيار العناصر غير القابلة للتحديد عادة قد تؤدي إلى تعطل اللعبة أو لا يوجد تأثير واضح.
جزء الهاتف المحمول واضح ومباشر. إذا أشرت إلى أنك تمتلك هاتفًا محمولًا, يفتح 8 فتحات حيث يمكنك تعيين مطالبات الاستجابة لتوريل, رقم هاتفها, أو البردي’ رقم التليفون. بشكل ملحوظ, في الجزء السفلي من هذه الصفيف, هناك مربع اختيار إذا كنت ترغب في الحصول على Undyne إلى جانب البردي (ينشط البردي والوندين بعد أن كنت مؤرخًا لها عادة).
في “آخر” قسم, يمكنك تبديل ما إذا كنت قد تركت للتو مختبر حقيقي و/أو تهزم Asriel. ال “قيمة المؤامرة” يكشف عن قائمة منسدلة مع العديد من الخيارات. إذا كنت غير متأكد من وظيفتها, يمكنك تخطيه. أساسًا, إنها قائمة أعلام نقطة التفتيش. نماذج العلامات في اللعبة حيث تحديث الأحداث وحفظها بناءً على اختياراتك وأفعالك. بعبارات أبسط, إنها تُعلم اللعبة عن تقدمك في القصة. لكن, من الأهمية بمكان أن نلاحظ أن هذا ليس هوفًا تلقائيًا. احفظ بانتظام في محدد نقاط حفظ لتأمين بياناتك. إذا قمت بتعيين هذه الأعلام إلى الأمام أو وراءها, قد تواجه لعبتك أخطاء. على سبيل المثال, إن الادعاء بأنك خرجت من المختبر الحقيقي بينما لا تزال قيمة المؤامرة في بداية Snowdin قد تخلط بين اللعبة وربما تتسبب في تعطل.
ال “هزار” يعمل قسم القيم كدليل لما تتوافق مع القيم الممتعة. من المستحسن الحفاظ على الاتساق في القيمة الممتعة بين File0 و Undertale.ini.
هناك أيضا “متقدم” القسم في أسفل الصفحة, الخوض في نقاط العلم المحددة للغاية. لا تستخدم هذا إذا كنت لا تعرف ماذا تفعل! على الرغم من أنني قد لا يكون لدي خبرة واسعة مع القسم المتقدم, سأحاول تقديم تفسير في ختام هذا الدليل.
تطبيق التغييرات
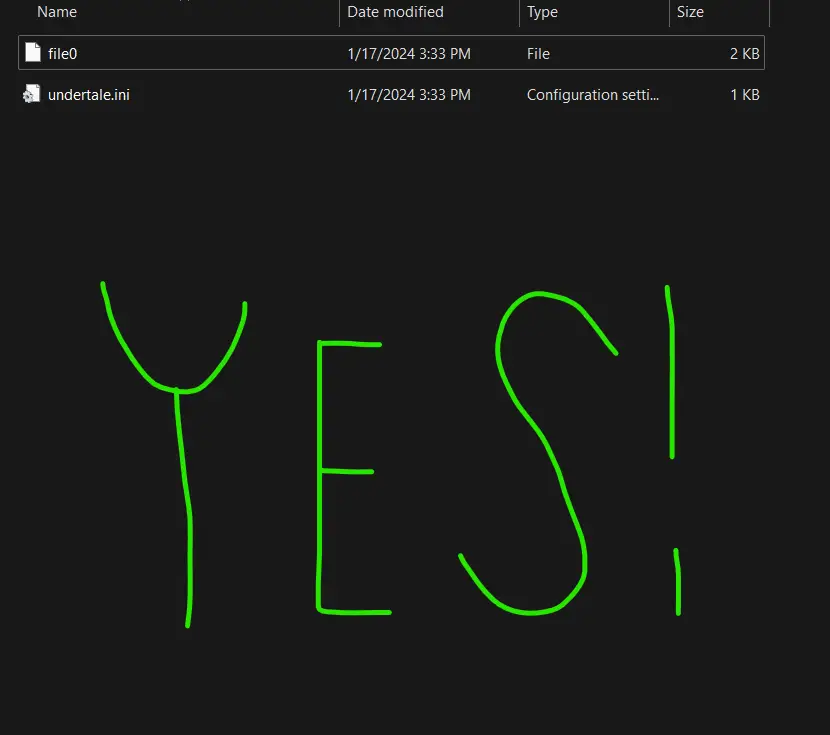
بمجرد ضبط ملفاتك لتناسب تفضيلاتك, انقر “يحفظ” على كلا الملفين (من أجل السلامة, نظرًا لأنه من غير المؤكد ما إذا كانت التأثيرات تنطبق على ملف واحد فقط). في التنزيل الخاص بك, ستجد “file0” و “endertale.ini” في قائمة انتظار تنزيل المستعرض الخاص بك.
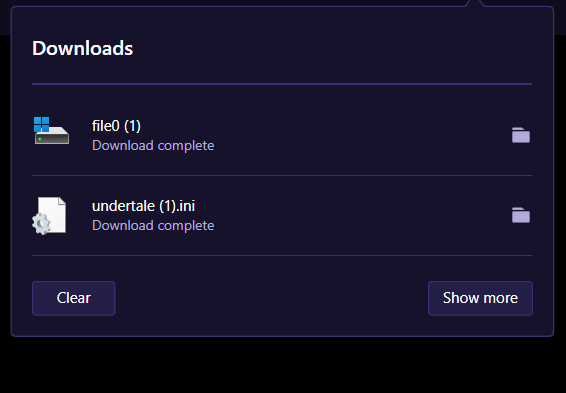
ملحوظة: ال (1) يشير على ملفاتي إلى أنني مررت بهذه العملية من قبل.
الآن, يمكن أن تكون العملية صاخبة بعض الشيء, اعتمادًا على نظام التشغيل الخاص بك. سأظهر أولاً على Windows. قد لا يكون لدي كل التفاصيل الصحيحة لنظام التشغيل Mac, لكنني سأبذل قصارى جهدي.
ويندوز
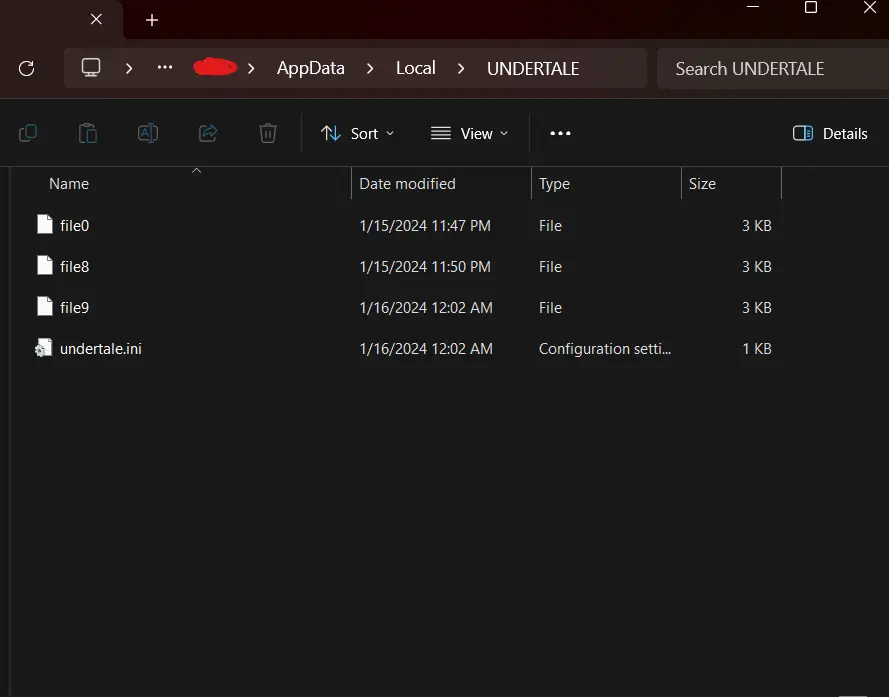
1. انتقل إلى DEANTTALE SAVE DATA. مسار الملف الافتراضي هو
ج:\المستخدمون (المستخدم الخاص بك)\AppData\Local\UNDERTALE
علامات النقطة الحمراء حيث سيظهر اسم المستخدم الخاص بك (على الرغم من أنني على Windows 11, لذلك قد يبدو مختلفًا بعض الشيء, ولكن يجب أن يظل مسار الملف كما هو).
2. إذا كنت تفضل بداية جديدة, الذي أوصي به, محو الملفات في مجلد حفظ المهاجم.
3. احصل على ملفات File0 و endertale.ini التي تم تنزيلها مؤخرًا ووضعها في مجلد حفظ Undertale.
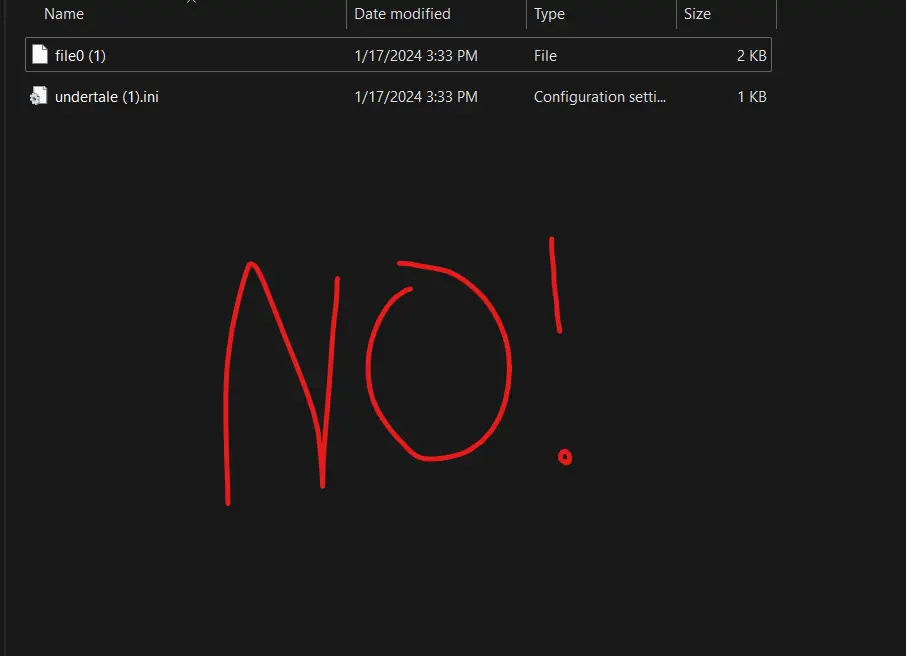
مهم: تأكد من عدم وجود (1) أو (2) أو أي تسمية مماثلة في نهاية الملفات الجديدة! هذا سيجعلها غير فعالة! بدلاً من, تأكيد أن File0 تم تسميته بالضبط و endertale.ini تم تسميته أيضًا!
إذا اتبعت جميع الخطوات بدقة, يجب أن يتم تشغيل Undertale استنادًا إلى ملف حفظك المعدل!
ماك
مرة أخرى, يرجى العلم أنه ليس لدي صور لهذه العملية على جهاز Mac لأنني لا أملك جهاز Mac ولم أستخدم واحدة من قبل.
- قم بتثبيت ملفاتك كما تفعل على Windows.
- انتقل إلى الباحث, ثم انتقل إلى المجلد, وإدخال هذا: ~/مكتبة/دعم التطبيق
- الوصول إلى المجلد التعهيد (com.tobyfox.undertale). إذا واجهت صعوبات في الوصول إلى هذا المجلد, استشر هذا r/endrminers بريد.
- استبدل جميع الملفات الموجودة مع تلك التي تم تنزيلها مؤخرًا وابدأ في التعهد. يجب أن تكون على ما يرام للذهاب!
تعديل الأعلام الفردية
يتضمن هذا الجزء بعض الأشياء المعقدة. حتى أنني غير متأكد من كيفية تعديل هذه الأعلام بالكامل. يرجى المتابعة فقط إذا كنت واثقًا مما تفعله!
في أسفل الصفحة, هناك أ (إلى حد ما) قسم مخفي. النقر “يعرض” يكشف عن العديد من الكلمات والأرقام, ربما شيء من هذا القبيل:
…نعم, الكثير للاستيعاب. “مزيد من المعلومات” يوفر شرحًا ممتازًا لما تفعله الأعلام, والنقاط الرئيسية موضحة أدناه.
- يتكون ملف حفظ Endertale في المقام الأول من 512 “أعلام,” تخزين معلومات محددة للغاية, تتراوح من نكهة الفطيرة المفضلة لديك إلى ما إذا كنت تتذكر تسخين اسم Flamesman.
- الأعلام غير المعتمدة رمادي, والأعلام التي لا يتم تسليط الضوء عليها باللون الأحمر. (تجنب تغييرها)
- العديد من الأعلام الحاسمة للمسارات المختلفة أكثر قابلة للتحرير بشكل أكثر ملاءمة باستخدام الواجهة الأساسية.
تبرز بعض الأعلام المحددة بسبب أهميتها الفريدة. وتشمل هذه:
- 26: يمكن معالجة مسار الإبادة الجماعية بالكامل باستخدام القائمة الأساسية. لكن, لأولئك الذين يفضلون عدم ملءها يدويًا أو استخدام مسبق, علَم 26 بمثابة علم تصحيح الأخطاء, تمكينك من القفز إلى أي نقطة في الطريق. ملحوظة, رغم ذلك, أنه يتجاهل المزيد من التقدم ويغلقك في قيمته الحالية.
- 88, 389, 493, 7: يتوقف مسار المسالم على عدة أعلام رئيسية. علَم 88 يراقب تقدمك في تاريخ البردي; علَم 389 يتتبع تفاعلاتك مع Undyne; والعلم 493 يسجل رسالة Undyne, تاريخ Alphys, والمختبر الحقيقي. أخيرا, علَم 7 (متاح في القائمة الأساسية) يؤدي إلى خاتمة ما بعد الأسرييل.
- 300-324: أعلام 300-324 يشمل محتويات صناديق الأبعاد الخاصة بك. إذا كنت تهدف إلى اختراق أكثر من ثمانية عناصر, هذه الأعلام تدخل في اللعب.
- 130-156: أعلام 130-156 الإشراف على العديد من الاعتمادات الصفراء لأعداء تجنيب بالطريقة الصحيحة. إذا كنت تطمح إلى تشغيل جميع الأوزان الصفراء أو ترغب في تحليل واحدة, هذا هو المكان المناسب للبدء.
- 452-454, 481-484, 497: يتم تخزين حالة سلسلة المفاتيح الخاصة بك في الأعلام. مفاتيح Asgore تشغل أعلامًا 452-454; توجد مفاتيح معملية حقيقية في الأعلام 481-484; ومفاتيح غرفة Sans موجودة في العلم 497.
غالباً, ستلاحظ أن الأعلام المشار إليها مع 0 أو 1. بلغة ثنائية أو كمبيوتر, هذا عادة ما يدل على بيان كاذب/حقيقي. إذا كان العلم يحمل ملف 1, إنه قيد الاستخدام أو نشط; إذا كان يحمل 0, إنه غير نشط حاليًا. من الأهمية بمكان أن نفهم ذلك تعديل الأعلام, خاصة دون معرفة وظائفهم, يمكنك كسر ملف حفظك! تمارس الحذر عند ضبط الأعلام.
كما ذكر الوصف, يمكنك الوصول إلى معظم, إن لم يكن كل شيء, من هذه الأعلام من خلال واجهة سهلة الاستخدام أكثر. فقط تتنقل في هذه الأعلام إذا كنت على دراية جيدة أو إذا كنت ترغب في تجربة تلك المذكورة على وجه التحديد في الجدول.
هذا كل ما نشاركه اليوم من أجل هذا هدد مرشد. تم إنشاء هذا الدليل وكتابته في الأصل بواسطة heartofthesoul. في حالة فشلنا في تحديث هذا الدليل, يمكنك العثور على آخر تحديث باتباع هذا وصلة.