

This guide is written for people with zero programming experience or knowledge. Working with IC10 can be quite daunting for someone new to it. لحسن الحظ, once you get used to thinking about things in a systematic, step-by-step manner, getting chips to do what you want them to do is surprisingly intuitive. This guide aims to get you to that point.
يثبت
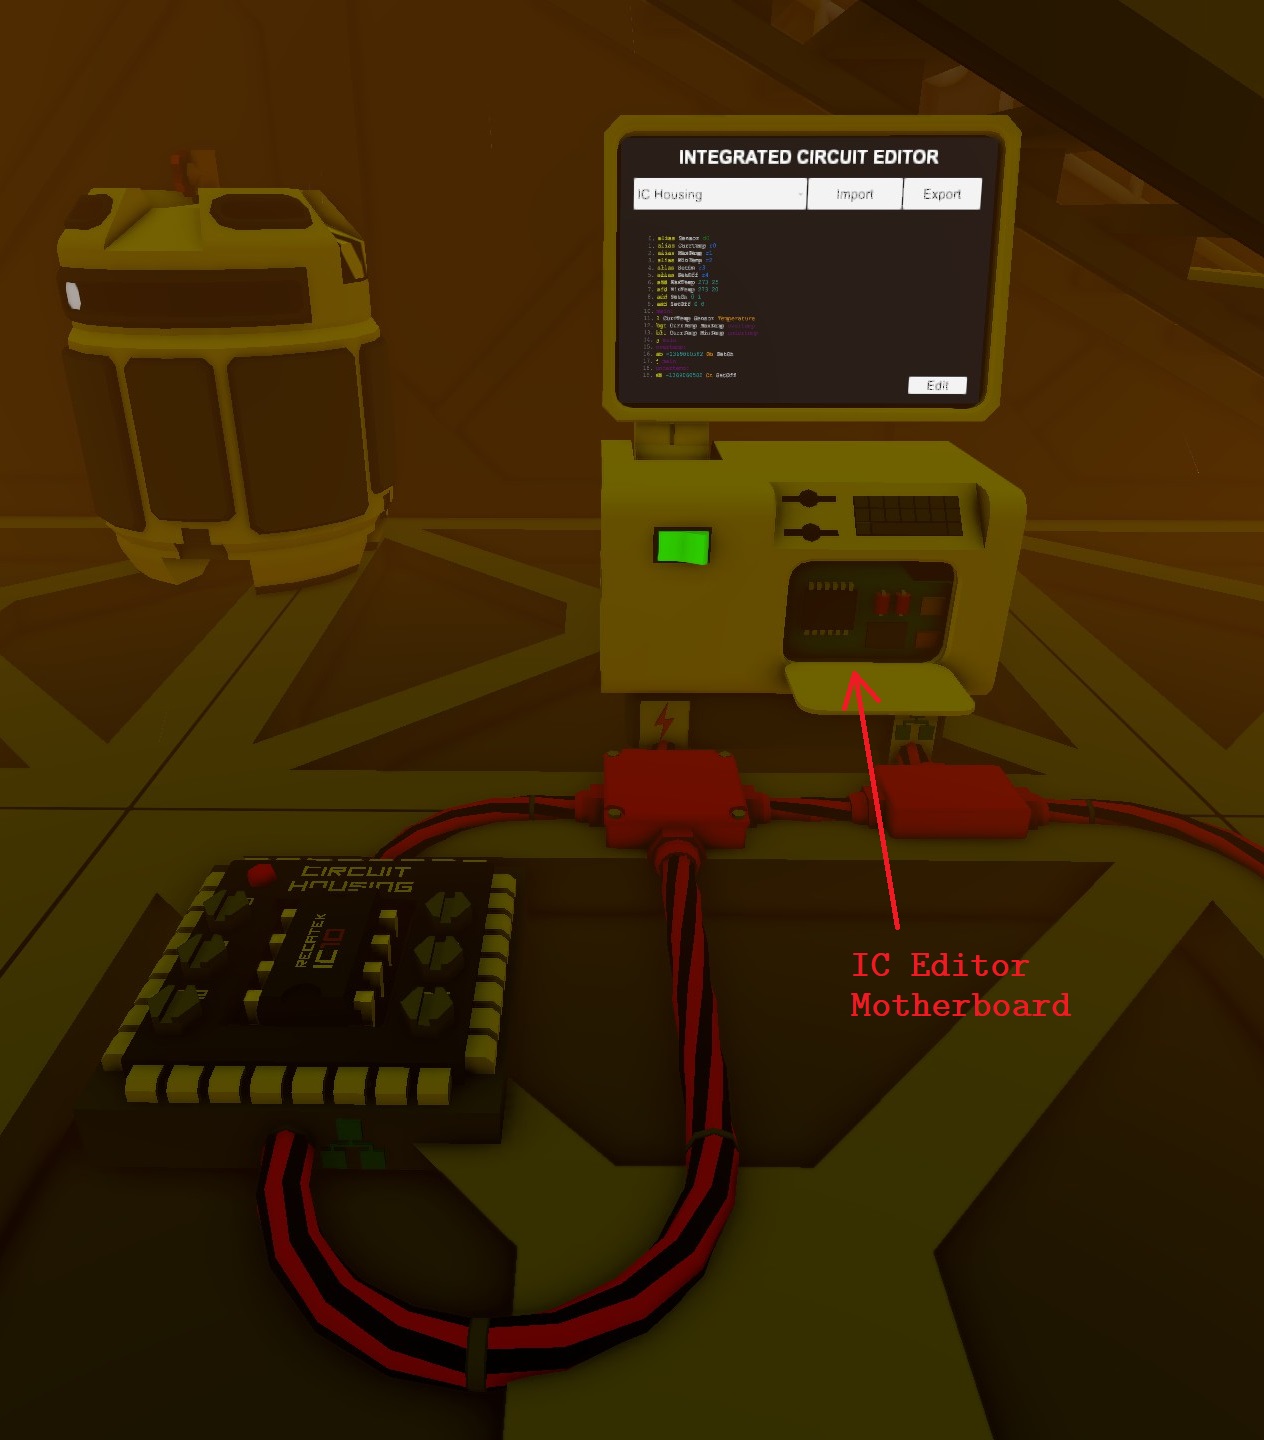
To start working with IC10, you will need some basic equipment:
- Computer
- IC Editor motherboard
- IC Housing
- IC10 chip (place inside housing)
The IC Housing’s data port should be connected to the Computer’s data port, and both should be powered. For simplicity, I just wire them all together on a separate network. You can separate a network from the rest of your base by putting a power controller in between.
If both are properly connected and powered on, you will see the dropdown on the top left of the Computer screen read “IC Housing” or whatever you have labeled the housing.
Note the two other buttons: “Import” و “يصدّر”. The code that you write in the computer is stored separately and does NOT automatically get transferred to the IC10 chip currently in the housing. Clicking on “Import” will load the code from the chip into your computer, overwriting what you have in the editor. Clicking on “يصدّر” will write the code from your computer onto the chip.
Don’t forget to hit Export whenever you are done tweaking your code.
أخيراً, انقر فوق “يحرر” button at the bottom-right of the screen to open up the code editor.
الأساسيات
Let’s dive straight into things.

Don’t worry about all the buttons for now. To understand code, let’s start with its structure.
Code is written as a series of lines, one after the other. Note the line numbers on the left side of the screen. It is read from top to bottom. Always keep in mind that that is exactly what the computer does as well. It first reads line 0 and does what that line tells it to do, then goes on to the next line and does what that line tells it to do.
أحيانا, a line will tell the computer to القفز to a different line instead of the next one. The computer will then read that line it jumped to, do what it says, then move on to the next line, and so on and so forth.
When in doubt, always start at line 0, and slowly work your way through your program line by line. Follow the computer’s train of thought and you will always be able to discover your mistakes.
Note that some words are in different colors. Each of these colors means something special. They are a great way to help you understand how the computer is interpreting what you have written.
- Yellow words are functions. They tell the computer to perform a specific action. Oftentimes you will need to give a function some additional information, أو arguments.
- White words are names. These help you remember what role you’ve assigned various devices and registers.
- Green words are device ports. They correspond to specific connections on the IC10 housing, and are how you connect the chip to other things on the network such as sensors, heaters and coolers, and so on.
- Orange words are device variables. They correspond to specific pieces of information that a device collects or uses, and they differ from device to device. على سبيل المثال, you can edit Horizontal و Vertical on solar panels to control where they are facing, while you can read Temperature و Pressure from gas sensors.
- Blue words are registers. They function as temporary memory, places to store numbers that you’re currently working with. على سبيل المثال, when you load the temperature from a gas sensor, you will first need to store it in a register if you want to compare it with something else.
- Teal words are values. They are simple numbers and mean what they look like they mean.
- Purple words are labels. Instead of telling a computer to jump to a specific line, we can tell it to jump to a label instead. This greatly helps us organize our code by giving names to specific parts of it.
- Red words are errors. معظم الوقت, you entered something wrong. لكن, sometimes the editor doesn’t recognize labels properly.
أخيراً, note the three buttons on the top right-hand side of the editor. Those are reference lists that can help you out when you’re not sure what order to write your arguments in for example.
The most important one is “f”, which is a list of functions and the arguments they take.
Devices
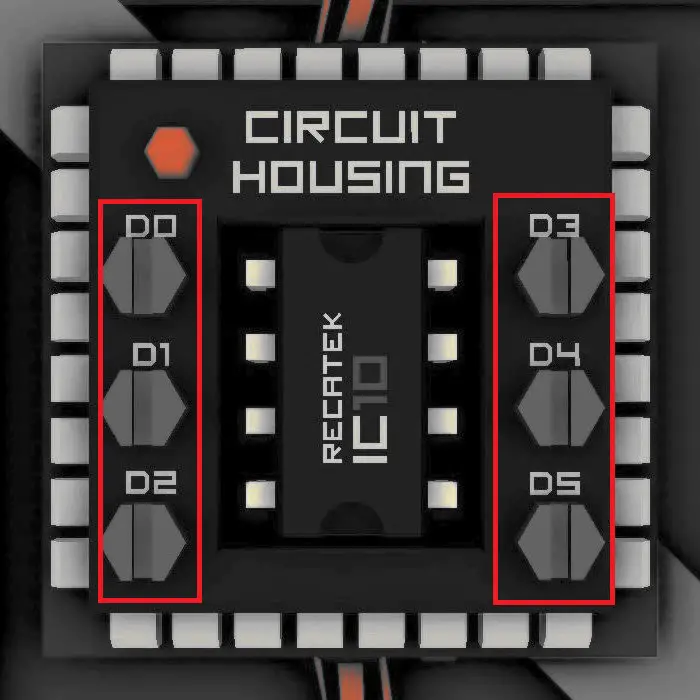
When you connect an IC10 housing to a network, it does not automatically recognize other devices on the network. In order to be able to talk to them in your code, you need to link them to the device ports on the IC10 housing.
This is done by holding a screwdriver and adjusting the screws on the housing. When you hover over each screw, you can see the name of the device that the port is currently connected to, and which one you will switch to if you click on the screw again.
Note that if you have renamed the device ports in your code with the alias function, you will see the port’s name when you hover on it. بصورة مماثلة, if you have renamed your devices with the labeler, you will see the device’s new name when you are adjusting the ports.
Code Part I

Throughout this section, I’ll refer to the example script posted above, and only that one. The line numbers and section labels will always be the same. This script controls a bunch of liquid wall coolers to keep the temperature between 20 degrees Celsius and 25 degrees Celsius.
Let’s start from the very top and work our way down line by line.
0. alias Sensor d0
ال alias function simply assigns a name to something such as a device or a register. It is however one of the most useful functions you can use since it greatly helps the organization.
في هذه الحالة, we are assigning the name “Sensor” to d0. Remember the previous section on devices? D0 is the device that is connected to the top left of the IC housing. في هذه الحالة, we are giving the device connected to that slot the nickname “Sensor”.
Note that the alias does not actually rename the device that is connected to the slot. You must manually use a labeler to do that. Alias is purely for use inside the code you are writing.
1. alias CurrTemp r0
Another use of an alias. لكن, we are assigning a name to a register. Think of a register like a memo pad. It stores information for temporary use. في هذه الحالة, we are going to use it to store the temperature that we get from the sensor, and so we call it “CurrTemp”, or current temperature.
2. alias MaxTemp r1
3. alias MinTemp r2
4. alias SetOn r3
5. alias SetOff r4
In these lines, we are assigning a few more names to registers that we will use in the program. These are the maximum and minimum temperatures that we want in the room, and the values that we need to store onto a device in order to tell it to turn on and off.
6. add MaxTemp 273 25
Here we get the first real math in the program. Let’s break it down. First though, let’s take a look at the description of the function to add in the editor’s own reference guide.
If that seems confusing, لا تقلق. It’s quite simple once you break it down.
add r? أ ( ص? | num ) ب ( ص? | num )
Register = a + ب.
The first line describes how you use the function in your code. في هذه الحالة, you type “يضيف” أولاً. Then you specify the register (ص?). Then you specify a, وأخيرا, you specify b.
The first register you specify is the location where you want to store the result. Remember that registers are memo pads where you store information. The result of adding two numbers together is useful, but if you want to use it, you need to store it somewhere- usually a register.
أ(ص? | num) means that “أ” can be either a register or a number. If you specify a register, يضيف will take the number stored in the register. The same goes for “ب”.
Remember that registers are memo pads that store information. معظم الوقت, registers will store a number. So if register 4 stores the number 15, and register 5 stores the number 3, ثم:
add r0 r4 r5
This means that you want to add the number in r4 to the number in r5 and store the result in r0. After this line, r0 will contain the number 18.
بصورة مماثلة:
add r0 r4 6
This means that you want to add the number in r4 to the number 6 and store the result in r0. After this line, r0 will contain the number 21.
In the example code, we used:
6. add MaxTemp 273 25
This means that we want to add 273 ل 25, and store the result in “MaxTemp”. Remember from earlier (in line 2) that we aliased “MaxTemp” to r1. لذلك, this line simply adds 273 ل 25 and stores it in register r1.
This is what we want our maximum temperature to be- 273 + 25 degrees Kelvin, or roughly 25 degrees Celsius.
7. add MinTemp 273 20
8. add SetOn 0 1
9. add SetOff 0 0
Same as above. We are storing our minimum temperature of 20 degrees Celsius into register r2, storing the number 1 into register r3, and storing the number 0 into register r4.
حتى الآن, so good. We have just set up the basic numbers we need.
Code Part II
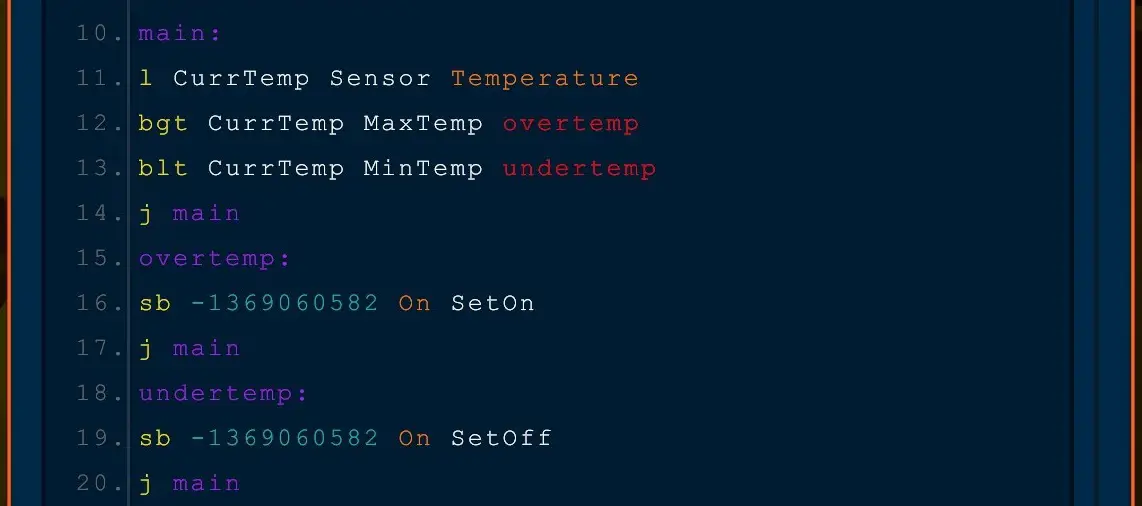
10. main:
This line is a ملصق. In the following lines of code, if we want to jump back to this location, instead of telling the computer the specific line we want to jump to, we can simply tell it to jump to “main” بدلاً من.
11. l CurrTemp Sensor Temperature
This is our first line with two aliases in it, but don’t be confused. It’s simple instruction.
What the computer is doing is:
- Look for the device “Sensor”, which was the alias we gave to d0 in line 0.
- Get the value “Temperature” from the sensor.
- Store the value into the register “CurrTemp”, which was the alias we gave to r0 in line 1.
After this line, the current temperature that our gas sensor is displaying will be collected and stored into r0, or CurrTemp.
12. bgt CurrTemp MaxTemp overtemp
bgt is a branch function, short for branch (لو) greater than.
The keyword is “لو”. If the first argument is greater than the second argument, then the computer will jump to the place that you specify.
في هذه الحالة: if CurrTemp is greater than MaxTemp- that is to say, if the temperature that we read from the sensor is greater than the maximum temperature we want, وهو 25 degrees celsius- then we want the computer to jump straight to the section called “overtemp”.
خلاف ذلك, if CurrTemp is not greater than MaxTemp, the computer will not jump to “overtemp” and instead just go on to the next line.
13. blt CurrTemp MinTemp undertemp
blt is another branch function, short for branch (لو) less than.
It’s the same deal as bgt, except with less than instead of greater than.
So in this case, if CurrTemp is less than MinTemp- if our current temperature on the sensor is lower than the minimum temperature of 20 degrees Celsius that we want- then we go straight to “undertemp”. Otherwise we simply go on to the next line.
14. j main
This is one of the most important lines in the entire program.
Simply enough, “j” tells the computer to القفز to another specific line in the program.
Since we want to monitor the temperature of our room, we can’t just run it once- the program needs to keep repeating itself over and over again. Each time it repeats, we want it to check the temperature, and then turn on and off the coolers as necessary.
So when we reach the end of the program, we tell it to jump back to the start.
في هذه الحالة, we tell it to jump back to “main”, which was labeled on line 10, at the start of this section of the guide. This entire looping part of the program is called the main loop.
We will get here if the temperature is neither above 25 degrees nor below 20 degrees Celsius- happily in between. في هذه الحالة, we want to start from the top and check the temperature again, so we jump back to line 10 and restart the program from that point.
Code Part III

15. overtemp:
This is the label “overtemp”. Remember that if the temperature we collected from the sensor in the main loop was greater than 25 degrees Celsius, we told the computer to jump here.
sb -1369060582 On SetOn
This is another function that looks complicated but is actually quite simple.
sb is a function that sets variables on a batch of devices on the network.
على سبيل المثال, if we wanted to tell all the solar panels on a network to turn towards a specific vertical height, we would use this function.
في هذه الحالة, we want to tell all the liquid wall coolers on the network to turn on, since the temperature is greater than the maximum temperature we want.
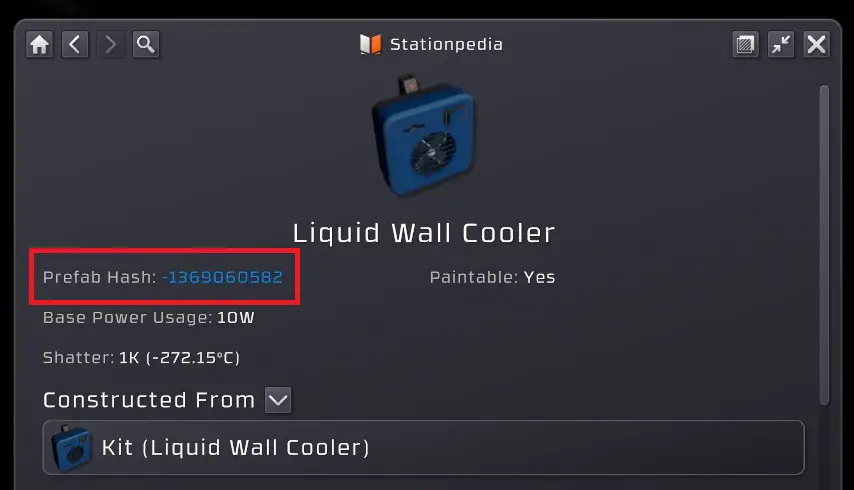
-1369060582 is the prefab hash of liquid wall coolers. The hash identifies the يكتب of device, not an individual object. You can click on the blue-coloured prefab hash to copy it onto your clipboard, and paste it into the editor that way instead of memorizing and typing it out.
So what we are saying with sb is that we want to do something to every device of this particular type.
خاصة, we want to write the value of the register “SetOn” to the “On” variable on the device.
أساسًا, in order to turn a device on and off, we need to write the values “1” و “0” respectively to its “On” variable. ال sb function is an easy way to do it to a whole batch of devices with an IC10 chip without having to use logic batch writers.
This can get a little confusing, because we will be writing to the same variable of “On” on the device later on in the undertemp قسم.
That’s just how things are. There isn’t a separate “Off” variable to write to if we want to shut it off. بدلاً من, we just have On = 0 for off, and On = 1 for on.
Thus after this line, we will have switched on all the liquid wall coolers on the network.
j main
مرة أخرى, we need to monitor the temperature as it changes continually, not just once. Just as before, we jump back to the start of main, so that we can read the temperature once again, and start the loop from the beginning.
18. undertemp:
19. sb -1369060582 On SetOff
20. j main
This should look familiar by now.
We get to undertemp when the temperature is under 20 degrees Celsius. في هذه الحالة, we want to turn عن all our coolers. Thus instead of writing SetOn (which has the value of 1) to our wall coolers, we write SetOff (which has the value of 0).
And finally, we jump back to the main مرة أخرى, starting the loop all over.
تحليل
Now that we know what each individual line does, what does the program as a whole actually do?
Let’s start off with a room that’s slightly too warm, يقول 30 degrees Celsius, and run through the entire program to see what it does.
At the very beginning, the program sets up its aliases and basic numbers (or constants). That part happens as normal.
Now we get to line 11. Since the room is 30 degrees Celsius, the sensor will read 303 degrees Kelvin, and hence the program will load the value of 303 into CurrTemp.
Now we get to line 12. The program compares CurrTemp to MaxTemp: 303 ل 298. Since 303 is greater than 298, we branch (or jump) to overtemp.
Now we are on line 15 (overtemp), and we move on to line 16. We set all the wall coolers to turn on, and then move on to the next line.
Now we are on line 17. We jump back to main, which is line 10, and move on to line 11.
In the meantime, the room has cooled down a bit- let’s say to 27 degrees Celsius.
مرة أخرى, the program loads the temperature into CurrTemp, وهو 300.
Since 300 is still greater than 298, it jumps to overtemp again, and turns on all the wall coolers.
Note that during all this time, the wall coolers were still on! There was nothing that told them to turn off, and turning them on while they’re already on does nothing.
بعد ذلك, we go back to the start of the main loop.
Now suppose the room has cooled even more, this time to 24 degrees Celsius.
The program loads the temperature once again, which is now 297.
This is not higher than 298! So the program does لا jump to overtemp.
بدلاً من, it goes on to line 13, and compares it to MinTemp- 293.
297 is also لا lower than 293, and so the program moves on to line 14, and starts the main loop all over again.
Note once again that the coolers are still on during all of this time.
Suppose the room has finally cooled down to 19 degrees Celsius.
Once again we load the temperature, وهو 292.
This is not higher than 298, and so we do not jump to overtemp.
However this is lower than 293, and so we jump to undertemp.
Now on line 19, we finally turn all the coolers off and jump back to the start of the main loop.
أساسًا, this program keeps the room in a range between 20 و 25 degrees Celsius. If it is over 25, it will cool it until it reaches 20. Once it hits 20, it will not start cooling again until the temperature goes over 25 once again.
You can check that you understand how the program works by starting with a cold room under 20 degrees Celsius that is naturally getting warmer, and running through the steps that we did in this section.
أخيراً, you can further check your understanding by starting with a room that is over 30 degrees Celsius, but instead of naturally getting warmer, it naturally gets colder down to 0 degrees Celsius.
Organization
حتى الآن, we have learned how to read and understand code from the perspective of the computer, and some basic functions, and how to use them.
لكن, the most important thing to understand is the structure of the program.
Almost every time, you will have the main loop. During this loop, you will read data from various sensors and machines. ثم, based on the data you gather, you may decide to do different things, using the various branch statements, and maybe using store statements to make other devices do something. At the end of everything, you will jump back to the start of the main loop.
Most programs in Stationeers will be structured like this. على سبيل المثال, with a solar tracking program, your main loop will be used to get the vertical and horizontal angles of the sun from daylight sensors. Then you will do some calculations on the angles, and use the store batch function to write to the Horizontal and Vertical variables on all the solar panels on the network.
The rest is figuring out what loads and writes to use, which math functions you need, when and how to branch, and then keeping everything tidy and readable.
هذا كل ما نشاركه اليوم من أجل هذا Stationeers مرشد. تم إنشاء هذا الدليل وكتابته في الأصل بواسطة whythecynic. في حالة فشلنا في تحديث هذا الدليل, يمكنك العثور على آخر تحديث باتباع هذا وصلة.
أهلاً,
I was looking for a detailed and explained example of ic code, and i find yours very clear! Thanks for taking the time to do this.
Great tutorial!
Спасибо! Очень подробно и понятно.