إليك دليل للتعديل الإنسان, بناءً على آخر تحديث. في هذا التجول الشامل, ستلتقط المهارات اللازمة لإنشاء أنواع مختلفة من التعديلات, متابعة ما اكتشفته حتى الآن. ضع في اعتبارك, سأستمر في إضافة رؤى جديدة لأنني أتعمق في تعديل الإنسان. لذا, ترقب التحديثات المستقبلية!
ابدء
لبدء رحلة تعديل الإنسان الخاصة بك, جمع الأدوات والبرامج التالية:
أقترح تنظيم كل هذه الأدوات داخل مجلد مخصص, للوصول الأسهل والأكثر كفاءة. منذ أن قمت بتثبيت اللعبة على د: يقود, لقد وضعت جميع الأدوات تحت مجلد اسمه “Humanitz Modding”.
الأساسيات
Before diving into the actual modding process, there are crucial aspects of modding Unreal Engine games, particularly HumanitZ, that you should grasp. Let’s delve into them:
- No Addition of New Files: Presently, adding new custom files to the game as part of a mod isn’t feasible. Your mod must function by overwriting existing files within the game. علاوة على ذلك, it’s imperative that the file structure remains identical. We’ll delve deeper into this shortly.
- Unpacking and Packing: Modding HumanitZ necessitates frequent unpacking and packing of files. This is where tools like UModel and the Unreal Engine come into play. Unpacking involves extracting the game’s base files, while packing entails assembling your custom mod files.
- Adherence to File Structure: This is paramount. Your mod won’t function unless you meticulously adhere to the game’s file structure. It’s critical to follow it precisely. على سبيل المثال, if you unpack a file located in:
[...]\HumanitZ\TSSGame\Content\VehicleVarietyPack\TexturesIn the Unreal Engine, your file must be placed in:[...]\YourProjectFolder\Content\VehicleVarietyPack\Textures
يتذكر, strict adherence to these rules is non-negotiable for a successful mod. Pay keen attention to these guidelines!
Unreal Project Setup
If you’re making a mod for a game built in Unreal Engine, it’s likely best to create your mod within an Unreal project to ensure compatibility.
لتبدأ, start by creating your Unreal Project. It’s important to maintain the same file structure for compatibility reasons. لذا, when naming your project, stick to the established file structure to keep things organized.
Creating the Project
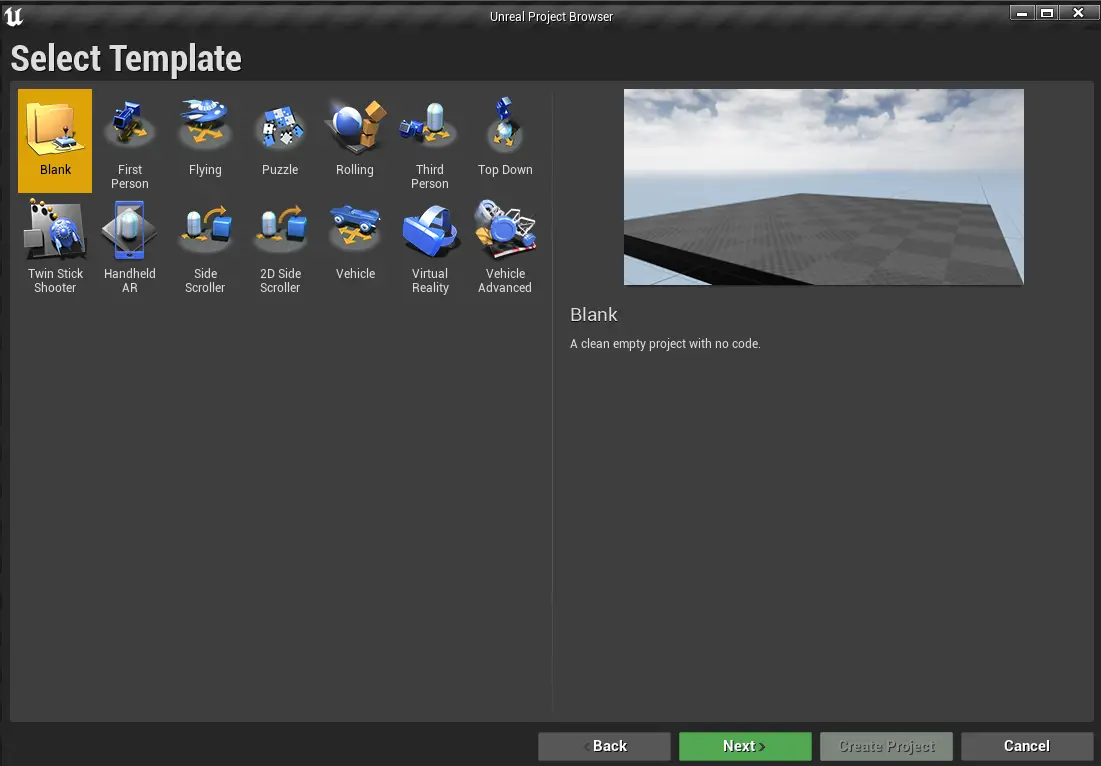
When creating your project, اختر “ألعاب” category from the options provided.

التالي, decide on a template that suits your preferences and experience level. You can opt for the “فارغ” template for a more organized approach, or if you’re new or don’t mind additional files, consider either Third Person أو Top Down.
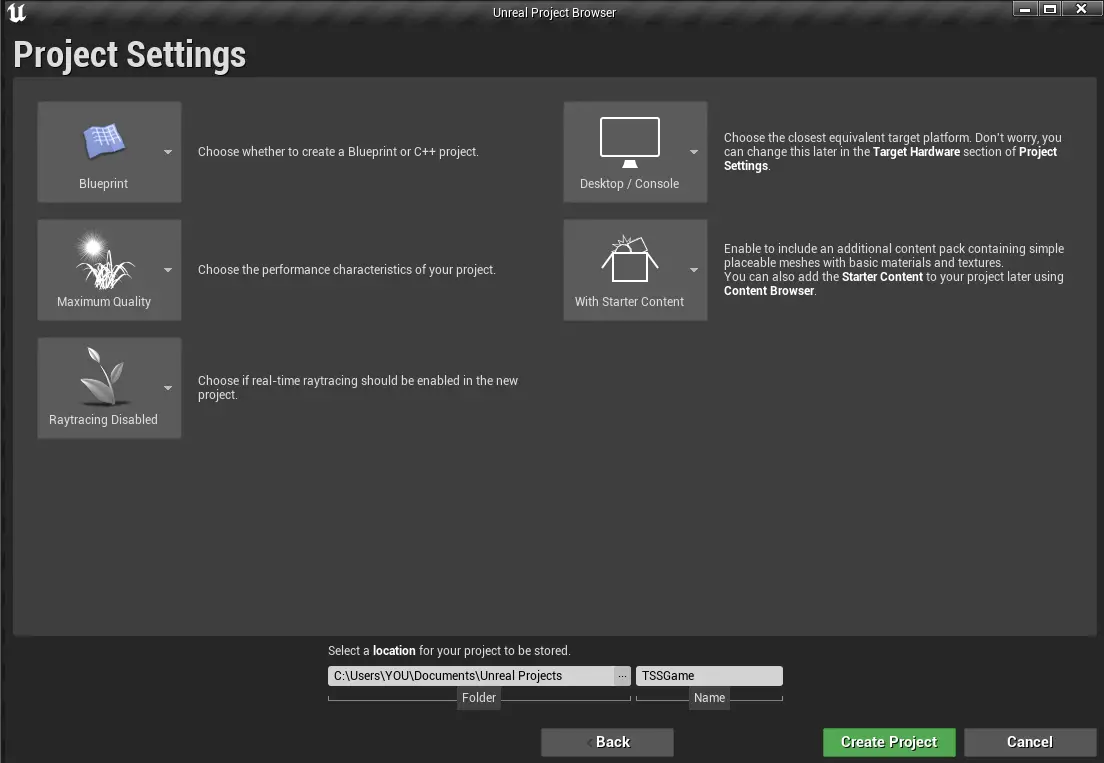
Ensure to name your project “TSSGame” to maintain consistency with the developers’ naming conventions. This step is crucial for proper organization and compatibility.
Project Configuration
After creating your Unreal Engine project, the next step is to perform some basic configuration.
- Open your project and locate the big gear button labeled “إعدادات” at the center of the top of the screen. Click on it.
- From the dropdown menu, يختار “Project Settings“. This action will open a new window with a list of items on the left.
- Find the section titled “مشروع” and look for a subsection labeled “Packaging“. Click on it.
- داخل “Packaging” فئة, scroll down to the bottom until you locate a tab named “مشروع“.
- Look for the second option from the top to the bottom, which is a dropdown labeled “Build Configuration“.
- Click on the dropdown and select “Shipping“.
- Close the window to save the changes. Your project is now configured and ready to proceed.


Unpacking the Game files
Let’s keep your Unreal Project open. الآن, we need the files you want to modify. Remember where you stored them?
تمام, so now we need to unpack those files. Do you recall how to do that? Let’s find out below!
The Methods
There are two methods to unpack game files:
- طريقة #1: This method will unpack the entire game into a folder. Be prepared, as this will require approximately 32.5GB of disk space. إذا كنت موافقًا على تخصيص هذه المساحة الكبيرة وتريد تفكيك كل شيء, هذا هو الطريق للذهاب.
- طريقة #2: إذا كانت لديك مساحة قصيرة أو لا تريد أن تهتم بتفريغ كل تحديث جديد, يمكنك اختيار هذه الطريقة بدلاً من ذلك.
إنشاء المجلد الخاص بك
لنقم بإنشاء مجلد جديد داخل الدليل الموصى به, حيث سنحتفظ بجميع الأدوات وما شابه. يمكنك تسميتها “الملفات غير المعبأة” أو ما تفضله.
طريقة #1 – تفريغ كل شيء:
لهذه الطريقة, سنستخدم الرائع مجموعة أدوات التعديل تم تطويره بواسطة ZGal88. فهو يجعل تفريغ اللعبة بأكملها أمرًا سهلاً!
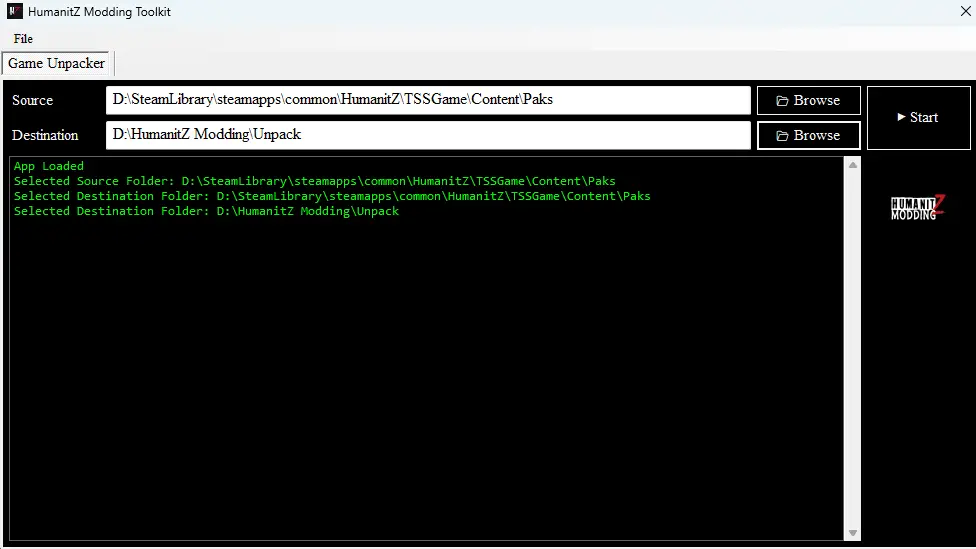
- قم بتثبيت مجموعة الأدوات وافتحها.
- سترى شاشة تطلب أ “مصدر” و أ “وجهة“.
- للدليل المصدر, انتقل إلى:
[...]\HumanitZ\TSSGame\Content\Paks. - للوجهة, اختر المجلد الذي قمت بإنشائه للتو (أو أي مجلد تفضله).
- للدليل المصدر, انتقل إلى:
- بمجرد تحديد كلا الدليلين, انقر “يبدأ” and let it do its thing.
That’s it! Once the process is complete, all the game files will be unpacked and neatly stored in your chosen folder.
طريقة #2 – Unpacking Specific Files:
لهذه الطريقة, you’ll need the نموذج tool I mentioned earlier.
- Install UModel and open it up.
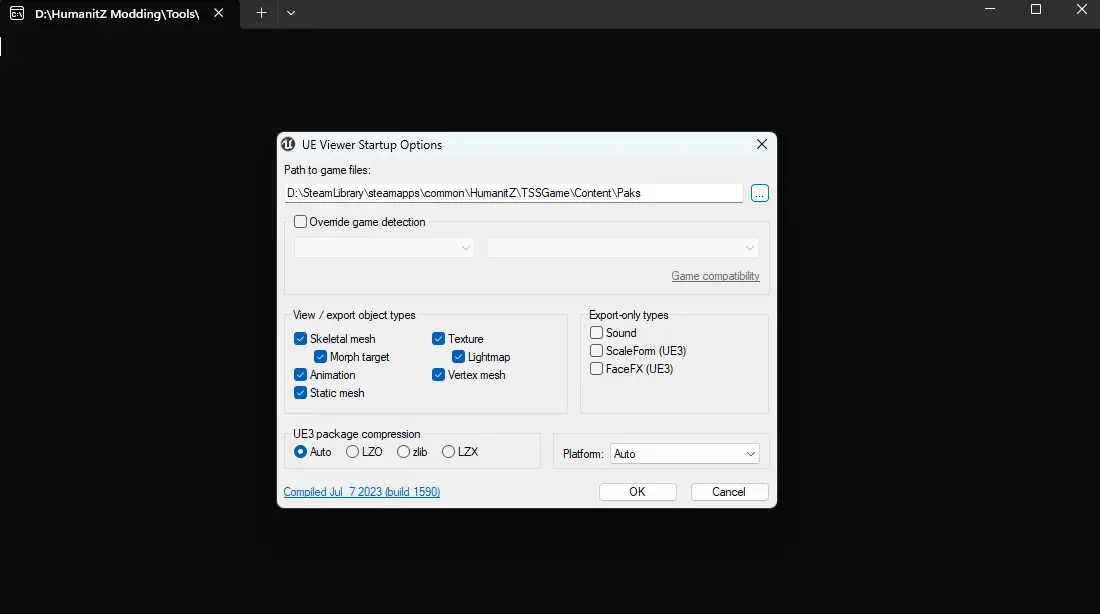
- You’ll see a screen asking for the “Path to game files“.
- Set the path to the game files to be exactly:
[...]\HumanitZ\TSSGame\Content\Paks.
- Set the path to the game files to be exactly:
- Once set, proceed with the unpacking process.
Don’t worry if a prompt or CMD window pops up; it’s just for displaying logs of what’s happening. You can safely ignore it.
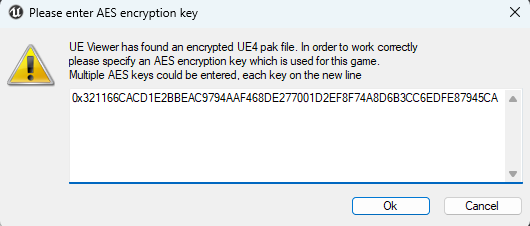
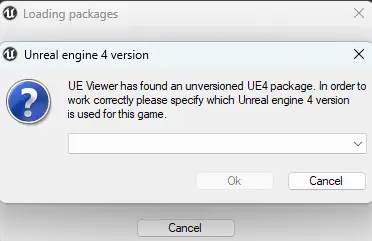
AES Encryption Key
If you encounter a warning screen stating that the app has found an encrypted file and requires an AES encryption key to view it, no worries! I’ve got you covered. Just paste the following encryption key into the prompt and hit “نعم”: 0x321166CACD1E2BBEAC9794AAF468DE277001D2EF8F74A8D6B3CC6EDFE87945CA
Exploring the Game Files
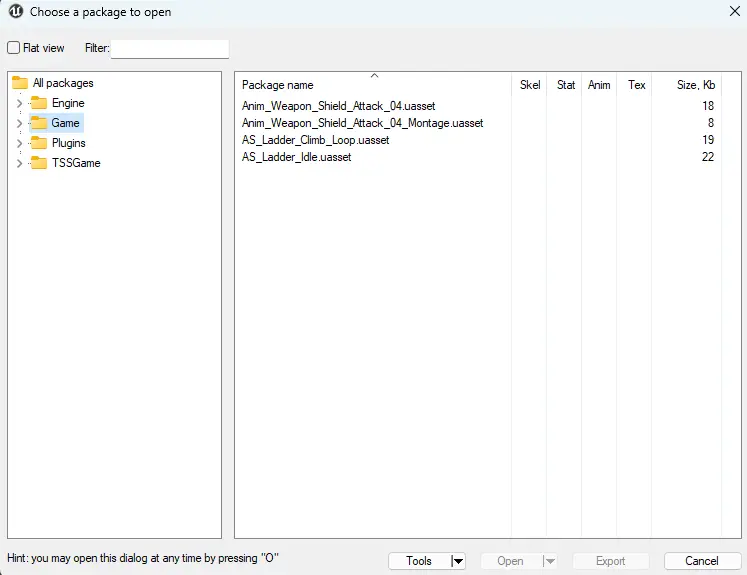
Alright, so you’ve got all your game files ready to unpack. الآن, it’s time to tidy up the file hierarchy. Close those submenus of each folder so it looks neat and organized. Head straight for the لعبة مجلد, but remember, in this context, “لعبة” actually means “Content.” متستر, يمين?
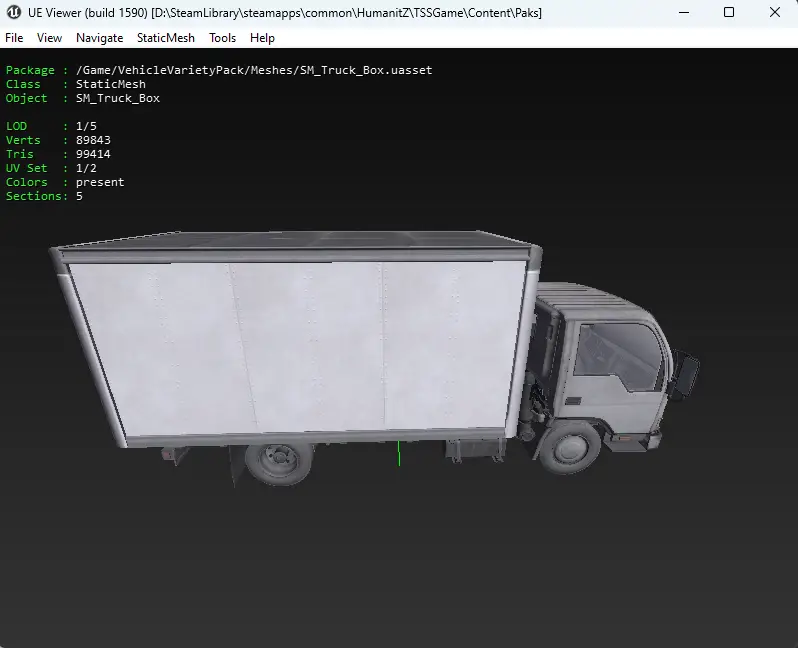
الآن, to preview an asset, just double click it. The app will try to show you a preview of meshes, materials, القوام, and animations. للأسف, it won’t recognize other stuff. But fear not, in the screenshot provided, the mesh of the white box truck has been found!
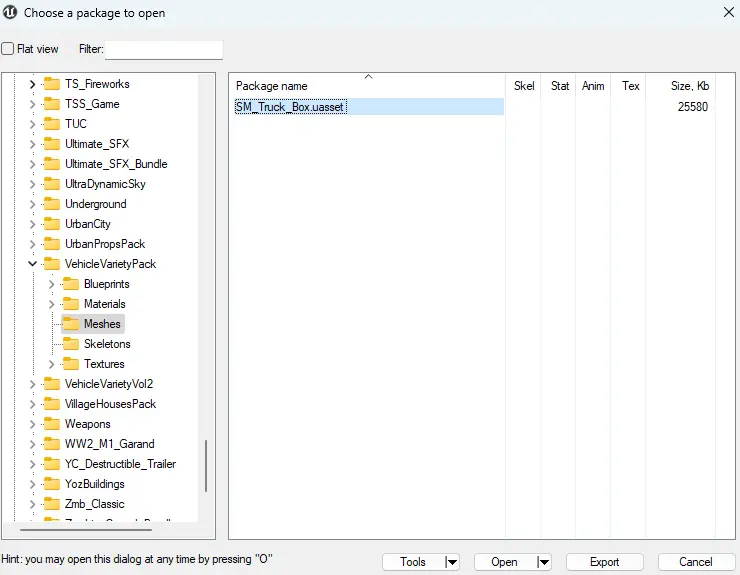
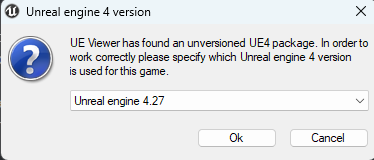
عظيم, you’ve found the file you need. Click to preview it and then select version 4.27 at the bottom of the list. سهل, يمين? Once you’re previewing the truck mesh, you’re on the right track. But how to go back? Simply click ملف on the top left, ثم Open Package. That’ll take you back to the window where you can select which files to handle.
الآن, once you’ve isolated the files or folder you want, just right-click and select يصدّر. Choose a folder to put the extracted files in, وفويلا! That’s how you unpack specific things instead of everything. Happy unpacking!
Modding
Sure thing, let’s take a moment to recap our progress.
حتى الآن, you’ve set up all the necessary tools for modding the game. This involved creating directories for both the tools themselves and the unpackaged game files. Depending on your preference, you either unpackaged the entire game or selected specific files for extraction.
If you opted for Method #1 for unpackaging the game files, you can still preview them by following Method #2, but this time opening the unpackaged folder instead of the game folder, skipping the AES key step.
بعد ذلك, you’ve also created an Unreal Project where you’ll be working on your mods.
أخيرا, you revisited “THE BASICS” to refresh your memory. الآن, when it comes to actually modding, it varies depending on what you want to modify.
Since this guide is getting quite extensive, it’s time to break it down into smaller, more focused guides. Each mini-guide will explain how to mod a specific aspect of the game. Once you’ve reached the packaging section of any of these guides, you can return here for further instructions.
Modifying Materials (Reskins, إلخ.)
Feel free to refer to this مرشد.
To clarify, make sure you return to the guide after reaching its final section for the specific modding instructions.
إليك انهيار لتعبئة وزارة الدفاع:
أولاً, بعد إنشاء وزارة الدفاع وتحديد موقع الملفات, لصقهم في الدليل حيث يتم تخزين unrealpak, الذي يبدو في حالتك “د:\HumanitZ Modding\Tools\Unrealpak”.
تأكد من الحفاظ على بنية الملف الصحيحة عن طريق إنشاء مجلد اسمه “tssgame-windowsnoeditor” داخل مجلد Unrealpak.
داخل هذا المجلد, يضيف “_p” حتى نهاية اسم المجلد لتحديد أولويات تحميل هذا الدليل, مما أدى إلى “tssgame-windowsnoeditor_p”.
يجب أن يكون هذا المجلد منظمًا مثل هذا: “[…]\Unrealpak\TSSGame-WindowsNoEditor_P”.
التالي, داخل “tssgame-windowsnoeditor_p”, قم بإنشاء مجلد باسم المشروع (من المفترض “TSSGame”).
داخل هذا المجلد الجديد, إنشاء مجلد آخر اسمه “محتوى”.
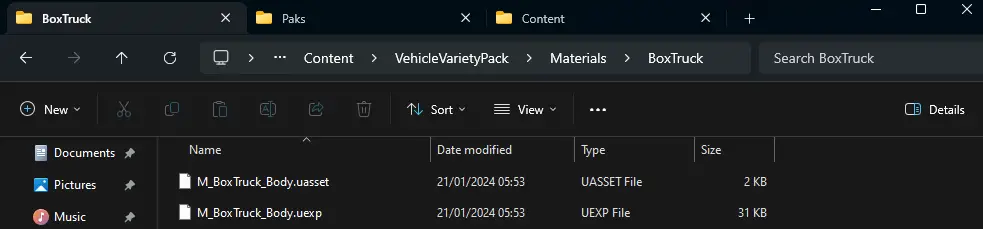
اتباع بنية ملف المطور, ضع الملفات المطبوخة داخل مجلد المحتوى. على سبيل المثال, إذا كنت تقوم بإضافة MOUREVARIETYPACK, تأكد من أن الدليل يبدو هكذا:
tssgame-windowsnoeditor_p
  └─ TSSGame
      └─ محتوى
          └─ مواد
              └─ BoxTruck
                  └─ M_BoxTruck_Body.uasset
                  └─ M_BoxTruck_Body.uexp
          └─ Textures
              └─ BoxTruck
                  └─ TX_Truck_Box_Diffuse.uasset
                  └─ TX_Truck_Box_Diffuse.uexp
Return to your Unrealpak folder and locate the TSSGame-WindowsNoEditor_P folder. Drag it gently over to the UnrealPak-With-Compression.bat file.
A prompt or command window will pop up, converting your folder into a .pak file. بمجرد الانتهاء, close the prompt.
تهانينا, your mod is now ready! Hooray! Simply navigate to the location of the original .pak file of the game:
[...]\HumanitZ\TSSGame\Content\Paks
Paste your TSSGame-WindowsNoEditor_P file there. Feel free to rename the file to your liking, but ensure to keep the _P at the end!
هذا كل شيء! Launch the game and enjoy your modded experience! 🥳 💖
هذا كل ما نشاركه اليوم من أجل هذا الإنسان مرشد. تم إنشاء هذا الدليل وكتابته في الأصل بواسطة شجاع. في حالة فشلنا في تحديث هذا الدليل, يمكنك العثور على آخر تحديث باتباع هذا وصلة.